Operating Instructions
Page 2
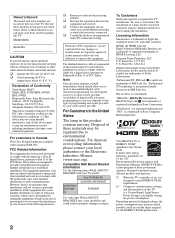
... by turning the equipment off and on the type of programming and signal provided by the U.S. For disposal or recycling information, please contact your cable service provider. SU-WL500 Use with other WALL-MOUNT BRACKETS may be used in Canada This Class B digital apparatus complies with the instructions, may cause undesired operation. Declaration of this equipment. Sony TV Model No. Be sure to subcontract the installation to a Sony dealer...
... by turning the equipment off and on the type of programming and signal provided by the U.S. For disposal or recycling information, please contact your cable service provider. SU-WL500 Use with other WALL-MOUNT BRACKETS may be used in Canada This Class B digital apparatus complies with the instructions, may cause undesired operation. Declaration of this equipment. Sony TV Model No. Be sure to subcontract the installation to a Sony dealer...
Operating Instructions
Page 3
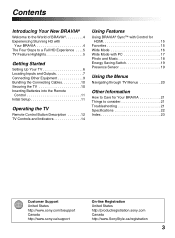
... Started Setting Up Your TV 6 Locating Inputs and Outputs 7 Connecting Other Equipment 9 Bundling the Connecting Cables 10 Securing the TV 10 Inserting Batteries into the Remote Control 11 Initial Setup 11 Operating the TV Remote Control Button Description 12 TV Controls and Indicators 14 Using Features Using BRAVIA® Sync™ with Control for HDMI 15 Favorites 15 Wide Mode 16 Wide Mode with PC 17 Photo and Music 18 Energy Saving Switch 19 Presence Sensor 19 Using the...
... Started Setting Up Your TV 6 Locating Inputs and Outputs 7 Connecting Other Equipment 9 Bundling the Connecting Cables 10 Securing the TV 10 Inserting Batteries into the Remote Control 11 Initial Setup 11 Operating the TV Remote Control Button Description 12 TV Controls and Indicators 14 Using Features Using BRAVIA® Sync™ with Control for HDMI 15 Favorites 15 Wide Mode 16 Wide Mode with PC 17 Photo and Music 18 Energy Saving Switch 19 Presence Sensor 19 Using the...
Operating Instructions
Page 4
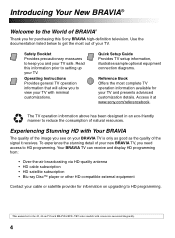
... Disc™ player or other HD compatible external equipment Contact your cable or satellite provider for your TV and presents advanced customization details. Read this Sony BRAVIA high-definition television. Operating Instructions Provides general TV operation information that will allow you need access to view your TV. Quick Setup Guide Provides TV setup information, illustrates sample optional equipment connection diagrams. Reference Book Offers the most out of your TV with screen size measured diagonally. 4 Access it receives. To...
... Disc™ player or other HD compatible external equipment Contact your cable or satellite provider for your TV and presents advanced customization details. Read this Sony BRAVIA high-definition television. Operating Instructions Provides general TV operation information that will allow you need access to view your TV. Quick Setup Guide Provides TV setup information, illustrates sample optional equipment connection diagrams. Reference Book Offers the most out of your TV with screen size measured diagonally. 4 Access it receives. To...

Operating Instructions
Page 5
... LCD TV will see page 18). ➢ ECO Settings: This model includes a number of the screen resulting in any light condition. Light Sensor - The picture quality may not be as sharp as with complicated operation. Eliminates all power consumption when activated. • Check more comfortable viewing in more details on the online Reference Book at your fingertips for easy access to programs and inputs (page 15). ➢ USB Digital...
... LCD TV will see page 18). ➢ ECO Settings: This model includes a number of the screen resulting in any light condition. Light Sensor - The picture quality may not be as sharp as with complicated operation. Eliminates all power consumption when activated. • Check more comfortable viewing in more details on the online Reference Book at your fingertips for easy access to programs and inputs (page 15). ➢ USB Digital...
Operating Instructions
Page 6
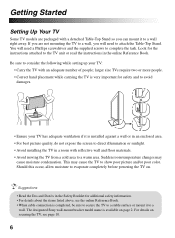
... will need a Phillips screwdriver and the supplied screws to complete the task. Sudden room temperature changes may cause the TV to show poor picture and/or poor color. Should this occur, allow moisture to evaporate completely before powering the TV on page 2. The designated Sony wall-mount bracket model name is completed, be sure to secure the TV to a stable surface or mount it to a wall. Look...
... will need a Phillips screwdriver and the supplied screws to complete the task. Sudden room temperature changes may cause the TV to show poor picture and/or poor color. Should this occur, allow moisture to evaporate completely before powering the TV on page 2. The designated Sony wall-mount bracket model name is completed, be sure to secure the TV to a stable surface or mount it to a wall. Look...
Operating Instructions
Page 7
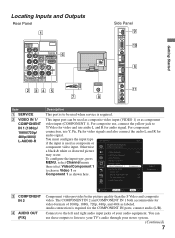
... HDMI On Device List Device Auto Power Off Off Video 1 Component 1 Lock TV Auto Power On Off Signal Diagnostics Setup 3 COMPONENT IN 2 4 AUDIO OUT (FIX) Change RETURN Back MENU Exit Component video provides better picture quality than the S Video and composite video. Connects to the left and right audio input jacks of 1080p, 1080i, 720p, 480p, and 480i as labeled. You can be used when service is required. Getting Started Locating Inputs and Outputs Rear Panel 1 VIDEO IN VIDEO Y SERVICE PB IN (OPTICAL) PR 1 DIGITAL AUDIO OUT L AUDIO R 1 2 AUDIO COMPONENT...
... HDMI On Device List Device Auto Power Off Off Video 1 Component 1 Lock TV Auto Power On Off Signal Diagnostics Setup 3 COMPONENT IN 2 4 AUDIO OUT (FIX) Change RETURN Back MENU Exit Component video provides better picture quality than the S Video and composite video. Connects to the left and right audio input jacks of 1080p, 1080i, 720p, 480p, and 480i as labeled. You can be used when service is required. Getting Started Locating Inputs and Outputs Rear Panel 1 VIDEO IN VIDEO Y SERVICE PB IN (OPTICAL) PR 1 DIGITAL AUDIO OUT L AUDIO R 1 2 AUDIO COMPONENT...
Operating Instructions
Page 8
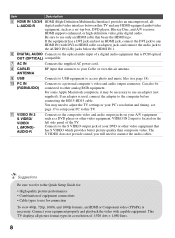
... the Quick Setup Guide for connection To view 480p, 720p, 1080i, and 1080p formats, an HDMI or Component video (YPBPR) is PCM optical OUT (OPTICAL) compatible. 7 AC IN Connects the supplied AC power cord. 8 CABLE/ ANTENNA RF input that bears the HDMI logo. If an adapter is located on your PC's resolution and timing. qa VIDEO IN 2 S VIDEO/ VIDEO/ L (MONO)AUDIO-R Connects to adjust the TV settings or your A/V equipment such as a set-top box, DVD player, Blu-ray Disc, and A/V receiver. The S VIDEO does not provide sound; You...
... the Quick Setup Guide for connection To view 480p, 720p, 1080i, and 1080p formats, an HDMI or Component video (YPBPR) is PCM optical OUT (OPTICAL) compatible. 7 AC IN Connects the supplied AC power cord. 8 CABLE/ ANTENNA RF input that bears the HDMI logo. If an adapter is located on your PC's resolution and timing. qa VIDEO IN 2 S VIDEO/ VIDEO/ L (MONO)AUDIO-R Connects to adjust the TV settings or your A/V equipment such as a set-top box, DVD player, Blu-ray Disc, and A/V receiver. The S VIDEO does not provide sound; You...
Operating Instructions
Page 9
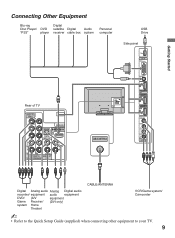
... receiver cable box system Personal computer USB Drive Side panel PC IN RGB Rear of TV VIDEO IN VIDEO Y SERVICE PB IN (OPTICAL) PR 1 DIGITAL AUDIO OUT L AUDIO R 1 2 AUDIO COMPONENT IN AUDIO OUT (1080p/1080i/720p/480p/480i) (FIX) L AUDIO R CABLE/ANTENNA AUDIO 2 IN IN 3 IN 4 S VIDEO VIDEO L (MONO) AUDIO R 2 VIDEO IN CABLE/ANTENNA Digital Analog audio Analog Digital audio recorder/ equipment audio equipment DVD/ (A/V equipment Game Receiver/ (DVI only) system Home Theater) VCR/Game system/ Camcorder ~ • Refer to the Quick Setup Guide (supplied) when connecting...
... receiver cable box system Personal computer USB Drive Side panel PC IN RGB Rear of TV VIDEO IN VIDEO Y SERVICE PB IN (OPTICAL) PR 1 DIGITAL AUDIO OUT L AUDIO R 1 2 AUDIO COMPONENT IN AUDIO OUT (1080p/1080i/720p/480p/480i) (FIX) L AUDIO R CABLE/ANTENNA AUDIO 2 IN IN 3 IN 4 S VIDEO VIDEO L (MONO) AUDIO R 2 VIDEO IN CABLE/ANTENNA Digital Analog audio Analog Digital audio recorder/ equipment audio equipment DVD/ (A/V equipment Game Receiver/ (DVI only) system Home Theater) VCR/Game system/ Camcorder ~ • Refer to the Quick Setup Guide (supplied) when connecting...

Operating Instructions
Page 11
... on-screen display text. 2 Select HOME or Retail mode. 3 Connect cable or antenna, then select OK to run Auto Program. • When prompted to select HOME or Retail, be available. 4 Auto Program will scan for available channels from the signal source directly connected to the TV's CABLE/ANTENNA input and may not be sure to select HOME for ENERGY STAR compliant mode. • If you use both cable without a box and antenna connections, use . Push to Setup menu...
... on-screen display text. 2 Select HOME or Retail mode. 3 Connect cable or antenna, then select OK to run Auto Program. • When prompted to select HOME or Retail, be available. 4 Auto Program will scan for available channels from the signal source directly connected to the TV's CABLE/ANTENNA input and may not be sure to select HOME for ENERGY STAR compliant mode. • If you use both cable without a box and antenna connections, use . Push to Setup menu...
Operating Instructions
Page 12
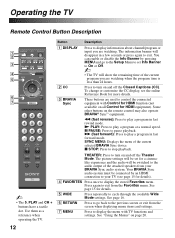
... from the screen when displaying menu items and settings. 7 MENU Press to control the connected equipment with TV functions and settings. Button Description 1 DISPLAY 2 CC 3 BRAVIA Sync Press to display information about channel/program or input you are used to display the menu with Control for HDMI function (not available on and off the Theater Mode. Your BRAVIA Sync audio system must be connected by pressing MENU and go back to display the stored Favorites menu. M (fast forward...
... from the screen when displaying menu items and settings. 7 MENU Press to control the connected equipment with TV functions and settings. Button Description 1 DISPLAY 2 CC 3 BRAVIA Sync Press to display information about channel/program or input you are used to display the menu with Control for HDMI function (not available on and off the Theater Mode. Your BRAVIA Sync audio system must be connected by pressing MENU and go back to display the stored Favorites menu. M (fast forward...
Operating Instructions
Page 13
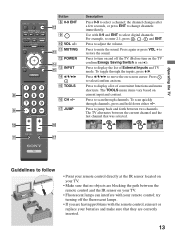
... content. WIDE INPUT qa MUTING qd qs POWER qf TOOLS qd INPUT qg qf V/v/B/b qg TOOLS 8 qh CH +/- 9 qj JUMP 0 qh Description Press 0-9 to select digital channels. Operating the TV DISPLAY CC POWER Button 8 0-9 ENT qs 9 0 VOL +/- Use with the remote control, reinsert or replace your TV. • Make sure that was selected. Press V/v/B/b to follow • Point your remote control directly at the IR sensor located on your...
... content. WIDE INPUT qa MUTING qd qs POWER qf TOOLS qd INPUT qg qf V/v/B/b qg TOOLS 8 qh CH +/- 9 qj JUMP 0 qh Description Press 0-9 to select digital channels. Operating the TV DISPLAY CC POWER Button 8 0-9 ENT qs 9 0 VOL +/- Use with the remote control, reinsert or replace your TV. • Make sure that was selected. Press V/v/B/b to follow • Point your remote control directly at the IR sensor located on your...
Operating Instructions
Page 14
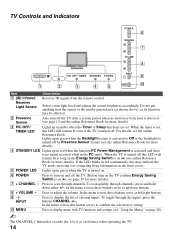
... Receives IR signals from the remote control. Lights up in red when the function PC Power Management is activated and there is turned on page 20). ~ The CHANNEL + button has a tactile dot. Use it as left/right buttons. 9 INPUT Press to Off or the backlight its function may indicate the TV needs servicing (see page 19 and the online Reference Book for more details). 4 STANDBY LED Lights up in green when...
... Receives IR signals from the remote control. Lights up in red when the function PC Power Management is activated and there is turned on page 20). ~ The CHANNEL + button has a tactile dot. Use it as left/right buttons. 9 INPUT Press to Off or the backlight its function may indicate the TV needs servicing (see page 19 and the online Reference Book for more details). 4 STANDBY LED Lights up in green when...
Operating Instructions
Page 15
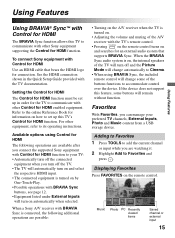
... using Control for HDMI The following additional operations are possible: • Turning on the A/V receiver when the TV is turned on. • Adjusting the volume and muting of the buttons functions to accommodate control over the device. When a Sony A/V receiver with Control for HDMI Use an HDMI cable that supports BRAVIA Sync. Adding to Favorites 1 Press TOOLS to your preferred TV channels, External Inputs, Photo and Music content from a USB storage device. To connect Sony equipment with BRAVIA Sync...
... using Control for HDMI The following additional operations are possible: • Turning on the A/V receiver when the TV is turned on. • Adjusting the volume and muting of the buttons functions to accommodate control over the device. When a Sony A/V receiver with Control for HDMI Use an HDMI cable that supports BRAVIA Sync. Adding to Favorites 1 Press TOOLS to your preferred TV channels, External Inputs, Photo and Music content from a USB storage device. To connect Sony equipment with BRAVIA Sync...
Operating Instructions
Page 16
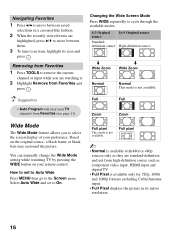
... input while you to select the screen display of your preference. Removing from high-definition source such as component video input, HDMI input and digital TV. • Full Pixel is available only for 720p, 1080i and 1080p formats excluding Cable/Antenna input. • Full Pixel displays the picture in a carousel-like fashion. 2 When the recently viewed items are watching it. 2 Highlight Remove from Favorites (see page 11). Full pixel This mode...
... input while you to select the screen display of your preference. Removing from high-definition source such as component video input, HDMI input and digital TV. • Full Pixel is available only for 720p, 1080i and 1080p formats excluding Cable/Antenna input. • Full Pixel displays the picture in a carousel-like fashion. 2 When the recently viewed items are watching it. 2 Highlight Remove from Favorites (see page 11). Full pixel This mode...
Operating Instructions
Page 17
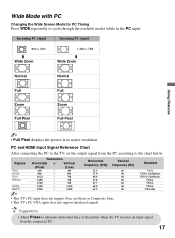
... displays the picture in the PC input. Standard VGA VESA Guidelines VESA Guidelines VESA VESA VESA CEA-861 • Adjust Phase to eliminate horizontal lines of the picture when the TV receives an input signal from the PC according to the chart below. PC and HDMI Input Signal Reference Chart After connecting the PC to the TV, set the output signal from the connected PC. 17 Wide Mode with PC Changing the Wide Screen Mode for PC Timing...
... displays the picture in the PC input. Standard VGA VESA Guidelines VESA Guidelines VESA VESA VESA CEA-861 • Adjust Phase to eliminate horizontal lines of the picture when the TV receives an input signal from the PC according to the chart below. PC and HDMI Input Signal Reference Chart After connecting the PC to the TV, set the output signal from the connected PC. 17 Wide Mode with PC Changing the Wide Screen Mode for PC Timing...
Operating Instructions
Page 19
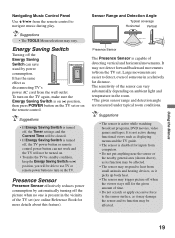
... online Reference Book for inputs from computers. • Do not put anything near the sensor or the nearby general area (shown above), as it may damage the sensor and its function may be able to use TV or remote power button to turn on the TV again, make the TV be standby condition, keep the Energy Saving Switch on the remote control. Navigating Music Control Panel Use V/v/B/b from the remote control...
... online Reference Book for inputs from computers. • Do not put anything near the sensor or the nearby general area (shown above), as it may damage the sensor and its function may be able to use TV or remote power button to turn on the TV again, make the TV be standby condition, keep the Energy Saving Switch on the remote control. Navigating Music Control Panel Use V/v/B/b from the remote control...
Operating Instructions
Page 20
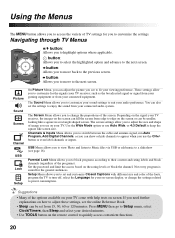
... gaming equipment or from your connected audio system. The Screen Menu allows you to change the settings related to power consumption. • Many of the options available on your TV come with different size and color of the fonts, program the TV to turn off, select the Language for the general audiences. Channels & Inputs Menu allows you to switch between the cable and antenna signal, run Auto Program, Add Digital Channels, or you can adjust the picture...
... gaming equipment or from your connected audio system. The Screen Menu allows you to change the settings related to power consumption. • Many of the options available on your TV come with different size and color of the fonts, program the TV to turn off, select the Language for the general audiences. Channels & Inputs Menu allows you to switch between the cable and antenna signal, run Auto Program, Add Digital Channels, or you can adjust the picture...
Operating Instructions
Page 21
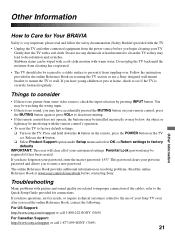
... and scratches. This password clears your TV. The online Reference Book provides additional information on Return settings to the use of the cables; Parental Lock password may be wiped with a soft cloth moisten with a soft cloth. Release the V button. ❑ Select Product Support option under Setup menu and select OK on resolving problems. Read the online Reference Book at home, check to improper connection of your remote control;
... and scratches. This password clears your TV. The online Reference Book provides additional information on Return settings to the use of the cables; Parental Lock password may be wiped with a soft cloth moisten with a soft cloth. Release the V button. ❑ Select Product Support option under Setup menu and select OK on resolving problems. Read the online Reference Book at home, check to improper connection of your remote control;
Operating Instructions
Page 22
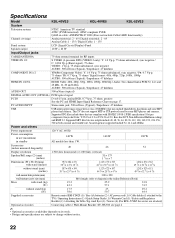
...-1 JPEG specification (8 bit per component, Grayscale/Color, Y:Cb:Cr=4:2:2 or Y:Cb:Cr=4:2:0, Base line DCT, Non-differential Huffman coding) and EXIF 2.2. PC AUDIO INPUT Stereo mini jack, 500 mVrms, (Typical) / Impedance: 47 kilohms USB USB input support mass storage device class (USB MSC) that are subject to the TV) / Operating Instructions (1) / Quick Setup Guide (1) / Warranty Card (1) / Safety and Regulatory Booklet (1) / Attaching the Table-Top stand flyer (1) / Screws (4) (For KDL-52VE5 the screws are attached) Connecting cables / Wall-Mount Bracket...
...-1 JPEG specification (8 bit per component, Grayscale/Color, Y:Cb:Cr=4:2:2 or Y:Cb:Cr=4:2:0, Base line DCT, Non-differential Huffman coding) and EXIF 2.2. PC AUDIO INPUT Stereo mini jack, 500 mVrms, (Typical) / Impedance: 47 kilohms USB USB input support mass storage device class (USB MSC) that are subject to the TV) / Operating Instructions (1) / Quick Setup Guide (1) / Warranty Card (1) / Safety and Regulatory Booklet (1) / Attaching the Table-Top stand flyer (1) / Screws (4) (For KDL-52VE5 the screws are attached) Connecting cables / Wall-Mount Bracket...
Operating Instructions
Page 23
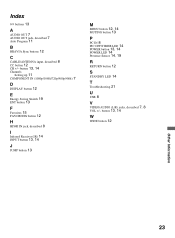
... H HDMI IN jack, described 8 I Infrared Receiver (IR) 14 INPUT button 13, 14 J JUMP button 13 M MENU button 12, 14 MUTING button 13 P PC IN 8 PIC OFF/TIMER LED 14 POWER button 13, 14 POWER LED 14 Presence Sensor 14, 19 R RETURN button 12 S STANDBY LED 14 T Troubleshooting 21 U USB 8 V VIDEO/AUDIO (L/R) jacks, described 7, 8 VOL +/- button 13, 14 W WIDE button 12 Other Information 23 Index 0-9 buttons 13 A AUDIO OUT 7 AUDIO OUT jack, described 7 Auto Program 11 B BRAVIA Sync buttons 12 C CABLE/ANTENNA input, described 8 CC button...
... H HDMI IN jack, described 8 I Infrared Receiver (IR) 14 INPUT button 13, 14 J JUMP button 13 M MENU button 12, 14 MUTING button 13 P PC IN 8 PIC OFF/TIMER LED 14 POWER button 13, 14 POWER LED 14 Presence Sensor 14, 19 R RETURN button 12 S STANDBY LED 14 T Troubleshooting 21 U USB 8 V VIDEO/AUDIO (L/R) jacks, described 7, 8 VOL +/- button 13, 14 W WIDE button 12 Other Information 23 Index 0-9 buttons 13 A AUDIO OUT 7 AUDIO OUT jack, described 7 Auto Program 11 B BRAVIA Sync buttons 12 C CABLE/ANTENNA input, described 8 CC button...


