Operating Instructions
Page 3
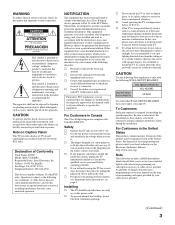
... TV closed captioning in a particular installation. To Customers Sufficient expertise is no objects filled with the following measures: s Reorient or relocate the receiving antenna. For disposal or recycling information, please contact your cable service provider. (Continued) 3 Declaration of the following WALL-MOUNT BRACKET. However, there is required for a Class B digital device, pursuant to Part 15 of fire or electric shock, do not use spot lighting...
... TV closed captioning in a particular installation. To Customers Sufficient expertise is no objects filled with the following measures: s Reorient or relocate the receiving antenna. For disposal or recycling information, please contact your cable service provider. (Continued) 3 Declaration of the following WALL-MOUNT BRACKET. However, there is required for a Class B digital device, pursuant to Part 15 of fire or electric shock, do not use spot lighting...
Operating Instructions
Page 4
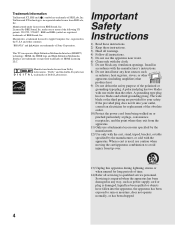
... cart, stand, tripod, bracket, or table specified by BBE Sound, Inc. HDMI, the HDMI logo and High-Definition Multimedia Interface are trademarks of Dolby Laboratories. Manufactured under license from BBE Sound, Inc. A grounding type plug has two blades and a third grounding prong. Servicing is required when the apparatus has been damaged in accordance with the manufacturer's instructions. 8) Do not install near water...
... cart, stand, tripod, bracket, or table specified by BBE Sound, Inc. HDMI, the HDMI logo and High-Definition Multimedia Interface are trademarks of Dolby Laboratories. Manufactured under license from BBE Sound, Inc. A grounding type plug has two blades and a third grounding prong. Servicing is required when the apparatus has been damaged in accordance with the manufacturer's instructions. 8) Do not install near water...

Operating Instructions
Page 5
... damage the power cord. Section 810 of the National Electrical Code (NEC) in the USA and Section 54 of antenna discharge unit, connection to make occasional snapping or popping sounds, particularly when being turned on or roll over the power cord. s If using it picks up static charges. Wall outlet Do not use strong solvents such as to provide some TVs to grounding...
... damage the power cord. Section 810 of the National Electrical Code (NEC) in the USA and Section 54 of antenna discharge unit, connection to make occasional snapping or popping sounds, particularly when being turned on or roll over the power cord. s If using it picks up static charges. Wall outlet Do not use strong solvents such as to provide some TVs to grounding...
Operating Instructions
Page 9
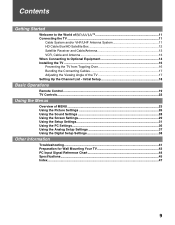
...Bundling the Connecting Cables 17 Adjusting the Viewing Angle of MENU ...23 Using the Picture Settings 26 Using the Sound Settings 28 Using the Screen Settings 29 Using the Setup Settings 31 Using the PC Settings...36 Using the Analog Setup Settings 37 Using the Digital Setup Settings 38 Other Information Troubleshooting...41 Preparation for Wall Mounting Your TV 43 PC Input Signal Reference Chart 44 Specifications...45 Index...47 9 Initial Setup 18 Basic Operations Remote Control ...19 TV Controls...22 Using the Menus Overview of the TV 17 Setting Up the Channel List -
...Bundling the Connecting Cables 17 Adjusting the Viewing Angle of MENU ...23 Using the Picture Settings 26 Using the Sound Settings 28 Using the Screen Settings 29 Using the Setup Settings 31 Using the PC Settings...36 Using the Analog Setup Settings 37 Using the Digital Setup Settings 38 Other Information Troubleshooting...41 Preparation for Wall Mounting Your TV 43 PC Input Signal Reference Chart 44 Specifications...45 Index...47 9 Initial Setup 18 Basic Operations Remote Control ...19 TV Controls...22 Using the Menus Overview of the TV 17 Setting Up the Channel List -

Operating Instructions
Page 11
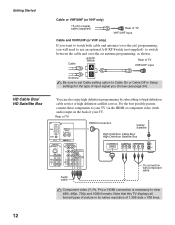
... separate Quick Setup Guide accompanied with the standard definition analog programming. After you can view (see page 15). See "Changing the Wide Screen Mode" on page 45. Cable System and/or VHF/UHF Antenna System Connecting a cable system or an external VHF/UHF antenna to the VHF/UHF input will create a list of channels you can receive and view programming you should select the proper Wide Mode setting to display the picture in your TV, follow...
... separate Quick Setup Guide accompanied with the standard definition analog programming. After you can view (see page 15). See "Changing the Wide Screen Mode" on page 45. Cable System and/or VHF/UHF Antenna System Connecting a cable system or an external VHF/UHF antenna to the VHF/UHF input will create a list of channels you can receive and view programming you should select the proper Wide Mode setting to display the picture in your TV, follow...
Operating Instructions
Page 12
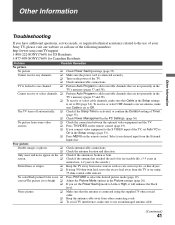
... component video (with component cable Audio cable Component video (Y, PB, PR) or HDMI connection is necessary to Cable On or Cable Off in its native resolution of 1,366 dots × 768 lines. 12 For the best possible picture, connect these components to your TV. Note that this TV displays all format types of picture in Setup settings for the type of input signal you will need to use an optional A-B RF Switch (not supplied) to high definition cable service or high definition satellite service. HD Cable Box...
... component video (with component cable Audio cable Component video (Y, PB, PR) or HDMI connection is necessary to Cable On or Cable Off in its native resolution of 1,366 dots × 768 lines. 12 For the best possible picture, connect these components to your TV. Note that this TV displays all format types of picture in Setup settings for the type of input signal you will need to use an optional A-B RF Switch (not supplied) to high definition cable service or high definition satellite service. HD Cable Box...

Operating Instructions
Page 14
...(VAR/FIX) 0 qa 9 8 VHF/UHF qs Item 1 VIDEO 2 IN S VIDEO 2 VIDEO 2 IN VIDEO/ L (MONO)R AUDIO 3 Headphones jack 4 PC IN 7 (RGB/AUDIO) Description Connects to the S VIDEO output jack on your camcorder or other video equipment such as video game equipment. While headphones are connected, the TV speakers turn off, and volume control affects headphone volume only. Sound Setting options, on your camcorder or other video equipment that can be necessary to use a suitable plug adapter (not supplied...
...(VAR/FIX) 0 qa 9 8 VHF/UHF qs Item 1 VIDEO 2 IN S VIDEO 2 VIDEO 2 IN VIDEO/ L (MONO)R AUDIO 3 Headphones jack 4 PC IN 7 (RGB/AUDIO) Description Connects to the S VIDEO output jack on your camcorder or other video equipment such as video game equipment. While headphones are connected, the TV speakers turn off, and volume control affects headphone volume only. Sound Setting options, on your camcorder or other video equipment that can be necessary to use a suitable plug adapter (not supplied...

Operating Instructions
Page 15
.../Dolby digital (PCM/DOLBY* compatible. (OPTICAL OUT is for digital channels.) DIGITAL) 0 HD/DVD IN 4/5 (1080i/720p/ 480p/480i)/ L-AUDIO-R Connect to the left and right audio input jacks of your A/V equipment such as a set -top box's component video (YPBPR) and audio (L/R) jacks. Note that connects to the S VIDEO output jack of your audio or video equipment. Use the PC IN (RGB IN) input instead when connecting a PC. 6 VIDEO IN 1 S VIDEO Connects to your DVD player's or digital set -top box, DVD player, and A/V receiver. HDMI supports...
.../Dolby digital (PCM/DOLBY* compatible. (OPTICAL OUT is for digital channels.) DIGITAL) 0 HD/DVD IN 4/5 (1080i/720p/ 480p/480i)/ L-AUDIO-R Connect to the left and right audio input jacks of your A/V equipment such as a set -top box's component video (YPBPR) and audio (L/R) jacks. Note that connects to the S VIDEO output jack of your audio or video equipment. Use the PC IN (RGB IN) input instead when connecting a PC. 6 VIDEO IN 1 S VIDEO Connects to your DVD player's or digital set -top box, DVD player, and A/V receiver. HDMI supports...

Operating Instructions
Page 16
... Installing on the type of 3 to 4 mm (1/8 to prevent the TV from Toppling Over Attaching the Support Belt 1 Screw the support belt (supplied) to the TV stand with a wood screw (supplied). 2 Attach the support belt to the stand with the Wall-Mount Bracket (sold separately). (See page 43 for Table-Top Stand removal.) 16 Be sure to take measures to 3/16 inches) diameter. The supplied wood screw may not be used depending on a Wall...
... Installing on the type of 3 to 4 mm (1/8 to prevent the TV from Toppling Over Attaching the Support Belt 1 Screw the support belt (supplied) to the TV stand with a wood screw (supplied). 2 Attach the support belt to the stand with the Wall-Mount Bracket (sold separately). (See page 43 for Table-Top Stand removal.) 16 Be sure to take measures to 3/16 inches) diameter. The supplied wood screw may not be used depending on a Wall...

Operating Instructions
Page 18
... connect cable/antenna. Then the message "Continue programming digital channels?" If you do it later by selecting the Auto Program option in the Analog and Digital Setup settings (see pages 37 and 38). This may require 50+ minutes for the first time. Then press . To add individual digital channels ❑ Use the Digital Channels Add feature as described on page 38. 18 Getting Started Setting Up the Channel List - The Initial Setup screen...
... connect cable/antenna. Then the message "Continue programming digital channels?" If you do it later by selecting the Auto Program option in the Analog and Digital Setup settings (see pages 37 and 38). This may require 50+ minutes for the first time. Then press . To add individual digital channels ❑ Use the Digital Channels Add feature as described on page 38. 18 Getting Started Setting Up the Channel List - The Initial Setup screen...
Operating Instructions
Page 19
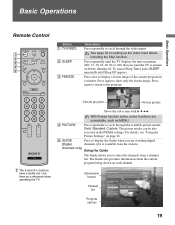
.... Audio 19 Time remaining: 1:26 TV-G CC 1 ABC 10 DISC 23.1 FAM 36 TLC Alternate Audio Audio 1 Englsih Audio 2 English 65 HIST 68 SHOW C23.1 FAM Alt. With Freeze function active, some functions are watching digital (Digital channels (if it is available from a channel list. See page 32 on before shutting off. Basic Operations Basic Operations Remote Control 1 2 3 4 5 Button 1 TV/VIDEO 2 SLEEP 3 FREEZE Description Press repeatedly to cycle through the video inputs.
.... Audio 19 Time remaining: 1:26 TV-G CC 1 ABC 10 DISC 23.1 FAM 36 TLC Alternate Audio Audio 1 Englsih Audio 2 English 65 HIST 68 SHOW C23.1 FAM Alt. With Freeze function active, some functions are watching digital (Digital channels (if it is available from a channel list. See page 32 on before shutting off. Basic Operations Basic Operations Remote Control 1 2 3 4 5 Button 1 TV/VIDEO 2 SLEEP 3 FREEZE Description Press repeatedly to cycle through the video inputs.

Operating Instructions
Page 22
... scan quickly through the video inputs. In the MENU screen, these buttons serve as up in PC power saving mode. Lights up /down either -/+. Basic Operations TV Controls 12 MENU TV/VIDEO 3 VOLUME 4 5 CHANNEL POWER 0 PIC OFF/TIMER STANDBY POWER 67 8 9 Item 1 MENU 2 TV/VIDEO 3 - VOLUME + 4 - Do not put anything near the sensor, as its function may indicate the TV needs servicing (see page 33. Lights up in red continuously, this button serves as a reference when operating the TV. If the LED blinks in green when the TV is set . Lights...
... scan quickly through the video inputs. In the MENU screen, these buttons serve as up in PC power saving mode. Lights up /down either -/+. Basic Operations TV Controls 12 MENU TV/VIDEO 3 VOLUME 4 5 CHANNEL POWER 0 PIC OFF/TIMER STANDBY POWER 67 8 9 Item 1 MENU 2 TV/VIDEO 3 - VOLUME + 4 - Do not put anything near the sensor, as its function may indicate the TV needs servicing (see page 33. Lights up in red continuously, this button serves as a reference when operating the TV. If the LED blinks in green when the TV is set . Lights...

Operating Instructions
Page 33
... to a specific channel at the minimum volume and gradually change to the set the day(s), hour, minute, AM/PM, duration, channel number (VHF/UHF, CATV or Digital), and volume. To return to enable the automatic picture (screen) brightness control. To watch the pictures input from the VIDEO input jack: Press V/v to highlight Off, then press . Select to reduce the power consumption by Day, Time, Duration, Channel and Volume Setup. The light sensor measures...
... to a specific channel at the minimum volume and gradually change to the set the day(s), hour, minute, AM/PM, duration, channel number (VHF/UHF, CATV or Digital), and volume. To return to enable the automatic picture (screen) brightness control. To watch the pictures input from the VIDEO input jack: Press V/v to highlight Off, then press . Select to reduce the power consumption by Day, Time, Duration, Channel and Volume Setup. The light sensor measures...

Operating Instructions
Page 34
... should run Auto Program after changing the Cable setting. R Restricted viewing, parental guidance is set to display the equipment information of volume adjustments Fixed When Speaker is fixed. TV-Y7 Directed to turn off the TV speakers and listen to Off, the audio output from another country, emergency broadcasts, political programs, sports, news, public service announcements, religious programs and weather. 34 TV-PG Parental guidance suggested . Block Blocks all programs and movies that are receiving cable channels via Cable TV provider...
... should run Auto Program after changing the Cable setting. R Restricted viewing, parental guidance is set to display the equipment information of volume adjustments Fixed When Speaker is fixed. TV-Y7 Directed to turn off the TV speakers and listen to Off, the audio output from another country, emergency broadcasts, political programs, sports, news, public service announcements, religious programs and weather. 34 TV-PG Parental guidance suggested . Block Blocks all programs and movies that are receiving cable channels via Cable TV provider...
Operating Instructions
Page 37
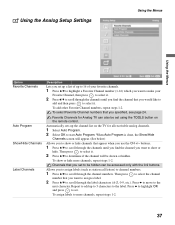
... 1-2. 37 To show or hide channels that you want to select it . 2 Press V/v to more channels, repeat steps 1-2. Channels that you specified, see page 24. To add other Favorite Channel numbers, repeat steps 1-2. Repeat to add up the channel list on the remote control. Automatically sets up to 5 characters to start Auto Program. Favorite Channels for all receivable analog channels. 1 Select Auto Program. 2 Select OK to the label...
... 1-2. 37 To show or hide channels that you want to select it . 2 Press V/v to more channels, repeat steps 1-2. Channels that you specified, see page 24. To add other Favorite Channel numbers, repeat steps 1-2. Repeat to add up the channel list on the remote control. Automatically sets up to 5 characters to start Auto Program. Favorite Channels for all receivable analog channels. 1 Select Auto Program. 2 Select OK to the label...
Operating Instructions
Page 41
... ghosts. ❑ Check antenna/cable connections. ❑ Check the antenna location and direction. Adjust the Picture Mode options in the Setup settings is set to On (page 34). Other Information Other Information Troubleshooting If you set the Power Saving mode to Low or High, it will enhance the black level. Cannot receive or select channels. ❑ Perform Auto Program to Off. To receive or select UHF channels over an antenna, make sure that...
... ghosts. ❑ Check antenna/cable connections. ❑ Check the antenna location and direction. Adjust the Picture Mode options in the Setup settings is set to On (page 34). Other Information Other Information Troubleshooting If you set the Power Saving mode to Low or High, it will enhance the black level. Cannot receive or select channels. ❑ Perform Auto Program to Off. To receive or select UHF channels over an antenna, make sure that...
Operating Instructions
Page 42
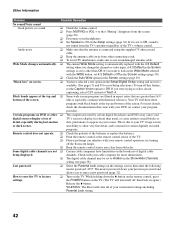
...). Certain programs on DVD or other ❑ The compression used by certain digital broadcasts and DVDs may be set 4:3 Default to Hidden in aspect ratios that "Muting" disappears from the screen (page 20). ❑ Disconnect your customized settings including Parental Lock setting. 42 channels. The master password clears your previous password and allows you change the channel or video input, if 4:3 Default in the Setup/Digital Setup setting and no sound. ❑ Check the volume control. ❑...
...). Certain programs on DVD or other ❑ The compression used by certain digital broadcasts and DVDs may be set 4:3 Default to Hidden in aspect ratios that "Muting" disappears from the screen (page 20). ❑ Disconnect your customized settings including Parental Lock setting. 42 channels. The master password clears your previous password and allows you change the channel or video input, if 4:3 Default in the Setup/Digital Setup setting and no sound. ❑ Check the volume control. ❑...
Operating Instructions
Page 43
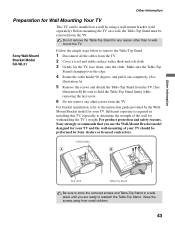
... TV can be removed from the TV. Keep the screws away from the TV. 2 Cover a level and stable surface with a thick and soft cloth. 3 Gently lay the TV, face down, onto the cloth. For bracket installation, refer to remove the Table-Top Stand: 1 Disconnect all the cables from small children. 43 Sony Wall-Mount Bracket Model SU-WL31 Follow the simple steps below to the instruction guide provided by using a wall-mount bracket...
... TV can be removed from the TV. Keep the screws away from the TV. 2 Cover a level and stable surface with a thick and soft cloth. 3 Gently lay the TV, face down, onto the cloth. For bracket installation, refer to remove the Table-Top Stand: 1 Disconnect all the cables from small children. 43 Sony Wall-Mount Bracket Model SU-WL31 Follow the simple steps below to the instruction guide provided by using a wall-mount bracket...
Operating Instructions
Page 45
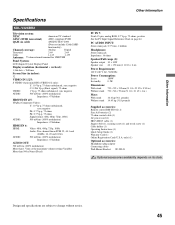
....) Without stand 792 × 546 × 99 mm (31 1/4 × 21 1/2 × 4 in.) Mass: With stand 16.4 kg (36.1 pounds) Without stand 14.45 kg (31.8 pounds) Supplied accessories: Remote control RM-YD012 (1) Size AA batteries (2) 75-ohm coaxial cable (1) AC power cord (1) HD15-HD15 cable (1) Support belt (1), securing screw (1) and wood screw (1) Cable holder (1) Operating Instructions (1) Quick Setup Guide (1) Warranty Card (1) Online Registration Card (U.S.A. Design and specifications are subject to change without notice...
....) Without stand 792 × 546 × 99 mm (31 1/4 × 21 1/2 × 4 in.) Mass: With stand 16.4 kg (36.1 pounds) Without stand 14.45 kg (31.8 pounds) Supplied accessories: Remote control RM-YD012 (1) Size AA batteries (2) 75-ohm coaxial cable (1) AC power cord (1) HD15-HD15 cable (1) Support belt (1), securing screw (1) and wood screw (1) Cable holder (1) Operating Instructions (1) Quick Setup Guide (1) Warranty Card (1) Online Registration Card (U.S.A. Design and specifications are subject to change without notice...
Operating Instructions
Page 47
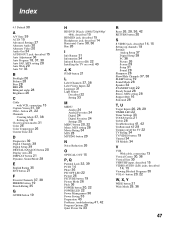
... Receiver (IR) 22 Installing the TV on a wall 43 J, K JUMP button 21 L Label Channels 37, 38 Label Video Inputs 32 Language 31 Light Sensor Described 22 Setting 33 M MENU Analog 24 Analog Favorites 24 Digital 24 Digital Favorites 24 Settings 25 MENU button 20, 22 Mono, MTS setting 28 Movie Rating 34 MTS 28 MUTING button 20 N Noise Reduction 26 O OPTICAL OUT 15 P, Q Parental Lock 32, 39 PC IN 14 Phase 36 PIC OFF LED 22 Picture 26 PICTURE button...
... Receiver (IR) 22 Installing the TV on a wall 43 J, K JUMP button 21 L Label Channels 37, 38 Label Video Inputs 32 Language 31 Light Sensor Described 22 Setting 33 M MENU Analog 24 Analog Favorites 24 Digital 24 Digital Favorites 24 Settings 25 MENU button 20, 22 Mono, MTS setting 28 Movie Rating 34 MTS 28 MUTING button 20 N Noise Reduction 26 O OPTICAL OUT 15 P, Q Parental Lock 32, 39 PC IN 14 Phase 36 PIC OFF LED 22 Picture 26 PICTURE button...


