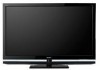
Operating Instructions
Page 2
... not use this TV. s Increase the separation between the equipment and receiver. s Connect the equipment into an outlet on 120 V AC. Sony TV Stand Model No. To Customers Sufficient expertise is required for help. HDMI, the HDMI logo and High-Definition Multimedia Interface are trademarks, service marks, or certification marks of the Digital Living Network Alliance. The TV Guide On Screen system is subject to a cable service provider. "BRAVIA" and...
... not use this TV. s Increase the separation between the equipment and receiver. s Connect the equipment into an outlet on 120 V AC. Sony TV Stand Model No. To Customers Sufficient expertise is required for help. HDMI, the HDMI logo and High-Definition Multimedia Interface are trademarks, service marks, or certification marks of the Digital Living Network Alliance. The TV Guide On Screen system is subject to a cable service provider. "BRAVIA" and...
Operating Instructions
Page 3
...) Settings 47 Parental Lock Settings 47 External Inputs Settings 50 HDMI Settings 50 Network Settings 51 General Setup Settings 51 Initial Setup 52 Other Information Troubleshooting 53 Specifications 57 Index 58 Customer Support United States http://www.sony.com/tvsupport Canada http://www.sony.ca/support On-line Registration United States http://productregistration.sony.com Canada http://www.SonyStyle.ca/registration 3 Setting Up the Channel List - Installing the TV 6 Carrying the TV 6 Preparation for HDMI ....36 Using DIGITAL MEDIA PORT Adapter 36 Using P&P and PIP Features...
...) Settings 47 Parental Lock Settings 47 External Inputs Settings 50 HDMI Settings 50 Network Settings 51 General Setup Settings 51 Initial Setup 52 Other Information Troubleshooting 53 Specifications 57 Index 58 Customer Support United States http://www.sony.com/tvsupport Canada http://www.sony.ca/support On-line Registration United States http://productregistration.sony.com Canada http://www.SonyStyle.ca/registration 3 Setting Up the Channel List - Installing the TV 6 Carrying the TV 6 Preparation for HDMI ....36 Using DIGITAL MEDIA PORT Adapter 36 Using P&P and PIP Features...
Operating Instructions
Page 5
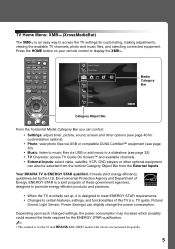
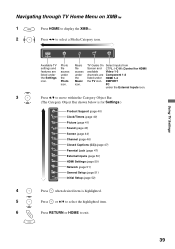
... Bar from the External Inputs. Environmental Protection Agency and Department of this TV (i.e. Press the HOME button on your remote control to access the TV settings for customizing, making adjustments, viewing the available TV channels, photo and music files, and selecting connected equipment. DISPLAY LIGHT POWER TV POWER DVD AMP STB TV FUNCTION PREV REPLAY ADVANCE NEXT PLAY SYNC MENU PAUSE STOP THEATER SOUND PICTURE WIDE CC FREEZE Product Support Clock/Timers Settings Sound Screen Channel Media Category Bar TV Category Object Bar...
... Bar from the External Inputs. Environmental Protection Agency and Department of this TV (i.e. Press the HOME button on your remote control to access the TV settings for customizing, making adjustments, viewing the available TV channels, photo and music files, and selecting connected equipment. DISPLAY LIGHT POWER TV POWER DVD AMP STB TV FUNCTION PREV REPLAY ADVANCE NEXT PLAY SYNC MENU PAUSE STOP THEATER SOUND PICTURE WIDE CC FREEZE Product Support Clock/Timers Settings Sound Screen Channel Media Category Bar TV Category Object Bar...

Operating Instructions
Page 6
... hold the bottom of the panel, and not the transparent part, speaker, or speaker grill area. M6 screw (supplied with the WallMount Bracket when attaching the mounting hooks to the TV set • Be sure to use the screws supplied with the Wall-Mount Bracket) Mounting Hook Rear of the mounting hook. For details on the LCD panel. ~ • Be sure to attach the Table-Top Stand. Do not subject the TV to protect your property and...
... hold the bottom of the panel, and not the transparent part, speaker, or speaker grill area. M6 screw (supplied with the WallMount Bracket when attaching the mounting hooks to the TV set • Be sure to use the screws supplied with the Wall-Mount Bracket) Mounting Hook Rear of the mounting hook. For details on the LCD panel. ~ • Be sure to attach the Table-Top Stand. Do not subject the TV to protect your property and...
Operating Instructions
Page 8
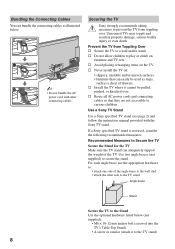
... the instruction manual provided with other side to the Stand Use the optional hardware listed below . If a Sony specified TV stand is not used as steps, such as a chest of the TV. Angle brace Stand Secure the TV to the TV stand. Prevent the TV from toppling over . s Avoid placing or hanging items on furniture and TV sets. s Route all AC power cords and connecting cables so that can adequately support the weight...
... the instruction manual provided with other side to the Stand Use the optional hardware listed below . If a Sony specified TV stand is not used as steps, such as a chest of the TV. Angle brace Stand Secure the TV to the TV stand. Prevent the TV from toppling over . s Avoid placing or hanging items on furniture and TV sets. s Route all AC power cords and connecting cables so that can adequately support the weight...

Operating Instructions
Page 11
... the picture is PCM/Dolby* OUT (OPTICAL) Digital compatible. 8 AUDIO OUT (VAR/FIX) Connects to the left and right audio input jacks of your analog audio equipment. HDMI IN 4 R-AUDIO-L If the equipment has a DVI jack and not an HDMI jack, connect the DVI jack to the HDMI IN 4 (with the TV's remote control (see page 30). qs AC IN Connects to your power source. Connects to your equipment's component video (YPBPR) and audio (L/R) jacks. HDMI supports enhanced...
... the picture is PCM/Dolby* OUT (OPTICAL) Digital compatible. 8 AUDIO OUT (VAR/FIX) Connects to the left and right audio input jacks of your analog audio equipment. HDMI IN 4 R-AUDIO-L If the equipment has a DVI jack and not an HDMI jack, connect the DVI jack to the HDMI IN 4 (with the TV's remote control (see page 30). qs AC IN Connects to your power source. Connects to your equipment's component video (YPBPR) and audio (L/R) jacks. HDMI supports enhanced...
Operating Instructions
Page 14
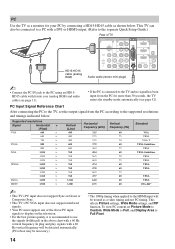
... must support one of TV HD15-HD15 cable (analog RGB) VIDEO IN 1 3 S VIDEO VIDEO L (MONO) AUDIO R COMPONENT IN PC IN 1 2 Y RGB PB PR L AUDIO R AUDIO (1080p/1080i/720p/480p/480i) IN DIGITAL 1 AUDIO OUT (OPTICAL) 3 4 AUDIO OUT R AUDIO L L AUDIO R (VAR/FIX) Audio cable (stereo mini plugs) ~ • Connect the PC IN jack to the PC using an HD15HD15 cable with ferrite core (analog RGB) and audio cable (see page 52). PC Input Signal Reference Chart After connecting the PC to the TV, set Picture Mode...
... must support one of TV HD15-HD15 cable (analog RGB) VIDEO IN 1 3 S VIDEO VIDEO L (MONO) AUDIO R COMPONENT IN PC IN 1 2 Y RGB PB PR L AUDIO R AUDIO (1080p/1080i/720p/480p/480i) IN DIGITAL 1 AUDIO OUT (OPTICAL) 3 4 AUDIO OUT R AUDIO L L AUDIO R (VAR/FIX) Audio cable (stereo mini plugs) ~ • Connect the PC IN jack to the PC using an HD15HD15 cable with ferrite core (analog RGB) and audio cable (see page 52). PC Input Signal Reference Chart After connecting the PC to the TV, set Picture Mode...
Operating Instructions
Page 16
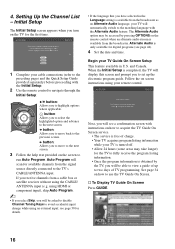
... input change while using HDMI or component input), skip Auto Program. ~ • If you select Skip, you will be accessed by the TV, you will be able to view a guide of charge. • Your TV acquires program listing information while your TV will automatically switch to use the TV Guide On Screen. Language settings will see a confirmation screen with instructions on screen instructions using the CABLE/ ANTENNA input (e.g. Highlight a choice and press to the previous screen. B button: Allows you receive channels from the signal source directly connected...
... input change while using HDMI or component input), skip Auto Program. ~ • If you select Skip, you will be accessed by the TV, you will be able to view a guide of charge. • Your TV acquires program listing information while your TV will automatically switch to use the TV Guide On Screen. Language settings will see a confirmation screen with instructions on screen instructions using the CABLE/ ANTENNA input (e.g. Highlight a choice and press to the previous screen. B button: Allows you receive channels from the signal source directly connected...

Operating Instructions
Page 22
...-Original, Photo-Custom, Video, Text. (Available options depend on setting up the External Inputs labels. The OPTIONS menu items vary based on current input and content. Press to a different location on page 41. Press V/v/B/b to move the small window showing current program to display the list of convenient functions and menu shortcuts. Menu Item Picture Adjustments Sound Adjustments P&P or PIP Exit P&P or Exit PIP Speakers Audio Swap Screen Add to select/ confirm...
...-Original, Photo-Custom, Video, Text. (Available options depend on setting up the External Inputs labels. The OPTIONS menu items vary based on current input and content. Press to a different location on page 41. Press V/v/B/b to move the small window showing current program to display the list of convenient functions and menu shortcuts. Menu Item Picture Adjustments Sound Adjustments P&P or PIP Exit P&P or Exit PIP Speakers Audio Swap Screen Add to select/ confirm...

Operating Instructions
Page 28
... Remove from Favorites and press . ~ • Auto Program will clear your TV channels from Favorites, follow the instructions below. Adding to Favorites 1 From the XMBTM, select a Photo, Music, TV, or External Inputs icon. Displaying Favorites Press FAVORITES. Exploring Fun Features Favorites With Favorites, you can manage your Favorites to factory default settings (see pages 16 and 46). • Initial Setup will return your preferred TV channels, External Inputs...
... Remove from Favorites and press . ~ • Auto Program will clear your TV channels from Favorites, follow the instructions below. Adding to Favorites 1 From the XMBTM, select a Photo, Music, TV, or External Inputs icon. Displaying Favorites Press FAVORITES. Exploring Fun Features Favorites With Favorites, you can manage your Favorites to factory default settings (see pages 16 and 46). • Initial Setup will return your preferred TV channels, External Inputs...
Operating Instructions
Page 36
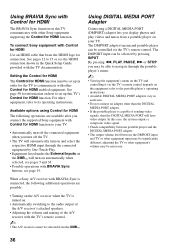
... other Control for HDMI function to its operating instructions. The DMPORT adapter's menu and portable player can be controlled via the TV's remote control depends on this case, the system outputs a composite video signal. • Check compatibility between portable player and the DIGITAL MEDIA PORT adapter. • The output volume level between the DMPORT input and TV or other equipment's volume may be necessary. 36 adjusting the TV or other equipment input may be significantly different; To connect Sony equipment...
... other Control for HDMI function to its operating instructions. The DMPORT adapter's menu and portable player can be controlled via the TV's remote control depends on this case, the system outputs a composite video signal. • Check compatibility between portable player and the DIGITAL MEDIA PORT adapter. • The output volume level between the DMPORT input and TV or other equipment's volume may be necessary. 36 adjusting the TV or other equipment input may be significantly different; To connect Sony equipment...
Operating Instructions
Page 39
... file access under the Photo icon. TV Guide On Select inputs from Screen and CTRL: HDMI (Control for Settings.) Product Support (page 40) Clock/Timers (page 40) Picture (page 41) Sound (page 43) Screen (page 44) Channel (page 46) CC Closed Captions (CC) (page 47) Parental Lock (page 47) External Inputs (page 50) HDMI Settings (page 50) Network (page 51) General Setup (page 51) Initial Setup (page 52) 4 Press when desired item is for HDMI) available Video 1-3 channels are listed...
... file access under the Photo icon. TV Guide On Select inputs from Screen and CTRL: HDMI (Control for Settings.) Product Support (page 40) Clock/Timers (page 40) Picture (page 41) Sound (page 43) Screen (page 44) Channel (page 46) CC Closed Captions (CC) (page 47) Parental Lock (page 47) External Inputs (page 50) HDMI Settings (page 50) Network (page 51) General Setup (page 51) Initial Setup (page 52) 4 Press when desired item is for HDMI) available Video 1-3 channels are listed...

Operating Instructions
Page 40
... as Model Name, Serial Number, Software Version and downloadable ratings if available from this screen for U.S. TV Settings Descriptions Product Support Contact Sony Signal Diagnostics Software Update Sony contact information is disabled, the TV Guide On Screen has automatically set the time. Press V/v to choose the new version (if available) and press to begin the software update. ~ • The Cable/Antenna cable needs to be set to the TV or a broadcast download must be available until you set . Turning on the Timer...
... as Model Name, Serial Number, Software Version and downloadable ratings if available from this screen for U.S. TV Settings Descriptions Product Support Contact Sony Signal Diagnostics Software Update Sony contact information is disabled, the TV Guide On Screen has automatically set the time. Press V/v to choose the new version (if available) and press to begin the software update. ~ • The Cable/Antenna cable needs to be set to the TV or a broadcast download must be available until you set . Turning on the Timer...

Operating Instructions
Page 45
... HDMI input. 45 When you to fill the 16:9 screen, displaying as much of the original image as channels and inputs are changed . ~ • 4:3 Default is not available if Auto Wide is set to Off. • If 4:3 Default is automatically replaced with PC signal connected to move the position of the picture vertically (up and down). Using TV Settings Screen settings for PC timings and HDMI-PC (PC input) differ from all other input modes...
... HDMI input. 45 When you to fill the 16:9 screen, displaying as much of the original image as channels and inputs are changed . ~ • 4:3 Default is not available if Auto Wide is set to Off. • If 4:3 Default is automatically replaced with PC signal connected to move the position of the picture vertically (up and down). Using TV Settings Screen settings for PC timings and HDMI-PC (PC input) differ from all other input modes...
Operating Instructions
Page 47
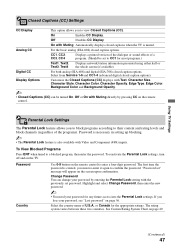
... Use 0-9 button on the TV. Highlight and select Change Password, then enter the new password. ~ • You need your password, see "Lost password" on the remote control. The rating system varies between these two countries. To View Blocked Programs Press ENT when tuned to a blocked program, then enter the password. If you must re-enter it again to confirm the password. Off Disables CC Display. To reactivate the Parental Lock settings, turn...
... Use 0-9 button on the TV. Highlight and select Change Password, then enter the new password. ~ • You need your password, see "Lost password" on the remote control. The rating system varies between these two countries. To View Blocked Programs Press ENT when tuned to a blocked program, then enter the password. If you must re-enter it again to confirm the password. Off Disables CC Display. To reactivate the Parental Lock settings, turn...

Operating Instructions
Page 50
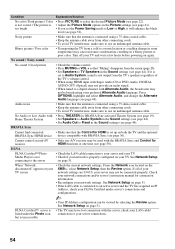
... when Control for HDMI is connected to this function. Disabled Select to disable the tuning keys during external input mode and prevent unintentionally exiting the external input. ~ • Useful for HDMI function. Device List Displays a list of your connected equipment with your TV remote control. • Some equipment with Control for HDMI function connected to the TV. ~ • Press OPTIONS while the equipment supporting Control for HDMI is turned off automatically when the TV is connected to display the Device Control...
... when Control for HDMI is connected to this function. Disabled Select to disable the tuning keys during external input mode and prevent unintentionally exiting the external input. ~ • Useful for HDMI function. Device List Displays a list of your connected equipment with your TV remote control. • Some equipment with Control for HDMI function connected to the TV. ~ • Press OPTIONS while the equipment supporting Control for HDMI is turned off automatically when the TV is connected to display the Device Control...
Operating Instructions
Page 52
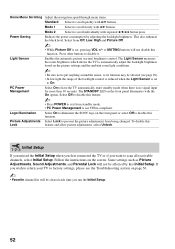
... front panel or select Off to disable it. Home Menu Scrolling Adjust the navigation speed through menu items. Standard Select to scroll quickly with the On option. Press other buttons to disable this Lock feature and allow picture adjustments, select Unlock. Light Sensor Enables the automatic picture (screen) brightness control. Picture Adjustments Select Lock to prevent the picture adjustments from standby mode. • PC Power Management is set to scan all receivable channels, select Initial Setup. This also enhances the black...
... front panel or select Off to disable it. Home Menu Scrolling Adjust the navigation speed through menu items. Standard Select to scroll quickly with the On option. Press other buttons to disable this Lock feature and allow picture adjustments, select Unlock. Light Sensor Enables the automatic picture (screen) brightness control. Picture Adjustments Select Lock to prevent the picture adjustments from standby mode. • PC Power Management is set to scan all receivable channels, select Initial Setup. This also enhances the black...
Operating Instructions
Page 54
... connected using HDMI input with Super Audio CD or DVD-Audio, DIGITAL AUDIO OUT (Optical) may not provide an audio signal. • When tuned to use an undamaged antenna cable. Noisy picture • Make sure that "Muting" disappears from other connecting cords. • To avoid TV interference, make sure to a digital channel with Alternate Audio, the broadcaster may be viewed by selecting the Review option. Press OPTIONS, highlight and select Alternate Audio, and change in the Picture settings...
... connected using HDMI input with Super Audio CD or DVD-Audio, DIGITAL AUDIO OUT (Optical) may not provide an audio signal. • When tuned to use an undamaged antenna cable. Noisy picture • Make sure that "Muting" disappears from other connecting cords. • To avoid TV interference, make sure to a digital channel with Alternate Audio, the broadcaster may be viewed by selecting the Review option. Press OPTIONS, highlight and select Alternate Audio, and change in the Picture settings...
Operating Instructions
Page 57
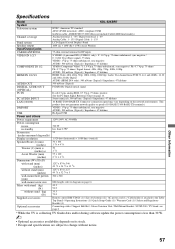
...Television system Channel coverage Panel system Speaker output Input/Output jacks CABLE/ANTENNA VIDEO IN 1/2/3 COMPONENT IN 1/2 HDMI IN 1/2/3/4 AUDIO OUT DIGITAL AUDIO OUT (OPTICAL) PC IN PC AUDIO INPUT LAN (10/100) DMPORT USB Power and others Power requirement Power consumption in use in standby Screen size (inches measured diagonally) Display resolution Speaker/Front (2) (mm) (inches) Tweater (2) (mm) ø (inches) ø Assist Woofer (mm) (inches) Dimensions (W x H x D) with stand (mm) (inches) without stand (mm) (inches) wall-mount hole pattern (mm) wall-mount screw size Mass with stand...
...Television system Channel coverage Panel system Speaker output Input/Output jacks CABLE/ANTENNA VIDEO IN 1/2/3 COMPONENT IN 1/2 HDMI IN 1/2/3/4 AUDIO OUT DIGITAL AUDIO OUT (OPTICAL) PC IN PC AUDIO INPUT LAN (10/100) DMPORT USB Power and others Power requirement Power consumption in use in standby Screen size (inches measured diagonally) Display resolution Speaker/Front (2) (mm) (inches) Tweater (2) (mm) ø (inches) ø Assist Woofer (mm) (inches) Dimensions (W x H x D) with stand (mm) (inches) without stand (mm) (inches) wall-mount hole pattern (mm) wall-mount screw size Mass with stand...
Operating Instructions
Page 58
... RETURN button 20 S S VIDEO jack 11 Screen Position 45 Server Diagnostics 51 Settings Channel 46 Clock/Timers 40 Closed Captions (CC) 47 External Inputs 50 General Setup 51 HDMI Settings 50 Initial Setup 52 Network 51 Parental Lock 47 Picture 41 Product Support 40 Screen 44 Sound 43 Sharpness 41 Show/Hide Channels 46 Show/Hide Servers 51 Signal Diagnostics 40 Signal Type 46 Sleep Timer 40 Software Update 40 Sound Adjustments 32, 43 Sound Booster 43 SOUND button 19 Sound Mode 43 Speaker 24 Speakers 32, 44 STANDBY LED 24...
... RETURN button 20 S S VIDEO jack 11 Screen Position 45 Server Diagnostics 51 Settings Channel 46 Clock/Timers 40 Closed Captions (CC) 47 External Inputs 50 General Setup 51 HDMI Settings 50 Initial Setup 52 Network 51 Parental Lock 47 Picture 41 Product Support 40 Screen 44 Sound 43 Sharpness 41 Show/Hide Channels 46 Show/Hide Servers 51 Signal Diagnostics 40 Signal Type 46 Sleep Timer 40 Software Update 40 Sound Adjustments 32, 43 Sound Booster 43 SOUND button 19 Sound Mode 43 Speaker 24 Speakers 32, 44 STANDBY LED 24...


