Operating Instructions
Page 2
..., for help. If you call upon your cable service provider. s For details concerning safety precautions, see "Important Safety Instructions" on 120 - 240 V AC. In this device must accept any interference received, including interference that face the screen with the limits for installing the specified TV. CAUTION Use the following two conditions: (1) This device may cause undesired operation. KDL-40XBR4/5 KDL-46XBR4/5 KDL-52XBR4/5 Sony Wall-Mount Bracket Mode No...
..., for help. If you call upon your cable service provider. s For details concerning safety precautions, see "Important Safety Instructions" on 120 - 240 V AC. In this device must accept any interference received, including interference that face the screen with the limits for installing the specified TV. CAUTION Use the following two conditions: (1) This device may cause undesired operation. KDL-40XBR4/5 KDL-46XBR4/5 KDL-52XBR4/5 Sony Wall-Mount Bracket Mode No...
Operating Instructions
Page 3
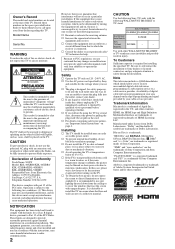
...the Menus Adjusting TV Settings 32 Watching TV 32 Accessing the Equipment Connected to Your TV 32 Navigating through TV Home Menu on XMB 33 TV Setting Description 34 Product Support 34 Clock/Timers Settings 34 Picture Settings 34 Sound Settings 36 Screen Settings 37 Video Options Settings 39 Audio Options Settings 40 Channel Settings 40 CC Closed Captions (CC) Settings 41 Parental Lock Settings 42 External Inputs Settings 44 HDMI Settings 44 General Settings 44 Initial Setup 45 Other Information Cleaning 46 Troubleshooting 46 Specifications 49 Index 51 Quick Setup Guide...
...the Menus Adjusting TV Settings 32 Watching TV 32 Accessing the Equipment Connected to Your TV 32 Navigating through TV Home Menu on XMB 33 TV Setting Description 34 Product Support 34 Clock/Timers Settings 34 Picture Settings 34 Sound Settings 36 Screen Settings 37 Video Options Settings 39 Audio Options Settings 40 Channel Settings 40 CC Closed Captions (CC) Settings 41 Parental Lock Settings 42 External Inputs Settings 44 HDMI Settings 44 General Settings 44 Initial Setup 45 Other Information Cleaning 46 Troubleshooting 46 Specifications 49 Index 51 Quick Setup Guide...
Operating Instructions
Page 4
... the outlet changed. The core lines may result in accordance with the apparatus. s Use only an original Sony AC power cord, not other . Do not use the supplied AC power cord on any equipment emitting electromagnetic radiation. 4 To disconnect the TV set is switched off. Picture distortion and/or noisy sound may cause arcing and result in . A polarized plug has two blades with the power cord plugged in a fire...
... the outlet changed. The core lines may result in accordance with the apparatus. s Use only an original Sony AC power cord, not other . Do not use the supplied AC power cord on any equipment emitting electromagnetic radiation. 4 To disconnect the TV set is switched off. Picture distortion and/or noisy sound may cause arcing and result in . A polarized plug has two blades with the power cord plugged in a fire...

Operating Instructions
Page 5
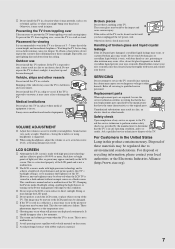
... the AC power plug Unplug the AC power plug and clean it may be located in contact with such power lines or circuits. To remove dust from the screen, wipe it firmly from the bottom. Place your local laws or regulations. SOUND If a snapping or popping sound from the speaker. KDL-40XBR4/ KDL-46XBR4/ KDL-40XBR5/ KDL-46XBR5 KDL-52XBR4/ KDL-52XBR5 Electric service equipment NEC: National Electrical Code Antenna discharge...
... the AC power plug Unplug the AC power plug and clean it may be located in contact with such power lines or circuits. To remove dust from the screen, wipe it firmly from the bottom. Place your local laws or regulations. SOUND If a snapping or popping sound from the speaker. KDL-40XBR4/ KDL-46XBR4/ KDL-40XBR5/ KDL-46XBR5 KDL-52XBR4/ KDL-52XBR5 Electric service equipment NEC: National Electrical Code Antenna discharge...
Operating Instructions
Page 7
... TV in writing that he/she has used in a cold place, a smear may occur in use Do not install this condition. This is a structural property of broken glass and liquid crystal leakage If the LCD panel gets damaged, crystalline liquid leakage may occur, or scattered broken glass may damage the LCD panel. Changing the Picture mode, Backlight setting, enabling the Light Sensor, or turning on...
... TV in writing that he/she has used in a cold place, a smear may occur in use Do not install this condition. This is a structural property of broken glass and liquid crystal leakage If the LCD panel gets damaged, crystalline liquid leakage may occur, or scattered broken glass may damage the LCD panel. Changing the Picture mode, Backlight setting, enabling the Light Sensor, or turning on...
Operating Instructions
Page 10
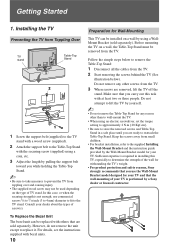
... screws from small children. • For bracket installation, refer to the supplied Installing the Wall-Mount Bracket and the instruction guide provided by the Wall-Mount Bracket model for your TV and that you while holding the Table-Top Stand. ~ • Be sure to take measures to prevent the TV from Toppling Over TV stand Table-Top Stand 2 3 1 1 Screw the support belt (supplied) to the TV stand with a wood screw (supplied). 2 Attach the support belt to wall-mount the TV. • When using a WallMount Bracket...
... screws from small children. • For bracket installation, refer to the supplied Installing the Wall-Mount Bracket and the instruction guide provided by the Wall-Mount Bracket model for your TV and that you while holding the Table-Top Stand. ~ • Be sure to take measures to prevent the TV from Toppling Over TV stand Table-Top Stand 2 3 1 1 Screw the support belt (supplied) to the TV stand with a wood screw (supplied). 2 Attach the support belt to wall-mount the TV. • When using a WallMount Bracket...
Operating Instructions
Page 11
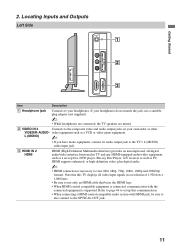
... a set up this communication. • When connecting a HDMI control compatible audio system with the connected equipment is necessary to view 480i, 480p, 720p, 1080i, 1080p and 1080/24p formats. HDMI supports enhanced, or high-definition video, plus digital audio. ~ • HDMI connection is supported. L (MONO) ~ • If you have mono equipment, connect its audio output jack to the TV's L (MONO) audio input jack. 3 HDMI IN 2 HDMI HDMI (High-Definition Multimedia Interface) provides an uncompressed, all video input signals in a resolution...
... a set up this communication. • When connecting a HDMI control compatible audio system with the connected equipment is necessary to view 480i, 480p, 720p, 1080i, 1080p and 1080/24p formats. HDMI supports enhanced, or high-definition video, plus digital audio. ~ • HDMI connection is supported. L (MONO) ~ • If you have mono equipment, connect its audio output jack to the TV's L (MONO) audio input jack. 3 HDMI IN 2 HDMI HDMI (High-Definition Multimedia Interface) provides an uncompressed, all video input signals in a resolution...
Operating Instructions
Page 13
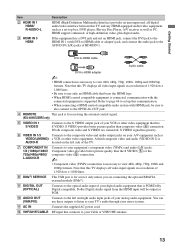
... OPTICAL OUT jack. 4 REMOTE This jack is AUDIO-R located on your equipment's component video (YPBPR) and audio (L/R) jacks. qa AC IN Connects the supplied AC power cord. HDMI supports enhanced, or high-definition video, plus digital audio. Component video provides better picture quality than composite video (6) connection. This USB port is for receiving the external control signal. (KDL-40/46/52XBR5 only) 5 VIDEO IN 1 S VIDEO Connects to view 480i, 480p, 720p, 1080i, 1080p and 1080/24p formats. qs VHF/UHF/CABLE RF input that this TV...
... OPTICAL OUT jack. 4 REMOTE This jack is AUDIO-R located on your equipment's component video (YPBPR) and audio (L/R) jacks. qa AC IN Connects the supplied AC power cord. HDMI supports enhanced, or high-definition video, plus digital audio. Component video provides better picture quality than composite video (6) connection. This USB port is for receiving the external control signal. (KDL-40/46/52XBR5 only) 5 VIDEO IN 1 S VIDEO Connects to view 480i, 480p, 720p, 1080i, 1080p and 1080/24p formats. qs VHF/UHF/CABLE RF input that this TV...
Operating Instructions
Page 18
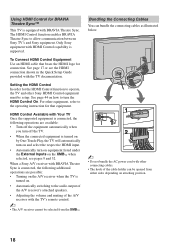
... respective HDMI input. • Automatically turn the HDMI Control On. To Connect HDMI Control Equipment Use an HDMI cable that equipment. Setting the HDMI Control In order for the HDMI Control function to operate, the TV and other equipment, refer to turn on equipment listed under the External Inputs on the XMB™ when selected, see the HDMI connection shown in the Quick Setup Guide provided with other connecting cables. • The hook of the A/V receiver with BRAVIA Theatre Sync. When a Sony A/V receiver with BRAVIA...
... respective HDMI input. • Automatically turn the HDMI Control On. To Connect HDMI Control Equipment Use an HDMI cable that equipment. Setting the HDMI Control In order for the HDMI Control function to operate, the TV and other equipment, refer to turn on equipment listed under the External Inputs on the XMB™ when selected, see the HDMI connection shown in the Quick Setup Guide provided with other connecting cables. • The hook of the A/V receiver with BRAVIA Theatre Sync. When a Sony A/V receiver with BRAVIA...
Operating Instructions
Page 19
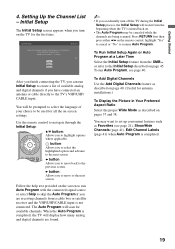
... are receiving channels from a cable box or satellite receiver and the VHF/UHF/CABLE input is completed. 19 b button: Allows you to move back to on the screen to run Auto Program with the connected signal source or select Skip to the next screen. Follow the help text provided on screen display as well as default audio for antenna installations.) To Display the Picture in Your Preferred Aspect Ratio Select the proper Wide Mode as...
... are receiving channels from a cable box or satellite receiver and the VHF/UHF/CABLE input is completed. 19 b button: Allows you to move back to on the screen to run Auto Program with the connected signal source or select Skip to the next screen. Follow the help text provided on screen display as well as default audio for antenna installations.) To Display the Picture in Your Preferred Aspect Ratio Select the proper Wide Mode as...

Operating Instructions
Page 22
... advance forward a set period of your TV (see "Using ql Buttons Other Equipment with Your Remote Control" on BD (Blu-ray Disc), DVD or STB or STB, these buttons operate the video equipment you want the TV to the audio output of the attached speakers of time. qj TOP MENU qk qk BD/DVD Press to mute the sound. To cancel Sleep Timer, press SLEEP repeatedly until the TV displays the time in fast...
... advance forward a set period of your TV (see "Using ql Buttons Other Equipment with Your Remote Control" on BD (Blu-ray Disc), DVD or STB or STB, these buttons operate the video equipment you want the TV to the audio output of the attached speakers of time. qj TOP MENU qk qk BD/DVD Press to mute the sound. To cancel Sleep Timer, press SLEEP repeatedly until the TV displays the time in fast...
Operating Instructions
Page 24
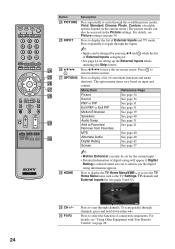
... can also be accessed in the Picture settings. Product Support Clock/Timers wl CH +/- Press to display the TV Home Menu/XMB™ to select the function of connected components. e; Press to access the TV Home Menu items such as the TV Settings, TV channels and External Inputs list (see "Using Other Equipment with Your Remote Control" on setting up the External Inputs labels, including the Skip feature. F1/F2 Sound Screen Video Options TV Press to scan through channels, press and...
... can also be accessed in the Picture settings. Product Support Clock/Timers wl CH +/- Press to display the TV Home Menu/XMB™ to select the function of connected components. e; Press to access the TV Home Menu items such as the TV Settings, TV channels and External Inputs list (see "Using Other Equipment with Your Remote Control" on setting up the External Inputs labels, including the Skip feature. F1/F2 Sound Screen Video Options TV Press to scan through channels, press and...

Operating Instructions
Page 31
... input signal and TV channels. ~ • The VHF/UHF/CABLE input must be displayed for Component 1/2 in the sub window in PIP mode, press OPTIONS, then press V/v to highlight Audio Swap. • 1080p signal cannot be connected to use the PIP feature. • For the PIP feature, Closed Caption (CC) is required to view two pictures simultaneously. P&P Availability In main window In sub window Video 1/2/3 Component 1/2 HDMI IN 1/2/3 (except PC timing) TV Channel (VHF/UHF/ CABLE IN) Video 1/2/3 Component 1/2 PIP...
... input signal and TV channels. ~ • The VHF/UHF/CABLE input must be displayed for Component 1/2 in the sub window in PIP mode, press OPTIONS, then press V/v to highlight Audio Swap. • 1080p signal cannot be connected to use the PIP feature. • For the PIP feature, Closed Caption (CC) is required to view two pictures simultaneously. P&P Availability In main window In sub window Video 1/2/3 Component 1/2 HDMI IN 1/2/3 (except PC timing) TV Channel (VHF/UHF/ CABLE IN) Video 1/2/3 Component 1/2 PIP...
Operating Instructions
Page 33
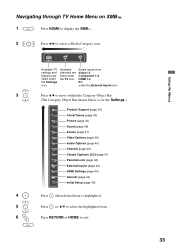
... Category Object Bar shown below is for the Settings.) Product Support (page 34) Clock/Timers (page 34) Picture (page 34) Sound (page 36) Screen (page 37) Video Options (page 39) Audio Options (page 40) Channel (page 40) CC Closed Captions (CC) (page 41) Parental Lock (page 42) External Inputs (page 44) HDMI Settings (page 44) General (page 44) Initial Setup (page 45) 4 Press when desired item is highlighted...
... Category Object Bar shown below is for the Settings.) Product Support (page 34) Clock/Timers (page 34) Picture (page 34) Sound (page 36) Screen (page 37) Video Options (page 39) Audio Options (page 40) Channel (page 40) CC Closed Captions (CC) (page 41) Parental Lock (page 42) External Inputs (page 44) HDMI Settings (page 44) General (page 44) Initial Setup (page 45) 4 Press when desired item is highlighted...
Operating Instructions
Page 34
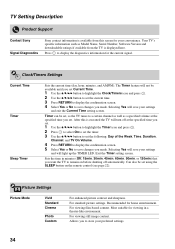
... Current Time setting screen. Recommended for the current signal. Allows you set using the SLEEP button on before shutting off at the specified time you to display the diagnostics information for home entertainment. For viewing film-based content. Exit the Timer setting screen. Can also be set, so the TV tunes to a certain channel as well as Model Name, Serial Number, Software Version and downloadable ratings if available from this is displayed here. For viewing...
... Current Time setting screen. Recommended for the current signal. Allows you set using the SLEEP button on before shutting off at the specified time you to display the diagnostics information for home entertainment. For viewing film-based content. Exit the Timer setting screen. Can also be set, so the TV tunes to a certain channel as well as Model Name, Serial Number, Software Version and downloadable ratings if available from this is displayed here. For viewing...

Operating Instructions
Page 39
... pictures that supports Video-A mode. Video-A Sets suitable image quality, depending on signal. Selects the option to On for standard use . Video Produces suitable image quality for film-based content. Auto Automatically optimize based on the input source, video data or photograph data when directly connecting Sony HDMI outputcapable equipment that is unnatural. 39 Select Auto 1 or Auto 2 to reduce blur. Using the Menus Video Options Settings Motion Enhancer CineMotion Game/Text Mode Video/Photo Optimizer Video Color...
... pictures that supports Video-A mode. Video-A Sets suitable image quality, depending on signal. Selects the option to On for standard use . Video Produces suitable image quality for film-based content. Auto Automatically optimize based on the input source, video data or photograph data when directly connecting Sony HDMI outputcapable equipment that is unnatural. 39 Select Auto 1 or Auto 2 to reduce blur. Using the Menus Video Options Settings Motion Enhancer CineMotion Game/Text Mode Video/Photo Optimizer Video Color...
Operating Instructions
Page 40
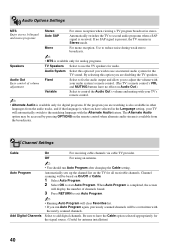
... screen will display the number of channels found. 3 Press RETURN to start Auto Program. Audio Out Easy control of Cable. 1 Select Auto Program. 2 Select OK to exit Auto Program. ~ • Running Auto Program will be overwritten with the Alternate Audio feature. Automatically sets up the channel list on the TV for antenna installation) 40 The Alternate Audio option may be based on the remote control when alternate audio stream is received. Be sure to second audio programs when a SAP signal is...
... screen will display the number of channels found. 3 Press RETURN to start Auto Program. Audio Out Easy control of Cable. 1 Select Auto Program. 2 Select OK to exit Auto Program. ~ • Running Auto Program will be overwritten with the Alternate Audio feature. Automatically sets up the channel list on the TV for antenna installation) 40 The Alternate Audio option may be based on the remote control when alternate audio stream is received. Be sure to second audio programs when a SAP signal is...
Operating Instructions
Page 42
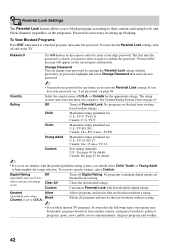
... the password. Password Use 0-9 buttons on page 43. Rating Off Turns off Digital Rating. If you lose your password for details. ~ • If you are broadcast without a rating. • If you block unrated TV programs, be aware that the following types of programs may be blocked: programs broadcast from viewing based on page 48. See Custom Rating System Chart on the remote control to enter a four-digit password...
... the password. Password Use 0-9 buttons on page 43. Rating Off Turns off Digital Rating. If you lose your password for details. ~ • If you are broadcast without a rating. • If you block unrated TV programs, be aware that the following types of programs may be blocked: programs broadcast from viewing based on page 48. See Custom Rating System Chart on the remote control to enter a four-digit password...
Operating Instructions
Page 47
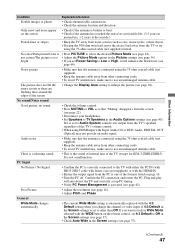
...; Check antenna/cable connections. • Check the antenna location and direction. Only snow and noise appear on page 16. • Turn the PC off. PC Input No Picture / No Signal • Confirm the PC is set up PC timing. • Verify PC Power Management is the sound of internal fans of the TV's volume control. • When using HDMI input with the HDMI IN. • Ensure the output signal from other connecting cords. •...
...; Check antenna/cable connections. • Check the antenna location and direction. Only snow and noise appear on page 16. • Turn the PC off. PC Input No Picture / No Signal • Confirm the PC is set up PC timing. • Verify PC Power Management is the sound of internal fans of the TV's volume control. • When using HDMI input with the HDMI IN. • Ensure the output signal from other connecting cords. •...
Operating Instructions
Page 51
.../TIMER LED 25 Picture 35 Settings Audio Options 40 Channel 40 Clock/Timers 34 Closed Captions (CC) 41 External Inputs 44 General 44 HDMI Settings 44 Initial Setup 45 Parental Lock 42 Picture 34 Product Support 34 Screen 37 Sound 36 Video Options 39 Sharpness 35 Show/Hide Channels 41 Signal Diagnostics 34 SLEEP button 22 Sleep Timer 34 Sound Booster 37 SOUND button 21 Sound Mode 36 Speaker 25 Speakers 40 STANDBY LED 25 Steady Sound 37 Surround 36 T THEATER button 22 Timer 34 Treble 36 Troubleshooting 46-48 TV Auto Power...
.../TIMER LED 25 Picture 35 Settings Audio Options 40 Channel 40 Clock/Timers 34 Closed Captions (CC) 41 External Inputs 44 General 44 HDMI Settings 44 Initial Setup 45 Parental Lock 42 Picture 34 Product Support 34 Screen 37 Sound 36 Video Options 39 Sharpness 35 Show/Hide Channels 41 Signal Diagnostics 34 SLEEP button 22 Sleep Timer 34 Sound Booster 37 SOUND button 21 Sound Mode 36 Speaker 25 Speakers 40 STANDBY LED 25 Steady Sound 37 Surround 36 T THEATER button 22 Timer 34 Treble 36 Troubleshooting 46-48 TV Auto Power...


