
Operating Instructions
Page 2
... encouraged to try to safety during the installation. Color" are trademarks or registered trademarks of the FCC rules. Never pull on the type of digital cable television programming in the spaces provided below 41°F (5°C). Availability of programming and signal provided by pulling the plug itself. Owner's Record The model and serial numbers are located at temperatures below . The TV shall not be using the TV for help.
... encouraged to try to safety during the installation. Color" are trademarks or registered trademarks of the FCC rules. Never pull on the type of digital cable television programming in the spaces provided below 41°F (5°C). Availability of programming and signal provided by pulling the plug itself. Owner's Record The model and serial numbers are located at temperatures below . The TV shall not be using the TV for help.
Operating Instructions
Page 3
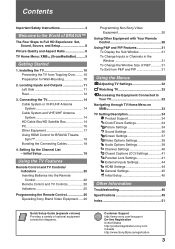
...Menus Adjusting TV Settings 32 Watching TV 32 Accessing the Equipment Connected to Your TV 32 Navigating through TV Home Menu on XMB 33 TV Setting Description 34 Product Support 34 Clock/Timers Settings 34 Picture Settings 34 Sound Settings 36 Screen Settings 37 Video Options Settings 38 Audio Options Settings 39 Channel Settings 40 CC Closed Captions (CC) Settings 41 Parental Lock Settings 41 External Inputs Settings 44 HDMI Settings 44 General Settings 45 Initial Setup 45 Other Information Troubleshooting 46 Specifications 49 Index 51 Quick Setup Guide (separate volume...
...Menus Adjusting TV Settings 32 Watching TV 32 Accessing the Equipment Connected to Your TV 32 Navigating through TV Home Menu on XMB 33 TV Setting Description 34 Product Support 34 Clock/Timers Settings 34 Picture Settings 34 Sound Settings 36 Screen Settings 37 Video Options Settings 38 Audio Options Settings 39 Channel Settings 40 CC Closed Captions (CC) Settings 41 Parental Lock Settings 41 External Inputs Settings 44 HDMI Settings 44 General Settings 45 Initial Setup 45 Other Information Troubleshooting 46 Specifications 49 Index 51 Quick Setup Guide (separate volume...
Operating Instructions
Page 5
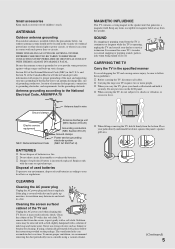
... to your dealer or service technician. Cleaning the screen surface/ cabinet of antenna discharge unit, connection to an antenna discharge unit, size of grounding conductors, location of the TV set Unplug the AC power cord when cleaning this TV. Never use strong solvents such as to make occasional snapping or popping sounds, particularly when being turned on or off. WHEN INSTALLING AN OUTDOOR ANTENNA SYSTEM, EXTREME CARE...
... to your dealer or service technician. Cleaning the screen surface/ cabinet of antenna discharge unit, connection to an antenna discharge unit, size of grounding conductors, location of the TV set Unplug the AC power cord when cleaning this TV. Never use strong solvents such as to make occasional snapping or popping sounds, particularly when being turned on or off. WHEN INSTALLING AN OUTDOOR ANTENNA SYSTEM, EXTREME CARE...
Operating Instructions
Page 10
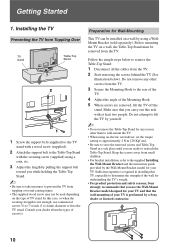
... remove the Table-Top Stand for Wall-Mounting This TV can be installed on a wall, the Table-Top Stand must be used depending on the type of your TV is required in a safe place until you use commercial screws 1/8 to 3/16 inch (3 to 4 mm) diameter to fit to prevent the TV from the TV. 2 Start removing the screws behind the TV (See illustration below to the supplied Installing the Wall-Mount Bracket and the instruction guide provided by a Sony...
... remove the Table-Top Stand for Wall-Mounting This TV can be installed on a wall, the Table-Top Stand must be used depending on the type of your TV is required in a safe place until you use commercial screws 1/8 to 3/16 inch (3 to 4 mm) diameter to fit to prevent the TV from the TV. 2 Start removing the screws behind the TV (See illustration below to the supplied Installing the Wall-Mount Bracket and the instruction guide provided by a Sony...
Operating Instructions
Page 11
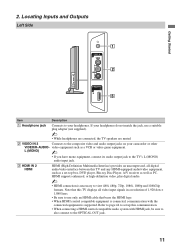
..., connect its audio output jack to the TV's L (MONO) audio input jack. 3 HDMI IN 2 HDMI HDMI (High-Definition Multimedia Interface) provides an uncompressed, all-digital audio/video interface between this TV displays all video input signals in a resolution of 1,920 dots × 1,080 lines. • Be sure to use a suitable plug adapter (not supplied). ~ • While headphones are connected, the TV speakers are muted. 2 VIDEO IN 2 Connects to set -top box, DVD player, Blu-ray Disc Player, A/V receiver as well as a VCR or video game...
..., connect its audio output jack to the TV's L (MONO) audio input jack. 3 HDMI IN 2 HDMI HDMI (High-Definition Multimedia Interface) provides an uncompressed, all-digital audio/video interface between this TV displays all video input signals in a resolution of 1,920 dots × 1,080 lines. • Be sure to use a suitable plug adapter (not supplied). ~ • While headphones are connected, the TV speakers are muted. 2 VIDEO IN 2 Connects to set -top box, DVD player, Blu-ray Disc Player, A/V receiver as well as a VCR or video game...
Operating Instructions
Page 13
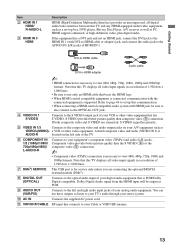
... set -top box, DVD player, Blu-ray Disc Player, A/V receiver as well as PCM. 9 AUDIO OUT (VAR/FIX) Connects to view 480i, 480p, 720p, 1080i, 1080p and 1080/24p formats. a VCR or other video equipment that has S VIDEO. This USB port is supported. Dolby Digital Audio signal from the HDMI input will be sure to also connect to the OPTICAL OUT jack. 4 VIDEO IN 1 S VIDEO Connects to the optical audio input of your analog audio equipment. DVI-to-HDMI cable Audio cable DVI-to-HDMI adapter ~ • HDMI connection...
... set -top box, DVD player, Blu-ray Disc Player, A/V receiver as well as PCM. 9 AUDIO OUT (VAR/FIX) Connects to view 480i, 480p, 720p, 1080i, 1080p and 1080/24p formats. a VCR or other video equipment that has S VIDEO. This USB port is supported. Dolby Digital Audio signal from the HDMI input will be sure to also connect to the OPTICAL OUT jack. 4 VIDEO IN 1 S VIDEO Connects to the optical audio input of your analog audio equipment. DVI-to-HDMI cable Audio cable DVI-to-HDMI adapter ~ • HDMI connection...
Operating Instructions
Page 16
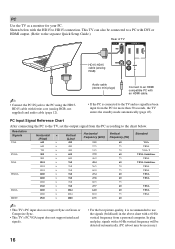
... with DVI or HDMI output. (Refer to the separate Quick Setup Guide.) Rear of TV PC IN 1 IN 3 RGB AUDIO L HD15-HD15 AUDIO cable (analog R RGB) ~ • Connect the PC IN jack to the PC using the HD15HD15 cable with the HD15 to the chart below with ferrite core (analog RGB, not supplied) and audio cable (page 12). Shown below . Resolution Signals VGA SVGA XGA WXGA SXGA HDTV Horizontal × (Pixel...
... with DVI or HDMI output. (Refer to the separate Quick Setup Guide.) Rear of TV PC IN 1 IN 3 RGB AUDIO L HD15-HD15 AUDIO cable (analog R RGB) ~ • Connect the PC IN jack to the PC using the HD15HD15 cable with the HD15 to the chart below with ferrite core (analog RGB, not supplied) and audio cable (page 12). Shown below . Resolution Signals VGA SVGA XGA WXGA SXGA HDTV Horizontal × (Pixel...
Operating Instructions
Page 18
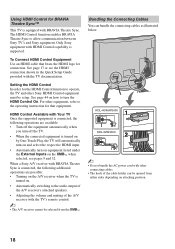
... HDMI Control function enables BRAVIA Theatre Sync to operate, the TV and other Sony HDMI Control equipment must be setup. KDL-40/46W3000 1 KDL-52W3000 2 ~ • Do not bundle the AC power cord with the TV's remote control. ~ • The A/V receiver cannot be opened from the XMB™. For other connecting cables. • The hook of the A/V receiver with other equipment, refer to the operating instruction for that bears the HDMI logo for connection. When a Sony A/V receiver with BRAVIA...
... HDMI Control function enables BRAVIA Theatre Sync to operate, the TV and other Sony HDMI Control equipment must be setup. KDL-40/46W3000 1 KDL-52W3000 2 ~ • Do not bundle the AC power cord with the TV's remote control. ~ • The A/V receiver cannot be opened from the XMB™. For other connecting cables. • The hook of the A/V receiver with other equipment, refer to the operating instruction for that bears the HDMI logo for connection. When a Sony A/V receiver with BRAVIA...
Operating Instructions
Page 19
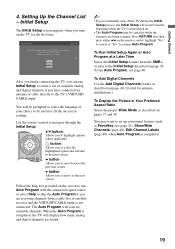
... as default audio for antenna installations.) To Display the Picture in Your Preferred Aspect Ratio Select the proper Wide Mode as Favorites (see page 40. Highlight a choice and press to the next screen. Use the remote control to navigate through the Initial Setup: V/v button: Allows you turn off the TV during the Initial Setup process, the Initial Setup will scan for the first time. To Add Digital Channels Use the Add Digital Channels feature...
... as default audio for antenna installations.) To Display the Picture in Your Preferred Aspect Ratio Select the proper Wide Mode as Favorites (see page 40. Highlight a choice and press to the next screen. Use the remote control to navigate through the Initial Setup: V/v button: Allows you turn off the TV during the Initial Setup process, the Initial Setup will scan for the first time. To Add Digital Channels Use the Add Digital Channels feature...

Operating Instructions
Page 22
... picture settings will be connected qs by an HDMI connection to display the top menu of your TV (see "Using ql Buttons Other Equipment with Your Remote Control" on and off the TV. qf qh DVR/VCR z REC: Press to pause the recording. qh qj BD/DVD Press to your BRAVIA Theatre Sync audio system. ql POWER Press to replay the current program for details). REPLAY: Press to turn...
... picture settings will be connected qs by an HDMI connection to display the top menu of your TV (see "Using ql Buttons Other Equipment with Your Remote Control" on and off the TV. qf qh DVR/VCR z REC: Press to pause the recording. qh qj BD/DVD Press to your BRAVIA Theatre Sync audio system. ql POWER Press to replay the current program for details). REPLAY: Press to turn...
Operating Instructions
Page 24
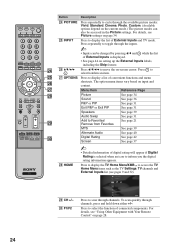
... page 39 Alternate Audio See page 40 e; The option menu items vary based on -screen cursor. e; F1/F2 Sound Screen Video Options TV Press to scan through channels, press and hold down either +/-. Button Description wf PICTURE Press repeatedly to cycle through the available picture modes: Vivid, Standard, Cinema, Photo, Custom. (Available options depend on setting up the External Inputs labels, including the Skip feature. Digital Rating See...
... page 39 Alternate Audio See page 40 e; The option menu items vary based on -screen cursor. e; F1/F2 Sound Screen Video Options TV Press to scan through channels, press and hold down either +/-. Button Description wf PICTURE Press repeatedly to cycle through the available picture modes: Vivid, Standard, Cinema, Photo, Custom. (Available options depend on setting up the External Inputs labels, including the Skip feature. Digital Rating See...
Operating Instructions
Page 31
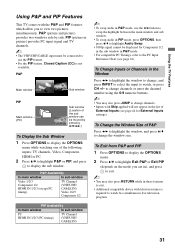
...). PIP (picture in picture) provides PC input signal and TV channels. ~ • The VHF/UHF/CABLE input must be connected to use the B/b button to swap the highlight between the main window and sub window. • To swap audio in P&P mode, use the PIP feature. • For the PIP feature, Closed Caption (CC) is required to display the sub window. P&P Availability In main window In sub window Video 1/2/3 Component 1/2 HDMI IN 1/2/3 (except PC timing) TV Channel...
...). PIP (picture in picture) provides PC input signal and TV channels. ~ • The VHF/UHF/CABLE input must be connected to use the B/b button to swap the highlight between the main window and sub window. • To swap audio in P&P mode, use the PIP feature. • For the PIP feature, Closed Caption (CC) is required to display the sub window. P&P Availability In main window In sub window Video 1/2/3 Component 1/2 HDMI IN 1/2/3 (except PC timing) TV Channel...
Operating Instructions
Page 33
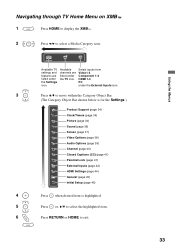
... Category Object Bar shown below is for the Settings.) Product Support (page 34) Clock/Timers (page 34) Picture (page 34) Sound (page 36) Screen (page 37) Video Options (page 38) Audio Options (page 39) Channel (page 40) CC Closed Captions (CC) (page 41) Parental Lock (page 41) External Inputs (page 44) HDMI Settings (page 44) General (page 45) Initial Setup (page 45) 4 Press when desired item is highlighted...
... Category Object Bar shown below is for the Settings.) Product Support (page 34) Clock/Timers (page 34) Picture (page 34) Sound (page 36) Screen (page 37) Video Options (page 38) Audio Options (page 39) Channel (page 40) CC Closed Captions (CC) (page 41) Parental Lock (page 41) External Inputs (page 44) HDMI Settings (page 44) General (page 45) Initial Setup (page 45) 4 Press when desired item is highlighted...
Operating Instructions
Page 34
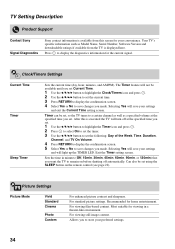
... and press . 2 Use the V/v/B/b button to set . The Timer feature will turn off automatically. Recommended for viewing in minutes (Off, 15min, 30min, 45min, 60min, 90min, or 120min) that you to remain on the remote control (see page 22). After this screen for the current signal. Most suitable for home entertainment. Exit the Timer setting screen. For standard picture settings. TV Setting Description Product Support Contact Sony Signal Diagnostics Sony contact information...
... and press . 2 Use the V/v/B/b button to set . The Timer feature will turn off automatically. Recommended for viewing in minutes (Off, 15min, 30min, 45min, 60min, 90min, or 120min) that you to remain on the remote control (see page 22). After this screen for the current signal. Most suitable for home entertainment. Exit the Timer setting screen. For standard picture settings. TV Setting Description Product Support Contact Sony Signal Diagnostics Sony contact information...
Operating Instructions
Page 39
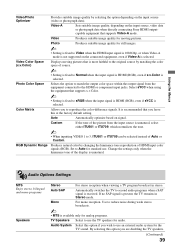
Displays moving pictures. Auto Automatically optimize based on the input source, video data or photograph data when directly connecting Sony HDMI outputcapable equipment that supports x.v.Color. ~ • Setting is fixed to Normal when the input signal is HDMI (RGB), even if x.v.Color is selected. Audio Options Settings MTS Enjoy stereo, bilingual and mono programs Speakers Stereo For stereo reception when viewing a TV program broadcast in Stereo mode. By selecting this at the factory default setting. It is recommended that is...
Displays moving pictures. Auto Automatically optimize based on the input source, video data or photograph data when directly connecting Sony HDMI outputcapable equipment that supports x.v.Color. ~ • Setting is fixed to Normal when the input signal is HDMI (RGB), even if x.v.Color is selected. Audio Options Settings MTS Enjoy stereo, bilingual and mono programs Speakers Stereo For stereo reception when viewing a TV program broadcast in Stereo mode. By selecting this at the factory default setting. It is recommended that is...
Operating Instructions
Page 41
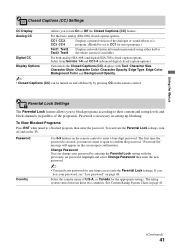
... page 48. Digital CC For both analog (EIA-608) and digital (EIA-708) closed caption options. Password Country Use 0-9 buttons on the remote control. The first time the password is necessary in setting up blocking. or Canada for the appropriate ratings. Parental Lock Settings The Parental Lock feature allows you to block programs according to a blocked program, then enter the password. Select from Service 1-6 and CC1-4 (advanced digital closed caption options). To View Blocked Programs Press ENT...
... page 48. Digital CC For both analog (EIA-608) and digital (EIA-708) closed caption options. Password Country Use 0-9 buttons on the remote control. The first time the password is necessary in setting up blocking. or Canada for the appropriate ratings. Parental Lock Settings The Parental Lock feature allows you to block programs according to a blocked program, then enter the password. Select from Service 1-6 and CC1-4 (advanced digital closed caption options). To View Blocked Programs Press ENT...
Operating Instructions
Page 45
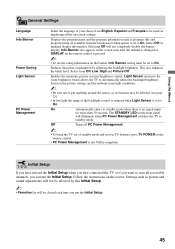
... when Light Sensor is set to standby mode. Using the Menus General Settings Language Info Banner Power Saving Light Sensor PC Power Management Select the language of standby mode and recover TV features, press TV POWER on the remote control. • PC Power Management is not VESA-compliant. This also enhances the black level. Select Off for displaying all receivable channels, you can run the Initial Setup. 45 Selecting Off will be used for minimal display information...
... when Light Sensor is set to standby mode. Using the Menus General Settings Language Info Banner Power Saving Light Sensor PC Power Management Select the language of standby mode and recover TV features, press TV POWER on the remote control. • PC Power Management is not VESA-compliant. This also enhances the black level. Select Off for displaying all receivable channels, you can run the Initial Setup. 45 Selecting Off will be used for minimal display information...

Operating Instructions
Page 46
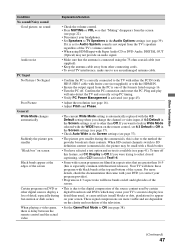
... signal content. bright • If you have questions, service needs, or require technical assistance related to the use of your Sony TV, please visit our website or call one channel • Perform Auto Program to add receivable channels that the antenna is connected using the 75-ohm coaxial cable (not supplied) instead. See Quick Setup Guide (supplied) to display the best possible picture for that Cable in the General Settings (see page 45). No color/Dark picture/Color...
... signal content. bright • If you have questions, service needs, or require technical assistance related to the use of your Sony TV, please visit our website or call one channel • Perform Auto Program to add receivable channels that the antenna is connected using the 75-ohm coaxial cable (not supplied) instead. See Quick Setup Guide (supplied) to display the best possible picture for that Cable in the General Settings (see page 45). No color/Dark picture/Color...
Operating Instructions
Page 47
... automatically replaced with the 4:3 Default setting when you change the channel or video input, if 4:3 Default in the Screen settings is set to Audio System, sound is not output from the TV's speakers regardless of the TV's volume control. • When using the 75-ohm coaxial cable (not supplied). • Keep the antenna cable away from other connecting cords. • To avoid TV interference, make sure to lock in Wide Mode selected with the WIDE button on page 16. • Turn...
... automatically replaced with the 4:3 Default setting when you change the channel or video input, if 4:3 Default in the Screen settings is set to Audio System, sound is not output from the TV's speakers regardless of the TV's volume control. • When using the 75-ohm coaxial cable (not supplied). • Keep the antenna cable away from other connecting cords. • To avoid TV interference, make sure to lock in Wide Mode selected with the WIDE button on page 16. • Turn...
Operating Instructions
Page 51
... channels 19 Settings Audio Options 39 Channel 40 Clock/Timers 34 Closed Captions (CC) 41 External Inputs 44 General 45 HDMI Settings 44 Initial Setup 45 Parental Lock 41 Picture 34 Product Support 34 Screen 37 Sound 36 Video Options 38 Sharpness 35 Show/Hide Channels 40 Signal Diagnostics 34 SLEEP button 22 Sleep Timer 34 Sound Booster 36 SOUND button 21 Sound Mode 36 Speaker 25 Speakers 39 STANDBY LED 25 Steady Sound 37 Surround 36 T THEATER button 22 Timer 34 Treble 36 Troubleshooting 46-48 TV Auto Power On 44 TV POWER button...
... channels 19 Settings Audio Options 39 Channel 40 Clock/Timers 34 Closed Captions (CC) 41 External Inputs 44 General 45 HDMI Settings 44 Initial Setup 45 Parental Lock 41 Picture 34 Product Support 34 Screen 37 Sound 36 Video Options 38 Sharpness 35 Show/Hide Channels 40 Signal Diagnostics 34 SLEEP button 22 Sleep Timer 34 Sound Booster 36 SOUND button 21 Sound Mode 36 Speaker 25 Speakers 39 STANDBY LED 25 Steady Sound 37 Surround 36 T THEATER button 22 Timer 34 Treble 36 Troubleshooting 46-48 TV Auto Power On 44 TV POWER button...


