Operating Instructions
Page 2
.... Declaration of the following WALL-MOUNT BRACKET or TV-stand. Pursuant to FCC regulations, you will not occur in a particular installation. s The plug is designed, for the voltage where you to receive unscrambled digital cable television programming via subscription service to operate this equipment. Never pull on page 4. Sony TV Model No. KDL-26S3000 KDL-32S3000 KDL-40S3000 KDL-32SL130 KDL-46S3000 KDL-40SL130 SU-WL100 SU-WL500 RHT-G800 - To Customers Sufficient expertise...
.... Declaration of the following WALL-MOUNT BRACKET or TV-stand. Pursuant to FCC regulations, you will not occur in a particular installation. s The plug is designed, for the voltage where you to receive unscrambled digital cable television programming via subscription service to operate this equipment. Never pull on page 4. Sony TV Model No. KDL-26S3000 KDL-32S3000 KDL-40S3000 KDL-32SL130 KDL-46S3000 KDL-40SL130 SU-WL100 SU-WL500 RHT-G800 - To Customers Sufficient expertise...
Operating Instructions
Page 3
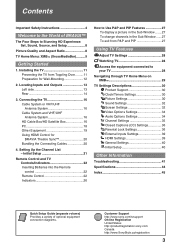
... PIP 27 Using TV Features Adjust TV Settings 28 Watching TV 28 Access the equipment connected to your TV 28 Navigating through TV Home Menu on XMB 29 TV Settings Descriptions 30 Product Support 30 Clock/Timers Settings 30 Picture Settings 30 Sound Settings 32 Screen Settings 32 Video Options Settings 34 Audio Options Settings 34 Channel Settings 35 CC Closed Captions (CC) Settings 36 Parental Lock Settings 36 External Inputs Settings 39 HDMI Settings 39 General Settings 40 Initial Setup 40 Other Information Troubleshooting 41 Specifications 44 Index 45 Quick Setup Guide...
... PIP 27 Using TV Features Adjust TV Settings 28 Watching TV 28 Access the equipment connected to your TV 28 Navigating through TV Home Menu on XMB 29 TV Settings Descriptions 30 Product Support 30 Clock/Timers Settings 30 Picture Settings 30 Sound Settings 32 Screen Settings 32 Video Options Settings 34 Audio Options Settings 34 Channel Settings 35 CC Closed Captions (CC) Settings 36 Parental Lock Settings 36 External Inputs Settings 39 HDMI Settings 39 General Settings 40 Initial Setup 40 Other Information Troubleshooting 41 Specifications 44 Index 45 Quick Setup Guide...
Operating Instructions
Page 4
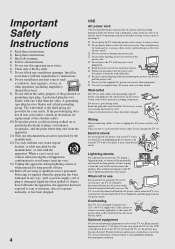
... been spilled or objects have the outlet changed. If you plug/unplug the AC power cord from the wall outlet first. To disconnect the TV set is used, use attachments/accessories specified by the manufacturer. 12) Use only with the cart, stand, tripod, bracket, or table specified by the manufacturer, or sold with a protective earthing connection. A polarized plug has two blades with a wet hand, it...
... been spilled or objects have the outlet changed. If you plug/unplug the AC power cord from the wall outlet first. To disconnect the TV set is used, use attachments/accessories specified by the manufacturer. 12) Use only with the cart, stand, tripod, bracket, or table specified by the manufacturer, or sold with a protective earthing connection. A polarized plug has two blades with a wet hand, it...
Operating Instructions
Page 5
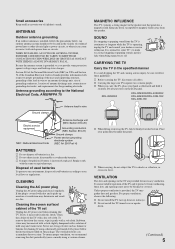
... water. Never use strong solvents such as to make occasional snapping or popping sounds, particularly when being turned on the LCD panel. Be sure the antenna system is provided, the TV may be located in the speaker unit that generates a magnetic field. s Carrying the large size TV requires two or more people. CLEANING Cleaning the AC power plug Unplug the AC power plug and clean...
... water. Never use strong solvents such as to make occasional snapping or popping sounds, particularly when being turned on the LCD panel. Be sure the antenna system is provided, the TV may be located in the speaker unit that generates a magnetic field. s Carrying the large size TV requires two or more people. CLEANING Cleaning the AC power plug Unplug the AC power plug and clean...

Operating Instructions
Page 7
... input source or a blank screen. Replacement parts When replacement parts are displayed continuously. Sound carries very easily at night. s Do not push or scratch the LCD screen, or place objects on the screen. s Avoid spraying insect repellent with high-precision technology and has effective pixels of 99.99% or more, black dots or bright points of light (red, blue, or green) may appear constantly on the Power...
... input source or a blank screen. Replacement parts When replacement parts are displayed continuously. Sound carries very easily at night. s Do not push or scratch the LCD screen, or place objects on the screen. s Avoid spraying insect repellent with high-precision technology and has effective pixels of 99.99% or more, black dots or bright points of light (red, blue, or green) may appear constantly on the Power...
Operating Instructions
Page 12
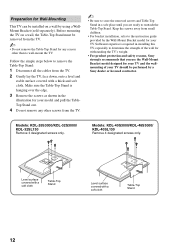
... bracket installation, refer to wall-mount the TV. Preparation for Wall-Mounting This TV can be installed on a wall, the Table-Top Stand must be removed from the TV. ~ • Do not remove the Table-Top Stand for any other screws from the TV. ~ • Be sure to store the removed screws and Table-Top Stand in a safe place until you use the Wall-Mount Bracket model designed for your TV and the wallmounting of the wall for withstanding the TV's weight...
... bracket installation, refer to wall-mount the TV. Preparation for Wall-Mounting This TV can be installed on a wall, the Table-Top Stand must be removed from the TV. ~ • Do not remove the Table-Top Stand for any other screws from the TV. ~ • Be sure to store the removed screws and Table-Top Stand in a safe place until you use the Wall-Mount Bracket model designed for your TV and the wallmounting of the wall for withstanding the TV's weight...
Operating Instructions
Page 15
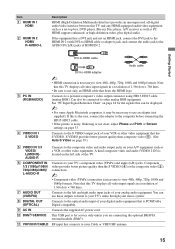
... adapter (not supplied). If this TV and any HDMI-equipped audio/video equipment, such as a set-top box, DVD player, Blu-ray Disc player, A/V receiver as well as a VCR or other analog RGB equipment. Connects to the left side of the TV. Note that connects to your TV's component video (YPBPR) and audio (L/R) jacks. Connects the supplied AC power cord. Getting Started Item 1 HDMI IN 1 HDMI 2 HDMI IN 2 HDMI/ R-AUDIO-L Description HDMI (High-Definition Multimedia Interface) provides an uncompressed, all video input signals...
... adapter (not supplied). If this TV and any HDMI-equipped audio/video equipment, such as a set-top box, DVD player, Blu-ray Disc player, A/V receiver as well as a VCR or other analog RGB equipment. Connects to the left side of the TV. Note that connects to your TV's component video (YPBPR) and audio (L/R) jacks. Connects the supplied AC power cord. Getting Started Item 1 HDMI IN 1 HDMI 2 HDMI IN 2 HDMI/ R-AUDIO-L Description HDMI (High-Definition Multimedia Interface) provides an uncompressed, all video input signals...

Operating Instructions
Page 18
... HDMI output. (Refer to the separate Quick Setup Guide.) Rear of TV 1 RGB S VIDEO Y PB 2 VIDEO PR DIGITAL OUT (OPTICAL) R AUDIO L AUDIO L (MONO) AUDIO R 1 3 IN PC IN VIDEO IN L AUDIO R 1 2 (VAR/FIX) COMPONENT IN AUDIO (1080p/1080i/720p/480p/480i) OUT HD15-HD15 cable (analog RGB) Audio cable (stereo mini plugs) ~ • Connect the PC IN jack to the PC using the HD15HD15 cable with the HD15 to the TV and no signal has been input from a personal computer. This TV...
... HDMI output. (Refer to the separate Quick Setup Guide.) Rear of TV 1 RGB S VIDEO Y PB 2 VIDEO PR DIGITAL OUT (OPTICAL) R AUDIO L AUDIO L (MONO) AUDIO R 1 3 IN PC IN VIDEO IN L AUDIO R 1 2 (VAR/FIX) COMPONENT IN AUDIO (1080p/1080i/720p/480p/480i) OUT HD15-HD15 cable (analog RGB) Audio cable (stereo mini plugs) ~ • Connect the PC IN jack to the PC using the HD15HD15 cable with the HD15 to the TV and no signal has been input from a personal computer. This TV...
Operating Instructions
Page 20
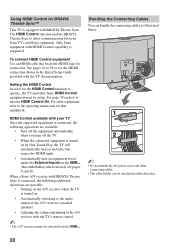
... with HDMI Control capability is supported. Using HDMI Control for BRAVIA Theatre Sync™ This TV is equipped with other equipment, refer to the operating instruction for that bears the HDMI logo for the HDMI Control function to operate, the TV and other Sony HDMI Control equipment must be setup. Setting the HDMI Control In order for connection. To connect HDMI Control equipment Use an HDMI cable that equipment. See page 39 on how to turn on equipment listed under the External Inputs...
... with HDMI Control capability is supported. Using HDMI Control for BRAVIA Theatre Sync™ This TV is equipped with other equipment, refer to the operating instruction for that bears the HDMI logo for the HDMI Control function to operate, the TV and other Sony HDMI Control equipment must be setup. Setting the HDMI Control In order for connection. To connect HDMI Control equipment Use an HDMI cable that equipment. See page 39 on how to turn on equipment listed under the External Inputs...

Operating Instructions
Page 21
... connected signal source or select Skip to be canceled while the channels are receiving channels from a cable box or satellite receiver and the VHF/UHF/CABLE input is not connected. Follow the help text provided on the TV for the first time. When the Auto Program is completed, the TV will apply to the TV's VHF/UHF/ CABLE input. Initial Setup The Initial Setup screen appears when you have connected an antenna or cable directly to on screen display...
... connected signal source or select Skip to be canceled while the channels are receiving channels from a cable box or satellite receiver and the VHF/UHF/CABLE input is not connected. Follow the help text provided on the TV for the first time. When the Auto Program is completed, the TV will apply to the TV's VHF/UHF/ CABLE input. Initial Setup The Initial Setup screen appears when you have connected an antenna or cable directly to on screen display...

Operating Instructions
Page 23
... Favorites list will deactivate the Freeze and display the XMB™. 5 • If Parental Lock settings are in use, only the frozen picture view is available and the audio is active, pressing HOME will be available in your dealer or www.sony.com/bravia for more information. Product Support Clock/Timers 8 DMex 9 0-9 ENT 0 Sound Screen Video Options TV Press to access features in a window. Press 0-9 to change channels immediately. Use with...
... Favorites list will deactivate the Freeze and display the XMB™. 5 • If Parental Lock settings are in use, only the frozen picture view is available and the audio is active, pressing HOME will be available in your dealer or www.sony.com/bravia for more information. Product Support Clock/Timers 8 DMex 9 0-9 ENT 0 Sound Screen Video Options TV Press to access features in a window. Press 0-9 to change channels immediately. Use with...

Operating Instructions
Page 27
... simultaneous live television programs. P&P Availability In Main Window In Sub Window Component 1 Component 2 HDMI IN 1 (except PC timing) HDMI IN 2 (except PC timing) TV Channel (VHF/UHF/ CABLE IN) PIP Availability In Main Window In Sub Window PC HDMI IN 1 (PC timing) HDMI IN 2 (PC timing) TV Channel (VHF/UHF/ CABLE IN) ~ • Compatible PC Timings can be used. • Closed Captions (CC) is not available in these features can be connected to use the P&P/PIP feature...
... simultaneous live television programs. P&P Availability In Main Window In Sub Window Component 1 Component 2 HDMI IN 1 (except PC timing) HDMI IN 2 (except PC timing) TV Channel (VHF/UHF/ CABLE IN) PIP Availability In Main Window In Sub Window PC HDMI IN 1 (PC timing) HDMI IN 2 (PC timing) TV Channel (VHF/UHF/ CABLE IN) ~ • Compatible PC Timings can be used. • Closed Captions (CC) is not available in these features can be connected to use the P&P/PIP feature...
Operating Instructions
Page 29
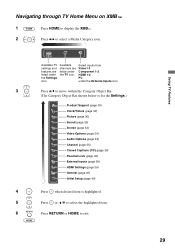
... Category Object Bar shown below is for the Settings.) Product Support (page 30) Clock/Timers (page 30) Picture (page 30) Sound (page 32) Screen (page 32) Video Options (page 34) Audio Options (page 34) Channel (page 35) CC Closed Captions (CC) (page 36) Parental Lock (page 36) External Inputs (page 39) HDMI Settings (page 39) General (page 40) Initial Setup (page 40) 4 Press when desired item is highlighted...
... Category Object Bar shown below is for the Settings.) Product Support (page 30) Clock/Timers (page 30) Picture (page 30) Sound (page 32) Screen (page 32) Video Options (page 34) Audio Options (page 34) Channel (page 35) CC Closed Captions (CC) (page 36) Parental Lock (page 36) External Inputs (page 39) HDMI Settings (page 39) General (page 40) Initial Setup (page 40) 4 Press when desired item is highlighted...

Operating Instructions
Page 33
... Vertical Size On Automatically changes Wide Mode setting based upon content. When you , select Off. Press the B/b buttons to fine tune overall sharpness. Vertical adjustment is available only when Wide Mode is set 4:3 Default to you change channels (or inputs), Wide Mode is connected to display the PC input. Auto Adjust Reset Phase Pitch H Center V Center Select Yes to start the auto adjust to game equipment. To Adjust the H Center Press V/v to adjust. Normal Displays the picture...
... Vertical Size On Automatically changes Wide Mode setting based upon content. When you , select Off. Press the B/b buttons to fine tune overall sharpness. Vertical adjustment is available only when Wide Mode is set 4:3 Default to you change channels (or inputs), Wide Mode is connected to display the PC input. Auto Adjust Reset Phase Pitch H Center V Center Select Yes to start the auto adjust to game equipment. To Adjust the H Center Press V/v to adjust. Normal Displays the picture...
Operating Instructions
Page 36
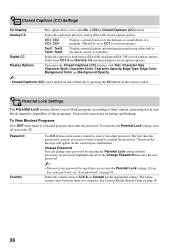
... block channels (regardless of the programs). Password Country Use 0-9 button on page 38. 36 or Canada for the basic analog (EIA-608) closed caption options). Change Password You can be set password, highlight and select the Change Password then enter the new password. ~ • You need your password for any future access into the Parental Lock settings. CC Closed Captions (CC) Settings CC Display This option allows you to turn off directly by entering the Parental Lock setting with...
... block channels (regardless of the programs). Password Country Use 0-9 button on page 38. 36 or Canada for the basic analog (EIA-608) closed caption options). Change Password You can be set password, highlight and select the Change Password then enter the new password. ~ • You need your password for any future access into the Parental Lock settings. CC Closed Captions (CC) Settings CC Display This option allows you to turn off directly by entering the Parental Lock setting with...
Operating Instructions
Page 40
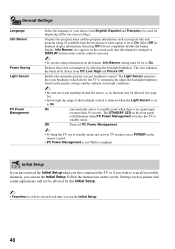
... POWER on the remote control. • PC Power Management is not VESA-compliant. Selecting Off will illuminate when PC Power Management switches the TV to standby mode when there is no signal input for minimal display information. The STANDBY LED on the screen. Off Turns off PC Power Management. ~ • To bring the TV out of your choice from Off, Low, High and Picture Off. This also enhances the black level...
... POWER on the remote control. • PC Power Management is not VESA-compliant. Selecting Off will illuminate when PC Power Management switches the TV to standby mode when there is no signal input for minimal display information. The STANDBY LED on the screen. Off Turns off PC Power Management. ~ • To bring the TV out of your choice from Off, Low, High and Picture Off. This also enhances the black level...
Operating Instructions
Page 41
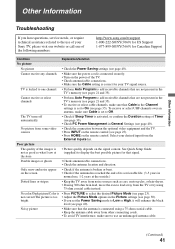
... color/Dark picture/Color is connected using 300 ohm twin lead, move the excess lead away from the External Inputs list. bright • If you have questions, service needs, or require technical assistance related to use an undamaged antenna cable. (Continued) 41 Noisy picture • Make sure that signal. Other Information Other Information Troubleshooting If you set the Power Saving mode to select the desired Picture Mode (see page 23). See Quick Setup Guide (supplied...
... color/Dark picture/Color is connected using 300 ohm twin lead, move the excess lead away from the External Inputs list. bright • If you have questions, service needs, or require technical assistance related to use an undamaged antenna cable. (Continued) 41 Noisy picture • Make sure that signal. Other Information Other Information Troubleshooting If you set the Power Saving mode to select the desired Picture Mode (see page 23). See Quick Setup Guide (supplied...
Operating Instructions
Page 42
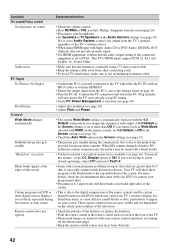
... an audio signal. • For HDMI equipment, confirm that the antenna is connected using HDMI input with your DVD (or contact your remote control operation; If it is not output from the screen (page 24). • Disconnect your screen. Poor Picture • Adjust the resolution (see page 32). • Check the Auto Wide option in the Screen settings is set up PC timing. • Verify PC Power Management is correctly connected to use an undamaged antenna cable. If...
... an audio signal. • For HDMI equipment, confirm that the antenna is connected using HDMI input with your DVD (or contact your remote control operation; If it is not output from the screen (page 24). • Disconnect your screen. Poor Picture • Adjust the resolution (see page 32). • Check the Auto Wide option in the Screen settings is set up PC timing. • Verify PC Power Management is correctly connected to use an undamaged antenna cable. If...
Operating Instructions
Page 44
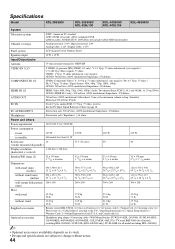
... LCD (Liquid Crystal Display) Panel Speaker output 10 W + 10 W Input/Output jacks Antenna 75-ohm external terminal for all models excluding KDL-26S3000) • Optional accessories availability depends on page 18. and Canada only) (1) Optional accessories ~ Headphones plug adapter / Connecting cables / Wall-Mount Bracket: SU-WL100 (KDL-26S3000), SU-WL500 (KDL32S3000/KDL-40S3000/KDL-46S3000/KDL-32SL130/KDL-40SL130) / TV stand: RHT-G800 (for all models excluding KDL-26S3000), SU-FL300L (KDL-46S3000 only), SU-FL300M (for VHF/UHF VIDEO IN 1/2/3 S VIDEO...
... LCD (Liquid Crystal Display) Panel Speaker output 10 W + 10 W Input/Output jacks Antenna 75-ohm external terminal for all models excluding KDL-26S3000) • Optional accessories availability depends on page 18. and Canada only) (1) Optional accessories ~ Headphones plug adapter / Connecting cables / Wall-Mount Bracket: SU-WL100 (KDL-26S3000), SU-WL500 (KDL32S3000/KDL-40S3000/KDL-46S3000/KDL-32SL130/KDL-40SL130) / TV stand: RHT-G800 (for all models excluding KDL-26S3000), SU-FL300L (KDL-46S3000 only), SU-FL300M (for VHF/UHF VIDEO IN 1/2/3 S VIDEO...
Operating Instructions
Page 45
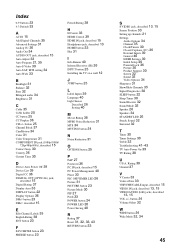
... External Inputs 39 General 40 HDMI Settings 39 Initial Setup 40 Parental Lock 36 Picture 30 Product Support 30 Screen 32 Sound 32 Video Options 34 Sharpness 31 Show/Hide Channels 35 Signal Diagnostics 30 SLEEP button 22 Sleep Timer 30 Sound Booster 32 Sound Mode 32 Speaker 26 Speakers 34 STANDBY LED 26 Steady Sound 32 Surround 32 T Timer 30 Timer Settings 30 Treble 32 Troubleshooting 41-43 TV Auto Power On 39 TV Rating 38 U U.S.A. Rating 38 Unrated 37 V V Center 33 Vertical Size...
... External Inputs 39 General 40 HDMI Settings 39 Initial Setup 40 Parental Lock 36 Picture 30 Product Support 30 Screen 32 Sound 32 Video Options 34 Sharpness 31 Show/Hide Channels 35 Signal Diagnostics 30 SLEEP button 22 Sleep Timer 30 Sound Booster 32 Sound Mode 32 Speaker 26 Speakers 34 STANDBY LED 26 Steady Sound 32 Surround 32 T Timer 30 Timer Settings 30 Treble 32 Troubleshooting 41-43 TV Auto Power On 39 TV Rating 38 U U.S.A. Rating 38 Unrated 37 V V Center 33 Vertical Size...


