Operating Instructions
Page 2
...; are located at the rear of the TV. Owner's Record The model and serial numbers are trademarks, service marks, or certification marks of the Digital Living Network Alliance. Record these materials may cause undesired operation. Refer to them whenever you to receive unscrambled digital cable television programming via subscription service to which should allow you call upon your Sony dealer regarding this manual could void your area. s Operate the TV only...
...; are located at the rear of the TV. Owner's Record The model and serial numbers are trademarks, service marks, or certification marks of the Digital Living Network Alliance. Record these materials may cause undesired operation. Refer to them whenever you to receive unscrambled digital cable television programming via subscription service to which should allow you call upon your Sony dealer regarding this manual could void your area. s Operate the TV only...
Operating Instructions
Page 3
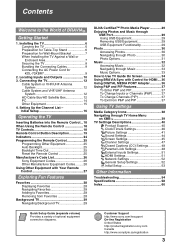
... VHF/UHF Antenna System 12 HD Cable Box/HD Satellite Box 12 PC 14 Other Equipment 15 4. Setting Up the Channel List - Installing the TV 6 Carrying the TV 6 Preparation for Table-Top Stand 6 Preparation for Wall-Mount Bracket 7 When Installing the TV Against a Wall or Enclosed Area 7 Securing the TV 8 Bundling the Connecting Cables 9 Connecting the AC Power Cord for HDMI ....36 Using DIGITAL MEDIA PORT Adapter 36 Using P&P and PIP Features 37 To Enter P&P and PIP 37 To Change Inputs or Channels (P&P) ..........37 To Change Channels (PIP 37...
... VHF/UHF Antenna System 12 HD Cable Box/HD Satellite Box 12 PC 14 Other Equipment 15 4. Setting Up the Channel List - Installing the TV 6 Carrying the TV 6 Preparation for Table-Top Stand 6 Preparation for Wall-Mount Bracket 7 When Installing the TV Against a Wall or Enclosed Area 7 Securing the TV 8 Bundling the Connecting Cables 9 Connecting the AC Power Cord for HDMI ....36 Using DIGITAL MEDIA PORT Adapter 36 Using P&P and PIP Features 37 To Enter P&P and PIP 37 To Change Inputs or Channels (P&P) ..........37 To Change Channels (PIP 37...
Operating Instructions
Page 5
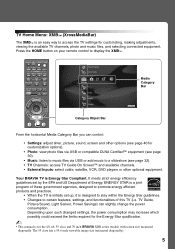
... via USB or add music to display the XMB™. DISPLAY LIGHT POWER TV POWER DVD AMP STB TV FUNCTION PREV REPLAY ADVANCE NEXT PLAY SYNC MENU PAUSE STOP THEATER SOUND PICTURE WIDE CC FREEZE Product Support Clock/Timers Settings Sound Screen Channel Media Category Bar TV Category Object Bar From the horizontal Media Category Bar you can slightly change the power consumption. TV Guide, Picture/Sound, Light Sensor, Power Savings) can control: • Settings: adjust timer, picture, sound, screen and other options (see page 40 for customizing, making adjustments, viewing...
... via USB or add music to display the XMB™. DISPLAY LIGHT POWER TV POWER DVD AMP STB TV FUNCTION PREV REPLAY ADVANCE NEXT PLAY SYNC MENU PAUSE STOP THEATER SOUND PICTURE WIDE CC FREEZE Product Support Clock/Timers Settings Sound Screen Channel Media Category Bar TV Category Object Bar From the horizontal Media Category Bar you can slightly change the power consumption. TV Guide, Picture/Sound, Light Sensor, Power Savings) can control: • Settings: adjust timer, picture, sound, screen and other options (see page 40 for customizing, making adjustments, viewing...
Operating Instructions
Page 6
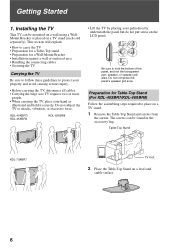
... transparent part, speaker, or speaker grill area. Table-Top Stand KDL-70XBR7 TV Unit 2 Place the Table-Top Stand on the LCD panel. Do not subject the TV to place on a TV stand (each sold separately). The screws can be found in the accessory bag. Installing the TV This TV can be mounted on a wall using a WallMount Bracket or placed on a TV stand. 1 Remove the Table-Top Stand and screws from the carton. Do not compress the panel's speaker grill...
... transparent part, speaker, or speaker grill area. Table-Top Stand KDL-70XBR7 TV Unit 2 Place the Table-Top Stand on the LCD panel. Do not subject the TV to place on a TV stand (each sold separately). The screws can be found in the accessory bag. Installing the TV This TV can be mounted on a wall using a WallMount Bracket or placed on a TV stand. 1 Remove the Table-Top Stand and screws from the carton. Do not compress the panel's speaker grill...
Operating Instructions
Page 7
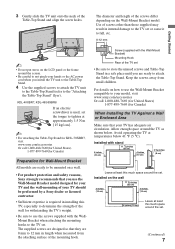
... or the AC power cord when you use the Wall-Mount Bracket model designed for your TV and the wall-mounting of the wall for withstanding the TV's weight. • Be sure to use the Wall-Mount Bracket compatible to the TV set . (Continued) 7 Allow enough space around the TV as shown below 41 °F (5 °C). Installed on how to use the screws supplied with stand 11 7/8 inches (30 cm) 4 inches (10 cm) 4 inches (10 cm) 2 3/8 inches (6 cm) Leave at...
... or the AC power cord when you use the Wall-Mount Bracket model designed for your TV and the wall-mounting of the wall for withstanding the TV's weight. • Be sure to use the Wall-Mount Bracket compatible to the TV set . (Continued) 7 Allow enough space around the TV as shown below 41 °F (5 °C). Installed on how to use the screws supplied with stand 11 7/8 inches (30 cm) 4 inches (10 cm) 4 inches (10 cm) 2 3/8 inches (6 cm) Leave at...
Operating Instructions
Page 8
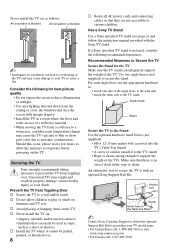
... enough to evaporate before powering on the Table-Top Stand ~ Contact Sony Customer Support to secure the TV is blocked. Use two angle braces (not supplied) to Secure the TV Secure the Stand for best picture quality • Do not expose the screen to direct illumination or sunlight. • Use spot lighting directed down from toppling over . 8 s Route all AC power cords and connecting cables so that can easily...
... enough to evaporate before powering on the Table-Top Stand ~ Contact Sony Customer Support to secure the TV is blocked. Use two angle braces (not supplied) to Secure the TV Secure the Stand for best picture quality • Do not expose the screen to direct illumination or sunlight. • Use spot lighting directed down from toppling over . 8 s Route all AC power cords and connecting cables so that can easily...
Operating Instructions
Page 11
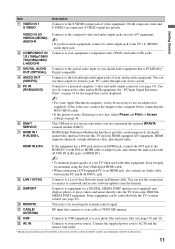
... are connected, S VIDEO signal has priority. Connects to the optical audio input of your digital audio equipment that connects to the TV's L (MONO) audio input jack. Connects to access photo files and music files (see pages 30 and 32). If this TV and any HDMI-equipped A/V equipment. HDMI supports enhanced, or high-definition video, plus digital audio. You can use an adapter (not supplied). This USB port is PCM/Dolby* Digital compatible. Connect the supplied power cord to AC IN and the nearest wall...
... are connected, S VIDEO signal has priority. Connects to the optical audio input of your digital audio equipment that connects to the TV's L (MONO) audio input jack. Connects to access photo files and music files (see pages 30 and 32). If this TV and any HDMI-equipped A/V equipment. HDMI supports enhanced, or high-definition video, plus digital audio. You can use an adapter (not supplied). This USB port is PCM/Dolby* Digital compatible. Connect the supplied power cord to AC IN and the nearest wall...
Operating Instructions
Page 14
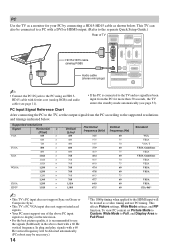
... HDMI output. (Refer to the separate Quick Setup Guide.) Rear of the above chart with ferrite core (analog RGB) and audio cable (see page 53). PC Use the TV as a monitor for more than 30 seconds, the TV enters the standby mode automatically (see page 11). • If the PC is recommended to use the signals (boldfaced) in the above PC input signals to display on the television. • For the best picture...
... HDMI output. (Refer to the separate Quick Setup Guide.) Rear of the above chart with ferrite core (analog RGB) and audio cable (see page 53). PC Use the TV as a monitor for more than 30 seconds, the TV enters the standby mode automatically (see page 11). • If the PC is recommended to use the signals (boldfaced) in the above PC input signals to display on the television. • For the best picture...
Operating Instructions
Page 16
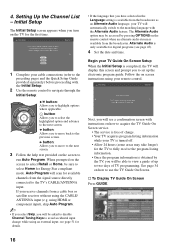
... available channels from a cable box or satellite receiver without using HDMI or component input), skip Auto Program. ~ • If you select Skip, you receive channels from the signal source directly connected to use the TV Guide On Screen. using the CABLE/ ANTENNA input (e.g. Alternate Audio is obtained by pressing OPTIONS on how to acquire the TV Guide On Screen service. • The service is free of 7 Please select a language. Follow the on screen instructions using your cable connections (refer to the preceding pages and the Quick Setup Guide...
... available channels from a cable box or satellite receiver without using HDMI or component input), skip Auto Program. ~ • If you select Skip, you receive channels from the signal source directly connected to use the TV Guide On Screen. using the CABLE/ ANTENNA input (e.g. Alternate Audio is obtained by pressing OPTIONS on how to acquire the TV Guide On Screen service. • The service is free of 7 Please select a language. Follow the on screen instructions using your cable connections (refer to the preceding pages and the Quick Setup Guide...

Operating Instructions
Page 19
.... These buttons can operate video equipment programmed to display the banner with the Control for HDMI function (not available on page 44. SYNC MENU: Press once to your BRAVIA Sync audio system. The buttons listed below can be connected by an HDMI connection to display the Sync'd HDMI Devices (while a Control for details). Remote Control Button Description Operating the TV 1 2 3 4 DISPLAY LIGHT POWER TV POWER DVD AMP STB TV FUNCTION PREV REPLAY ADVANCE NEXT PLAY SYNC MENU PAUSE STOP 5 6 THEATER SOUND PICTURE WIDE CC...
.... These buttons can operate video equipment programmed to display the banner with the Control for HDMI function (not available on page 44. SYNC MENU: Press once to your BRAVIA Sync audio system. The buttons listed below can be connected by an HDMI connection to display the Sync'd HDMI Devices (while a Control for details). Remote Control Button Description Operating the TV 1 2 3 4 DISPLAY LIGHT POWER TV POWER DVD AMP STB TV FUNCTION PREV REPLAY ADVANCE NEXT PLAY SYNC MENU PAUSE STOP 5 6 THEATER SOUND PICTURE WIDE CC...
Operating Instructions
Page 36
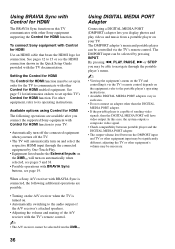
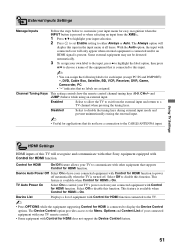
... video signal. • Check compatibility between portable player and the DIGITAL MEDIA PORT adapter. • The output volume level between the DMPORT input and TV or other Sony equipment supporting the Control for HDMI function must be controlled via the TV's remote control depends on how to set up this TV communicates with the TV documentation. See page 51 for connection. Using DIGITAL MEDIA PORT Adapter Connecting a DIGITAL MEDIA PORT (DMPORT) adapter lets you turn on and select the respective HDMI input through the portable player's menu. ~ • Viewing the...
... video signal. • Check compatibility between portable player and the DIGITAL MEDIA PORT adapter. • The output volume level between the DMPORT input and TV or other Sony equipment supporting the Control for HDMI function must be controlled via the TV's remote control depends on how to set up this TV communicates with the TV documentation. See page 51 for connection. Using DIGITAL MEDIA PORT Adapter Connecting a DIGITAL MEDIA PORT (DMPORT) adapter lets you turn on and select the respective HDMI input through the portable player's menu. ~ • Viewing the...

Operating Instructions
Page 39
... Bar shown below is for HDMI) available Video 1-3 channels are listed under the Music icon. TV Guide On Select inputs from Screen and CTRL: HDMI (Control for Settings.) Product Support (page 40) Clock/Timers (page 40) Picture (page 41) Sound (page 44) Screen (page 45) Channel (page 47) CC Closed Captions (CC) (page 48) Parental Lock (page 48) External Inputs (page 51) HDMI Settings (page 51) Network (page 52) General Setup (page 52) Initial Setup (page 53) 4 Press when desired...
... Bar shown below is for HDMI) available Video 1-3 channels are listed under the Music icon. TV Guide On Select inputs from Screen and CTRL: HDMI (Control for Settings.) Product Support (page 40) Clock/Timers (page 40) Picture (page 41) Sound (page 44) Screen (page 45) Channel (page 47) CC Closed Captions (CC) (page 48) Parental Lock (page 48) External Inputs (page 51) HDMI Settings (page 51) Network (page 52) General Setup (page 52) Initial Setup (page 53) 4 Press when desired...
Operating Instructions
Page 40
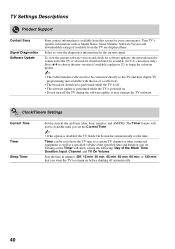
... Product Support Contact Sony Signal Diagnostics Software Update Sony contact information is disabled, the TV Guide On Screen has automatically set the time. Select to remain on . • Do not turn off automatically. 40 To view the current software version and check for your convenience. customers only). Press V/v to choose the new version (if available) and press to begin the software update. ~ • The Cable/Antenna cable needs to a certain TV channel or other connected...
... Product Support Contact Sony Signal Diagnostics Software Update Sony contact information is disabled, the TV Guide On Screen has automatically set the time. Select to remain on . • Do not turn off automatically. 40 To view the current software version and check for your convenience. customers only). Press V/v to choose the new version (if available) and press to begin the software update. ~ • The Cable/Antenna cable needs to a certain TV channel or other connected...
Operating Instructions
Page 43
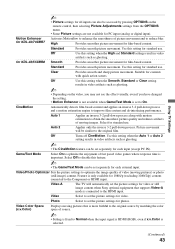
... in video artifacts such as ghosting. ~ • The CineMotion feature can be set to On. Game/Text Mode Select On to optimize the enjoyment of source. ~ • Setting is fixed to Normal when the input signal is HDMI (RGB), even if x.v.Color is only available for 1080i/p (excluding 1080/24p) content connected to the Component or HDMI input. Picture movement will automatically set separately for each external input. Using TV Settings ~ • Picture settings...
... in video artifacts such as ghosting. ~ • The CineMotion feature can be set to On. Game/Text Mode Select On to optimize the enjoyment of source. ~ • Setting is fixed to Normal when the input signal is HDMI (RGB), even if x.v.Color is only available for 1080i/p (excluding 1080/24p) content connected to the Component or HDMI input. Picture movement will automatically set separately for each external input. Using TV Settings ~ • Picture settings...
Operating Instructions
Page 46
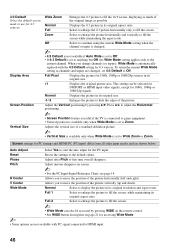
... HDMI input video signals, except for 1080i, 1080p or 1080/24p sources in its original resolution and aspect ratio. Press B/b to adjust the Horizontal positioning. ~ • Screen Position feature is useful if the TV is connected to game equipment. • Vertical position is available only when Wide Mode is set to Wide Zoom or Zoom. Screen settings for 4:3 sources. When you change channels (or inputs), Wide Mode is set 4:3 Default to the current channel...
... HDMI input video signals, except for 1080i, 1080p or 1080/24p sources in its original resolution and aspect ratio. Press B/b to adjust the Horizontal positioning. ~ • Screen Position feature is useful if the TV is connected to game equipment. • Vertical position is available only when Wide Mode is set to Wide Zoom or Zoom. Screen settings for 4:3 sources. When you change channels (or inputs), Wide Mode is set 4:3 Default to the current channel...

Operating Instructions
Page 48
... set to view Closed Captions (CC). or Canada for any future access into the Parental Lock settings. On with the previously set " message will appear on the TV. Display Options Customize the Closed Captions (CC) displays with Text, Character Size, Character Style, Character Color, Character Opacity, Edge Type, Edge Color, Background Color and Background Opacity. ~ • Closed Captions (CC) can change your password by entering the Parental Lock setting with Muting Automatically displays closed caption options. Password Country Use 0-9 button on the remote control. Analog...
... set to view Closed Captions (CC). or Canada for any future access into the Parental Lock settings. On with the previously set " message will appear on the TV. Display Options Customize the Closed Captions (CC) displays with Text, Character Size, Character Style, Character Color, Character Opacity, Edge Type, Edge Color, Background Color and Background Opacity. ~ • Closed Captions (CC) can change your password by entering the Parental Lock setting with Muting Automatically displays closed caption options. Password Country Use 0-9 button on the remote control. Analog...
Operating Instructions
Page 51
... the INPUT button is pressed or when selecting an input from the external input and return to a TV channel when pressing the tuning keys. Using TV Settings HDMI Settings HDMI inputs of your connected equipment with your TV to disable this TV will display this function. Control for HDMI On/Off feature allows your TV remote control. • Some equipment with Control for HDMI function connected to the TV. ~ • Press OPTIONS while the equipment supporting Control for HDMI is connected to display...
... the INPUT button is pressed or when selecting an input from the external input and return to a TV channel when pressing the tuning keys. Using TV Settings HDMI Settings HDMI inputs of your connected equipment with your TV to disable this TV will display this function. Control for HDMI On/Off feature allows your TV remote control. • Some equipment with Control for HDMI function connected to the TV. ~ • Press OPTIONS while the equipment supporting Control for HDMI is connected to display...
Operating Instructions
Page 53
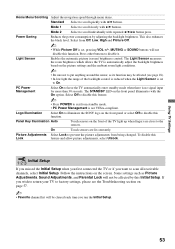
... the sensor, as Picture Adjustments, Sound Adjustments, and Parental Lock will be affected by adjusting the backlight brightness. Using TV Settings Home Menu Scrolling Adjust the navigation speed through menu items. Standard Select to scroll individually with repeated V/v/B/b button press. Light Sensor Enables the automatic picture (screen) brightness control. Initial Setup If you missed the Initial Setup when you first connected the TV or if you run the Initial Setup. 53 Mode 2 Select to scroll quickly with...
... the sensor, as Picture Adjustments, Sound Adjustments, and Parental Lock will be affected by adjusting the backlight brightness. Using TV Settings Home Menu Scrolling Adjust the navigation speed through menu items. Standard Select to scroll individually with repeated V/v/B/b button press. Light Sensor Enables the automatic picture (screen) brightness control. Initial Setup If you missed the Initial Setup when you first connected the TV or if you run the Initial Setup. 53 Mode 2 Select to scroll quickly with...
Operating Instructions
Page 58
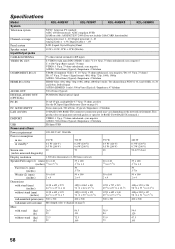
... Specifications Model KDL-40XBR7 KDL-70XBR7 KDL-46XBR8 KDL-55XBR8 System Television system NTSC: American TV standard ATSC (8VSB terrestrial): ATSC compliant 8VSB QAM on cable: ANSI/SCTE 07 2000 (Does not include CableCARD functionality) Channel coverage Analog terrestrial: 2 - 69 / Digital terrestrial: 2 - 69 Analog Cable: 1 - 135 / Digital Cable: 1 - 135 Panel system LCD (Liquid Crystal Display) Panel Speaker output 10 W + 10 W, 12 W + 12 W (Woofer) Input/Output jacks CABLE/ANTENNA 75-ohm external terminal for RF inputs VIDEO IN 1/2/3 S VIDEO (4-pin mini DIN) (VIDEO...
... Specifications Model KDL-40XBR7 KDL-70XBR7 KDL-46XBR8 KDL-55XBR8 System Television system NTSC: American TV standard ATSC (8VSB terrestrial): ATSC compliant 8VSB QAM on cable: ANSI/SCTE 07 2000 (Does not include CableCARD functionality) Channel coverage Analog terrestrial: 2 - 69 / Digital terrestrial: 2 - 69 Analog Cable: 1 - 135 / Digital Cable: 1 - 135 Panel system LCD (Liquid Crystal Display) Panel Speaker output 10 W + 10 W, 12 W + 12 W (Woofer) Input/Output jacks CABLE/ANTENNA 75-ohm external terminal for RF inputs VIDEO IN 1/2/3 S VIDEO (4-pin mini DIN) (VIDEO...
Operating Instructions
Page 60
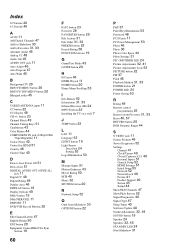
... POWER LED 24 Power Saving 53 R Rating 49 Remote control programming 25 Remove from Favorites 31, 33 Reset 46, 57 RETURN button 20 RGB Dynamic Range 44 S S VIDEO jack 11 Screen Position 46 Server Diagnostics 52 Settings Channel 47 Clock/Timers 40 Closed Captions (CC) 48 External Inputs 51 General Setup 52 HDMI Settings 51 Initial Setup 53 Network 52 Parental Lock 48 Picture 41 Product Support 40 Screen 45 Sound 44 Show/Hide Channels 47 Show/Hide Servers 52 Signal Diagnostics 40 Signal Type 47 Sleep Timer 40 Software Update 40 Sound Adjustments...
... POWER LED 24 Power Saving 53 R Rating 49 Remote control programming 25 Remove from Favorites 31, 33 Reset 46, 57 RETURN button 20 RGB Dynamic Range 44 S S VIDEO jack 11 Screen Position 46 Server Diagnostics 52 Settings Channel 47 Clock/Timers 40 Closed Captions (CC) 48 External Inputs 51 General Setup 52 HDMI Settings 51 Initial Setup 53 Network 52 Parental Lock 48 Picture 41 Product Support 40 Screen 45 Sound 44 Show/Hide Channels 47 Show/Hide Servers 52 Signal Diagnostics 40 Signal Type 47 Sleep Timer 40 Software Update 40 Sound Adjustments...


