Operating Instructions
Page 2
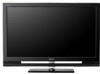
... Gemstar-TV Guide International, Inc. Fergason Patent Properties, LLC: U.S. The TV Guide On Screen system is a trademark of Sony Computer Entertainment Inc. "BRAVIA" and , S-Force, Motionflow, BRAVIA Sync, , DMex and "x.v. CAUTION Use the following Sony TVs only with the instructions, may cause instability and possibly result in a particular installation. KDL-32XBR6 KDL-37XBR6 KDL-40V4150 KDL-40V4100 KDL-40W4100 KDL-42V4100 KDL-46V4100 KDL-46W4100 KDL-46W4150 KDL-52V4100 KDL-52W4100 Sony Wall-Mount Bracket Model No. Model Name Serial No. Operation is...
... Gemstar-TV Guide International, Inc. Fergason Patent Properties, LLC: U.S. The TV Guide On Screen system is a trademark of Sony Computer Entertainment Inc. "BRAVIA" and , S-Force, Motionflow, BRAVIA Sync, , DMex and "x.v. CAUTION Use the following Sony TVs only with the instructions, may cause instability and possibly result in a particular installation. KDL-32XBR6 KDL-37XBR6 KDL-40V4150 KDL-40V4100 KDL-40W4100 KDL-42V4100 KDL-46V4100 KDL-46W4100 KDL-46W4150 KDL-52V4100 KDL-52W4100 Sony Wall-Mount Bracket Model No. Model Name Serial No. Operation is...
Operating Instructions
Page 3
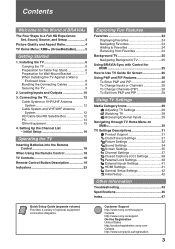
... P&P and PIP 28 To Change Inputs or Channels 28 To Change Channels (PIP 28 To Exit from Favorites 24 Background TV 25 Navigating Background TV 25 Using BRAVIA Sync with Control for Wall-Mount Bracket 7 When Installing the TV Against a Wall or Enclosed Area 8 Bundling the Connecting Cables 8 Securing the TV 9 2. Locating Inputs and Outputs 10 3. Setting Up the Channel List - Installing the TV 6 Carrying the TV 6 Preparation for Table-Top Stand 6 Preparation for HDMI 25 How to a Full HD Experience: Set, Sound, Source, and Setup 4 Picture Quality...
... P&P and PIP 28 To Change Inputs or Channels 28 To Change Channels (PIP 28 To Exit from Favorites 24 Background TV 25 Navigating Background TV 25 Using BRAVIA Sync with Control for Wall-Mount Bracket 7 When Installing the TV Against a Wall or Enclosed Area 8 Bundling the Connecting Cables 8 Securing the TV 9 2. Locating Inputs and Outputs 10 3. Setting Up the Channel List - Installing the TV 6 Carrying the TV 6 Preparation for Table-Top Stand 6 Preparation for HDMI 25 How to a Full HD Experience: Set, Sound, Source, and Setup 4 Picture Quality...
Operating Instructions
Page 6
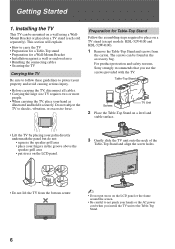
... speaker grill area • place your hands or the AC power cord when you use the screws provided with the TV. Do not subject the TV to the Table-Top Stand. 6 Preparation for a Wall-Mount Bracket • Installation against a wall or enclosed area • Bundling the connecting cables • Securing the TV Carrying the TV Be sure to follow these guidelines to place on a TV stand (except models: KDL-52V4100 and KDL-52W4100). 1 Remove...
... speaker grill area • place your hands or the AC power cord when you use the screws provided with the TV. Do not subject the TV to the Table-Top Stand. 6 Preparation for a Wall-Mount Bracket • Installation against a wall or enclosed area • Bundling the connecting cables • Securing the TV Carrying the TV Be sure to follow these guidelines to place on a TV stand (except models: KDL-52V4100 and KDL-52W4100). 1 Remove...
Operating Instructions
Page 9
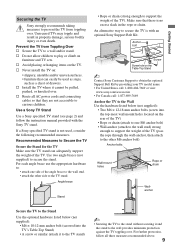
... anchor bolt) Anchor bolts Wall-mount holes Rope or chain Wallanchor Secure the TV to the Stand Use the optional hardware listed below (not supplied): • Two M6 × 12-18 mm anchor bolts (screw into the TV's Table-Top Stand) • A screw or similar (attach it to the TV stand) ~ • Securing the TV to support the weight of drawers. For further protection, follow the instruction manual provided with an optional Sony Support...
... anchor bolt) Anchor bolts Wall-mount holes Rope or chain Wallanchor Secure the TV to the Stand Use the optional hardware listed below (not supplied): • Two M6 × 12-18 mm anchor bolts (screw into the TV's Table-Top Stand) • A screw or similar (attach it to the TV stand) ~ • Securing the TV to support the weight of drawers. For further protection, follow the instruction manual provided with an optional Sony Support...
Operating Instructions
Page 11
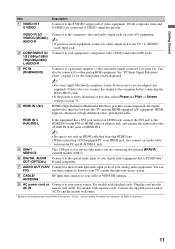
...-HDMI cable or adapter) jack, and connect the audio jack to the AUDIO IN (L/R) jacks of Screen settings on page 14 for service only unless you are connecting the optional BRAVIA external module (DMex). 6 DIGITAL AUDIO Connects to the optical audio input of your digital audio equipment that connects to your cable or VHF/UHF antenna. 9 AC power cord or Connects to your A/V equipment. ~ • If you have mono equipment, connect its audio output jack to a personal computer's video and audio output...
...-HDMI cable or adapter) jack, and connect the audio jack to the AUDIO IN (L/R) jacks of Screen settings on page 14 for service only unless you are connecting the optional BRAVIA external module (DMex). 6 DIGITAL AUDIO Connects to the optical audio input of your digital audio equipment that connects to your cable or VHF/UHF antenna. 9 AC power cord or Connects to your A/V equipment. ~ • If you have mono equipment, connect its audio output jack to a personal computer's video and audio output...
Operating Instructions
Page 14
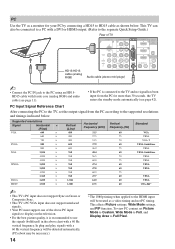
... Green or Composite Sync. • This TV's PC VGA input does not support interlaced signals. • Your PC must support one of TV HD15-HD15 cable (analog RGB) VIDEO IN 1 3 S VIDEO VIDEO L (MONO) AUDIO R COMPONENT IN PC IN 1 2 Y RGB PB PR L AUDIO R AUDIO (1080p/1080i/720p/480p/480i) IN DIGITAL 1 AUDIO OUT (OPTICAL) 3 4 AUDIO OUT R AUDIO L L AUDIO R (VAR/FIX) Audio cable (stereo mini plugs) ~ • Connect the PC IN jack to Full Pixel. To view PC content set the output signal...
... Green or Composite Sync. • This TV's PC VGA input does not support interlaced signals. • Your PC must support one of TV HD15-HD15 cable (analog RGB) VIDEO IN 1 3 S VIDEO VIDEO L (MONO) AUDIO R COMPONENT IN PC IN 1 2 Y RGB PB PR L AUDIO R AUDIO (1080p/1080i/720p/480p/480i) IN DIGITAL 1 AUDIO OUT (OPTICAL) 3 4 AUDIO OUT R AUDIO L L AUDIO R (VAR/FIX) Audio cable (stereo mini plugs) ~ • Connect the PC IN jack to Full Pixel. To view PC content set the output signal...
Operating Instructions
Page 16
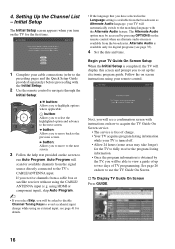
... cable connections (refer to the preceding pages and the Quick Setup Guide provided separately) before proceeding with instructions on screen instructions using HDMI or component input), skip Auto Program. ~ • If you select Skip, you to continue. Auto Program will be asked to disable Channel Tuning Keys to the previous screen. Follow the on how to acquire the TV Guide On Screen service. • The service is available from a cable box or satellite receiver without using an external input; s To Display TV Guide...
... cable connections (refer to the preceding pages and the Quick Setup Guide provided separately) before proceeding with instructions on screen instructions using HDMI or component input), skip Auto Program. ~ • If you select Skip, you to continue. Auto Program will be asked to disable Channel Tuning Keys to the previous screen. Follow the on how to acquire the TV Guide On Screen service. • The service is available from a cable box or satellite receiver without using an external input; s To Display TV Guide...
Operating Instructions
Page 25
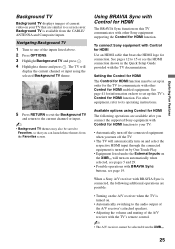
... speakers. • Adjusting the volume and muting of the A/V receiver with the TV documentation. When a Sony A/V receiver with BRAVIA Sync is connected, the following operations are available after you connect the supported Sony equipment with BRAVIA Sync buttons, see pages 5 and 29. • Possible operations with Control for HDMI enabled equipment. Navigating Background TV 1 Tune to its operating instructions. Background TV is turned on. • Automatically switching to a screen saver. Exploring Fun Features Background TV Background TV displays...
... speakers. • Adjusting the volume and muting of the A/V receiver with the TV documentation. When a Sony A/V receiver with BRAVIA Sync is connected, the following operations are available after you connect the supported Sony equipment with BRAVIA Sync buttons, see pages 5 and 29. • Possible operations with Control for HDMI enabled equipment. Navigating Background TV 1 Tune to its operating instructions. Background TV is turned on. • Automatically switching to a screen saver. Exploring Fun Features Background TV Background TV displays...
Operating Instructions
Page 29
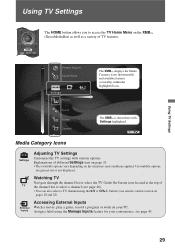
... depending on the situations and conditions applied. TV Media Category Icons Settings Adjusting TV Settings Customize the TV settings with Settings highlighted. Using TV Settings The HOME button allows you to select a channel (see page 41. 29 Using TV Settings Product Support Clock/Timers Settings The XMB™ displays the Media Category icons (horizontally) and available features (vertically) within the highlighted icon. Accessing External Inputs External Watch a movie, play a game, record a program or work on pages 20 and 22). Explanations...
... depending on the situations and conditions applied. TV Media Category Icons Settings Adjusting TV Settings Customize the TV settings with Settings highlighted. Using TV Settings The HOME button allows you to select a channel (see page 41. 29 Using TV Settings Product Support Clock/Timers Settings The XMB™ displays the Media Category icons (horizontally) and available features (vertically) within the highlighted icon. Accessing External Inputs External Watch a movie, play a game, record a program or work on pages 20 and 22). Explanations...
Operating Instructions
Page 30
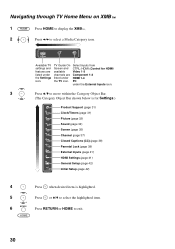
TV Guide On Screen and available channels are listed under the Settings icon. Select inputs from CTRL: HDMI (Control for Settings.) Product Support (page 31) Clock/Timers (page 31) Picture (page 32) Sound (page 34) Screen (page 35) Channel (page 37) CC Closed Captions (CC) (page 38) Parental Lock (page 38) External Inputs (page 41) HDMI Settings (page 41) General Setup (page 42) Initial Setup (page 42) 4 Press when desired item is for HDMI) Video 1-3 Component 1-2 HDMI 1-4 PC under the TV icon...
TV Guide On Screen and available channels are listed under the Settings icon. Select inputs from CTRL: HDMI (Control for Settings.) Product Support (page 31) Clock/Timers (page 31) Picture (page 32) Sound (page 34) Screen (page 35) Channel (page 37) CC Closed Captions (CC) (page 38) Parental Lock (page 38) External Inputs (page 41) HDMI Settings (page 41) General Setup (page 42) Initial Setup (page 42) 4 Press when desired item is for HDMI) Video 1-3 Component 1-2 HDMI 1-4 PC under the TV icon...

Operating Instructions
Page 31
... not turn off automatically. Sets the time in the US. • CATV/antenna cable needs to be set to have digital TV programming. (Not available with the use of the Week, Time, Duration, Input, Channel, and TV On Volume. otherwise, software corruption may occur. The Timer feature will allow setting the following: Day of a cable box.) • The software update is performed while the TV is powered on the remote control (see page 19). This can be connected...
... not turn off automatically. Sets the time in the US. • CATV/antenna cable needs to be set to have digital TV programming. (Not available with the use of the Week, Time, Duration, Input, Channel, and TV On Volume. otherwise, software corruption may occur. The Timer feature will allow setting the following: Day of a cable box.) • The software update is performed while the TV is powered on the remote control (see page 19). This can be connected...
Operating Instructions
Page 33
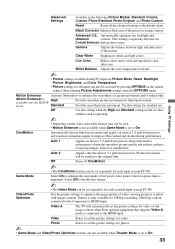
... setting for KDL-W series. Game Mode Select On to the Component or HDMI input. Feature is only available for video. Video Select to On. Off Use this feature. ~ • The Game Mode can be accessed by pressing OPTIONS on the video, noticeable change may not be seen. • Motion Enhancer is not available when Game Mode is important. Picture movement will automatically set the picture settings for video or still image content when Sony...
... setting for KDL-W series. Game Mode Select On to the Component or HDMI input. Feature is only available for video. Video Select to On. Off Use this feature. ~ • The Game Mode can be accessed by pressing OPTIONS on the video, noticeable change may not be seen. • Motion Enhancer is not available when Game Mode is important. Picture movement will automatically set the picture settings for video or still image content when Sony...
Operating Instructions
Page 35
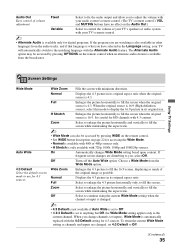
... Turns off the Auto Wide option. Audio Out Easy control of volume adjustment Fixed Select to fix the audio output and allow you to adjust the volume with your audio system's remote control. (The TV's remote control's VOL and MUTING buttons have no effect on the Audio Out.) Variable Select to control the volume of the original image as possible. Using TV Settings Screen Settings Wide Mode Auto Wide 4:3 Default Select the default screen mode to fill the screen. Normal Displays the 4:3 picture in its original size...
... Turns off the Auto Wide option. Audio Out Easy control of volume adjustment Fixed Select to fix the audio output and allow you to adjust the volume with your audio system's remote control. (The TV's remote control's VOL and MUTING buttons have no effect on the Audio Out.) Variable Select to control the volume of the original image as possible. Using TV Settings Screen Settings Wide Mode Auto Wide 4:3 Default Select the default screen mode to fill the screen. Normal Displays the 4:3 picture in its original size...
Operating Instructions
Page 38
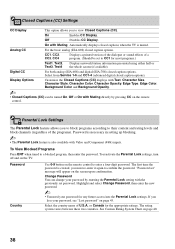
... be turned On, Off or On with Video and Component (480i) inputs. Password is necessary in setting up blocking. ~ • The Parental Lock feature is muted. Password Country Use 0-9 button on the remote control. or Canada for the appropriate ratings. On with Muting Automatically displays closed caption options). Parental Lock Settings The Parental Lock feature allows you to block programs according to enter a four-digit password. Change Password You can be set " message will appear on page 40...
... be turned On, Off or On with Video and Component (480i) inputs. Password is necessary in setting up blocking. ~ • The Parental Lock feature is muted. Password Country Use 0-9 button on the remote control. or Canada for the appropriate ratings. On with Muting Automatically displays closed caption options). Parental Lock Settings The Parental Lock feature allows you to block programs according to enter a four-digit password. Change Password You can be set " message will appear on page 40...
Operating Instructions
Page 41
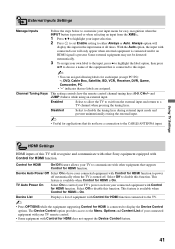
... HDMI does not support the Device Control feature. 41 Using TV Settings HDMI Settings HDMI inputs of your connected equipment with your TV remote control. • Some equipment with other Sony equipment equipped with Control for HDMI function. Select Off to disable this input. ~ • You can assign following labels for HDMI is turned off automatically when the TV is On. TV Auto Power On Select On to control your TV's power on from the external input and return to a TV channel...
... HDMI does not support the Device Control feature. 41 Using TV Settings HDMI Settings HDMI inputs of your connected equipment with your TV remote control. • Some equipment with other Sony equipment equipped with Control for HDMI function. Select Off to disable this input. ~ • You can assign following labels for HDMI is turned off automatically when the TV is On. TV Auto Power On Select On to control your TV's power on from the external input and return to a TV channel...
Operating Instructions
Page 42
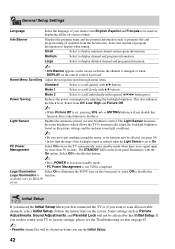
... signal input for KDL-W series. Medium Select to disable it. Light Sensor Enables the automatic picture (screen) brightness control. Select the amount of program information to display minimal channel and program information. Mode 1 Select to scan all the on the screen. This also enhances the black level. Initial Setup If you missed the Initial Setup when you first connected the TV or if you want to scroll slowly with V/v buttons. Small Select to display...
... signal input for KDL-W series. Medium Select to disable it. Light Sensor Enables the automatic picture (screen) brightness control. Select the amount of program information to display minimal channel and program information. Mode 1 Select to scan all the on the screen. This also enhances the black level. Initial Setup If you missed the Initial Setup when you first connected the TV or if you want to scroll slowly with V/v buttons. Small Select to display...
Operating Instructions
Page 43
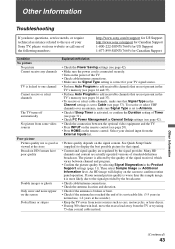
... Setup settings (see page 42). • Check the connection between channel and program. • Confirm the picture quality by selecting Signal Diagnostics in the Product Support settings (page 31). Select your desired input from the TV or try using 300 ohm twin lead, move the excess lead away from the External Inputs list. • Picture quality depends on the signal content. See Quick Setup Guide (supplied) to confirm routine panel operation. Many HD channels...
... Setup settings (see page 42). • Check the connection between channel and program. • Confirm the picture quality by selecting Signal Diagnostics in the Product Support settings (page 31). Select your desired input from the TV or try using 300 ohm twin lead, move the excess lead away from the External Inputs list. • Picture quality depends on the signal content. See Quick Setup Guide (supplied) to confirm routine panel operation. Many HD channels...
Operating Instructions
Page 44
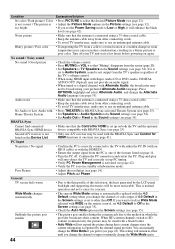
... to lock in Wide Mode selected with WIDE on the remote control, set 4:3 Default to Off in the Screen settings (see page 35). • Check the Auto Wide option in the Picture settings (see page 35). Turn off . Second A/V receiver is not output from the TV's speakers regardless of the TV's volume control. • When using HDMI input with Super Audio CD or DVD-Audio, DIGITAL AUDIO OUT (Optical) may not provide an audio signal. • When tuned to a digital channel with BRAVIA...
... to lock in Wide Mode selected with WIDE on the remote control, set 4:3 Default to Off in the Screen settings (see page 35). • Check the Auto Wide option in the Picture settings (see page 35). Turn off . Second A/V receiver is not output from the TV's speakers regardless of the TV's volume control. • When using HDMI input with Super Audio CD or DVD-Audio, DIGITAL AUDIO OUT (Optical) may not provide an audio signal. • When tuned to a digital channel with BRAVIA...
Operating Instructions
Page 46
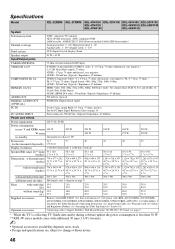
...Stand) / Operating Instructions (1) / Quick Setup Guide (1) / Warranty Card (1) / Safety and Regulatory Booklet (1) / Attaching the Table-Top Stand (1) / Screws (4) Optional accessories Connecting cables / Support Belt Kit / Wall-Mount Bracket: SU-WL500 / TV Stand: see page 2 * While the TV is collecting TV Guide data and/or during software update the power consumption is less than 30 W. ** KDL-W series models come with additional 30 mm (1 1/8") tweeters. ~ • Optional accessories availability depends on page 14. Specifications Model KDL-32XBR6 KDL-37XBR6 KDL-40V4150 KDL-42V4100 KDL...
...Stand) / Operating Instructions (1) / Quick Setup Guide (1) / Warranty Card (1) / Safety and Regulatory Booklet (1) / Attaching the Table-Top Stand (1) / Screws (4) Optional accessories Connecting cables / Support Belt Kit / Wall-Mount Bracket: SU-WL500 / TV Stand: see page 2 * While the TV is collecting TV Guide data and/or during software update the power consumption is less than 30 W. ** KDL-W series models come with additional 30 mm (1 1/8") tweeters. ~ • Optional accessories availability depends on page 14. Specifications Model KDL-32XBR6 KDL-37XBR6 KDL-40V4150 KDL-42V4100 KDL...
Operating Instructions
Page 47
... S S VIDEO jack 11 Screen Position 36 Settings Channel 37 Clock/Timers 31 Closed Captions (CC) 38 External Inputs 41 General Setup 42 HDMI Settings 41 Initial Setup 42 Parental Lock 38 Picture 32 Product Support 31 Screen 35 Sound 34 Sharpness 32 Show/Hide Channels 37 Signal Diagnostics 31 Signal Type 37 SLEEP button 19 Sleep Timer 31 Software Update 31 Sound Adjustments 34 Sound Booster 34 Sound Mode 34 Speaker 23 Speakers 34 STANDBY LED 23 Steady Sound 34 Surround 34 T Timer 31 Treble 34 Troubleshooting 43-45 TV Auto Power On 41 TV Guide...
... S S VIDEO jack 11 Screen Position 36 Settings Channel 37 Clock/Timers 31 Closed Captions (CC) 38 External Inputs 41 General Setup 42 HDMI Settings 41 Initial Setup 42 Parental Lock 38 Picture 32 Product Support 31 Screen 35 Sound 34 Sharpness 32 Show/Hide Channels 37 Signal Diagnostics 31 Signal Type 37 SLEEP button 19 Sleep Timer 31 Software Update 31 Sound Adjustments 34 Sound Booster 34 Sound Mode 34 Speaker 23 Speakers 34 STANDBY LED 23 Steady Sound 34 Surround 34 T Timer 31 Treble 34 Troubleshooting 43-45 TV Auto Power On 41 TV Guide...


