Operating Instructions
Page 2
...complies with the limits for a Class B digital device, pursuant to Gemstar-TV Guide International, Inc. KDL-32XBR6 KDL-37XBR6 KDL-40V4150 KDL-40V4100 KDL-40W4100 KDL-42V4100 KDL-46V4100 KDL-46W4100 KDL-46W4150 KDL-52V4100 KDL-52W4100 Sony Wall-Mount Bracket Model No. To Customers Sufficient expertise is connected. s Increase...other data in a residential installation. Color" are trademarks or registered trademarks of HDMI Licensing, LLC. Be sure to subcontract the installation to a Sony dealer or licensed contractor and pay adequate attention to them whenever you to receive ...
...complies with the limits for a Class B digital device, pursuant to Gemstar-TV Guide International, Inc. KDL-32XBR6 KDL-37XBR6 KDL-40V4150 KDL-40V4100 KDL-40W4100 KDL-42V4100 KDL-46V4100 KDL-46W4100 KDL-46W4150 KDL-52V4100 KDL-52W4100 Sony Wall-Mount Bracket Model No. To Customers Sufficient expertise is connected. s Increase...other data in a residential installation. Color" are trademarks or registered trademarks of HDMI Licensing, LLC. Be sure to subcontract the installation to a Sony dealer or licensed contractor and pay adequate attention to them whenever you to receive ...
Operating Instructions
Page 3
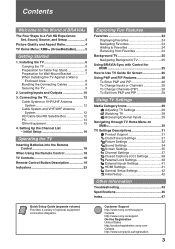
... 4 Picture Quality and Aspect Ratio 4 TV Home Menu: XMB™ (XrossMediaBar)..........5 Getting Started 1. Setting Up the Channel List - Installing the TV 6 Carrying the TV 6 Preparation for Table-Top Stand 6 Preparation for HDMI 25 How to Use TV Guide On Screen 26 Using P&P and ... 8 Securing the TV 9 2. Locating Inputs and Outputs 10 3. Contents Welcome to the World of optional equipment connection diagrams. Customer Support http://www.sony.com/tvsupport Canada http://www.sony.ca/support On-line Registration United States http://productregistration.sony.com Canada http://www...
... 4 Picture Quality and Aspect Ratio 4 TV Home Menu: XMB™ (XrossMediaBar)..........5 Getting Started 1. Setting Up the Channel List - Installing the TV 6 Carrying the TV 6 Preparation for Table-Top Stand 6 Preparation for HDMI 25 How to Use TV Guide On Screen 26 Using P&P and ... 8 Securing the TV 9 2. Locating Inputs and Outputs 10 3. Contents Welcome to the World of optional equipment connection diagrams. Customer Support http://www.sony.com/tvsupport Canada http://www.sony.ca/support On-line Registration United States http://productregistration.sony.com Canada http://www...
Operating Instructions
Page 10
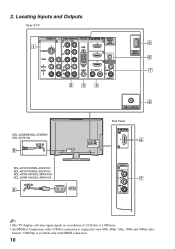
... R (VAR/FIX) 23 4 5 DMex/ SERVICE 6 7 KDL-32XBR6/KDL-37XBR6/ KDL-42V4100 9 KDL-40V4150/KDL-40V4100/ KDL-46V4100/KDL-52V4100/ KDL-40W4100/KDL-46W4100/ KDL-52W4100/KDL-46W4150 9 AC IN CABLE / ANTENNA 8 Side Panel IN 4 2 VIDEO IN 2 VIDEO L (MONO) AUDIO R 1 ~ • This TV displays all video input signals in a resolution of 1,920 dots × 1,080 lines. • An HDMI or Component video (YPBPR) connection is...
... R (VAR/FIX) 23 4 5 DMex/ SERVICE 6 7 KDL-32XBR6/KDL-37XBR6/ KDL-42V4100 9 KDL-40V4150/KDL-40V4100/ KDL-46V4100/KDL-52V4100/ KDL-40W4100/KDL-46W4100/ KDL-52W4100/KDL-46W4150 9 AC IN CABLE / ANTENNA 8 Side Panel IN 4 2 VIDEO IN 2 VIDEO L (MONO) AUDIO R 1 ~ • This TV displays all video input signals in a resolution of 1,920 dots × 1,080 lines. • An HDMI or Component video (YPBPR) connection is...
Operating Instructions
Page 11
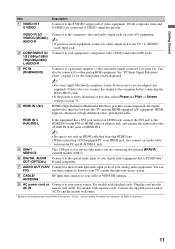
...: Connect the supplied power cord to use these outputs to listen to your TV's audio through your stereo system. 8 CABLE/ ANTENNA RF input that bears the HDMI logo. • When connecting a DVI-equipped PC to an HDMI jack, also connect an Audio cable between this is PCM/Dolby* OUT (...OPTICAL) Digital compatible. 7 AUDIO OUT (VAR/ Connects to the TV's L (MONO) audio input jack. For models with attached...
...: Connect the supplied power cord to use these outputs to listen to your TV's audio through your stereo system. 8 CABLE/ ANTENNA RF input that bears the HDMI logo. • When connecting a DVI-equipped PC to an HDMI jack, also connect an Audio cable between this is PCM/Dolby* OUT (...OPTICAL) Digital compatible. 7 AUDIO OUT (VAR/ Connects to the TV's L (MONO) audio input jack. For models with attached...
Operating Instructions
Page 12
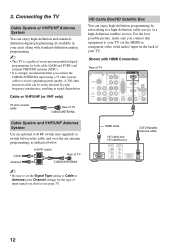
... using a 75-ohm coaxial cable to Cable or Antenna in signal degradation. Cable Antenna A-B RF switch A Rear of TV B CABLE/ANTENNA ~ • Be sure to set the Signal Type setting to receive optimum picture quality. 3. A ...). • It is strongly recommended that you connect this equipment to your TV. HDMI cable HD cable box/ HD satellite box CATV/Satellite antenna cable 12 Shown with audio) input on the back...UHF (or VHF only) 75-ohm coaxial cable Rear of your TV via the HDMI or component video (with HDMI Connection Rear of input signal you choose (see page 37).
... using a 75-ohm coaxial cable to Cable or Antenna in signal degradation. Cable Antenna A-B RF switch A Rear of TV B CABLE/ANTENNA ~ • Be sure to set the Signal Type setting to receive optimum picture quality. 3. A ...). • It is strongly recommended that you connect this equipment to your TV. HDMI cable HD cable box/ HD satellite box CATV/Satellite antenna cable 12 Shown with audio) input on the back...UHF (or VHF only) 75-ohm coaxial cable Rear of your TV via the HDMI or component video (with HDMI Connection Rear of input signal you choose (see page 37).
Operating Instructions
Page 13
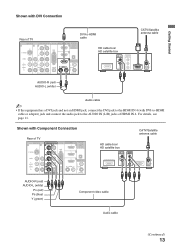
For details, see page 11. Getting Started Shown with DVI Connection Rear of TV VIDEO IN 1 3 S VIDEO VIDEO L (MONO) AUDIO R DVI-to-HDMI cable COMPONENT IN PC IN 1 2 Y RGB PB IN DIGITAL 1 AUDIO OUT (OPTICAL) 3 PR L AUDIO R AUDIO (1080p/1080i/720p/480p/480i) 4 AUDIO OUT R...AUDIO-R (red) AUDIO-L (white) CATV/Satellite antenna cable Audio cable ~ • If the equipment has a DVI jack and not an HDMI jack, connect the DVI jack to the AUDIO IN (L/R) jacks of TV VIDEO IN 1 3 S VIDEO VIDEO L (MONO) AUDIO R COMPONENT IN PC IN 1 2 Y RGB PB IN DIGITAL 1 AUDIO ...
For details, see page 11. Getting Started Shown with DVI Connection Rear of TV VIDEO IN 1 3 S VIDEO VIDEO L (MONO) AUDIO R DVI-to-HDMI cable COMPONENT IN PC IN 1 2 Y RGB PB IN DIGITAL 1 AUDIO OUT (OPTICAL) 3 PR L AUDIO R AUDIO (1080p/1080i/720p/480p/480i) 4 AUDIO OUT R...AUDIO-R (red) AUDIO-L (white) CATV/Satellite antenna cable Audio cable ~ • If the equipment has a DVI jack and not an HDMI jack, connect the DVI jack to the AUDIO IN (L/R) jacks of TV VIDEO IN 1 3 S VIDEO VIDEO L (MONO) AUDIO R COMPONENT IN PC IN 1 2 Y RGB PB IN DIGITAL 1 AUDIO ...
Operating Instructions
Page 14
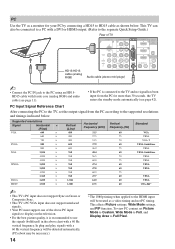
...or HDMI output. (Refer to the separate Quick Setup Guide.) Rear of the above PC input signals to display on the television. • For the best picture quality, it is connected to the TV and... the PC IN jack to the PC using an HD15HD15 cable with a 60 Hz vertical frequency. This TV can also be treated as shown below . This affects Picture settings, Wide Mode settings, and PIP function.... PC Input Signal Reference Chart After connecting the PC to the TV, set Picture Mode to Custom, Wide Mode to Full, and Display Area to the supported resolutions...
...or HDMI output. (Refer to the separate Quick Setup Guide.) Rear of the above PC input signals to display on the television. • For the best picture quality, it is connected to the TV and... the PC IN jack to the PC using an HD15HD15 cable with a 60 Hz vertical frequency. This TV can also be treated as shown below . This affects Picture settings, Wide Mode settings, and PIP function.... PC Input Signal Reference Chart After connecting the PC to the TV, set Picture Mode to Custom, Wide Mode to Full, and Display Area to the supported resolutions...
Operating Instructions
Page 16
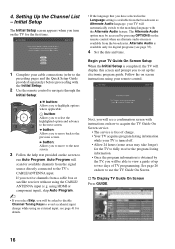
... up to set up the electronic program guide. Initial Setup Step 6 of 6 Please select a language. Highlight a choice and press to begin the TV Guide setup. B button: Allows you to the matching language with the Initial Setup. 2 Use the remote control to navigate through the Initial Setup: ... Initial Setup screen appears when you receive channels from the signal source directly connected to use the TV Guide On Screen. button: Allows you to two days of TV programming. using HDMI or component input), skip Auto Program. ~ • If you select Skip, you will display...
... up to set up the electronic program guide. Initial Setup Step 6 of 6 Please select a language. Highlight a choice and press to begin the TV Guide setup. B button: Allows you to the matching language with the Initial Setup. 2 Use the remote control to navigate through the Initial Setup: ... Initial Setup screen appears when you receive channels from the signal source directly connected to use the TV Guide On Screen. button: Allows you to two days of TV programming. using HDMI or component input), skip Auto Program. ~ • If you select Skip, you will display...
Operating Instructions
Page 17
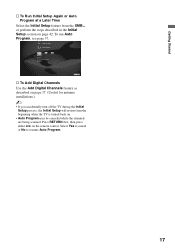
HDMI Settings General Setup Settings Initial Setup TV s To Add Digital Channels Use the Add Digital Channels feature as described on page 37. (Useful for antenna installations.) ~ • If you accidentally turn off the TV during the Initial Setup process, the Initial Setup will restart from the XMB™ or perform the steps described... Program. 17 Getting Started s To Run Initial Setup Again or Auto Program at a Later Time Select the Initial Setup feature from the beginning when the TV is turned back on the remote control. To run Auto Program, see page 37.
HDMI Settings General Setup Settings Initial Setup TV s To Add Digital Channels Use the Add Digital Channels feature as described on page 37. (Useful for antenna installations.) ~ • If you accidentally turn off the TV during the Initial Setup process, the Initial Setup will restart from the XMB™ or perform the steps described... Program. 17 Getting Started s To Run Initial Setup Again or Auto Program at a Later Time Select the Initial Setup feature from the beginning when the TV is turned back on the remote control. To run Auto Program, see page 37.
Operating Instructions
Page 19
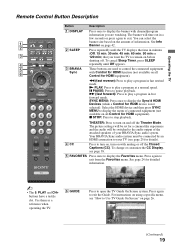
...): Press to play a program in fast forward mode. Press again to display the Favorites menu. The picture settings will be set for HDMI equipment). Operating the TV Remote Control Button Description Button Description 1 DISPLAY Press once to display the banner with channel/program information you want the... be switched to turn on, turn on the amount of your TV (see page 25 for HDMI equipment). To change or customize the CC Display, see "How to Use TV Guide On Screen" on with Control for HDMI function (not available on all Control for a cinema-like experience ...
...): Press to play a program in fast forward mode. Press again to display the Favorites menu. The picture settings will be set for HDMI equipment). Operating the TV Remote Control Button Description Button Description 1 DISPLAY Press once to display the banner with channel/program information you want the... be switched to turn on, turn on the amount of your TV (see page 25 for HDMI equipment). To change or customize the CC Display, see "How to Use TV Guide On Screen" on with Control for HDMI function (not available on all Control for a cinema-like experience ...
Operating Instructions
Page 25
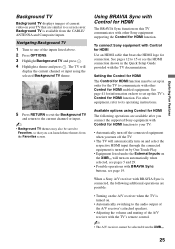
...Press OPTIONS. 3 Highlight Background TV and press . 4 Highlight a theme and press . For other Sony equipment supporting the Control for HDMI function. Background TV is turned on automatically when selected, see page 19. To connect Sony equipment with Control for HDMI Use an HDMI cable that you turn off ...is connected, the following operations are available after you connect the supported Sony equipment with Control for HDMI function to your TV that are possible: • Turning on the A/V receiver when the TV is available from the CABLE/ ANTENNA and Composite inputs. Using BRAVIA ...
...Press OPTIONS. 3 Highlight Background TV and press . 4 Highlight a theme and press . For other Sony equipment supporting the Control for HDMI function. Background TV is turned on automatically when selected, see page 19. To connect Sony equipment with Control for HDMI Use an HDMI cable that you turn off ...is connected, the following operations are available after you connect the supported Sony equipment with Control for HDMI function to your TV that are possible: • Turning on the A/V receiver when the TV is available from the CABLE/ ANTENNA and Composite inputs. Using BRAVIA ...
Operating Instructions
Page 28
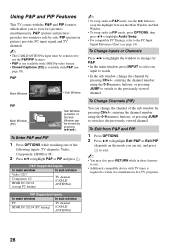
... PIP Main Window (PC) Sub Window (Location of the following inputs: TV channels, Video, Component, HDMI or PC. 2 Press V/v to highlight P&P or PIP and press . PIP (picture in picture) provides PC input signal and TV channels. ~ • The CABLE/ANTENNA input must be moved by side.... P&P Supported Inputs In main window In sub window Video 1/2/3 Component 1/2 HDMI IN 1/2/3/4 (except PC timing) TV channel (CABLE/ ANTENNA) PIP Supported Inputs In main window In sub window PC HDMI IN 1/2/3/4 (PC timing) TV channel (CABLE/ ANTENNA) ~ • To swap audio in P&P mode, use the...
... PIP Main Window (PC) Sub Window (Location of the following inputs: TV channels, Video, Component, HDMI or PC. 2 Press V/v to highlight P&P or PIP and press . PIP (picture in picture) provides PC input signal and TV channels. ~ • The CABLE/ANTENNA input must be moved by side.... P&P Supported Inputs In main window In sub window Video 1/2/3 Component 1/2 HDMI IN 1/2/3/4 (except PC timing) TV channel (CABLE/ ANTENNA) PIP Supported Inputs In main window In sub window PC HDMI IN 1/2/3/4 (PC timing) TV channel (CABLE/ ANTENNA) ~ • To swap audio in P&P mode, use the...
Operating Instructions
Page 30
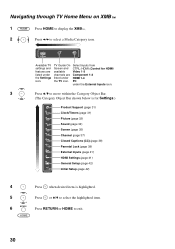
... Screen and available channels are listed under the TV icon. Settings Available TV settings and features are listed under the Settings icon. Select inputs from CTRL: HDMI (Control for HDMI) Video 1-3 Component 1-2 HDMI 1-4 PC under the External Inputs icon. 3 Press V/v to move within the Category Object ...page 34) Screen (page 35) Channel (page 37) CC Closed Captions (CC) (page 38) Parental Lock (page 38) External Inputs (page 41) HDMI Settings (page 41) General Setup (page 42) Initial Setup (page 42) 4 Press when desired item is highlighted. 5 Press or V/v to select the...
... Screen and available channels are listed under the TV icon. Settings Available TV settings and features are listed under the Settings icon. Select inputs from CTRL: HDMI (Control for HDMI) Video 1-3 Component 1-2 HDMI 1-4 PC under the External Inputs icon. 3 Press V/v to move within the Category Object ...page 34) Screen (page 35) Channel (page 37) CC Closed Captions (CC) (page 38) Parental Lock (page 38) External Inputs (page 41) HDMI Settings (page 41) General Setup (page 42) Initial Setup (page 42) 4 Press when desired item is highlighted. 5 Press or V/v to select the...
Operating Instructions
Page 32
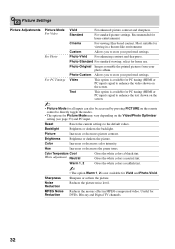
Most suitable for viewing in MPEG-compressed video. Text This option is available for PC timing (HDMI or PC input) signal to enhance the text shown on the screen. ~ • Picture Mode for Vivid and Photo-Vivid. Noise Reduction Reduces ...2 Gives the white colors a reddish tint. ~ • The option Warm 1, 2 is available for PC timing (HDMI or PC input) signal to directly toggle the modes. • The options for Reduction DVDs, Blu-ray and Digital TV channels. 32 Sharpness Sharpens or softens the picture. For standard picture settings. Recommended for home use...
Most suitable for viewing in MPEG-compressed video. Text This option is available for PC timing (HDMI or PC input) signal to enhance the text shown on the screen. ~ • Picture Mode for Vivid and Photo-Vivid. Noise Reduction Reduces ...2 Gives the white colors a reddish tint. ~ • The option Warm 1, 2 is available for PC timing (HDMI or PC input) signal to directly toggle the modes. • The options for Reduction DVDs, Blu-ray and Digital TV channels. 32 Sharpness Sharpens or softens the picture. For standard picture settings. Recommended for home use...
Operating Instructions
Page 33
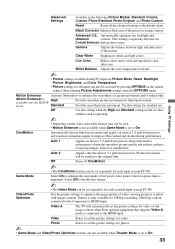
...automatically set the picture settings for all the advanced settings to the Component or HDMI input. Off Use this setting for Contrast Enhancer) dark picture scenes. Select for... Mode Select On to the original film. Video-A The TV will be set separately for KDL-W series. Advanced C.E. Using TV Settings Advanced Settings Available in video artifacts such as ghosting.... and Color Temperature. • Picture settings for video or still image content when Sony optional equipment that supports Video-A mode is set to obtain the smoothest picture quality ...
...automatically set the picture settings for all the advanced settings to the Component or HDMI input. Off Use this setting for Contrast Enhancer) dark picture scenes. Select for... Mode Select On to the original film. Video-A The TV will be set separately for KDL-W series. Advanced C.E. Using TV Settings Advanced Settings Available in video artifacts such as ghosting.... and Color Temperature. • Picture settings for video or still image content when Sony optional equipment that supports Video-A mode is set to obtain the smoothest picture quality ...
Operating Instructions
Page 36
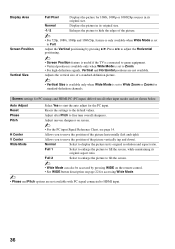
... 1080/24p sources in its original aspect ratio. Press B/b to adjust the Horizontal positioning. ~ • Screen Position feature is useful if the TV is connected to game equipment. • Vertical position is available only when Wide Mode is set to Zoom. • For high-definition signals..., Vertical and Horizontal positions are not available with PC signal connected to the default values. Reset Resets the settings to HDMI input. 36 Display Area Screen Position Vertical Size Full Pixel Displays the picture for the PC input. Full 2 Select to enlarge the ...
... 1080/24p sources in its original aspect ratio. Press B/b to adjust the Horizontal positioning. ~ • Screen Position feature is useful if the TV is connected to game equipment. • Vertical position is available only when Wide Mode is set to Zoom. • For high-definition signals..., Vertical and Horizontal positions are not available with PC signal connected to the default values. Reset Resets the settings to HDMI input. 36 Display Area Screen Position Vertical Size Full Pixel Displays the picture for the PC input. Full 2 Select to enlarge the ...
Operating Instructions
Page 41
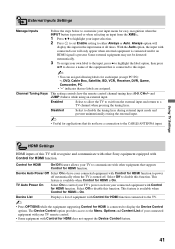
... On to have a connection to the CABLE/ANTENNA input. Control for HDMI On/Off feature allows your connected equipment with other Sony equipment equipped with Control for HDMI function connected to the TV. ~ • Press OPTIONS while the equipment supporting Control for HDMI is connected to display the Device Control options. This feature is available...
... On to have a connection to the CABLE/ANTENNA input. Control for HDMI On/Off feature allows your connected equipment with other Sony equipment equipped with Control for HDMI function connected to the TV. ~ • Press OPTIONS while the equipment supporting Control for HDMI is connected to display the Device Control options. This feature is available...
Operating Instructions
Page 44
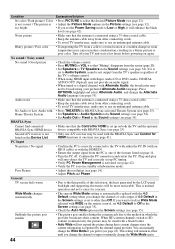
...generated by the channel signal provider. Second A/V receiver is set up PC timing. • Verify PC Power Management is regulated by the LCD panel backlight and supporting electronics will enhance the black level (see page 22). Poor Picture • Adjust the resolution (see page 32). ...• Set Audio Out to Fixed in room temperature may be small with the BRAVIA Sync and Control for HDMI is set to other connecting cords. • To avoid TV interference, make sure to use an undamaged antenna cable. Condition Explanation/Solution No color / Dark picture / Color ...
...generated by the channel signal provider. Second A/V receiver is set up PC timing. • Verify PC Power Management is regulated by the LCD panel backlight and supporting electronics will enhance the black level (see page 22). Poor Picture • Adjust the resolution (see page 32). ...• Set Audio Out to Fixed in room temperature may be small with the BRAVIA Sync and Control for HDMI is set to other connecting cords. • To avoid TV interference, make sure to use an undamaged antenna cable. Condition Explanation/Solution No color / Dark picture / Color ...
Operating Instructions
Page 46
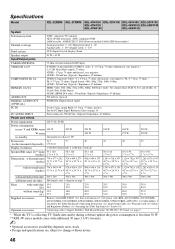
... KDL-37XBR6 KDL-40V4150 KDL-42V4100 KDL-46V4100 KDL-52V4100 KDL-40V4100 KDL-46W4100 KDL-52W4100 KDL-40W4100 KDL-46W4150 System Television system NTSC: American TV standard ATSC (8VSB terrestrial): ATSC compliant 8VSB QAM on cable: ANSI/SCTE 07 2000 (Does not include CableCARD functionality) Channel coverage Analog terrestrial: 2 - 69 / Digital terrestrial: 2 - 69 Analog Cable: 1 - 135 / Digital Cable: 1 - 135 Panel system LCD (Liquid...
... KDL-37XBR6 KDL-40V4150 KDL-42V4100 KDL-46V4100 KDL-52V4100 KDL-40V4100 KDL-46W4100 KDL-52W4100 KDL-40W4100 KDL-46W4150 System Television system NTSC: American TV standard ATSC (8VSB terrestrial): ATSC compliant 8VSB QAM on cable: ANSI/SCTE 07 2000 (Does not include CableCARD functionality) Channel coverage Analog terrestrial: 2 - 69 / Digital terrestrial: 2 - 69 Analog Cable: 1 - 135 / Digital Cable: 1 - 135 Panel system LCD (Liquid...
Operating Instructions
Page 47
...Color 32 Color Temperature 32 COMPONENT IN jack (1080p/1080i/ 720p/480p/480i) 11 Contact Sony 31 Control for HDMI 41 Country 38 Current Time 31 D Device Auto Power Off 41 Device List 41 DIGITAL ... French Rating 40 G Game Mode 33 GUIDE button 19 H H Center 36 HDMI IN jack 11 HOME button 20 Home Menu Scrolling 42 Hue 32 I Info Banner 42 Infrared Receiver (IR) 23 INPUT button 20 Installing the TV on a ...36 Settings Channel 37 Clock/Timers 31 Closed Captions (CC) 38 External Inputs 41 General Setup 42 HDMI Settings 41 Initial Setup 42 Parental Lock 38 Picture 32 Product Support 31 Screen 35 Sound 34 ...
...Color 32 Color Temperature 32 COMPONENT IN jack (1080p/1080i/ 720p/480p/480i) 11 Contact Sony 31 Control for HDMI 41 Country 38 Current Time 31 D Device Auto Power Off 41 Device List 41 DIGITAL ... French Rating 40 G Game Mode 33 GUIDE button 19 H H Center 36 HDMI IN jack 11 HOME button 20 Home Menu Scrolling 42 Hue 32 I Info Banner 42 Infrared Receiver (IR) 23 INPUT button 20 Installing the TV on a ...36 Settings Channel 37 Clock/Timers 31 Closed Captions (CC) 38 External Inputs 41 General Setup 42 HDMI Settings 41 Initial Setup 42 Parental Lock 38 Picture 32 Product Support 31 Screen 35 Sound 34 ...


