Operating Instructions
Page 3
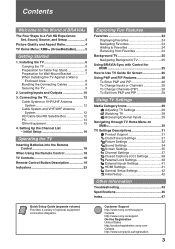
...Equipment 15 4. Setting Up the Channel List - Initial Setup 16 Operating the TV Inserting Batteries into the Remote Control 18 When Using the Remote Control 18 TV Controls 18 Remote Control Button Description 19 Indicators 23 Exploring Fun Features Favorites 24 Displaying Favorites 24 ...) Provides a variety of optional equipment connection diagrams. Customer Support http://www.sony.com/tvsupport Canada http://www.sony.ca/support On-line Registration United States http://productregistration.sony.com Canada http://www.sonystyle.ca/registration 3 Locating Inputs and Outputs 10...
...Equipment 15 4. Setting Up the Channel List - Initial Setup 16 Operating the TV Inserting Batteries into the Remote Control 18 When Using the Remote Control 18 TV Controls 18 Remote Control Button Description 19 Indicators 23 Exploring Fun Features Favorites 24 Displaying Favorites 24 ...) Provides a variety of optional equipment connection diagrams. Customer Support http://www.sony.com/tvsupport Canada http://www.sony.ca/support On-line Registration United States http://productregistration.sony.com Canada http://www.sonystyle.ca/registration 3 Locating Inputs and Outputs 10...
Operating Instructions
Page 5
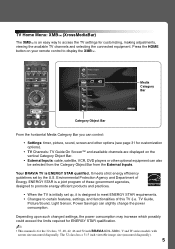
...The 32 class has a 31.5 inch viewable image size (measured diagonally). 5 TV Home Menu: XMB™ (XrossMediaBar) The XMB™ is for the 32 class, 37, 40, 42, 46 and 52 inch BRAVIA KDL-XBR6, V and W series models with screen size measured diagonally. Press the... of these government agencies, designed to access the TV settings for customization options). • TV Channels: TV Guide On Screen™ and available channels are displayed on your remote control to certain features, settings, and functionalities of this TV (i.e. TV Guide, Picture/Sound, Light Sensor, Power Savings)...
...The 32 class has a 31.5 inch viewable image size (measured diagonally). 5 TV Home Menu: XMB™ (XrossMediaBar) The XMB™ is for the 32 class, 37, 40, 42, 46 and 52 inch BRAVIA KDL-XBR6, V and W series models with screen size measured diagonally. Press the... of these government agencies, designed to access the TV settings for customization options). • TV Channels: TV Guide On Screen™ and available channels are displayed on your remote control to certain features, settings, and functionalities of this TV (i.e. TV Guide, Picture/Sound, Light Sensor, Power Savings)...
Operating Instructions
Page 16
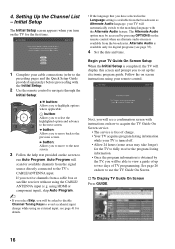
...cable connections (refer to the preceding pages and the Quick Setup Guide provided separately) before proceeding with the Initial Setup. 2 Use the remote control to navigate through the Initial Setup: V/v button: Allows you to select the highlighted option and advance to the next screen. button: Allows...the Initial Setup is available only for digital programs (see a confirmation screen with the Alternate Audio feature. Begin your remote control. If you to set up to the TV's CABLE/ANTENNA input. See page 26 on screen instructions using HDMI or component input), skip Auto Program. ~ &#...
...cable connections (refer to the preceding pages and the Quick Setup Guide provided separately) before proceeding with the Initial Setup. 2 Use the remote control to navigate through the Initial Setup: V/v button: Allows you to select the highlighted option and advance to the next screen. button: Allows...the Initial Setup is available only for digital programs (see a confirmation screen with the Alternate Audio feature. Begin your remote control. If you to set up to the TV's CABLE/ANTENNA input. See page 26 on screen instructions using HDMI or component input), skip Auto Program. ~ &#...
Operating Instructions
Page 17
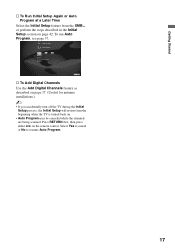
...17 To run Auto Program, see page 37. Press RETURN first, then press either B/b on page 42. HDMI Settings General Setup Settings Initial Setup TV s To Add Digital Channels Use the Add Digital Channels feature as described on page 37. (Useful for antenna installations.) ~ • If you ...accidentally turn off the TV during the Initial Setup process, the Initial Setup will restart from the XMB™ or perform the steps described in the Initial Setup section on the remote control.
...17 To run Auto Program, see page 37. Press RETURN first, then press either B/b on page 42. HDMI Settings General Setup Settings Initial Setup TV s To Add Digital Channels Use the Add Digital Channels feature as described on page 37. (Useful for antenna installations.) ~ • If you ...accidentally turn off the TV during the Initial Setup process, the Initial Setup will restart from the XMB™ or perform the steps described in the Initial Setup section on the remote control.

Operating Instructions
Page 18
...; If you are having problems with your remote control; See descriptions on the remote control. TV Controls The buttons located on the top of the remote control. Operating the TV Inserting Batteries into the Remote Control Insert two size AA batteries (supplied) by matching e and E on your TV. • Fluorescent lamps can interfere with the remote control, reinsert or replace your batteries and make...
...; If you are having problems with your remote control; See descriptions on the remote control. TV Controls The buttons located on the top of the remote control. Operating the TV Inserting Batteries into the Remote Control Insert two size AA batteries (supplied) by matching e and E on your TV. • Fluorescent lamps can interfere with the remote control, reinsert or replace your batteries and make...
Operating Instructions
Page 19
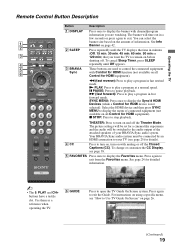
... then press SYNC MENU to display the menu of information. To change or customize the CC Display, see "How to Use TV Guide On Screen" on all Control for HDMI function (not available on page 26. (Continued) 19 See page 24 for details). 4 CC Press to your ... 120 min) that you are used to play a program at a normal speed. Operating the TV Remote Control Button Description Button Description 1 DISPLAY Press once to display the banner with channel/program information you want the TV to remain on using a specific menu, see page 38. 5 FAVORITES Press once to display ...
... then press SYNC MENU to display the menu of information. To change or customize the CC Display, see "How to Use TV Guide On Screen" on all Control for HDMI function (not available on page 26. (Continued) 19 See page 24 for details). 4 CC Press to your ... 120 min) that you are used to play a program at a normal speed. Operating the TV Remote Control Button Description Button Description 1 DISPLAY Press once to display the banner with channel/program information you want the TV to remain on using a specific menu, see page 38. 5 FAVORITES Press once to display ...
Operating Instructions
Page 23
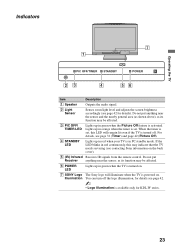
...6 POWER LED Lights up in green when the TV is turned on. 7 SONY Logo Illumination The Sony logo will remain lit even if the TV is turned off the logo illumination, for details see contacting Sony information on . For details, see page 42 for KDL-W series. 23 Do not put Receiver anything near ...see page 31 (Timer) and page 42 (Picture Off). 4 STANDBY LED Lights up in red when your TV is in PC standby mode. If the LED blinks in red continuously, this LED will illuminate when the TV is powered on the back cover). 5 (IR) Infrared Receives IR signals from the remote control.
...6 POWER LED Lights up in green when the TV is turned on. 7 SONY Logo Illumination The Sony logo will remain lit even if the TV is turned off the logo illumination, for details see contacting Sony information on . For details, see page 42 for KDL-W series. 23 Do not put Receiver anything near ...see page 31 (Timer) and page 42 (Picture Off). 4 STANDBY LED Lights up in red when your TV is in PC standby mode. If the LED blinks in red continuously, this LED will illuminate when the TV is powered on the back cover). 5 (IR) Infrared Receives IR signals from the remote control.
Operating Instructions
Page 25
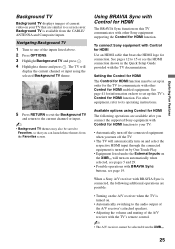
... may also be set up in the Quick Setup Guide provided with the TV's remote control. ~ • The A/V receiver cannot be selected from the XMB™. 25 Navigating Background TV 1 Tune to communicate with other Sony equipment supporting the Control for HDMI function. See pages 12 to 15 or see the HDMI connection shown in order...
... may also be set up in the Quick Setup Guide provided with the TV's remote control. ~ • The A/V receiver cannot be selected from the XMB™. 25 Navigating Background TV 1 Tune to communicate with other Sony equipment supporting the Control for HDMI function. See pages 12 to 15 or see the HDMI connection shown in order...
Operating Instructions
Page 26
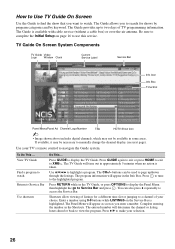
... service. The Guide provides up /down through the listings. To Do This ... The Guide allows you want to watch Return to display the TV Guide. Be sure to complete the Initial Setup on the Service Bar is available with cable service (without a cable box) or over-the-... may be used to page up to the highlighted program. The program information will time out in the Shortcuts. Press V/v to make your TV's remote control to navigate the Guide system. You can be necessary to manually change the channel display (see next page). Shortcuts allow viewing of listings for...
... service. The Guide provides up /down through the listings. To Do This ... The Guide allows you want to watch Return to display the TV Guide. Be sure to complete the Initial Setup on the Service Bar is available with cable service (without a cable box) or over-the-... may be used to page up to the highlighted program. The program information will time out in the Shortcuts. Press V/v to make your TV's remote control to navigate the Guide system. You can be necessary to manually change the channel display (see next page). Shortcuts allow viewing of listings for...
Operating Instructions
Page 29
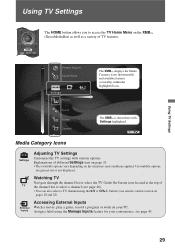
... the Media Category icons (horizontally) and available features (vertically) within the highlighted icon. buttons (see remote control section on the XMB™ (XrossMediaBar) as well as a variety of TV features. Accessing External Inputs External Watch a movie, play a game, record a program or work on...displayed. Inputs Assign a label using the 0-9 or CH+/- TV Media Category Icons Settings Adjusting TV Settings Customize the TV settings with Settings highlighted. Watching TV Navigate through the channel list or select the TV Guide On Screen icon located at the top of different ...
... the Media Category icons (horizontally) and available features (vertically) within the highlighted icon. buttons (see remote control section on the XMB™ (XrossMediaBar) as well as a variety of TV features. Accessing External Inputs External Watch a movie, play a game, record a program or work on...displayed. Inputs Assign a label using the 0-9 or CH+/- TV Media Category Icons Settings Adjusting TV Settings Customize the TV settings with Settings highlighted. Watching TV Navigate through the channel list or select the TV Guide On Screen icon located at the top of different ...

Operating Instructions
Page 31
... the US. • CATV/antenna cable needs to be connected directly to the TV and have the TV tune to remain on the remote control (see page 19). Using TV Settings 31 Your TV's specific information such as a specified volume at the specified time and duration you set... the Current Time. ~ • If the option is disabled, the TV Guide On Screen has automatically set . TV Settings Descriptions Product Support Contact Sony...
... the US. • CATV/antenna cable needs to be connected directly to the TV and have the TV tune to remain on the remote control (see page 19). Using TV Settings 31 Your TV's specific information such as a specified volume at the specified time and duration you set... the Current Time. ~ • If the option is disabled, the TV Guide On Screen has automatically set . TV Settings Descriptions Product Support Contact Sony...
Operating Instructions
Page 32
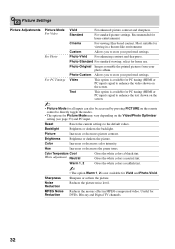
... for PC timing (HDMI or PC input) signal to directly toggle the modes. • The options for Reduction DVDs, Blu-ray and Digital TV channels. 32 MPEG Noise Reduces the mosaic effect in a theater-like environment. Most suitable for home use. Picture Increases or decreases picture contrast....to enhance the text shown on the screen. ~ • Picture Mode for all inputs can also be accessed by pressing PICTURE on the remote control to enhance the video shown on the Video/Photo Optimizer setting (see page 33) and PC input. Sharpness Sharpens or softens the picture. Photo...
... for PC timing (HDMI or PC input) signal to directly toggle the modes. • The options for Reduction DVDs, Blu-ray and Digital TV channels. 32 MPEG Noise Reduces the mosaic effect in a theater-like environment. Most suitable for home use. Picture Increases or decreases picture contrast....to enhance the text shown on the screen. ~ • Picture Mode for all inputs can also be accessed by pressing PICTURE on the remote control to enhance the video shown on the Video/Photo Optimizer setting (see page 33) and PC input. Sharpness Sharpens or softens the picture. Photo...
Operating Instructions
Page 33
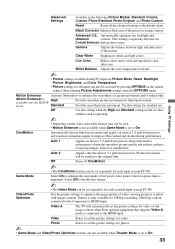
...smoother picture movement for video or still image content when Sony optional equipment that supports Video-A mode is connected to optimize...games where response time is set the picture settings for KDL-W series. Video/Photo Optimizer Sets the picture settings to... and (Advanced contrast. Select Off to the default values. Using TV Settings Advanced Settings Available in detail. ~ • Picture settings ... video artifacts such as ghosting. ~ • Depending on the remote control, then selecting Picture Adjustments settings from the OPTIONS menu. Off Use...
...smoother picture movement for video or still image content when Sony optional equipment that supports Video-A mode is connected to optimize...games where response time is set the picture settings for KDL-W series. Video/Photo Optimizer Sets the picture settings to... and (Advanced contrast. Select Off to the default values. Using TV Settings Advanced Settings Available in detail. ~ • Picture settings ... video artifacts such as ghosting. ~ • Depending on the remote control, then selecting Picture Adjustments settings from the OPTIONS menu. Off Use...

Operating Instructions
Page 34
... desire. Balance Emphasizes left or right speaker balance. Mono For mono reception. Sound Settings Available Sound settings depend on the remote control. Volume Offset Adjusts the volume level of the current input (TV or video input) relative to other inputs. ~ • Sound Adjustments can turn up this setting to second audio programs when...
... desire. Balance Emphasizes left or right speaker balance. Mono For mono reception. Sound Settings Available Sound settings depend on the remote control. Volume Offset Adjusts the volume level of the current input (TV or video input) relative to other inputs. ~ • Sound Adjustments can turn up this setting to second audio programs when...
Operating Instructions
Page 35
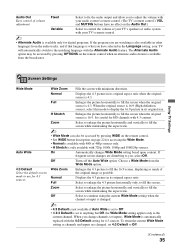
... Default to you, select Off. Wide Zoom Enlarges the 4:3 picture to fill the 16:9 screen, displaying as much of your TV's speakers or audio system with your TV's remote control. ~ • Alternate Audio is available only for HD channels with 4:3 content. It is what you have no effect on the... volume adjustment Fixed Select to fix the audio output and allow you to adjust the volume with your audio system's remote control. (The TV's remote control's VOL and MUTING buttons have selected in other languages from the Wide Mode option. Normal Displays the 4:3 picture in its ...
... Default to you, select Off. Wide Zoom Enlarges the 4:3 picture to fill the 16:9 screen, displaying as much of your TV's speakers or audio system with your TV's remote control. ~ • Alternate Audio is available only for HD channels with 4:3 content. It is what you have no effect on the... volume adjustment Fixed Select to fix the audio output and allow you to adjust the volume with your audio system's remote control. (The TV's remote control's VOL and MUTING buttons have selected in other languages from the Wide Mode option. Normal Displays the 4:3 picture in its ...
Operating Instructions
Page 36
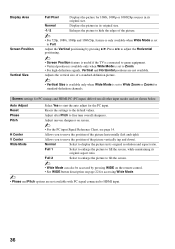
...and HDMI-PC (PC input) differ from all other input modes and are shown below. Adjust the Vertical positioning by pressing WIDE on the remote control. • See WIDE button description on screen. ~ • For the PC input Signal Reference Chart, see page 14. Screen settings ... enlarge the picture to fine tune overall sharpness. Press B/b to adjust the Horizontal positioning. ~ • Screen Position feature is useful if the TV is connected to game equipment. • Vertical position is available only when Wide Mode is set to the default values. V Center Allows you...
...and HDMI-PC (PC input) differ from all other input modes and are shown below. Adjust the Vertical positioning by pressing WIDE on the remote control. • See WIDE button description on screen. ~ • For the PC input Signal Reference Chart, see page 14. Screen settings ... enlarge the picture to fine tune overall sharpness. Press B/b to adjust the Horizontal positioning. ~ • Screen Position feature is useful if the TV is connected to game equipment. • Vertical position is available only when Wide Mode is set to the default values. V Center Allows you...

Operating Instructions
Page 37
...channel number to assign a label. 2 Press V/v to set it. When Auto Program is not available when using the TV Guide On Screen system. button or in the TV for all receivable channels. Press to scroll through the label characters (A-Z, 0-9, etc.). Select to scroll through the channels ...~ • Hidden channels can be accessed by entering the channel number with the CH +/- Using TV Settings 37 To show or hide. 2 Press to scroll through the channel numbers. Automatically sets the channel list in the TV channel list on the remote control. To assign labels to the next character.
...channel number to assign a label. 2 Press V/v to set it. When Auto Program is not available when using the TV Guide On Screen system. button or in the TV for all receivable channels. Press to scroll through the label characters (A-Z, 0-9, etc.). Select to scroll through the channels ...~ • Hidden channels can be accessed by entering the channel number with the CH +/- Using TV Settings 37 To show or hide. 2 Press to scroll through the channel numbers. Automatically sets the channel list in the TV channel list on the remote control. To assign labels to the next character.
Operating Instructions
Page 38
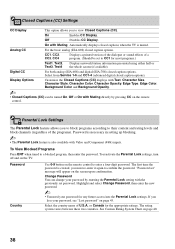
... CC For the basic analog (EIA-608) closed caption options. Select from Service 1-6 and CC1-4 (advanced digital closed captions when the TV is muted. The first time the password is also available with Muting directly by entering the Parental Lock setting with Muting Automatically displays closed ... is created, you to block programs according to confirm the password. On with the previously set " message will appear on page 40. 38 See Custom Rating System Chart on the screen upon confirmation. To reactivate the Parental Lock settings, turn off and on the remote control.
... CC For the basic analog (EIA-608) closed caption options. Select from Service 1-6 and CC1-4 (advanced digital closed captions when the TV is muted. The first time the password is also available with Muting directly by entering the Parental Lock setting with Muting Automatically displays closed ... is created, you to block programs according to confirm the password. On with the previously set " message will appear on page 40. 38 See Custom Rating System Chart on the screen upon confirmation. To reactivate the Parental Lock settings, turn off and on the remote control.
Operating Instructions
Page 41
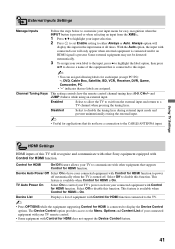
... automatically. 3 To assign your TV remote control. • Some equipment with Control for HDMI does not support the Device Control feature. 41 TV Auto Power On Select On to control your TV to communicate with other Sony equipment equipped with Control for HDMI function. Channel Tuning Keys This setting controls how the remote control channel tuning keys (0-9, CH+/- Using TV Settings HDMI Settings HDMI...
... automatically. 3 To assign your TV remote control. • Some equipment with Control for HDMI does not support the Device Control feature. 41 TV Auto Power On Select On to control your TV to communicate with other Sony equipment equipped with Control for HDMI function. Channel Tuning Keys This setting controls how the remote control channel tuning keys (0-9, CH+/- Using TV Settings HDMI Settings HDMI...
Operating Instructions
Page 42
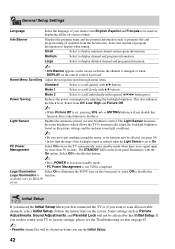
...VOL +/- Press other buttons to display when tuning. The STANDBY LED on the remote control is function. available only for more than 30 seconds. Mode 2 Select to ...standby mode. • PC Power Management is no signal input for KDL-W series. If you want to scan all the on the picture settings... on the front panel or select Off to have the TV automatically enter standby mode when there is not VESA-compliant....information. This also enhances the black level. Large Select to illuminate the SONY logo on the screen. Logo Illumination Select On to display detailed channel and...
...VOL +/- Press other buttons to display when tuning. The STANDBY LED on the remote control is function. available only for more than 30 seconds. Mode 2 Select to ...standby mode. • PC Power Management is no signal input for KDL-W series. If you want to scan all the on the picture settings... on the front panel or select Off to have the TV automatically enter standby mode when there is not VESA-compliant....information. This also enhances the black level. Large Select to illuminate the SONY logo on the screen. Logo Illumination Select On to display detailed channel and...


