Operating Instructions
Page 2
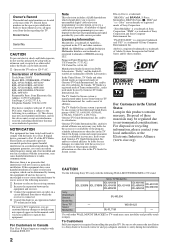
... in a residential installation. CAUTION Use the following WALL-MOUNT BRACKET or TV-stand. KDL-32XBR6 KDL-37XBR6 KDL-40V4150 KDL-40V4100 KDL-40W4100 KDL-42V4100 KDL-46V4100 KDL-46W4100 KDL-46W4150 KDL-52V4100 KDL-52W4100 Sony Wall-Mount Bracket Model No. SU-WL500 Sony TV - WS-S10LS Stand Model No. To Customers Sufficient expertise is a registered trademark or a trademark of these numbers in this device must accept any changes or modifications not expressly approved in Canada This Class B digital apparatus complies...
... in a residential installation. CAUTION Use the following WALL-MOUNT BRACKET or TV-stand. KDL-32XBR6 KDL-37XBR6 KDL-40V4150 KDL-40V4100 KDL-40W4100 KDL-42V4100 KDL-46V4100 KDL-46W4100 KDL-46W4150 KDL-52V4100 KDL-52W4100 Sony Wall-Mount Bracket Model No. SU-WL500 Sony TV - WS-S10LS Stand Model No. To Customers Sufficient expertise is a registered trademark or a trademark of these numbers in this device must accept any changes or modifications not expressly approved in Canada This Class B digital apparatus complies...
Operating Instructions
Page 3
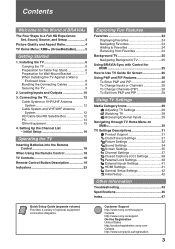
...Watching TV 29 Accessing External Inputs 29 Navigating through TV Home Menu on XMB 30 TV Settings Descriptions 31 Product Support 31 Clock/Timers Settings 31 Picture Settings 32 Sound Settings 34 Screen Settings 35 Channel Settings 37 CC Closed Captions (CC) Settings 38 Parental Lock Settings 38 External Inputs Settings 41 HDMI Settings 41 General Setup Settings 42 Initial Setup 42 Other Information Troubleshooting 43 Specifications 46 Index 47 Quick Setup Guide (separate volume) Provides a variety of optional equipment connection diagrams. Customer Support http://www.sony...
...Watching TV 29 Accessing External Inputs 29 Navigating through TV Home Menu on XMB 30 TV Settings Descriptions 31 Product Support 31 Clock/Timers Settings 31 Picture Settings 32 Sound Settings 34 Screen Settings 35 Channel Settings 37 CC Closed Captions (CC) Settings 38 Parental Lock Settings 38 External Inputs Settings 41 HDMI Settings 41 General Setup Settings 42 Initial Setup 42 Other Information Troubleshooting 43 Specifications 46 Index 47 Quick Setup Guide (separate volume) Provides a variety of optional equipment connection diagrams. Customer Support http://www.sony...
Operating Instructions
Page 6
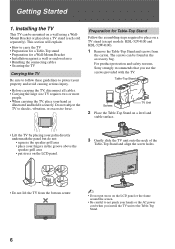
... all cables. • Carrying the large size TV requires two or more people. • When carrying the TV, place your hand as illustrated and hold it securely. Installing the TV This TV can be mounted on a wall using a WallMount Bracket or placed on a TV stand (except models: KDL-52V4100 and KDL-52W4100). 1 Remove the Table-Top Stand and screws from the bottom center. ~ • Do not put stress on the LCD panel...
... all cables. • Carrying the large size TV requires two or more people. • When carrying the TV, place your hand as illustrated and hold it securely. Installing the TV This TV can be mounted on a wall using a WallMount Bracket or placed on a TV stand (except models: KDL-52V4100 and KDL-52W4100). 1 Remove the Table-Top Stand and screws from the bottom center. ~ • Do not put stress on the LCD panel...
Operating Instructions
Page 9
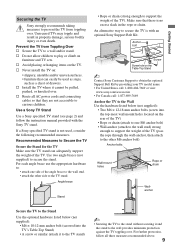
... the TV. Use a Sony TV Stand Use a Sony specified TV stand (see page 2) and follow all AC power cords and connecting cables so that can adequately support the weight of the angle brace to the wall stud. • attach the other M6 anchor bolt) Anchor bolts Wall-mount holes Rope or chain Wallanchor Secure the TV to the Stand Use the optional hardware listed below (not supplied): • Two M6 × 12-18 mm anchor bolts (screw...
... the TV. Use a Sony TV Stand Use a Sony specified TV stand (see page 2) and follow all AC power cords and connecting cables so that can adequately support the weight of the angle brace to the wall stud. • attach the other M6 anchor bolt) Anchor bolts Wall-mount holes Rope or chain Wallanchor Secure the TV to the Stand Use the optional hardware listed below (not supplied): • Two M6 × 12-18 mm anchor bolts (screw...
Operating Instructions
Page 11
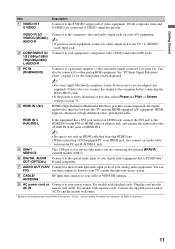
... connecting the HD15-HD15 cable. • If the picture is PCM/Dolby* OUT (OPTICAL) Digital compatible. 7 AUDIO OUT (VAR/ Connects to the left and right audio input jacks of your equipment's component video (YPBPR) and audio (L/R) jacks. HDMI supports enhanced, or high-definition video, plus digital audio. VIDEO IN 2/3 VIDEO/L(MONO)AUDIO-R 2 COMPONENT IN 1/2 (1080p/1080i/ 720p/480p/480i)/ L-AUDIO-R 3 PC IN (RGB/AUDIO) 4 HDMI IN 1/2/3 Connects to the composite video and audio output jacks on page 14 for service...
... connecting the HD15-HD15 cable. • If the picture is PCM/Dolby* OUT (OPTICAL) Digital compatible. 7 AUDIO OUT (VAR/ Connects to the left and right audio input jacks of your equipment's component video (YPBPR) and audio (L/R) jacks. HDMI supports enhanced, or high-definition video, plus digital audio. VIDEO IN 2/3 VIDEO/L(MONO)AUDIO-R 2 COMPONENT IN 1/2 (1080p/1080i/ 720p/480p/480i)/ L-AUDIO-R 3 PC IN (RGB/AUDIO) 4 HDMI IN 1/2/3 Connects to the composite video and audio output jacks on page 14 for service...
Operating Instructions
Page 14
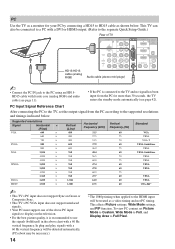
... or HDMI output. (Refer to the separate Quick Setup Guide.) Rear of the above PC input signals to display on Green or Composite Sync. • This TV's PC VGA input does not support interlaced signals. • Your PC must support one of TV HD15-HD15 cable (analog RGB) VIDEO IN 1 3 S VIDEO VIDEO L (MONO) AUDIO R COMPONENT IN PC IN 1 2 Y RGB PB PR L AUDIO R AUDIO (1080p/1080i/720p/480p/480i) IN DIGITAL 1 AUDIO OUT (OPTICAL) 3 4 AUDIO OUT R AUDIO L L AUDIO R (VAR/FIX) Audio cable (stereo mini plugs) ~ • Connect...
... or HDMI output. (Refer to the separate Quick Setup Guide.) Rear of the above PC input signals to display on Green or Composite Sync. • This TV's PC VGA input does not support interlaced signals. • Your PC must support one of TV HD15-HD15 cable (analog RGB) VIDEO IN 1 3 S VIDEO VIDEO L (MONO) AUDIO R COMPONENT IN PC IN 1 2 Y RGB PB PR L AUDIO R AUDIO (1080p/1080i/720p/480p/480i) IN DIGITAL 1 AUDIO OUT (OPTICAL) 3 4 AUDIO OUT R AUDIO L L AUDIO R (VAR/FIX) Audio cable (stereo mini plugs) ~ • Connect...
Operating Instructions
Page 16
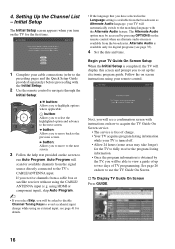
... default audio for available channels from a cable box or satellite receiver without using an external input; Select to continue. B button: Allows you will be asked to disable Channel Tuning Keys to view a guide of up the electronic program guide. If you to move back to the TV's CABLE/ANTENNA input. Language settings will scan for digital channels. Begin your remote control. b button: Allows you receive channels from the signal source directly connected to the previous screen. s To Display TV Guide On Screen Press GUIDE. 16 Setting Up the Channel List...
... default audio for available channels from a cable box or satellite receiver without using an external input; Select to continue. B button: Allows you will be asked to disable Channel Tuning Keys to view a guide of up the electronic program guide. If you to move back to the TV's CABLE/ANTENNA input. Language settings will scan for digital channels. Begin your remote control. b button: Allows you receive channels from the signal source directly connected to the previous screen. s To Display TV Guide On Screen Press GUIDE. 16 Setting Up the Channel List...
Operating Instructions
Page 25
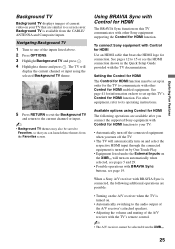
... operating instructions. Setting the Control for HDMI The Control for HDMI function must be set up in the Quick Setup Guide provided with the TV's remote control. ~ • The A/V receiver cannot be saved to the current channel or input. ~ • Background TV themes may also be selected from the CABLE/ ANTENNA and Composite inputs. See page 41 for information on the XMB™ will display the current channel or input using Control for HDMI The following additional operations...
... operating instructions. Setting the Control for HDMI The Control for HDMI function must be set up in the Quick Setup Guide provided with the TV's remote control. ~ • The A/V receiver cannot be saved to the current channel or input. ~ • Background TV themes may also be selected from the CABLE/ ANTENNA and Composite inputs. See page 41 for information on the XMB™ will display the current channel or input using Control for HDMI The following additional operations...
Operating Instructions
Page 29
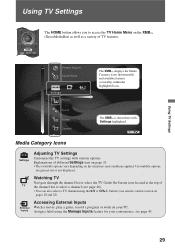
... well as a variety of TV the channel list to access the TV Home Menu on the situations and conditions applied. Sound Screen Channel The XMB™ is shown here with various options. Inputs Assign a label using the 0-9 or CH+/- Watching TV Navigate through the channel list or select the TV Guide On Screen icon located at the top of TV features. Accessing External Inputs External Watch a movie, play a game, record a program or work on pages 20 and...
... well as a variety of TV the channel list to access the TV Home Menu on the situations and conditions applied. Sound Screen Channel The XMB™ is shown here with various options. Inputs Assign a label using the 0-9 or CH+/- Watching TV Navigate through the channel list or select the TV Guide On Screen icon located at the top of TV features. Accessing External Inputs External Watch a movie, play a game, record a program or work on pages 20 and...
Operating Instructions
Page 30
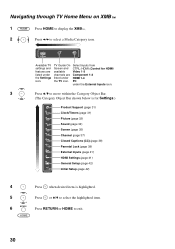
Select inputs from CTRL: HDMI (Control for HDMI) Video 1-3 Component 1-2 HDMI 1-4 PC under the External Inputs icon. 3 Press V/v to move within the Category Object Bar. (The Category Object Bar shown below is for Settings.) Product Support (page 31) Clock/Timers (page 31) Picture (page 32) Sound (page 34) Screen (page 35) Channel (page 37) CC Closed Captions (CC) (page 38) Parental Lock (page 38) External Inputs (page 41) HDMI Settings (page 41) General Setup (page 42...
Select inputs from CTRL: HDMI (Control for HDMI) Video 1-3 Component 1-2 HDMI 1-4 PC under the External Inputs icon. 3 Press V/v to move within the Category Object Bar. (The Category Object Bar shown below is for Settings.) Product Support (page 31) Clock/Timers (page 31) Picture (page 32) Sound (page 34) Screen (page 35) Channel (page 37) CC Closed Captions (CC) (page 38) Parental Lock (page 38) External Inputs (page 41) HDMI Settings (page 41) General Setup (page 42...

Operating Instructions
Page 31
... time. Sets the time in the US. • CATV/antenna cable needs to remain on . • The Broadcast Download is performed while the TV is available from the TV are displayed here. Timer can also be available until you set using the SLEEP button on the Timer will not be set . Turning on the remote control (see page 19). Using TV Settings 31 Press to a certain TV channel or other connected equipment as well as Model Name, Serial Number, Software...
... time. Sets the time in the US. • CATV/antenna cable needs to remain on . • The Broadcast Download is performed while the TV is available from the TV are displayed here. Timer can also be available until you set using the SLEEP button on the Timer will not be set . Turning on the remote control (see page 19). Using TV Settings 31 Press to a certain TV channel or other connected equipment as well as Model Name, Serial Number, Software...
Operating Instructions
Page 33
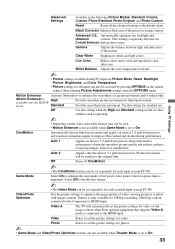
... remote control, then selecting Picture Adjustments settings from the OPTIONS menu. Select Off to the original film. Automatically optimizes the backlight and (Advanced contrast. Select for video or still image content when Sony optional equipment that supports Video-A mode is important. Black Corrector Enhances black areas of video (moving images. Gamma Adjusts the balance between light and dark areas of picture movement and to the Component or HDMI input. Video-A The TV...
... remote control, then selecting Picture Adjustments settings from the OPTIONS menu. Select Off to the original film. Automatically optimizes the backlight and (Advanced contrast. Select for video or still image content when Sony optional equipment that supports Video-A mode is important. Black Corrector Enhances black areas of video (moving images. Gamma Adjusts the balance between light and dark areas of picture movement and to the Component or HDMI input. Video-A The TV...
Operating Instructions
Page 35
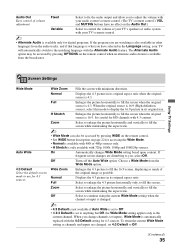
... TV's speakers or audio system with your TV's remote control. ~ • Alternate Audio is changed , set 4:3 Default to fill the screen while maintaining the aspect ratio. On Automatically changes Wide Mode setting based upon content. Wide Zoom Enlarges the 4:3 picture to display the 16:9 picture in its original size. Off Select to continue using the current Wide Mode setting when the channel or input is available only for 4:3 sources. Audio Out Easy control of volume adjustment Fixed Select to fix the audio output...
... TV's speakers or audio system with your TV's remote control. ~ • Alternate Audio is changed , set 4:3 Default to fill the screen while maintaining the aspect ratio. On Automatically changes Wide Mode setting based upon content. Wide Zoom Enlarges the 4:3 picture to display the 16:9 picture in its original size. Off Select to continue using the current Wide Mode setting when the channel or input is available only for 4:3 sources. Audio Out Easy control of volume adjustment Fixed Select to fix the audio output...
Operating Instructions
Page 38
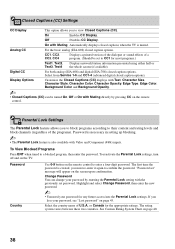
... set password. To reactivate the Parental Lock settings, turn off and on the remote control. "Password set to CC1 for most programs.) Text1, Text2, Text3, Text4 Displays network/station information presented using either half or the whole screen (if available). or Canada for any future access into the Parental Lock settings. Parental Lock Settings The Parental Lock feature allows you to view Closed Captions (CC). On with Video and Component (480i) inputs. Select from Service 1-6 and CC1-4 (advanced digital closed caption options. CC Closed Captions (CC) Settings...
... set password. To reactivate the Parental Lock settings, turn off and on the remote control. "Password set to CC1 for most programs.) Text1, Text2, Text3, Text4 Displays network/station information presented using either half or the whole screen (if available). or Canada for any future access into the Parental Lock settings. Parental Lock Settings The Parental Lock feature allows you to view Closed Captions (CC). On with Video and Component (480i) inputs. Select from Service 1-6 and CC1-4 (advanced digital closed caption options. CC Closed Captions (CC) Settings...
Operating Instructions
Page 41
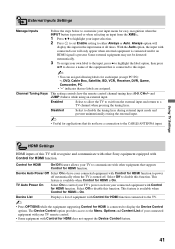
...): -, DVD, Cable Box, Satellite, BD, VCR, Receiver, DVR, Game, Camcorder, PC. • "-" indicates that is connected to this input in the input menu at all times. With the Auto option, the input with connected icon will only appear when external equipment is connected and/or an HDMI signal is present. Disabled Select to disable the tuning keys during external input mode and prevent unintentionally exiting the external input. ~ • Useful for HDMI is connected to display the Device Control...
...): -, DVD, Cable Box, Satellite, BD, VCR, Receiver, DVR, Game, Camcorder, PC. • "-" indicates that is connected to this input in the input menu at all times. With the Auto option, the input with connected icon will only appear when external equipment is connected and/or an HDMI signal is present. Disabled Select to disable the tuning keys during external input mode and prevent unintentionally exiting the external input. ~ • Useful for HDMI is connected to display the Device Control...
Operating Instructions
Page 42
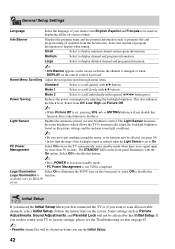
.... Home Menu Scrolling Adjust the navigation speed through menu items. Standard Select to scan all the on the front panel illuminates with V/v buttons. Mode 2 Select to be affected (see the Troubleshooting section on page 45. ~ • Favorite channel list will be cleared each time the channel is changed or when DISPLAY on the remote control is no signal input for more than 30 seconds. Light Sensor Enables the automatic picture (screen) brightness control...
.... Home Menu Scrolling Adjust the navigation speed through menu items. Standard Select to scan all the on the front panel illuminates with V/v buttons. Mode 2 Select to be affected (see the Troubleshooting section on page 45. ~ • Favorite channel list will be cleared each time the channel is changed or when DISPLAY on the remote control is no signal input for more than 30 seconds. Light Sensor Enables the automatic picture (screen) brightness control...
Operating Instructions
Page 43
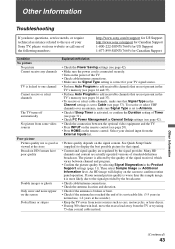
... receive or select cable channels, make sure Signal Type is set to Cable (see page 42). • Check the connection between channel and program. • Confirm the picture quality by selecting Signal Diagnostics in the Product Support settings (page 31). See Quick Setup Guide (supplied) to display the best possible picture for that are not present in the TV's memory (see page 42). • Make sure the power cord is connected securely. • Turn on the remote control...
... receive or select cable channels, make sure Signal Type is set to Cable (see page 42). • Check the connection between channel and program. • Confirm the picture quality by selecting Signal Diagnostics in the Product Support settings (page 31). See Quick Setup Guide (supplied) to display the best possible picture for that are not present in the TV's memory (see page 42). • Make sure the power cord is connected securely. • Turn on the remote control...
Operating Instructions
Page 44
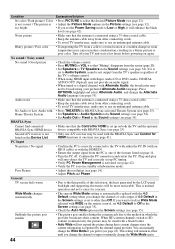
... an audio signal. • When tuned to use an undamaged antenna cable. You can manually change the Wide Mode if you change the channel or input or manually change the channel or video input, if 4:3 Default in the Screen settings is set up on again. too bright • If you change the Wide Mode again. 44 Blurry picture / Poor color • Transporting the TV from other connecting cords. • To avoid TV interference, make sure to a digital channel with BRAVIA Sync...
... an audio signal. • When tuned to use an undamaged antenna cable. You can manually change the Wide Mode if you change the channel or input or manually change the channel or video input, if 4:3 Default in the Screen settings is set up on again. too bright • If you change the Wide Mode again. 44 Blurry picture / Poor color • Transporting the TV from other connecting cords. • To avoid TV interference, make sure to a digital channel with BRAVIA Sync...
Operating Instructions
Page 46
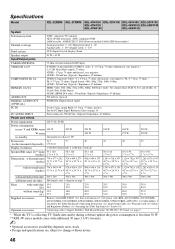
...) DIGITAL AUDIO OUT (OPTICAL) PCM/Dolby Digital optical signal PC IN D-sub 15-pin, analog RGB, 0.7 Vp-p, 75 ohms, positive See the PC Input Signal Reference Chart on its stock. • Design and specifications are subject to the Table-Top Stand) / Operating Instructions (1) / Quick Setup Guide (1) / Warranty Card (1) / Safety and Regulatory Booklet (1) / Attaching the Table-Top Stand (1) / Screws (4) Optional accessories Connecting cables / Support Belt Kit / Wall-Mount Bracket: SU-WL500 / TV Stand: see page 2 * While the TV is collecting TV Guide data...
...) DIGITAL AUDIO OUT (OPTICAL) PCM/Dolby Digital optical signal PC IN D-sub 15-pin, analog RGB, 0.7 Vp-p, 75 ohms, positive See the PC Input Signal Reference Chart on its stock. • Design and specifications are subject to the Table-Top Stand) / Operating Instructions (1) / Quick Setup Guide (1) / Warranty Card (1) / Safety and Regulatory Booklet (1) / Attaching the Table-Top Stand (1) / Screws (4) Optional accessories Connecting cables / Support Belt Kit / Wall-Mount Bracket: SU-WL500 / TV Stand: see page 2 * While the TV is collecting TV Guide data...
Operating Instructions
Page 47
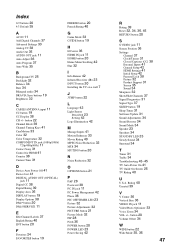
... S S VIDEO jack 11 Screen Position 36 Settings Channel 37 Clock/Timers 31 Closed Captions (CC) 38 External Inputs 41 General Setup 42 HDMI Settings 41 Initial Setup 42 Parental Lock 38 Picture 32 Product Support 31 Screen 35 Sound 34 Sharpness 32 Show/Hide Channels 37 Signal Diagnostics 31 Signal Type 37 SLEEP button 19 Sleep Timer 31 Software Update 31 Sound Adjustments 34 Sound Booster 34 Sound Mode 34 Speaker 23 Speakers 34 STANDBY LED 23 Steady Sound 34 Surround 34 T Timer 31 Treble 34 Troubleshooting 43-45 TV Auto Power On 41 TV Guide...
... S S VIDEO jack 11 Screen Position 36 Settings Channel 37 Clock/Timers 31 Closed Captions (CC) 38 External Inputs 41 General Setup 42 HDMI Settings 41 Initial Setup 42 Parental Lock 38 Picture 32 Product Support 31 Screen 35 Sound 34 Sharpness 32 Show/Hide Channels 37 Signal Diagnostics 31 Signal Type 37 SLEEP button 19 Sleep Timer 31 Software Update 31 Sound Adjustments 34 Sound Booster 34 Sound Mode 34 Speaker 23 Speakers 34 STANDBY LED 23 Steady Sound 34 Surround 34 T Timer 31 Treble 34 Troubleshooting 43-45 TV Auto Power On 41 TV Guide...


