Operating Instructions
Page 3
... TV Settings Media Category Icons 29 Adjusting TV Settings 29 Watching TV 29 Accessing External Inputs 29 Navigating through TV Home Menu on XMB 30 TV Settings Descriptions 31 Product Support 31 Clock/Timers Settings 31 Picture Settings 32 Sound Settings 34 Screen Settings 35 Channel Settings 37 CC Closed Captions (CC) Settings 38 Parental Lock Settings 38 External Inputs Settings 41 HDMI Settings 41 General Setup Settings...
... TV Settings Media Category Icons 29 Adjusting TV Settings 29 Watching TV 29 Accessing External Inputs 29 Navigating through TV Home Menu on XMB 30 TV Settings Descriptions 31 Product Support 31 Clock/Timers Settings 31 Picture Settings 32 Sound Settings 34 Screen Settings 35 Channel Settings 37 CC Closed Captions (CC) Settings 38 Parental Lock Settings 38 External Inputs Settings 41 HDMI Settings 41 General Setup Settings...
Operating Instructions
Page 4
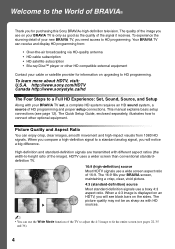
... upgrading to HD programming. The Quick Setup Guide, enclosed separately, illustrates how to connect other HD compatible external equipment Contact your BRAVIA TV set, a complete HD system requires an HD sound system, a source of HD programming and proper setup connections. The picture quality may ... High-definition and standard-definition signals are transmitted with your cable or satellite provider for purchasing this Sony BRAVIA® high-definition television. The 16:9 fills your new BRAVIA TV, you see pages 22, 35 and 36). 4 The quality of 16:9. Picture Quality and ...
... upgrading to HD programming. The Quick Setup Guide, enclosed separately, illustrates how to connect other HD compatible external equipment Contact your BRAVIA TV set, a complete HD system requires an HD sound system, a source of HD programming and proper setup connections. The picture quality may ... High-definition and standard-definition signals are transmitted with your cable or satellite provider for purchasing this Sony BRAVIA® high-definition television. The 16:9 fills your new BRAVIA TV, you see pages 22, 35 and 36). 4 The quality of 16:9. Picture Quality and ...
Operating Instructions
Page 5
...~ • This manual is ENERGY STAR qualified. Depending upon such changed settings, the power consumption may increase which possibly could exceed the limits required for the 32 class, 37, 40, 42, 46 and 52 inch BRAVIA KDL-XBR6, V and W series models with screen size measured diagonally. ENERGY... STAR is a joint program of these government agencies, designed to promote energy efficient products and practices. • When the TV is initially set by the U.S. ...
...~ • This manual is ENERGY STAR qualified. Depending upon such changed settings, the power consumption may increase which possibly could exceed the limits required for the 32 class, 37, 40, 42, 46 and 52 inch BRAVIA KDL-XBR6, V and W series models with screen size measured diagonally. ENERGY... STAR is a joint program of these government agencies, designed to promote energy efficient products and practices. • When the TV is initially set by the U.S. ...
Operating Instructions
Page 7
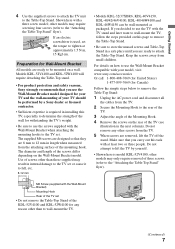
...Stand: 1 Unplug the AC power cord and disconnect all the cables from the TV. 5 When screws are 8 mm to fall, etc. 8-12 mm • Models KDL-32/37XBR6, KDL-40V4150, KDL-40/42/46V4100, KDL-40/46W4100 and KDL-46W4150 can be mounted on the Wall-Mount Bracket model. The diameter and ...two or three people. If an electric screwdriver is used, set the torque to lift the TV by a Sony dealer or licensed contractor. • Sufficient expertise is model KDL-52V4100; Getting Started 4 Use the supplied screws to attach the TV unit to the "Attaching the Table-Top Stand" flyer). other...
...Stand: 1 Unplug the AC power cord and disconnect all the cables from the TV. 5 When screws are 8 mm to fall, etc. 8-12 mm • Models KDL-32/37XBR6, KDL-40V4150, KDL-40/42/46V4100, KDL-40/46W4100 and KDL-46W4150 can be mounted on the Wall-Mount Bracket model. The diameter and ...two or three people. If an electric screwdriver is used, set the torque to lift the TV by a Sony dealer or licensed contractor. • Sufficient expertise is model KDL-52V4100; Getting Started 4 Use the supplied screws to attach the TV unit to the "Attaching the Table-Top Stand" flyer). other...
Operating Instructions
Page 8
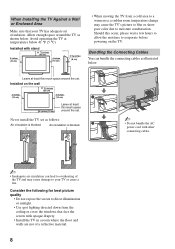
... (10 cm) 11 7/8 inches (30 cm) 4 inches (10 cm) 4 inches (10 cm) Leave at least this much space around the TV as illustrated below . Allow enough space around the set . When Installing the TV Against a Wall or Enclosed Area Make sure that face the screen with opaque drapery. • Install the... TV in a room where the floor and walls are not of the TV and may cause the TV's picture to blur or show poor ...
... (10 cm) 11 7/8 inches (30 cm) 4 inches (10 cm) 4 inches (10 cm) Leave at least this much space around the TV as illustrated below . Allow enough space around the set . When Installing the TV Against a Wall or Enclosed Area Make sure that face the screen with opaque drapery. • Install the... TV in a room where the floor and walls are not of the TV and may cause the TV's picture to blur or show poor ...
Operating Instructions
Page 9
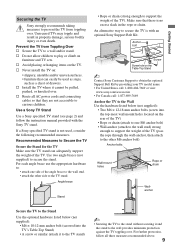
...Securing the TV Sony strongly recommends taking measures to prevent the TV from Toppling Over s Secure the TV to the Wall Use the hardware listed below (not supplied): • Two M6 × 12-18 mm anchor bolts (screw into the top-most wall-mount holes located on furniture and TV sets. Anchor bolt... Screw Screw hole on the Table-Top Stand ~ Contact Sony Customer Support to obtain the optional Support Belt Kit by providing your TV model name. • For United States call: 1-800-488-7669 or...
...Securing the TV Sony strongly recommends taking measures to prevent the TV from Toppling Over s Secure the TV to the Wall Use the hardware listed below (not supplied): • Two M6 × 12-18 mm anchor bolts (screw into the top-most wall-mount holes located on furniture and TV sets. Anchor bolt... Screw Screw hole on the Table-Top Stand ~ Contact Sony Customer Support to obtain the optional Support Belt Kit by providing your TV model name. • For United States call: 1-800-488-7669 or...
Operating Instructions
Page 11
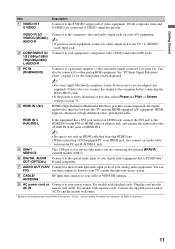
... on your A/V equipment. ~ • If you are connecting the optional BRAVIA external module (DMex). 6 DIGITAL AUDIO Connects to use these outputs to listen to your TV's audio through your equipment's component video (YPBPR) and audio (L/R) jacks. Connects to other analog RGB equipment. You can be displayed. ~ • For some Apple ... is noisy, flickering or not clear, adjust Phase and Pitch of Dolby Laboratories. 11 If both composite video and S VIDEO are trademarks of Screen settings on page 36. "Dolby" and the double-D symbol are connected, S VIDEO signal has priority. If this...
... on your A/V equipment. ~ • If you are connecting the optional BRAVIA external module (DMex). 6 DIGITAL AUDIO Connects to use these outputs to listen to your TV's audio through your equipment's component video (YPBPR) and audio (L/R) jacks. Connects to other analog RGB equipment. You can be displayed. ~ • For some Apple ... is noisy, flickering or not clear, adjust Phase and Pitch of Dolby Laboratories. 11 If both composite video and S VIDEO are trademarks of Screen settings on page 36. "Dolby" and the double-D symbol are connected, S VIDEO signal has priority. If this...
Operating Instructions
Page 12
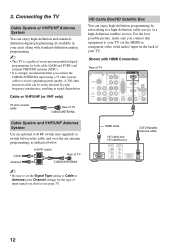
...cable can be easily affected by subscribing to receive optimum picture quality. Cable Antenna A-B RF switch A Rear of TV B CABLE/ANTENNA ~ • Be sure to set the Signal Type setting to switch between the cable and over-the-air antenna programming, as indicated below. Shown with standard-definition analog ...HD Satellite Box You can enjoy high-definition and standarddefinition digital programming (if available in the Channel settings for the type of input signal you connect this equipment to your TV via the HDMI or component video (with audio) input on the back of your area) ...
...cable can be easily affected by subscribing to receive optimum picture quality. Cable Antenna A-B RF switch A Rear of TV B CABLE/ANTENNA ~ • Be sure to set the Signal Type setting to switch between the cable and over-the-air antenna programming, as indicated below. Shown with standard-definition analog ...HD Satellite Box You can enjoy high-definition and standarddefinition digital programming (if available in the Channel settings for the type of input signal you connect this equipment to your TV via the HDMI or component video (with audio) input on the back of your area) ...
Operating Instructions
Page 14
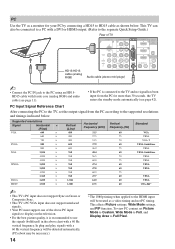
... PC IN jack to the PC using an HD15HD15 cable with ferrite core (analog RGB) and audio cable (see page 42). This affects Picture settings, Wide Mode settings, and PIP function. Supported resolutions Signal VGA Horizontal × (Pixel) 640 × 640 × 720 × SVGA 800 × 800 ×... PC by connecting a HD15 to the supported resolutions and timings indicated below . PC Input Signal Reference Chart After connecting the PC to the TV, set Picture Mode to Custom, Wide Mode to Full, and Display Area to the HDMI input will be necessary.) 14 * The 1080p timing when...
... PC IN jack to the PC using an HD15HD15 cable with ferrite core (analog RGB) and audio cable (see page 42). This affects Picture settings, Wide Mode settings, and PIP function. Supported resolutions Signal VGA Horizontal × (Pixel) 640 × 640 × 720 × SVGA 800 × 800 ×... PC by connecting a HD15 to the supported resolutions and timings indicated below . PC Input Signal Reference Chart After connecting the PC to the TV, set Picture Mode to Custom, Wide Mode to Full, and Display Area to the HDMI input will be necessary.) 14 * The 1080p timing when...
Operating Instructions
Page 16
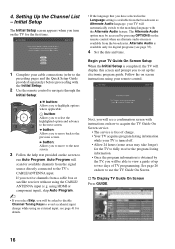
...where applicable. Auto Program will scan for details. • If the language that you have selected in the Language setting is completed, the TV will see page 35). 4 Set the date and time. The Alternate Audio option may take longer) for digital channels. See page 26 on screen ... the remote control when an alternate audio stream is complete. s To Display TV Guide On Screen Press GUIDE. 16 Setting Up the Channel List - Language settings will apply to on screen display as well as Alternate Audio language, your TV will be able to view a guide of 6 Please select a language....
...where applicable. Auto Program will scan for details. • If the language that you have selected in the Language setting is completed, the TV will see page 35). 4 Set the date and time. The Alternate Audio option may take longer) for digital channels. See page 26 on screen ... the remote control when an alternate audio stream is complete. s To Display TV Guide On Screen Press GUIDE. 16 Setting Up the Channel List - Language settings will apply to on screen display as well as Alternate Audio language, your TV will be able to view a guide of 6 Please select a language....
Operating Instructions
Page 17
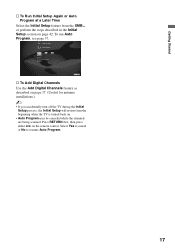
... Later Time Select the Initial Setup feature from the beginning when the TV is turned back on. • Auto Program may be canceled while the channels are being scanned. HDMI Settings General Setup Settings Initial Setup TV s To Add Digital Channels Use the Add Digital Channels feature as ...described on page 37. (Useful for antenna installations.) ~ • If you accidentally turn off the TV during the Initial Setup process, the Initial...
... Later Time Select the Initial Setup feature from the beginning when the TV is turned back on. • Auto Program may be canceled while the channels are being scanned. HDMI Settings General Setup Settings Initial Setup TV s To Add Digital Channels Use the Add Digital Channels feature as ...described on page 37. (Useful for antenna installations.) ~ • If you accidentally turn off the TV during the Initial Setup process, the Initial...
Operating Instructions
Page 19
...Your BRAVIA Sync audio system must be set for detailed information. ~ • The 5, PLAY and CH+ buttons have a tactile dot. Press again to turn on, turn on and off the Closed Captions (CC). To cancel Sleep Timer, press SLEEP 4 repeatedly until the TV displays the time in a few seconds ... playback. SYNC MENU: Press once to control the connected equipment 6 Sync with channel/program information you want the TV to the audio output of the attached speakers of information. The picture settings will time out in minutes (Off, 15 min, 30 min, 45 min, 60 min, 90 min or ...
...Your BRAVIA Sync audio system must be set for detailed information. ~ • The 5, PLAY and CH+ buttons have a tactile dot. Press again to turn on, turn on and off the Closed Captions (CC). To cancel Sleep Timer, press SLEEP 4 repeatedly until the TV displays the time in a few seconds ... playback. SYNC MENU: Press once to control the connected equipment 6 Sync with channel/program information you want the TV to the audio output of the attached speakers of information. The picture settings will time out in minutes (Off, 15 min, 30 min, 45 min, 60 min, 90 min or ...

Operating Instructions
Page 20
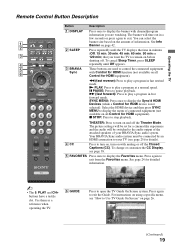
See your dealer or www.sony.com/bravia for more information. For example, to 0 restore the sound. Press again or press VOL + ... XMB™. Button 7 RETURN 8 HOME qf Description Press to go back to access the TV Home Menu items such as the TV Settings, TV channels and External Inputs list (see pages 5 and 29). Press ENT to move focus/highlight...qa Use with the frozen image. qf POWER Press to adjust the volume. Product Support Clock/Timers Settings Sound Screen qg Channel TV qh 9 DMex Press to select digital channels. DMX-NV1). The module qj 0 0-9 ENT may...
See your dealer or www.sony.com/bravia for more information. For example, to 0 restore the sound. Press again or press VOL + ... XMB™. Button 7 RETURN 8 HOME qf Description Press to go back to access the TV Home Menu items such as the TV Settings, TV channels and External Inputs list (see pages 5 and 29). Press ENT to move focus/highlight...qa Use with the frozen image. qf POWER Press to adjust the volume. Product Support Clock/Timers Settings Sound Screen qg Channel TV qh 9 DMex Press to select digital channels. DMX-NV1). The module qj 0 0-9 ENT may...

Operating Instructions
Page 21
...Favorites/ Remove from Favorites See page 24 qk MTS See page 34 Alternate Audio See page 35 ql Digital Rating See page 39 Background TV See page 25 Device Control See page 41 ql PICTURE ~ • The Digital Rating and Alternate Audio options will appear in Options... 34 Audio Swap See page 28 Screen See page 36 Add to display a list of convenient functions and menu shortcuts. For details, see Picture settings on current input and content. Press repeatedly to cycle through the available picture modes: Vivid, Standard, Cinema, Custom, PhotoVivid, Photo-Standard, Photo-...
...Favorites/ Remove from Favorites See page 24 qk MTS See page 34 Alternate Audio See page 35 ql Digital Rating See page 39 Background TV See page 25 Device Control See page 41 ql PICTURE ~ • The Digital Rating and Alternate Audio options will appear in Options... 34 Audio Swap See page 28 Screen See page 36 Add to display a list of convenient functions and menu shortcuts. For details, see Picture settings on current input and content. Press repeatedly to cycle through the available picture modes: Vivid, Standard, Cinema, Custom, PhotoVivid, Photo-Standard, Photo-...
Operating Instructions
Page 22
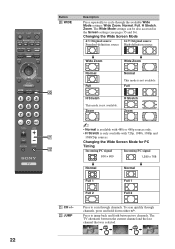
... This mode is not available. H Stretch H Stretch This mode is not available. ws JUMP Press to scan through the available Wide Mode settings: Wide Zoom, Normal, Full, H Stretch, Zoom. WIDE Description Press repeatedly to jump back and forth between the current channel and the ...sources. To scan quickly through channels, press and hold down either +/-. The TV alternates between two channels. Button w; JUMP JUMP 22 Full Full w; The Wide Mode settings can be also accessed in the Screen settings (see pages 35 and 36). Changing the Wide Screen Mode for PC ...
... This mode is not available. H Stretch H Stretch This mode is not available. ws JUMP Press to scan through the available Wide Mode settings: Wide Zoom, Normal, Full, H Stretch, Zoom. WIDE Description Press repeatedly to jump back and forth between the current channel and the ...sources. To scan quickly through channels, press and hold down either +/-. The TV alternates between two channels. Button w; JUMP JUMP 22 Full Full w; The Wide Mode settings can be also accessed in the Screen settings (see pages 35 and 36). Changing the Wide Screen Mode for PC ...
Operating Instructions
Page 23
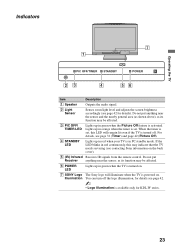
...function may indicate that the TV needs servicing (see contacting Sony information on . Lights up in red when your TV is in orange when the timer is set , this may be affected. 6 POWER LED Lights up in green when the TV is turned on. 7 SONY Logo Illumination The Sony logo will remain lit even...Item Description 1 Speaker Outputs the audio signal. 2 Light Sensor Senses room light level and adjusts the screen brightness accordingly (see page 42 for KDL-W series. 23 If the LED blinks in red continuously, this LED will illuminate when the TV is available only for details).
...function may indicate that the TV needs servicing (see contacting Sony information on . Lights up in red when your TV is in orange when the timer is set , this may be affected. 6 POWER LED Lights up in green when the TV is turned on. 7 SONY Logo Illumination The Sony logo will remain lit even...Item Description 1 Speaker Outputs the audio signal. 2 Light Sensor Senses room light level and adjusts the screen brightness accordingly (see page 42 for KDL-W series. 23 If the LED blinks in red continuously, this LED will illuminate when the TV is available only for details).
Operating Instructions
Page 24
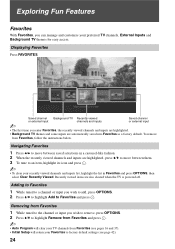
... from Favorites (see pages 16 and 37). • Initial Setup will return your Favorites to factory default settings (see page 42). 24 Saved channel Background TV Recently viewed or external input channels and inputs Saved channel or external input ~ • The first time ...you wish to remove, press OPTIONS. 2 Press V/v to highlight Remove from Favorites and press . ~ • Auto Program will clear your TV channels from Favorites, follow the instructions below. Recently viewed items are automatically saved into Favorites as a factory default. Adding to Favorites 1 While tuned...
... from Favorites (see pages 16 and 37). • Initial Setup will return your Favorites to factory default settings (see page 42). 24 Saved channel Background TV Recently viewed or external input channels and inputs Saved channel or external input ~ • The first time ...you wish to remove, press OPTIONS. 2 Press V/v to highlight Remove from Favorites and press . ~ • Auto Program will clear your TV channels from Favorites, follow the instructions below. Recently viewed items are automatically saved into Favorites as a factory default. Adding to Favorites 1 While tuned...
Operating Instructions
Page 25
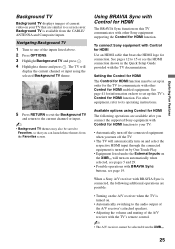
... in the Quick Setup Guide provided with other equipment, refer to set up this TV communicates with the TV documentation. Background TV is connected, the following operations are available after you can launch these themes from the Favorites screen. When a Sony A/V receiver with other Control for HDMI function. See page 41 for information on this...
... in the Quick Setup Guide provided with other equipment, refer to set up this TV communicates with the TV documentation. Background TV is connected, the following operations are available after you can launch these themes from the Favorites screen. When a Sony A/V receiver with other Control for HDMI function. See page 41 for information on this...
Operating Instructions
Page 27
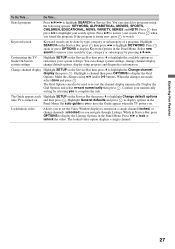
... channel then press OPTIONS to display the Listings Options in the Panel Menu. The locked video option displays a single channel. To Do This ... Set auto guide to on . Make the changes using the following options: KEYWORD, ALPHABETICAL, MOVIES, SPORTS, CHILDREN, EDUCATIONAL, NEWS, VARIETY, SERIES and ...search by type, category or subcategory by selecting yes to narrow your numerically sorting by pressing V/v/B/b. Customizing the TV Guide On Screen system settings Highlight SETUP on the Service Bar then press v to highlight the available options to have the Guide appear when ...
... channel then press OPTIONS to display the Listings Options in the Panel Menu. The locked video option displays a single channel. To Do This ... Set auto guide to on . Make the changes using the following options: KEYWORD, ALPHABETICAL, MOVIES, SPORTS, CHILDREN, EDUCATIONAL, NEWS, VARIETY, SERIES and ...search by type, category or subcategory by selecting yes to narrow your numerically sorting by pressing V/v/B/b. Customizing the TV Guide On Screen system settings Highlight SETUP on the Service Bar then press v to highlight the available options to have the Guide appear when ...
Operating Instructions
Page 29
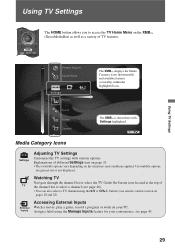
... XMB™ is shown here with various options. Using TV Settings The HOME button allows you to access the TV Home Menu on the XMB™ (XrossMediaBar) as well as a variety of TV the channel list to select a channel (see page 41... applied. Unavailable options are grayed out or not displayed. Using TV Settings Product Support Clock/Timers Settings The XMB™ displays the Media Category icons (horizontally) and available features (vertically) within the highlighted icon. TV Media Category Icons Settings Adjusting TV Settings Customize the TV settings with Settings highlighted.
... XMB™ is shown here with various options. Using TV Settings The HOME button allows you to access the TV Home Menu on the XMB™ (XrossMediaBar) as well as a variety of TV the channel list to select a channel (see page 41... applied. Unavailable options are grayed out or not displayed. Using TV Settings Product Support Clock/Timers Settings The XMB™ displays the Media Category icons (horizontally) and available features (vertically) within the highlighted icon. TV Media Category Icons Settings Adjusting TV Settings Customize the TV settings with Settings highlighted.


