Operating Instructions
Page 4
... Your TV 9 A Audio/video input jacks 9 B Component video input jacks (Y, PB, PR 9 Step 2: Connecting the Power Cord 10 Step 3: Preparing the Remote 10 Controlling your TV with the supplied remote 11 Step 4: Quick Setup 12 Playback 14 Playing Discs 14 Control Menu display (DISPLAY 16 List of Control Menu items 17 Various...
... Your TV 9 A Audio/video input jacks 9 B Component video input jacks (Y, PB, PR 9 Step 2: Connecting the Power Cord 10 Step 3: Preparing the Remote 10 Controlling your TV with the supplied remote 11 Step 4: Quick Setup 12 Playback 14 Playing Discs 14 Control Menu display (DISPLAY 16 List of Control Menu items 17 Various...
Operating Instructions
Page 5
... can also use the controls on the player if they have the same or similar names as those on the remote. • "DVD" may be used in this manual describe the controls on the screen) . . . . 34 Playable Discs 34 Specifications 36 Language Code List 37 Parental ...
... can also use the controls on the player if they have the same or similar names as those on the remote. • "DVD" may be used in this manual describe the controls on the screen) . . . . 34 Playable Discs 34 Specifications 36 Language Code List 37 Parental ...
Operating Instructions
Page 6
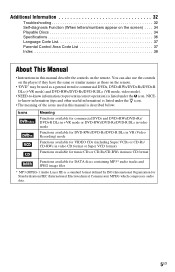
... code. The format of the current audio signal (Dolby Digital, DTS, PCM, etc.) appears as shown on the disc. This player supports ID3 versions 1.0/1.1 and 2.2/2.3. Remote VOL +, number 5, AUDIO, and N buttons have a tactile dot. A PICTURE NAVI (24) Divides the screen into 9 subscreens so you press the button, the display changes as...
... code. The format of the current audio signal (Dolby Digital, DTS, PCM, etc.) appears as shown on the disc. This player supports ID3 versions 1.0/1.1 and 2.2/2.3. Remote VOL +, number 5, AUDIO, and N buttons have a tactile dot. A PICTURE NAVI (24) Divides the screen into 9 subscreens so you press the button, the display changes as...
Operating Instructions
Page 8
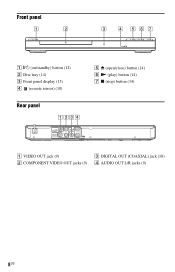
Front panel A [/1 (on/standby) button (12) B Disc tray (14) C Front panel display (15) D (remote sensor) (10) Rear panel E Z (open/close) button (14) F N (play) button (14) G x (stop) button (14) VIDEO VIDEO OUT COMPONENT VIDEO OUT Y PB DIGITAL OUT PR COAXIAL L R AUDIO OUT A VIDEO OUT jack (9) B COMPONENT VIDEO OUT jacks (9) C DIGITAL OUT (COAXIAL) jack (10) D AUDIO OUT L/R jacks (9) 8US
Front panel A [/1 (on/standby) button (12) B Disc tray (14) C Front panel display (15) D (remote sensor) (10) Rear panel E Z (open/close) button (14) F N (play) button (14) G x (stop) button (14) VIDEO VIDEO OUT COMPONENT VIDEO OUT Y PB DIGITAL OUT PR COAXIAL L R AUDIO OUT A VIDEO OUT jack (9) B COMPONENT VIDEO OUT jacks (9) C DIGITAL OUT (COAXIAL) jack (10) D AUDIO OUT L/R jacks (9) 8US
Operating Instructions
Page 10
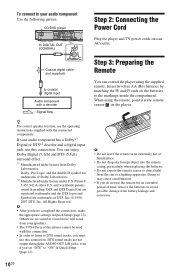
...logos and Symbol are trademarks of time, remove the batteries to coaxial digital input Audio component with a decoder : Signal flow Step 3: Preparing the Remote You can enjoy Dolby Digital (5.1ch) and DTS (5.1ch) surround effect. *1 Manufactured under U.S. DTS sound tracks are trademarks of this connection.... pattern. Insert two Size AA (R6) batteries by matching the 3 and # ends on the player. b • Do not leave the remote in Quick Setup (page 12). z For correct speaker location, see the operating instructions supplied with this connection. To connect to direct light from...
...logos and Symbol are trademarks of time, remove the batteries to coaxial digital input Audio component with a decoder : Signal flow Step 3: Preparing the Remote You can enjoy Dolby Digital (5.1ch) and DTS (5.1ch) surround effect. *1 Manufactured under U.S. DTS sound tracks are trademarks of this connection.... pattern. Insert two Size AA (R6) batteries by matching the 3 and # ends on the player. b • Do not leave the remote in Quick Setup (page 12). z For correct speaker location, see the operating instructions supplied with this connection. To connect to direct light from...
Operating Instructions
Page 11
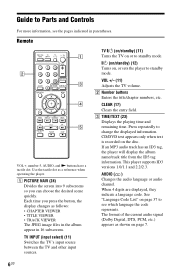
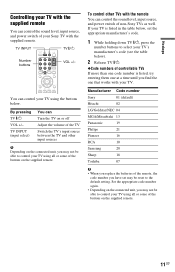
...Code numbers of the remote, the code number you find the one that works with your TV. If your TV is listed, try entering them one at a time until you have set may be reset to select your TV's manufacturer's code (see the table below . Manufacturer Code number Sony 01 (default) ...input sources b Depending on the connected unit, you may not be able to control your TV using all or some of your Sony TV with the supplied remote. Hookups Controlling your TV with the supplied remote You can control the sound level, input source, and power switch of the buttons on the supplied...
...Code numbers of the remote, the code number you find the one that works with your TV. If your TV is listed, try entering them one at a time until you have set may be reset to select your TV's manufacturer's code (see the table below . Manufacturer Code number Sony 01 (default) ...input sources b Depending on the connected unit, you may not be able to control your TV using all or some of your Sony TV with the supplied remote. Hookups Controlling your TV with the supplied remote You can control the sound level, input source, and power switch of the buttons on the supplied...
Operating Instructions
Page 15
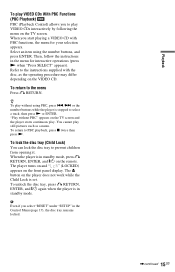
... unlock the disc tray, press O RETURN, ENTER, and [/1 again when the player is stopped to play VIDEO CDs interactively by following the menu on the remote. When you start playing a VIDEO CD with the disc, as a menu. Then, follow the instructions in standby mode. To return to prevent children from opening...
... unlock the disc tray, press O RETURN, ENTER, and [/1 again when the player is stopped to play VIDEO CDs interactively by following the menu on the remote. When you start playing a VIDEO CD with the disc, as a menu. Then, follow the instructions in standby mode. To return to prevent children from opening...
Operating Instructions
Page 28
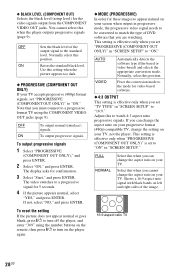
... press ENTER. OFF ON Sets the black level of DVD software that you must connect to a progressive format TV using the number buttons on the remote, then press [/1 to turn on the player again. ◆ MODE (PROGRESSIVE) In order for these images to turn off the player, and enter "369" using...
... press ENTER. OFF ON Sets the black level of DVD software that you must connect to a progressive format TV using the number buttons on the remote, then press [/1 to turn on the player again. ◆ MODE (PROGRESSIVE) In order for these images to turn off the player, and enter "369" using...
Operating Instructions
Page 32
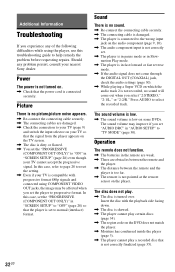
...no picture/picture noise appears. , Re-connect the connecting cable securely. , The connecting cables are damaged. , Check the connection to progressive format. Operation The remote does not function. , The batteries in fast forward or fast reverse mode. , If the audio signal does not come out when you select "2:STEREO," ... VIDEO OUT jacks, the image may improve if you set the player to your TV (page 9) and switch the input selector on your nearest Sony dealer. The disc does not play a recorded disc that the signal from the player appears on the audio component (page 9, 10). , The...
...no picture/picture noise appears. , Re-connect the connecting cable securely. , The connecting cables are damaged. , Check the connection to progressive format. Operation The remote does not function. , The batteries in fast forward or fast reverse mode. , If the audio signal does not come out when you select "2:STEREO," ... VIDEO OUT jacks, the image may improve if you set the player to your TV (page 9) and switch the input selector on your nearest Sony dealer. The disc does not play a recorded disc that the signal from the player appears on the audio component (page 9, 10). , The...
Operating Instructions
Page 36
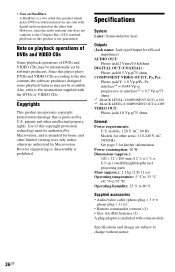
... on this player plays DVDs and VIDEO CDs according to 80 % Supplied accessories • Audio/video cable (phono plug × 3 y phono plug × 3) (1) • Remote commander (remote) (1) • Size AA (R6) batteries (2) A plug adaptor is included with some playback features may be authorized by software producers. Since this product is OFF VIDEO...
... on this player plays DVDs and VIDEO CDs according to 80 % Supplied accessories • Audio/video cable (phono plug × 3 y phono plug × 3) (1) • Remote commander (remote) (1) • Size AA (R6) batteries (2) A plug adaptor is included with some playback features may be authorized by software producers. Since this product is OFF VIDEO...

Operating Instructions
Page 38
... 15 PICTURE NAVI 6 PLAY LIST 17 Playable Discs 34 PROGRAM 17, 19 Program Play 19 PROGRESSIVE (COMPONENT OUT ONLY) 28 Q QUICK 17 Quick Setup 12 R Remote 6, 10, 11 REPEAT 17, 21 Repeat Play 21 REPLAY 7 RESET 17 Resume 14, 29 S Scan backward 7 Scan forward 7 SCENE 17 SCREEN SAVER 27 SCREEN SETUP...
... 15 PICTURE NAVI 6 PLAY LIST 17 Playable Discs 34 PROGRAM 17, 19 Program Play 19 PROGRESSIVE (COMPONENT OUT ONLY) 28 Q QUICK 17 Quick Setup 12 R Remote 6, 10, 11 REPEAT 17, 21 Repeat Play 21 REPLAY 7 RESET 17 Resume 14, 29 S Scan backward 7 Scan forward 7 SCENE 17 SCREEN SAVER 27 SCREEN SETUP...


