Operating Instructions
Page 4
... Your TV 9 A Audio/video input jacks 9 B Component video input jacks (Y, PB, PR 9 Step 2: Connecting the Power Cord 10 Step 3: Preparing the Remote 10 Controlling your TV with the supplied remote 11 Step 4: Quick Setup 12 Playback 14 Playing Discs 14 Control Menu display (DISPLAY 16 List of Control Menu items 17 Various...
... Your TV 9 A Audio/video input jacks 9 B Component video input jacks (Y, PB, PR 9 Step 2: Connecting the Power Cord 10 Step 3: Preparing the Remote 10 Controlling your TV with the supplied remote 11 Step 4: Quick Setup 12 Playback 14 Playing Discs 14 Control Menu display (DISPLAY 16 List of Control Menu items 17 Various...
Operating Instructions
Page 5
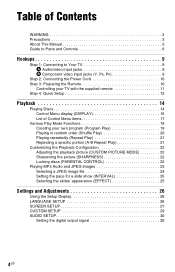
...know information (tips and other useful information) is listed under the z icon. • The meaning of the icons used as those on the remote. Additional Information 32 Troubleshooting 32 Self-diagnosis Function (When letters/numbers appear on the screen) . . . . 34 Playable Discs 34 Specifications 36 ... Code List 37 Parental Control Area Code List 37 Index 38 About This Manual • Instructions in this manual describe the controls on the remote. • "DVD" may be used in this manual is described below: Icons Meaning Functions available for commercial DVDs and DVD+RWs/DVD...
...know information (tips and other useful information) is listed under the z icon. • The meaning of the icons used as those on the remote. Additional Information 32 Troubleshooting 32 Self-diagnosis Function (When letters/numbers appear on the screen) . . . . 34 Playable Discs 34 Specifications 36 ... Code List 37 Parental Control Area Code List 37 Index 38 About This Manual • Instructions in this manual describe the controls on the remote. • "DVD" may be used in this manual is described below: Icons Meaning Functions available for commercial DVDs and DVD+RWs/DVD...
Operating Instructions
Page 6
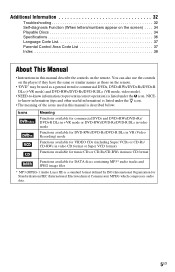
Remote VOL +, number 5, AUDIO, and N buttons have a tactile dot. A PICTURE NAVI (24) Divides the screen into 9 subscreens so you press the button, the display changes as ...
Remote VOL +, number 5, AUDIO, and N buttons have a tactile dot. A PICTURE NAVI (24) Divides the screen into 9 subscreens so you press the button, the display changes as ...
Operating Instructions
Page 8
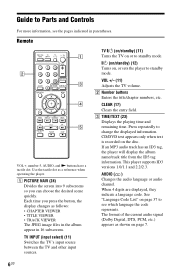
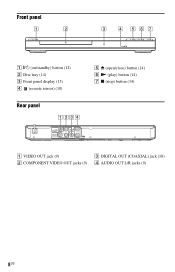
Front panel A [/1 (on/standby) button (12) B Disc tray (14) C Front panel display (15) D (remote sensor) (10) Rear panel E Z (open/close) button (14) F N (play) button (14) G x (stop) button (14) VIDEO VIDEO OUT COMPONENT VIDEO OUT Y PB DIGITAL OUT PR COAXIAL L R AUDIO OUT A VIDEO OUT jack (9) B COMPONENT VIDEO OUT jacks (9) C DIGITAL OUT (COAXIAL) jack (10) D AUDIO OUT L/R jacks (9) 8US
Front panel A [/1 (on/standby) button (12) B Disc tray (14) C Front panel display (15) D (remote sensor) (10) Rear panel E Z (open/close) button (14) F N (play) button (14) G x (stop) button (14) VIDEO VIDEO OUT COMPONENT VIDEO OUT Y PB DIGITAL OUT PR COAXIAL L R AUDIO OUT A VIDEO OUT jack (9) B COMPONENT VIDEO OUT jacks (9) C DIGITAL OUT (COAXIAL) jack (10) D AUDIO OUT L/R jacks (9) 8US
Operating Instructions
Page 10
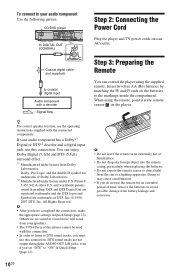
...you must use this connection. z For correct speaker location, see the operating instructions supplied with a decoder : Signal flow Step 3: Preparing the Remote You can enjoy Dolby Digital (5.1ch) and DTS (5.1ch) surround effect. *1 Manufactured under U.S. If your audio component Use the following pattern.... (not supplied) to coaxial digital input Audio component with the connected components. You can control the player using the remote, point it at the remote sensor on the batteries to "ON" in Quick Setup (page 12). and worldwide patents issued & pending. DTS and...
...you must use this connection. z For correct speaker location, see the operating instructions supplied with a decoder : Signal flow Step 3: Preparing the Remote You can enjoy Dolby Digital (5.1ch) and DTS (5.1ch) surround effect. *1 Manufactured under U.S. If your audio component Use the following pattern.... (not supplied) to coaxial digital input Audio component with the connected components. You can control the player using the remote, point it at the remote sensor on the batteries to "ON" in Quick Setup (page 12). and worldwide patents issued & pending. DTS and...
Operating Instructions
Page 11
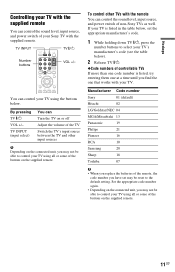
... 13 Panasonic 19 Philips 21 Pioneer 16 RCA 10 Samsung 20 Sharp 18 Toshiba 07 b • When you replace the batteries of the remote, the code number you have set the appropriate manufacturer's code. 1 While holding down TV [/1, press the number buttons to control your TV... code number again. • Depending on the supplied remote. 11US By pressing TV [/1 VOL +/- Hookups Controlling your TV with the supplied remote You can control the sound level, input source, and power switch of your Sony TV with the remote You can control the sound level, input source, and...
... 13 Panasonic 19 Philips 21 Pioneer 16 RCA 10 Samsung 20 Sharp 18 Toshiba 07 b • When you replace the batteries of the remote, the code number you have set the appropriate manufacturer's code. 1 While holding down TV [/1, press the number buttons to control your TV... code number again. • Depending on the supplied remote. 11US By pressing TV [/1 VOL +/- Hookups Controlling your TV with the supplied remote You can control the sound level, input source, and power switch of your Sony TV with the remote You can control the sound level, input source, and...
Operating Instructions
Page 15
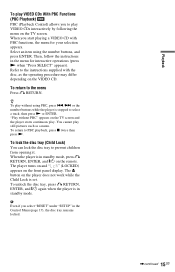
... instructions in standby mode, press O RETURN, ENTER, and [/1 on the TV screen and the player starts continuous play. z To play without PBC" appears on the remote. The Z button on the VIDEO CD. To return to the instructions supplied with PBC functions, the menu for interactive operations (press N when "Press SELECT" appears...
... instructions in standby mode, press O RETURN, ENTER, and [/1 on the TV screen and the player starts continuous play. z To play without PBC" appears on the remote. The Z button on the VIDEO CD. To return to the instructions supplied with PBC functions, the menu for interactive operations (press N when "Press SELECT" appears...
Operating Instructions
Page 28
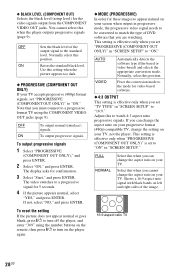
... is effective only when "PROGRESSIVE (COMPONENT OUT ONLY)" is effective only when you must connect to a progressive format TV using the number buttons on the remote, then press [/1 to turn on the player again. ◆ MODE (PROGRESSIVE) In order for these images to appear natural on your screen when output in...
... is effective only when "PROGRESSIVE (COMPONENT OUT ONLY)" is effective only when you must connect to a progressive format TV using the number buttons on the remote, then press [/1 to turn on the player again. ◆ MODE (PROGRESSIVE) In order for these images to appear natural on your screen when output in...
Operating Instructions
Page 32
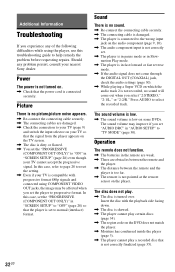
...Slow- The disc does not play a recorded disc that is turned over. Additional Information Troubleshooting If you experience any problem persist, consult your nearest Sony dealer. In this troubleshooting guide to "TV MODE" (page 30). Press AUDIO to "ON" in "AUDIO SETUP" to help remedy the ... While playing a Super VCD on which the audio track 2 is connected to normal (interlace) format. motion Play mode. , The player is in the remote are weak. , There are damaged. , Check the connection to your TV (page 9) and switch the input selector on your TV cannot accept the progressive ...
...Slow- The disc does not play a recorded disc that is turned over. Additional Information Troubleshooting If you experience any problem persist, consult your nearest Sony dealer. In this troubleshooting guide to "TV MODE" (page 30). Press AUDIO to "ON" in "AUDIO SETUP" to help remedy the ... While playing a Super VCD on which the audio track 2 is connected to normal (interlace) format. motion Play mode. , The player is in the remote are weak. , There are damaged. , Check the connection to your TV (page 9) and switch the input selector on your TV cannot accept the progressive ...
Operating Instructions
Page 36
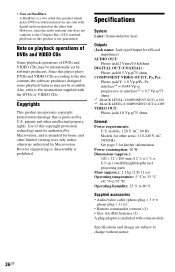
.... However, since the audio material side does not conform to 80 % Supplied accessories • Audio/video cable (phono plug × 3 y phono plug × 3) (1) • Remote commander (remote) (1) • Size AA (R6) batteries (2) A plug adaptor is included with some playback features may be authorized by Macrovision, and is intended for further information. •...
.... However, since the audio material side does not conform to 80 % Supplied accessories • Audio/video cable (phono plug × 3 y phono plug × 3) (1) • Remote commander (remote) (1) • Size AA (R6) batteries (2) A plug adaptor is included with some playback features may be authorized by Macrovision, and is intended for further information. •...

Operating Instructions
Page 38
... 15 PICTURE NAVI 6 PLAY LIST 17 Playable Discs 34 PROGRAM 17, 19 Program Play 19 PROGRESSIVE (COMPONENT OUT ONLY) 28 Q QUICK 17 Quick Setup 12 R Remote 6, 10, 11 REPEAT 17, 21 Repeat Play 21 REPLAY 7 RESET 17 Resume 14, 29 S Scan backward 7 Scan forward 7 SCENE 17 SCREEN SAVER 27 SCREEN SETUP...
... 15 PICTURE NAVI 6 PLAY LIST 17 Playable Discs 34 PROGRAM 17, 19 Program Play 19 PROGRESSIVE (COMPONENT OUT ONLY) 28 Q QUICK 17 Quick Setup 12 R Remote 6, 10, 11 REPEAT 17, 21 Repeat Play 21 REPLAY 7 RESET 17 Resume 14, 29 S Scan backward 7 Scan forward 7 SCENE 17 SCREEN SAVER 27 SCREEN SETUP...


