Operating Instructions
Page 4
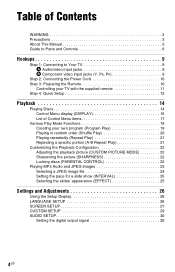
... Your TV 9 A Audio/video input jacks 9 B Component video input jacks (Y, PB, PR 9 Step 2: Connecting the Power Cord 10 Step 3: Preparing the Remote 10 Controlling your TV with the supplied remote 11 Step 4: Quick Setup 12 Playback 14 Playing Discs 14 Control Menu display (DISPLAY 16 List of Control Menu items 17 Various...
... Your TV 9 A Audio/video input jacks 9 B Component video input jacks (Y, PB, PR 9 Step 2: Connecting the Power Cord 10 Step 3: Preparing the Remote 10 Controlling your TV with the supplied remote 11 Step 4: Quick Setup 12 Playback 14 Playing Discs 14 Control Menu display (DISPLAY 16 List of Control Menu items 17 Various...
Operating Instructions
Page 5
... can also use the controls on the player if they have the same or similar names as those on the remote. • "DVD" may be used as a general term for commercial DVDs, DVD+RWs/DVD+Rs/DVD+R DLs (+VR mode) and DVD-RWs/DVD-Rs/DVD-R ...
... can also use the controls on the player if they have the same or similar names as those on the remote. • "DVD" may be used as a general term for commercial DVDs, DVD+RWs/DVD+Rs/DVD+R DLs (+VR mode) and DVD-RWs/DVD-Rs/DVD-R ...
Operating Instructions
Page 6
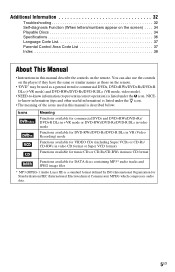
... display changes as a reference when operating the player. TV INPUT (input select) (11) Switches the TV's input source between the TV and other input sources. Remote VOL +, number 5, AUDIO, and N buttons have a tactile dot. Use the tactile dot as follows: • CHAPTER VIEWER • TITLE VIEWER • TRACK VIEWER The JPEG...
... display changes as a reference when operating the player. TV INPUT (input select) (11) Switches the TV's input source between the TV and other input sources. Remote VOL +, number 5, AUDIO, and N buttons have a tactile dot. Use the tactile dot as follows: • CHAPTER VIEWER • TITLE VIEWER • TRACK VIEWER The JPEG...
Operating Instructions
Page 8
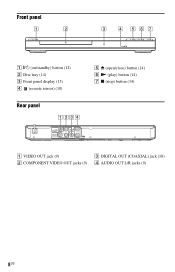
Front panel A [/1 (on/standby) button (12) B Disc tray (14) C Front panel display (15) D (remote sensor) (10) Rear panel E Z (open/close) button (14) F N (play) button (14) G x (stop) button (14) VIDEO VIDEO OUT COMPONENT VIDEO OUT Y PB DIGITAL OUT PR COAXIAL L R AUDIO OUT A VIDEO OUT jack (9) B COMPONENT VIDEO OUT jacks (9) C DIGITAL OUT (COAXIAL) jack (10) D AUDIO OUT L/R jacks (9) 8US
Front panel A [/1 (on/standby) button (12) B Disc tray (14) C Front panel display (15) D (remote sensor) (10) Rear panel E Z (open/close) button (14) F N (play) button (14) G x (stop) button (14) VIDEO VIDEO OUT COMPONENT VIDEO OUT Y PB DIGITAL OUT PR COAXIAL L R AUDIO OUT A VIDEO OUT jack (9) B COMPONENT VIDEO OUT jacks (9) C DIGITAL OUT (COAXIAL) jack (10) D AUDIO OUT L/R jacks (9) 8US
Operating Instructions
Page 10
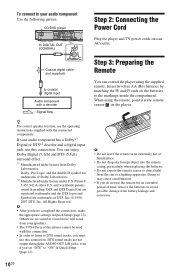
... "ON" in Quick Setup (page 12). z For correct speaker location, see the operating instructions supplied with a decoder : Signal flow Step 3: Preparing the Remote You can enjoy Dolby Digital (5.1ch) and DTS (5.1ch) surround effect. *1 Manufactured under U.S. b • After you set "DTS" to coaxial digital... input Audio component with the connected components. When using the supplied remote. DTS and DTS Digital Out are registered trademarks and the DTS logos and Symbol are trademarks of this player cannot be used with this ...
... "ON" in Quick Setup (page 12). z For correct speaker location, see the operating instructions supplied with a decoder : Signal flow Step 3: Preparing the Remote You can enjoy Dolby Digital (5.1ch) and DTS (5.1ch) surround effect. *1 Manufactured under U.S. b • After you set "DTS" to coaxial digital... input Audio component with the connected components. When using the supplied remote. DTS and DTS Digital Out are registered trademarks and the DTS logos and Symbol are trademarks of this player cannot be used with this ...
Operating Instructions
Page 11
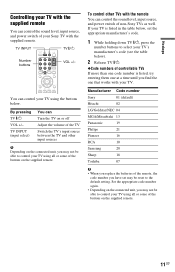
... until you find the one that works with the remote You can control the sound level, input source, and power switch of non-Sony TVs as well. To control other input sources b Depending on the supplied remote. 11US Manufacturer Code number Sony 01 (default) Hitachi 02 LG/Goldstar/NEC 04 ...MENU VOL +/- By pressing TV [/1 VOL +/- TV INPUT (input select) You can control your Sony TV with the supplied remote. Set the appropriate code number again. • Depending on the supplied remote. RETURN DISPLAY You can Turn the TV on or off Adjust the volume of the TV Switch ...
... until you find the one that works with the remote You can control the sound level, input source, and power switch of non-Sony TVs as well. To control other input sources b Depending on the supplied remote. 11US Manufacturer Code number Sony 01 (default) Hitachi 02 LG/Goldstar/NEC 04 ...MENU VOL +/- By pressing TV [/1 VOL +/- TV INPUT (input select) You can control your Sony TV with the supplied remote. Set the appropriate code number again. • Depending on the supplied remote. RETURN DISPLAY You can Turn the TV on or off Adjust the volume of the TV Switch ...
Operating Instructions
Page 15
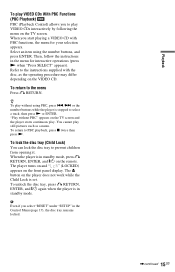
... (Child Lock) You can lock the disc tray to the menu Press O RETURN. To return to prevent children from opening it. The Z button on the remote. Refer to PBC playback, press x twice then press N. You cannot play without PBC" appears on the TV screen. "Play without using the number buttons, and...
... (Child Lock) You can lock the disc tray to the menu Press O RETURN. To return to prevent children from opening it. The Z button on the remote. Refer to PBC playback, press x twice then press N. You cannot play without PBC" appears on the TV screen. "Play without using the number buttons, and...
Operating Instructions
Page 28
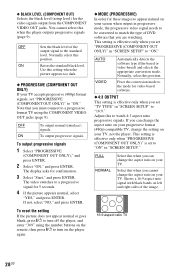
... you can change the aspect ratio on your TV, not the player. The video switches to a progressive format TV using the number buttons on the remote, then press [/1 to turn on your screen when output in "SCREEN SETUP." AUTO Automatically detects the software type (film-based or video-based) and selects...
... you can change the aspect ratio on your TV, not the player. The video switches to a progressive format TV using the number buttons on the remote, then press [/1 to turn on your screen when output in "SCREEN SETUP." AUTO Automatically detects the software type (film-based or video-based) and selects...
Operating Instructions
Page 32
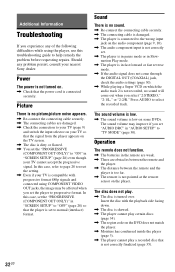
... input is not correctly set. , The player is set to progressive format. Additional Information Troubleshooting If you experience any problem persist, consult your nearest Sony dealer. Power The power is not turned on your TV so that is dirty or flawed. , You set the "PROGRESSIVE (COMPONENT OUT ONLY)" ...does not match the player. , Moisture has condensed inside the player (page 3). , The player cannot play . , The disc is not pointed at the remote sensor on the TV screen. , The disc is not correctly finalized (page 35). 32US motion Play mode. , The player is in fast forward or fast...
... input is not correctly set. , The player is set to progressive format. Additional Information Troubleshooting If you experience any problem persist, consult your nearest Sony dealer. Power The power is not turned on your TV so that is dirty or flawed. , You set the "PROGRESSIVE (COMPONENT OUT ONLY)" ...does not match the player. , Moisture has condensed inside the player (page 3). , The player cannot play . , The disc is not pointed at the remote sensor on the TV screen. , The disc is not correctly finalized (page 35). 32US motion Play mode. , The player is in fast forward or fast...
Operating Instructions
Page 36
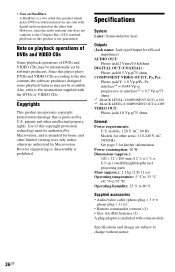
... on this player plays DVDs and VIDEO CDs according to 80 % Supplied accessories • Audio/video cable (phono plug × 3 y phono plug × 3) (1) • Remote commander (remote) (1) • Size AA (R6) batteries (2) A plug adaptor is included with digital audio material on playback operations of DVDs and VIDEO CDs Some playback operations of...
... on this player plays DVDs and VIDEO CDs according to 80 % Supplied accessories • Audio/video cable (phono plug × 3 y phono plug × 3) (1) • Remote commander (remote) (1) • Size AA (R6) batteries (2) A plug adaptor is included with digital audio material on playback operations of DVDs and VIDEO CDs Some playback operations of...

Operating Instructions
Page 38
... 15 PICTURE NAVI 6 PLAY LIST 17 Playable Discs 34 PROGRAM 17, 19 Program Play 19 PROGRESSIVE (COMPONENT OUT ONLY) 28 Q QUICK 17 Quick Setup 12 R Remote 6, 10, 11 REPEAT 17, 21 Repeat Play 21 REPLAY 7 RESET 17 Resume 14, 29 S Scan backward 7 Scan forward 7 SCENE 17 SCREEN SAVER 27 SCREEN SETUP...
... 15 PICTURE NAVI 6 PLAY LIST 17 Playable Discs 34 PROGRAM 17, 19 Program Play 19 PROGRESSIVE (COMPONENT OUT ONLY) 28 Q QUICK 17 Quick Setup 12 R Remote 6, 10, 11 REPEAT 17, 21 Repeat Play 21 REPLAY 7 RESET 17 Resume 14, 29 S Scan backward 7 Scan forward 7 SCENE 17 SCREEN SAVER 27 SCREEN SETUP...


