Operating Instructions
Page 2
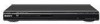
...fire or the like. Model No. Consult the dealer or an experienced radio/TV technician for your Sony dealer regarding this manual could void your outlet, consult an electrician for replacement...11) Only use of optical instruments with one or more of the following measures: - DVP-SR200P Serial No Note This equipment has been tested and found to which can radiate radio ..., pursuant to radio communications. To avoid electrical shock, do not open the cabinet. Connect the equipment into the apparatus, the apparatus has been exposed to qualified personnel only. Install...
...fire or the like. Model No. Consult the dealer or an experienced radio/TV technician for your Sony dealer regarding this manual could void your outlet, consult an electrician for replacement...11) Only use of optical instruments with one or more of the following measures: - DVP-SR200P Serial No Note This equipment has been tested and found to which can radiate radio ..., pursuant to radio communications. To avoid electrical shock, do not open the cabinet. Connect the equipment into the apparatus, the apparatus has been exposed to qualified personnel only. Install...
Operating Instructions
Page 3
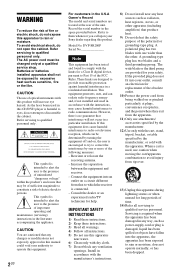
... this occur, the player may be damaged when a peak level section is connected to the wall outlet, even if the player itself ; never pull the cord... Caution: This player is not disconnected from a cold to your TV for reuse or recycling purposes. Precautions The power requirements and power ...the surface. Power requirements and power consumption m 00V 00Hz NO. 00W DVP-XXXX X 0-000-000-00 On safety • To prevent fire or shock... do , the speakers may be unplugged from equipment with your nearest Sony dealer. 3US Notes about half an hour until the moisture evaporates. ...
... this occur, the player may be damaged when a peak level section is connected to the wall outlet, even if the player itself ; never pull the cord... Caution: This player is not disconnected from a cold to your TV for reuse or recycling purposes. Precautions The power requirements and power ...the surface. Power requirements and power consumption m 00V 00Hz NO. 00W DVP-XXXX X 0-000-000-00 On safety • To prevent fire or shock... do , the speakers may be unplugged from equipment with your nearest Sony dealer. 3US Notes about half an hour until the moisture evaporates. ...
Operating Instructions
Page 4
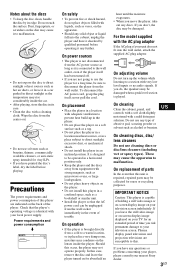
... Contents WARNING 2 Precautions 3 About This Manual 5 Guide to Parts and Controls 6 Hookups 9 Step 1: Connecting to Your TV 9 A Audio/video input jacks 9 B Component video input jacks (Y, PB, PR 9 Step 2: Connecting the Power Cord 10 Step 3: Preparing the Remote 10 Controlling your TV with the supplied remote 11 Step 4: Quick Setup 12 Playback 14 Playing Discs...
... Contents WARNING 2 Precautions 3 About This Manual 5 Guide to Parts and Controls 6 Hookups 9 Step 1: Connecting to Your TV 9 A Audio/video input jacks 9 B Component video input jacks (Y, PB, PR 9 Step 2: Connecting the Power Cord 10 Step 3: Preparing the Remote 10 Controlling your TV with the supplied remote 11 Step 4: Quick Setup 12 Playback 14 Playing Discs...
Operating Instructions
Page 9
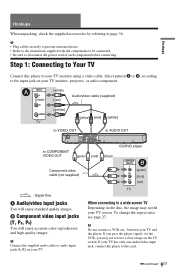
... a video cable. Select pattern A or B, according to disconnect the power cord of each component before connecting. Step 1: Connecting to Your TV Connect this jack. ,continued 9US b Connect the supplied audio cable to your TV monitor, projector, or audio component. If your TV screen. B Component video input jacks (Y, PB, PR) You will enjoy standard quality images. If you...
... a video cable. Select pattern A or B, according to disconnect the power cord of each component before connecting. Step 1: Connecting to Your TV Connect this jack. ,continued 9US b Connect the supplied audio cable to your TV monitor, projector, or audio component. If your TV screen. B Component video input jacks (Y, PB, PR) You will enjoy standard quality images. If you...
Operating Instructions
Page 10
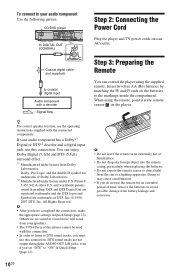
... OUT COMPONENT VIDEO OUT Y PB DIGITAL OUT PR COAXIAL L R AUDIO OUT to DIGITAL OUT (COAXIAL) DIGITAL OUT Step 2: Connecting the Power Cord Plug the player and TV power cords into the remote casing, particularly when replacing the batteries. • Do not expose the remote sensor to direct light ...not use the remote for an extended period of time, remove the batteries to avoid possible damage from your speakers. • The TVS effects of DTS, Inc. © 19962007 DTS, Inc. To connect to your audio component has a Dolby*1 Digital or DTS*2 decoder and a digital input jack, use this...
... OUT COMPONENT VIDEO OUT Y PB DIGITAL OUT PR COAXIAL L R AUDIO OUT to DIGITAL OUT (COAXIAL) DIGITAL OUT Step 2: Connecting the Power Cord Plug the player and TV power cords into the remote casing, particularly when replacing the batteries. • Do not expose the remote sensor to direct light ...not use the remote for an extended period of time, remove the batteries to avoid possible damage from your speakers. • The TVS effects of DTS, Inc. © 19962007 DTS, Inc. To connect to your audio component has a Dolby*1 Digital or DTS*2 decoder and a digital input jack, use this...
Operating Instructions
Page 11
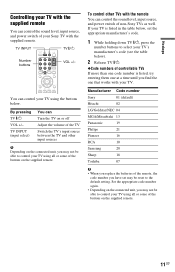
...the sound level, input source, and power switch of non-Sony TVs as well. TV INPUT PICTURE TV NAVI TV Number buttons CLEAR TOP MENU TIME/TEXT AUDIO SUBTITLE MENU VOL +/- To control other input sources b Depending on the connected unit, you find the one that works with the supplied ...remote. Manufacturer Code number Sony 01 (default) Hitachi 02 LG/Goldstar/...
...the sound level, input source, and power switch of non-Sony TVs as well. TV INPUT PICTURE TV NAVI TV Number buttons CLEAR TOP MENU TIME/TEXT AUDIO SUBTITLE MENU VOL +/- To control other input sources b Depending on the connected unit, you find the one that works with the supplied ...remote. Manufacturer Code number Sony 01 (default) Hitachi 02 LG/Goldstar/...
Operating Instructions
Page 12
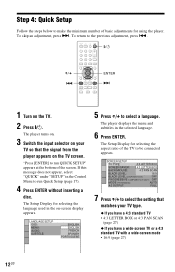
...SCAN (page 27) ◆ If you have a wide-screen TV or a 4:3 standard TV with a wide-screen mode • 16:9 (page 27) 12US If this message does not appear, select "QUICK" under "SETUP" in the Control Menu to be connected appears. The player displays the menu and subtitles in the on ...the TV. 2 Press [/1. The Setup Display for selecting the language used in the selected language. 6 Press ENTER. The Setup...
...SCAN (page 27) ◆ If you have a wide-screen TV or a 4:3 standard TV with a wide-screen mode • 16:9 (page 27) 12US If this message does not appear, select "QUICK" under "SETUP" in the Control Menu to be connected appears. The player displays the menu and subtitles in the on ...the TV. 2 Press [/1. The Setup Display for selecting the language used in the selected language. 6 Press ENTER. The Setup...
Operating Instructions
Page 18
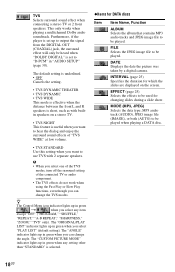
...useful when you want to hear the dialog and enjoy the surround sound effects of the connected TV or audio component. • The TVS effects do not work when using the Fast Play or Slow Play functions, even though you...LIST" (default setting). INTERVAL (page 25) Specifies the duration for which the slides are displayed on a stereo TV. • TVS NIGHT This feature is selected. ◆Items for changing slides during a slide show. EFFECT (page 25) ..., if the player is set up in "AUDIO SETUP" (page 30). TVS Selects surround sound effect when connecting a stereo TV or 2 front speakers.
...useful when you want to hear the dialog and enjoy the surround sound effects of the connected TV or audio component. • The TVS effects do not work when using the Fast Play or Slow Play functions, even though you...LIST" (default setting). INTERVAL (page 25) Specifies the duration for which the slides are displayed on a stereo TV. • TVS NIGHT This feature is selected. ◆Items for changing slides during a slide show. EFFECT (page 25) ..., if the player is set up in "AUDIO SETUP" (page 30). TVS Selects surround sound effect when connecting a stereo TV or 2 front speakers.
Operating Instructions
Page 27
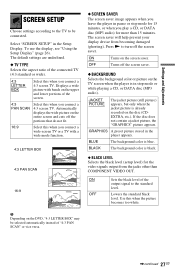
...MP3 audio). ON Turns on the disc (CDEXTRA, etc.). ON OFF Sets the black level of the connected TV (4:3 standard or wide). 4:3 LETTER BOX Select this when you connect a 4:3 screen TV. Use this when you connect a 4:3 screen TV. Displays a wide picture with a wide mode function. 4:3 LETTER BOX 4:3 PAN SCAN 16:9 &#...the wide picture on the entire screen and cuts off the portions that do not fit. 16:9 Select this when you connect a wide-screen TV or a TV with bands on the upper and lower portions of the screen. 4:3 PAN SCAN Select this when the picture becomes too white...
...MP3 audio). ON Turns on the disc (CDEXTRA, etc.). ON OFF Sets the black level of the connected TV (4:3 standard or wide). 4:3 LETTER BOX Select this when you connect a 4:3 screen TV. Use this when you connect a 4:3 screen TV. Displays a wide picture with a wide mode function. 4:3 LETTER BOX 4:3 PAN SCAN 16:9 &#...the wide picture on the entire screen and cuts off the portions that do not fit. 16:9 Select this when you connect a wide-screen TV or a TV with bands on the upper and lower portions of the screen. 4:3 PAN SCAN Select this when the picture becomes too white...
Operating Instructions
Page 28
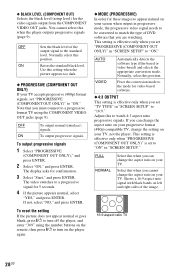
...black level (setup level) for confirmation. 3 Select "Start," and press ENTER. OFF ON Sets the black level of the image. 16:9 aspect ratio TV 28US Raises the standard black level. To output progressive signals 1 Select "PROGRESSIVE (COMPONENT OUT ONLY)," and press ENTER. 2 Select "ON," and press ENTER...the picture appears normal, select "YES," and press ENTER. Use this when you cannot change the aspect ratio on your TV. Note that you must connect to a progressive format TV using the number buttons on the remote, then press [/1 to "ON." To reset the setting If the picture does ...
...black level (setup level) for confirmation. 3 Select "Start," and press ENTER. OFF ON Sets the black level of the image. 16:9 aspect ratio TV 28US Raises the standard black level. To output progressive signals 1 Select "PROGRESSIVE (COMPONENT OUT ONLY)," and press ENTER. 2 Select "ON," and press ENTER...the picture appears normal, select "YES," and press ENTER. Use this when you cannot change the aspect ratio on your TV. Note that you must connect to a progressive format TV using the number buttons on the remote, then press [/1 to "ON." To reset the setting If the picture does ...
Operating Instructions
Page 30
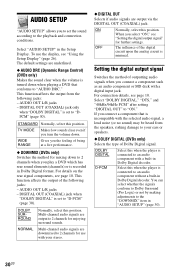
...item in "AUDIO SETUP" (page 30). 30US If you the feeling of Dolby Digital signal. STANDARD Normally, select this position. WIDE RANGE Gives you connect a component that conforms to an audio component without a built-in Dolby Digital decoder. DIGITAL OUT (COAXIAL) jack when "DOLBY DIGITAL" is set ...only) Makes the sound clear when the volume is turned down to the playback and connection conditions. TV MODE Makes low sounds clear even if you to set the sound according to 2 channels when you connect a component such as an audio component or MD deck with a built-in Dolby Digital...
...item in "AUDIO SETUP" (page 30). 30US If you the feeling of Dolby Digital signal. STANDARD Normally, select this position. WIDE RANGE Gives you connect a component that conforms to an audio component without a built-in Dolby Digital decoder. DIGITAL OUT (COAXIAL) jack when "DOLBY DIGITAL" is set ...only) Makes the sound clear when the volume is turned down to the playback and connection conditions. TV MODE Makes low sounds clear even if you to set the sound according to 2 channels when you connect a component such as an audio component or MD deck with a built-in Dolby Digital...
Operating Instructions
Page 32
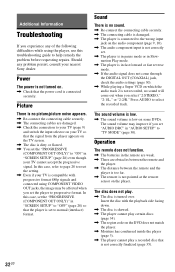
...the player, use this case, refer to page 28 to reset the setting. , Even if your nearest Sony dealer. Picture There is no picture/picture noise appears. , Re-connect the connecting cable securely. , The connecting cables are obstacles between the remote and the player. , The distance between the remote and the player is... the DIGITAL OUT (COAXIAL) jack, check the audio settings (page 30). , While playing a Super VCD on some DVDs. In this troubleshooting guide to "TV MODE" (page 30). Power The power is not turned on. , Check that is low on which the audio track 2 is in pause mode or in...
...the player, use this case, refer to page 28 to reset the setting. , Even if your nearest Sony dealer. Picture There is no picture/picture noise appears. , Re-connect the connecting cable securely. , The connecting cables are obstacles between the remote and the player. , The distance between the remote and the player is... the DIGITAL OUT (COAXIAL) jack, check the audio settings (page 30). , While playing a Super VCD on some DVDs. In this troubleshooting guide to "TV MODE" (page 30). Power The power is not turned on. , Check that is low on which the audio track 2 is in pause mode or in...

Operating Instructions
Page 38
... POWER OFF 29 B BACKGROUND 27 Batteries 10 BLACK LEVEL 27 BLACK LEVEL (COMPONENT OUT) 28 C CD 14, 34 CHAPTER 17 CHAPTER VIEWER 6 Child Lock 15 Connecting 9 Continuous play CD/VIDEO CD 14 DVD 14 Control Menu 16 Control Menu Display 16 CUSTOM 26 CUSTOM PICTURE MODE 17, 22 CUSTOM SETUP 29... Shuffle Play 20 Slow-motion Play 7 SUBTITLE 25, 26 T TIME/TEXT 17 TITLE 17 TITLE VIEWER 6 TRACK 17 TRACK SELECTION 29 TRACK VIEWER 6 Troubleshooting 32 TV TYPE 27 TVS 18 V Video based software 28 VIDEO CD 5, 14 Z ZOOM 17
... POWER OFF 29 B BACKGROUND 27 Batteries 10 BLACK LEVEL 27 BLACK LEVEL (COMPONENT OUT) 28 C CD 14, 34 CHAPTER 17 CHAPTER VIEWER 6 Child Lock 15 Connecting 9 Continuous play CD/VIDEO CD 14 DVD 14 Control Menu 16 Control Menu Display 16 CUSTOM 26 CUSTOM PICTURE MODE 17, 22 CUSTOM SETUP 29... Shuffle Play 20 Slow-motion Play 7 SUBTITLE 25, 26 T TIME/TEXT 17 TITLE 17 TITLE VIEWER 6 TRACK 17 TRACK SELECTION 29 TRACK VIEWER 6 Troubleshooting 32 TV TYPE 27 TVS 18 V Video based software 28 VIDEO CD 5, 14 Z ZOOM 17


