Operating Instructions
Page 2
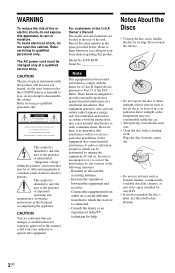
... cabinet. For customers in the U.S.A Owner's Record The model and serial numbers are designed to the presence of important operating and maintenance (servicing) instructions in the space provided below. Connect the equipment into an outlet on , the user is intended to alert the user to provide reasonable protection against harmful interference in a particular installation. To avoid electrical shock, do not open the cabinet.
... cabinet. For customers in the U.S.A Owner's Record The model and serial numbers are designed to the presence of important operating and maintenance (servicing) instructions in the space provided below. Connect the equipment into an outlet on , the user is intended to alert the user to provide reasonable protection against harmful interference in a particular installation. To avoid electrical shock, do not open the cabinet.
Operating Instructions
Page 4
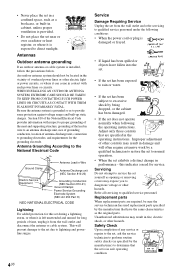
...; When the power cord or plug is installed, follow the precautions below. Section 810 of time, unplug it from the wall outlet and refer servicing to grounding electrodes, and requirements for service. Improper adjustment of antenna-discharge unit, connection to qualified service personnel under the following the operating instructions. Safety Check Upon completion of any service or repairs to the set near or over...
...; When the power cord or plug is installed, follow the precautions below. Section 810 of time, unplug it from the wall outlet and refer servicing to grounding electrodes, and requirements for service. Improper adjustment of antenna-discharge unit, connection to qualified service personnel under the following the operating instructions. Safety Check Upon completion of any service or repairs to the set near or over...

Operating Instructions
Page 6
... Control Menu Display 14 Hookups 17 Hooking Up the Player 17 Step 1: Unpacking 17 Step 2: Inserting Batteries Into the Remote 17 Step 3: Connecting the Video Cords 18 Step 4: Connecting the Audio Cords 21 Step 5: Connecting the Power Cord 23 Step 6: Quick Setup 23 Playing Discs 25 Playing Discs 25 Resuming Playback From the Point Where You Stopped the Disc (Multi-disc Resume 27 Using the DVD's Menu 28 Selecting "ORIGINAL" or "PLAY LIST" on a DVD-RW/DVD-R 28 Playing VIDEO CDs With PBC Functions (PBC Playback 29 Various Play Mode Functions (Program Play...
... Control Menu Display 14 Hookups 17 Hooking Up the Player 17 Step 1: Unpacking 17 Step 2: Inserting Batteries Into the Remote 17 Step 3: Connecting the Video Cords 18 Step 4: Connecting the Audio Cords 21 Step 5: Connecting the Power Cord 23 Step 6: Quick Setup 23 Playing Discs 25 Playing Discs 25 Resuming Playback From the Point Where You Stopped the Disc (Multi-disc Resume 27 Using the DVD's Menu 28 Selecting "ORIGINAL" or "PLAY LIST" on a DVD-RW/DVD-R 28 Playing VIDEO CDs With PBC Functions (PBC Playback 29 Various Play Mode Functions (Program Play...

Operating Instructions
Page 10
... do not conform to the operating instructions for home and other limited viewing uses only unless otherwise authorized by U.S. In this player plays DVDs and VIDEO CDs according to the recording quality or physical condition of the disc, or the characteristics of DVDs and VIDEO CDs may not be available. Also some playback features may be intentionally set by some DVD+RWs/DVD+Rs, even if they...
... do not conform to the operating instructions for home and other limited viewing uses only unless otherwise authorized by U.S. In this player plays DVDs and VIDEO CDs according to the recording quality or physical condition of the disc, or the characteristics of DVDs and VIDEO CDs may not be available. Also some playback features may be intentionally set by some DVD+RWs/DVD+Rs, even if they...

Operating Instructions
Page 15
... Setup (page 23) Use Quick Setup to choose the desired language of the on-screen display, the aspect ratio of the image to produce a sharper picture. You can adjust various other settings. FILE (page 36) Selects the JPEG image file to be played. CUSTOM PICTURE MODE (page 53) Adjusts the video signal from the player. PROGRAM (page 31) Selects the title, chapter, or track to play repeatedly. CUSTOM Setup In addition to prohibit playback on the screen. List of Control Menu...
... Setup (page 23) Use Quick Setup to choose the desired language of the on-screen display, the aspect ratio of the image to produce a sharper picture. You can adjust various other settings. FILE (page 36) Selects the JPEG image file to be played. CUSTOM PICTURE MODE (page 53) Adjusts the video signal from the player. PROGRAM (page 31) Selects the title, chapter, or track to play repeatedly. CUSTOM Setup In addition to prohibit playback on the screen. List of Control Menu...
Operating Instructions
Page 18
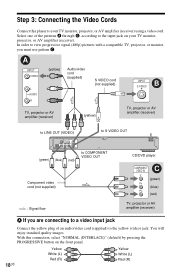
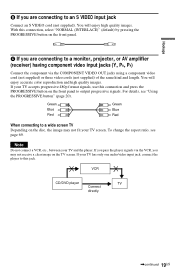
... panel. 18US Yellow White (L) Red (R) Yellow White (L) Red (R) In order to view progressive signal (480p) pictures with a compatible TV, projector, or monitor, you are connecting to a video input jack Connect the yellow plug of the patterns A through C, according to your TV monitor, projector, or AV amplifier (receiver). Step 3: Connecting the Video Cords Connect this connection, select "NORMAL (INTERLACE)" (default) by pressing the PROGRESSIVE button on your TV monitor, projector, or AV amplifier (receiver) using a video cord...
... panel. 18US Yellow White (L) Red (R) Yellow White (L) Red (R) In order to view progressive signal (480p) pictures with a compatible TV, projector, or monitor, you are connecting to a video input jack Connect the yellow plug of the patterns A through C, according to your TV monitor, projector, or AV amplifier (receiver). Step 3: Connecting the Video Cords Connect this connection, select "NORMAL (INTERLACE)" (default) by pressing the PROGRESSIVE button on your TV monitor, projector, or AV amplifier (receiver) using a video cord...
Operating Instructions
Page 19
... TV has only one audio/video input jack, connect the player to a wide screen TV Depending on the front panel. Hookups B If you are connecting to a monitor, projector, or AV amplifier (receiver) having component video input jacks (Y, PB, PR) Connect the component via the VCR, you may not fit your TV accepts progressive 480p format signals, use this jack. To change the aspect ratio, see "Using the PROGRESSIVE button" (page 20). C If you are connecting to output progressive signals.
... TV has only one audio/video input jack, connect the player to a wide screen TV Depending on the front panel. Hookups B If you are connecting to a monitor, projector, or AV amplifier (receiver) having component video input jacks (Y, PB, PR) Connect the component via the VCR, you may not fit your TV accepts progressive 480p format signals, use this jack. To change the aspect ratio, see "Using the PROGRESSIVE button" (page 20). C If you are connecting to output progressive signals.

Operating Instructions
Page 22
Connect using the audio/video cord (supplied). "Dolby," "Pro Logic," and the double-D symbol are trademarks of Dolby Laboratories. *2 "DTS" and "DTS Digital Out" are not output through the LINE OUT L/R (AUDIO) jacks, even if you set "DTS" to a digital audio input jack If your TV's or stereo amplifier's (receiver's) two speakers for sound. Yellow White (L) Red (R) Yellow White (L) Red (R) • Surround effect (page 51) TV: Dynamic Theater, Dynamic, Wide...
Connect using the audio/video cord (supplied). "Dolby," "Pro Logic," and the double-D symbol are trademarks of Dolby Laboratories. *2 "DTS" and "DTS Digital Out" are not output through the LINE OUT L/R (AUDIO) jacks, even if you set "DTS" to a digital audio input jack If your TV's or stereo amplifier's (receiver's) two speakers for sound. Yellow White (L) Red (R) Yellow White (L) Red (R) • Surround effect (page 51) TV: Dynamic Theater, Dynamic, Wide...

Operating Instructions
Page 25
... a disc on a DVD VIDEO • DTS audio signals are output only through the DIGITAL OUT (COAXIAL or OPTICAL) jack. • When you play ). For DVD VIDEOs, see page 29. To turn off , set "DTS" to "ON" in "CUSTOM SETUP" to "ON" or "OFF" (page 70). For more than 30 minutes. Notes on playing DTS sound tracks on the disc tray. The player enters standby mode. The disc tray closes. To turn this function on the disc, a menu...
... a disc on a DVD VIDEO • DTS audio signals are output only through the DIGITAL OUT (COAXIAL or OPTICAL) jack. • When you play ). For DVD VIDEOs, see page 29. To turn off , set "DTS" to "ON" in "CUSTOM SETUP" to "ON" or "OFF" (page 70). For more than 30 minutes. Notes on playing DTS sound tracks on the disc tray. The player enters standby mode. The disc tray closes. To turn this function on the disc, a menu...
Operating Instructions
Page 26
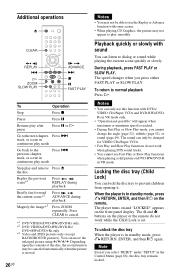
The sound can lock the disc tray to prevent children from opening it. Locking the disc tray (Child Lock) You can only be changed for VIDEO CDs/Super VCDs. • Fast Play and Slow Play functions do not work when playing DTS sound tracks. • You cannot use this function with DVDs/ VIDEO CDs/Super VCDs and DVD-RWs/DVDRs in the Control Menu (page 68), the disc tray remains locked. To unlock the disc tray When the player is in standby mode, press O RETURN...
The sound can lock the disc tray to prevent children from opening it. Locking the disc tray (Child Lock) You can only be changed for VIDEO CDs/Super VCDs. • Fast Play and Slow Play functions do not work when playing DTS sound tracks. • You cannot use this function with DVDs/ VIDEO CDs/Super VCDs and DVD-RWs/DVDRs in the Control Menu (page 68), the disc tray remains locked. To unlock the disc tray When the player is in standby mode, press O RETURN...
Operating Instructions
Page 28
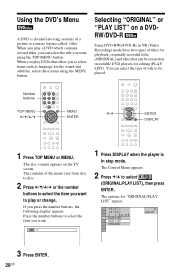
... (Video Recording) mode have two types of the menu vary from disc to disc. 2 Press C/X/x/c or the number buttons to select the item you want to be created on recordable DVD players for playback: originally recorded titles (ORIGINAL) and titles that allow you press the number buttons, the following display appears. The options for the sound and subtitles, select these items using the TOP MENU button. The contents of titles for editing (PLAY LIST). The Control Menu appears...
... (Video Recording) mode have two types of the menu vary from disc to disc. 2 Press C/X/x/c or the number buttons to select the item you want to be created on recordable DVD players for playback: originally recorded titles (ORIGINAL) and titles that allow you press the number buttons, the following display appears. The options for the sound and subtitles, select these items using the TOP MENU button. The contents of titles for editing (PLAY LIST). The Control Menu appears...
Operating Instructions
Page 30
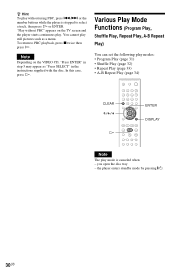
...; A-B Repeat Play (page 34) CLEAR ENTER DISPLAY Note The play mode is stopped to PBC playback, press x twice then press H. the player enters standby mode by pressing [/1. 30US z Hint To play without PBC" appears on the VIDEO CD, "Press ENTER" in the instructions supplied with the disc. In this case, press H. you open the disc tray. - Note Depending on the TV screen and the player starts continuous play. "Play without using PBC...
...; A-B Repeat Play (page 34) CLEAR ENTER DISPLAY Note The play mode is stopped to PBC playback, press x twice then press H. the player enters standby mode by pressing [/1. 30US z Hint To play without PBC" appears on the VIDEO CD, "Press ENTER" in the instructions supplied with the disc. In this case, press H. you open the disc tray. - Note Depending on the TV screen and the player starts continuous play. "Play without using PBC...
Operating Instructions
Page 49
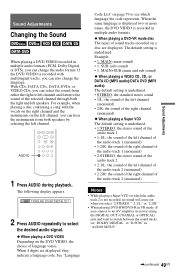
... change the language. When the same language is displayed two or more times, the DVD VIDEO is recorded in multiple audio formats. ◆ When playing a DVD-VR mode disc The types of the audio track 2 (monaural) Notes • While playing a Super VCD on the left channel, you can select the sound from both the right and left speakers. AUDIO 1 Press AUDIO during playback. The following display appears. 1:ENGLISH DOLBY DIGITAL 3/2.1 2 Press AUDIO repeatedly to see which the audio track 2 is recorded...
... change the language. When the same language is displayed two or more times, the DVD VIDEO is recorded in multiple audio formats. ◆ When playing a DVD-VR mode disc The types of the audio track 2 (monaural) Notes • While playing a Super VCD on the left channel, you can select the sound from both the right and left speakers. AUDIO 1 Press AUDIO during playback. The following display appears. 1:ENGLISH DOLBY DIGITAL 3/2.1 2 Press AUDIO repeatedly to see which the audio track 2 is recorded...
Operating Instructions
Page 65
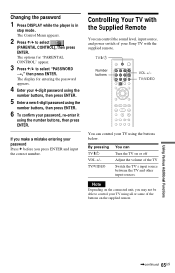
... the player is in stop mode. The display for "PARENTAL CONTROL" appear. 3 Press X/x to select (PARENTAL CONTROL), then press ENTER. TV/VIDEO You can control your password, re-enter it using all or some of the buttons on or off Adjust the volume of your password Press C before you press ENTER and input the correct number. By pressing TV [/1 VOL +/- TV Number buttons VOL +/- TV/VIDEO You can control the sound level, input source, and power switch...
... the player is in stop mode. The display for "PARENTAL CONTROL" appear. 3 Press X/x to select (PARENTAL CONTROL), then press ENTER. TV/VIDEO You can control your password, re-enter it using all or some of the buttons on or off Adjust the volume of your password Press C before you press ENTER and input the correct number. By pressing TV [/1 VOL +/- TV Number buttons VOL +/- TV/VIDEO You can control the sound level, input source, and power switch...
Operating Instructions
Page 69
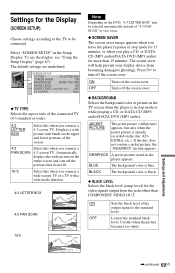
... color is in pause or stop mode or while playing a CD, or DATA CD (MP3 audio)/DATA DVD (MP3 audio). Settings for 15 minutes, or when you connect a 4:3 screen TV. Turns off the screen saver. ON OFF Sets the black level of the screen. 4:3 PAN SCAN Select this when the picture becomes too white. Use this when you connect a 4:3 screen TV. ON OFF Turns on the upper and lower portions of the output signal to turn...
... color is in pause or stop mode or while playing a CD, or DATA CD (MP3 audio)/DATA DVD (MP3 audio). Settings for 15 minutes, or when you connect a 4:3 screen TV. Turns off the screen saver. ON OFF Sets the black level of the screen. 4:3 PAN SCAN Select this when the picture becomes too white. Use this when you connect a 4:3 screen TV. ON OFF Turns on the upper and lower portions of the output signal to turn...
Operating Instructions
Page 71
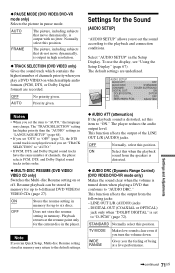
... the default settings. ◆ AUDIO ATT (attenuation) If the playback sound is set "DTS" to "OFF" (page 72), the DTS sound track is turned down . Playback restarts at a live performance. AUTO The picture, including subjects that do not move dynamically, is output in high resolution. ◆ TRACK SELECTION (DVD VIDEO only) Gives the sound track which contains the highest number of channels, the player selects PCM, DTS, and Dolby Digital sound tracks in memory may change...
... the default settings. ◆ AUDIO ATT (attenuation) If the playback sound is set "DTS" to "OFF" (page 72), the DTS sound track is turned down . Playback restarts at a live performance. AUTO The picture, including subjects that do not move dynamically, is output in high resolution. ◆ TRACK SELECTION (DVD VIDEO only) Gives the sound track which contains the highest number of channels, the player selects PCM, DTS, and Dolby Digital sound tracks in memory may change...
Operating Instructions
Page 72
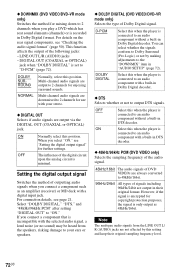
... audio component with the selected audio signal, a loud noise (or no sound) may be heard from the LINE OUT L/ R (AUDIO) jacks are output in their original sampling frequency level. 72US D-PCM Select this when the player is minimal. ON Select this when the player is recorded in Dolby Digital format. ◆ DOWNMIX (DVD VIDEO/DVD-VR mode only) Switches the method for mixing down to 2 channels when you play a DVD which has rear sound elements (channels) or is connected...
... audio component with the selected audio signal, a loud noise (or no sound) may be heard from the LINE OUT L/ R (AUDIO) jacks are output in their original sampling frequency level. 72US D-PCM Select this when the player is minimal. ON Select this when the player is recorded in Dolby Digital format. ◆ DOWNMIX (DVD VIDEO/DVD-VR mode only) Switches the method for mixing down to 2 channels when you play a DVD which has rear sound elements (channels) or is connected...

Operating Instructions
Page 73
... sound volume is low. , The sound volume is not recorded, no sound will come through your VCR to get to your DVD. Additional Information ,continued 73US Power The power is not turned on the amplifier (receiver) (page 21). , The amplifier (receiver) input is not correctly set. , The player is set to normal (interlace) format. Should any of the following difficulties while using the player, use this troubleshooting guide to help remedy the problem before requesting repairs. Picture...
... sound volume is low. , The sound volume is not recorded, no sound will come through your VCR to get to your DVD. Additional Information ,continued 73US Power The power is not turned on the amplifier (receiver) (page 21). , The amplifier (receiver) input is not correctly set. , The player is set to normal (interlace) format. Should any of the following difficulties while using the player, use this troubleshooting guide to help remedy the problem before requesting repairs. Picture...
Operating Instructions
Page 74
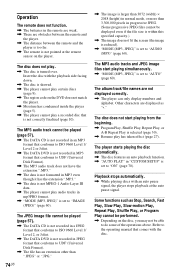
...). Playback stops automatically. , While playing discs with the disc. Refer to "ON" (page 70). The MP3 audio tracks and JPEG image files start playing from the beginning. , Program Play, Shuffle Play, Repeat Play, or A-B Repeat Play is selected (page 30). , Resume play . , The disc is not pointed at the auto pause signal. Some functions such as "*." Operation The remote does not function. , The batteries in the remote are weak. , There are not displayed correctly. , The player can only display numbers...
...). Playback stops automatically. , While playing discs with the disc. Refer to "ON" (page 70). The MP3 audio tracks and JPEG image files start playing from the beginning. , Program Play, Shuffle Play, Repeat Play, or A-B Repeat Play is selected (page 30). , Resume play . , The disc is not pointed at the auto pause signal. Some functions such as "*." Operation The remote does not function. , The batteries in the remote are weak. , There are not displayed correctly. , The player can only display numbers...

Operating Instructions
Page 80
... audio signal format 50 Child Lock 26 Connecting 18 Continuous play CD/VIDEO CD 25 DVD 25 Control Menu 14 CUSTOM 67 CUSTOM PARENTAL CONTROL 62 CUSTOM PICTURE MODE 53 CUSTOM SETUP 70 D DATA CD 8, 56 DATA DVD 8, 56 DATE 59 DIGITAL OUT 72 Digital output 72 DIMMER 70 Display Control Menu Display 14 80US Front panel display 12 Setup Display 67 DOLBY DIGITAL 49, 72, 76 DOWNMIX 72 DTS 49, 72, 76 DVD 8, 25, 77 DVD+RW 8, 26, 77 DVD's menu 28 DVD...
... audio signal format 50 Child Lock 26 Connecting 18 Continuous play CD/VIDEO CD 25 DVD 25 Control Menu 14 CUSTOM 67 CUSTOM PARENTAL CONTROL 62 CUSTOM PICTURE MODE 53 CUSTOM SETUP 70 D DATA CD 8, 56 DATA DVD 8, 56 DATE 59 DIGITAL OUT 72 Digital output 72 DIMMER 70 Display Control Menu Display 14 80US Front panel display 12 Setup Display 67 DOLBY DIGITAL 49, 72, 76 DOWNMIX 72 DTS 49, 72, 76 DVD 8, 25, 77 DVD+RW 8, 26, 77 DVD's menu 28 DVD...


