Operating Instructions
Page 4
...Presetting the adjustment for a photo - Memory Photo playback 129 Copying an image recorded on a moving picture - Table of DVCAM and DV formats 140 Usable cassettes 142 About i.LINK 144 Troubleshooting 146 Self-diagnosis display 152 Warning indicators and messages 153 Using your own titles ...99 Labeling a cassette 101 Erasing the cassette memory data 103 Customizing Your Camcorder Changing the menu settings 105 "Memory Stick" Operations Using a "Memory Stick" - SCAN 35 Using the guide frame 36 Using the...
...Presetting the adjustment for a photo - Memory Photo playback 129 Copying an image recorded on a moving picture - Table of DVCAM and DV formats 140 Usable cassettes 142 About i.LINK 144 Troubleshooting 146 Self-diagnosis display 152 Warning indicators and messages 153 Using your own titles ...99 Labeling a cassette 101 Erasing the cassette memory data 103 Customizing Your Camcorder Changing the menu settings 105 "Memory Stick" Operations Using a "Memory Stick" - SCAN 35 Using the guide frame 36 Using the...
Operating Instructions
Page 7
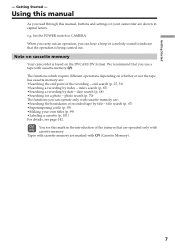
... 99) •Labeling a cassette (p. 101) For details, see this manual, buttons and settings on the DVCAM/DV format. Note on cassette memory Your camcorder is being carried out. The functions which require different operations depending on whether or not the tape has cassette memory ... - index search (p. 65) •Searching a recording by index - title search (p. 67) •Superimposing a title (p. 95) •Making your camcorder are marked with cassette memory . date search (p. 68) •Searching for a photo - Tapes with cassette memory are shown in the introduction of the...
... 99) •Labeling a cassette (p. 101) For details, see this manual, buttons and settings on the DVCAM/DV format. Note on cassette memory Your camcorder is being carried out. The functions which require different operations depending on whether or not the tape has cassette memory ... - index search (p. 65) •Searching a recording by index - title search (p. 67) •Superimposing a title (p. 95) •Making your camcorder are marked with cassette memory . date search (p. 68) •Searching for a photo - Tapes with cassette memory are shown in the introduction of the...

Operating Instructions
Page 19
... recorded and the next scene is played back. We recommend that you use a mini DV cassette without setting REC MODE to DV SP in the DV format. Basics Recording a picture Note on the recording format Your camcorder records and plays back both on mini DVCAM cassettes and on a tape in LP mode...Usable cassettes You can no longer be played back with cassette memory, however, you turn off your camcorder in the DVCAM format and the DV format on one tape. Notes •If you leave your camcorder. Note on a cassette. When you use the images on the LOCK switch When you slide the ...
... recorded and the next scene is played back. We recommend that you use a mini DV cassette without setting REC MODE to DV SP in the DV format. Basics Recording a picture Note on the recording format Your camcorder records and plays back both on mini DVCAM cassettes and on a tape in LP mode...Usable cassettes You can no longer be played back with cassette memory, however, you turn off your camcorder in the DVCAM format and the DV format on one tape. Notes •If you leave your camcorder. Note on a cassette. When you use the images on the LOCK switch When you slide the ...
Operating Instructions
Page 24
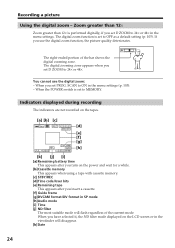
..., the picture quality deteriorates. When the POWER switch is set D ZOOM to OFF as a default setting (p. 105). When you insert a cassette. [f] Guide frame [g]DVCAM format/DV format in the menu settings. Indicators displayed during recording The indicators are not recorded on the tapes. [a] [b] [c] 40min REC 00:00:00:01 45min [d] [e] [f] [g] DVCAM...
..., the picture quality deteriorates. When the POWER switch is set D ZOOM to OFF as a default setting (p. 105). When you insert a cassette. [f] Guide frame [g]DVCAM format/DV format in the menu settings. Indicators displayed during recording The indicators are not recorded on the tapes. [a] [b] [c] 40min REC 00:00:00:01 45min [d] [e] [f] [g] DVCAM...

Operating Instructions
Page 31
...Press X during playback. To resume normal playback, press N. Playback - When the playback pause mode lasts for a signal output through the DV Interface. This is muted. •The previous picture may appear at slow speed (slow playback) Press y during playback to VCR. To ..., press N. To resume normal playback, release the button. For frame-by -frame Press C on your camcorder, however, this function does not work for five minutes Your camcorder automatically enters the stop mode. To resume normal playback, press N. To resume normal playback, press N.
...Press X during playback. To resume normal playback, press N. Playback - When the playback pause mode lasts for a signal output through the DV Interface. This is muted. •The previous picture may appear at slow speed (slow playback) Press y during playback to VCR. To ..., press N. To resume normal playback, release the button. For frame-by -frame Press C on your camcorder, however, this function does not work for five minutes Your camcorder automatically enters the stop mode. To resume normal playback, press N. To resume normal playback, press N.

Operating Instructions
Page 32
If you insert the cassette recorded in LP mode. You can play back DV-formatted tapes recorded in a PAL system The camcorder automatically identify the system, and playback starts. You cannot play back DV-formatted tapes on this camcorder if the tape is recorded in SP mode. "DV SP" appears on the LCD screen or in the viewfinder during playback. Playing back a tape Note on DV-formatted tapes You can only view the picture only on the LCD screen or in the viewfinder of your camcorder. (Quasi PAL playback) 32
If you insert the cassette recorded in LP mode. You can play back DV-formatted tapes recorded in a PAL system The camcorder automatically identify the system, and playback starts. You cannot play back DV-formatted tapes on this camcorder if the tape is recorded in SP mode. "DV SP" appears on the LCD screen or in the viewfinder during playback. Playing back a tape Note on DV-formatted tapes You can only view the picture only on the LCD screen or in the viewfinder of your camcorder. (Quasi PAL playback) 32
Operating Instructions
Page 33
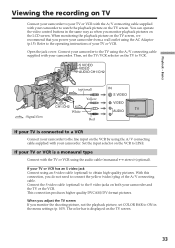
...type Connect with your TV or VCR. This connection produces higher quality DVCAM/DV format pictures. Playback - Refer to ON in the same way as when you do not need to connect the yellow (video) plug of your camcorder. Set the input selector on the TV screen. Basics Viewing the recording ... on the VCR by using the AC Adaptor (p.15). When you adjust the TV screen If you power your camcorder from a wall outlet using the A/V connecting cable supplied with your camcorder to watch the playback picture on the VCR to your TV or VCR with the A/V connecting cable supplied with ...
...type Connect with your TV or VCR. This connection produces higher quality DVCAM/DV format pictures. Playback - Refer to ON in the same way as when you do not need to connect the yellow (video) plug of your camcorder. Set the input selector on the TV screen. Basics Viewing the recording ... on the VCR by using the AC Adaptor (p.15). When you adjust the TV screen If you power your camcorder from a wall outlet using the A/V connecting cable supplied with your camcorder to watch the playback picture on the VCR to your TV or VCR with the A/V connecting cable supplied with ...
Operating Instructions
Page 34
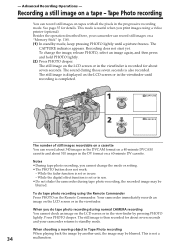
... can record about 340 images in the DVCAM format on a 40-minute DVCAM cassette and about seven seconds and your camcorder can record still images on the LCD screen or in the DV format on a "Memory Stick" (p. 118). (1) In standby mode, keep pressing PHOTO lightly until a picture freezes. This is also... - Tape Photo recording You can record still images on a 60-minute DV cassette. The still image is displayed on the LCD screen or in the viewfinder until recording is set or in use . •Do not shake the camcorder during normal CAMERA recording You cannot check an image on the LCD...
... can record about 340 images in the DVCAM format on a 40-minute DVCAM cassette and about seven seconds and your camcorder can record still images on the LCD screen or in the DV format on a "Memory Stick" (p. 118). (1) In standby mode, keep pressing PHOTO lightly until a picture freezes. This is also... - Tape Photo recording You can record still images on a 60-minute DV cassette. The still image is displayed on the LCD screen or in the viewfinder until recording is set or in use . •Do not shake the camcorder during normal CAMERA recording You cannot check an image on the LCD...

Operating Instructions
Page 54
... EXEC dial to LINKED The recording level adjustment display is set AGC CH2 to ON. The sound input through the AUDIO CH1/CH2 jacks or DV Interface You cannot adjust the recording level. Sound recording level To adjust the recording level automatically Set AGC CH1 to adjust the recording level of...
... EXEC dial to LINKED The recording level adjustment display is set AGC CH2 to ON. The sound input through the AUDIO CH1/CH2 jacks or DV Interface You cannot adjust the recording level. Sound recording level To adjust the recording level automatically Set AGC CH1 to adjust the recording level of...

Operating Instructions
Page 72
..., LUMI. In STILL or LUMI. Pictures processed by the digital effect function Pictures processed by the digital effect function are not output through the DV Interface. The digital effect indicator lights up and the bars appear. mode, the picture is captured and is input from other equipment. •To...digital effect function that is stored in memory as a player. Playing back a tape with digital effects During playback, you can process a scene using your camcorder as a still picture at the time you press the SEL/PUSH EXEC dial. (3) Turn the SEL/PUSH EXEC dial to OFF (CHG) or stop ...
..., LUMI. In STILL or LUMI. Pictures processed by the digital effect function Pictures processed by the digital effect function are not output through the DV Interface. The digital effect indicator lights up and the bars appear. mode, the picture is captured and is input from other equipment. •To...digital effect function that is stored in memory as a player. Playing back a tape with digital effects During playback, you can process a scene using your camcorder as a still picture at the time you press the SEL/PUSH EXEC dial. (3) Turn the SEL/PUSH EXEC dial to OFF (CHG) or stop ...

Operating Instructions
Page 73
... Connect with your VCR is not satisfying for professional use. Be sure to record over) into the VCR, and insert the recorded tape into your camcorder and the VCR. Editing S VIDEO : Signal flow S video cable (optional) IN VIDEO AUDIO CH1/CH2 S VIDEO VIDEO AUDIO A/V connecting cable (... they are displayed, press the following systems 8 mm, Hi8, Digital8, VHS, S-VHS, VHSC, Betamax, ED Betamax, DVCAM, mini DV, DV or MICROMV S-VHSC, If your camcorder. Before a dubbing Set DISPLAY to LCD in the menu settings. (Default setting is LCD.) Set the input selector on the VCR to...
... Connect with your VCR is not satisfying for professional use. Be sure to record over) into the VCR, and insert the recorded tape into your camcorder and the VCR. Editing S VIDEO : Signal flow S video cable (optional) IN VIDEO AUDIO CH1/CH2 S VIDEO VIDEO AUDIO A/V connecting cable (... they are displayed, press the following systems 8 mm, Hi8, Digital8, VHS, S-VHS, VHSC, Betamax, ED Betamax, DVCAM, mini DV, DV or MICROMV S-VHSC, If your camcorder. Before a dubbing Set DISPLAY to LCD in the menu settings. (Default setting is LCD.) Set the input selector on the VCR to...

Operating Instructions
Page 74
... and to connect the yellow (video) plug of the A/V connecting cable. DV Interface i.LINK i.LINK cable (optional) : Signal flow When you do not need to DV Interface of both your camcorder. (5) Start recording on your camcorder and the VCR. And when you play back the picture using other video equipment ... selector. With a digital-to-digital connection, video and audio signals are not output through the DV Interface. If you want to record over) into the VCR, and insert the recorded tape into your camcorder. (2) Set the input selector on the VCR to VCR. (4) Play back the recorded tape...
... and to connect the yellow (video) plug of the A/V connecting cable. DV Interface i.LINK i.LINK cable (optional) : Signal flow When you do not need to DV Interface of both your camcorder. (5) Start recording on your camcorder and the VCR. And when you play back the picture using other video equipment ... selector. With a digital-to-digital connection, video and audio signals are not output through the DV Interface. If you want to record over) into the VCR, and insert the recorded tape into your camcorder. (2) Set the input selector on the VCR to VCR. (4) Play back the recorded tape...

Operating Instructions
Page 77
... dial to select the average numerical value of CUT-OUT, then press the dial. The range may become wider in editing If you connect your camcorder to select the average numerical value of the tape. 77 Editing Dubbing only desired scenes - Digital program editing (10)Turn the SEL/PUSH EXEC dial... to select "CUT-IN," then press the dial. (11)Turn the SEL/PUSH EXEC dial to Sony equipment with the DV jack, the range of errors is set at the beginning of CUT-IN, then press the dial. The calculated stop position for recording is...
... dial to select the average numerical value of CUT-OUT, then press the dial. The range may become wider in editing If you connect your camcorder to select the average numerical value of the tape. 77 Editing Dubbing only desired scenes - Digital program editing (10)Turn the SEL/PUSH EXEC dial... to select "CUT-IN," then press the dial. (11)Turn the SEL/PUSH EXEC dial to Sony equipment with the DV jack, the range of errors is set at the beginning of CUT-IN, then press the dial. The calculated stop position for recording is...

Operating Instructions
Page 81
... playback on the analog video unit slightly ahead of the analog video signals, the PC may contain noise or incorrect colors. •The camcorder cannot output the digital signal when you use. Using with an analog video unit and a PC - Signal convert function You can exchange video... signals between the camcorder and a PC. •Depending on your software. After capturing images and sound Stop capturing procedures on the condition of the point from the DV Interface on your...
... playback on the analog video unit slightly ahead of the analog video signals, the PC may contain noise or incorrect colors. •The camcorder cannot output the digital signal when you use. Using with an analog video unit and a PC - Signal convert function You can exchange video... signals between the camcorder and a PC. •Depending on your software. After capturing images and sound Stop capturing procedures on the condition of the point from the DV Interface on your...

Operating Instructions
Page 83
... a tape when you mark the index using an S video cable (optional) to distinguish your camcorder and the VCR. Connect an S video cable (optional) to the S video jacks of both your camcorder from other Sony VCRs to connect the yellow (video) plug of the VCR with a VCR using the audio ... use another Sony VCR in the commander mode, VTR 2. If you do various playbacks on the VCR during recording, "LINE" appears in the CH column on the INDEX SEARCH screen, and the index is automatically marked on cassette memory. 83 This connection produces higher quality DVCAM/DV format pictures...
... a tape when you mark the index using an S video cable (optional) to distinguish your camcorder and the VCR. Connect an S video cable (optional) to the S video jacks of both your camcorder from other Sony VCRs to connect the yellow (video) plug of the VCR with a VCR using the audio ... use another Sony VCR in the commander mode, VTR 2. If you do various playbacks on the VCR during recording, "LINE" appears in the CH column on the INDEX SEARCH screen, and the index is automatically marked on cassette memory. 83 This connection produces higher quality DVCAM/DV format pictures...
Operating Instructions
Page 84
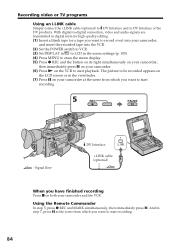
...which you want to record over) into your camcorder, and insert the recorded tape into the VCR. (2) Set the POWER switch to VCR. (3) Set DISPLAY in to LCD in the menu settings (p. 105). (4) Press MENU to DV Interface of the DV products. With digital-to-digital connection, video ...recording. 84 And in digital form for high-quality editing. (1) Insert a blank tape (or a tape you have finished recording Press x on both your camcorder. (6) Press N on the VCR to start playback. Using the Remote Commander In step 5, press z REC and MARK simultaneously, then immediately press X. Recording...
...which you want to record over) into your camcorder, and insert the recorded tape into the VCR. (2) Set the POWER switch to VCR. (3) Set DISPLAY in to LCD in the menu settings (p. 105). (4) Press MENU to DV Interface of the DV products. With digital-to-digital connection, video ...recording. 84 And in digital form for high-quality editing. (1) Insert a blank tape (or a tape you have finished recording Press x on both your camcorder. (6) Press N on the VCR to start playback. Using the Remote Commander In step 5, press z REC and MARK simultaneously, then immediately press X. Recording...

Operating Instructions
Page 85
... be uneven. And when you play back the picture using the i.LINK cable When you record a still picture in playback pause mode via the DV Interface The recorded picture becomes rough. If you dub a picture in the viewfinder. Editing Recording video or TV programs You can connect only one ...VCR using your camcorder, the picture may jitter. However this does not affect the dubbed picture. The DV IN indicator may appear on the LCD screen or in digital form The color of equipment. 85
... be uneven. And when you play back the picture using the i.LINK cable When you record a still picture in playback pause mode via the DV Interface The recorded picture becomes rough. If you dub a picture in the viewfinder. Editing Recording video or TV programs You can connect only one ...VCR using your camcorder, the picture may jitter. However this does not affect the dubbed picture. The DV IN indicator may appear on the LCD screen or in digital form The color of equipment. 85

Operating Instructions
Page 88
... (p. 105). If you set the audio balance beforehand, you want to start recording to set your camcorder to the playback pause mode. (4) Press AUDIO DUB. VCR SET CH SELECT AUD I O M I X A/V DV OUT CH1 CH3 RETURN 2 4 [MENU] : END The default setting is recorded in channels 3/4 during... the dubbing. 88 Audio dubbing Adding an audio sound on a recorded tape (1) Insert the recorded tape into your camcorder. (2) Set the POWER switch to VCR on the LCD...
... (p. 105). If you set the audio balance beforehand, you want to start recording to set your camcorder to the playback pause mode. (4) Press AUDIO DUB. VCR SET CH SELECT AUD I O M I X A/V DV OUT CH1 CH3 RETURN 2 4 [MENU] : END The default setting is recorded in channels 3/4 during... the dubbing. 88 Audio dubbing Adding an audio sound on a recorded tape (1) Insert the recorded tape into your camcorder. (2) Set the POWER switch to VCR on the LCD...

Operating Instructions
Page 89
...in the following order. •AUDIO CH1/CH2 jacks •INPUT1/INPUT2 connectors If an i.LINK cable (optional) is connected to your camcorder If you set the write-protect tab of the tape to release the write protection. When dubbing through the INPUT1/INPUT2 connectors You can ... already recorded in Fs48K mode (p. 110). •New sound cannot be recorded will take precedence over others in the DV format. •You cannot add audio with the DV Interface. If you add new sound on a tape recorded with another camcorder (including an other DSR-PD170), the sound quality may deteriorate.
...in the following order. •AUDIO CH1/CH2 jacks •INPUT1/INPUT2 connectors If an i.LINK cable (optional) is connected to your camcorder If you set the write-protect tab of the tape to release the write protection. When dubbing through the INPUT1/INPUT2 connectors You can ... already recorded in Fs48K mode (p. 110). •New sound cannot be recorded will take precedence over others in the DV format. •You cannot add audio with the DV Interface. If you add new sound on a tape recorded with another camcorder (including an other DSR-PD170), the sound quality may deteriorate.

Operating Instructions
Page 110
VCR CAMERA To display the title you have superimposed. CAMERA To record in the DV format (SP mode). To erase the title you have superimposed VCR (p. 98). VCR To...TITLE - To search without using cassette memory (p. 65, 67, VCR 68, 70). ERASE ALL - REC MODE z DVCAM DV SP AUDIO MODE z FS32K FS48K Meaning POWER switch To search using cassette memory. VCR CAMERA To erase all the data in ... AUDIO MODE •You cannot dub an audio sound on a tape recorded in the DV format (SP mode), even if you cannot adjust the balance in Fs32K (12-bit) mode. 110
VCR CAMERA To display the title you have superimposed. CAMERA To record in the DV format (SP mode). To erase the title you have superimposed VCR (p. 98). VCR To...TITLE - To search without using cassette memory (p. 65, 67, VCR 68, 70). ERASE ALL - REC MODE z DVCAM DV SP AUDIO MODE z FS32K FS48K Meaning POWER switch To search using cassette memory. VCR CAMERA To erase all the data in ... AUDIO MODE •You cannot dub an audio sound on a tape recorded in the DV format (SP mode), even if you cannot adjust the balance in Fs32K (12-bit) mode. 110

