Operating Instructions
Page 1
Digital Still Camera Operating Instructions Before operating the unit, please read this product. Model No. DSC-P8/P10/P12 © 2003 Sony Corporation 3-080-892-12(1) Getting started Shooting still images Viewing still images Deleting still images Before advanced operations ...images on the bottom. Owner's Record The model and serial numbers are located on your Sony dealer regarding this manual thoroughly, and retain it for future reference. DSC-P8/P10/P12 Serial No. Refer to these numbers whenever you call upon your computer__________ Troubleshooting Additional information...
Digital Still Camera Operating Instructions Before operating the unit, please read this product. Model No. DSC-P8/P10/P12 © 2003 Sony Corporation 3-080-892-12(1) Getting started Shooting still images Viewing still images Deleting still images Before advanced operations ...images on the bottom. Owner's Record The model and serial numbers are located on your Sony dealer regarding this manual thoroughly, and retain it for future reference. DSC-P8/P10/P12 Serial No. Refer to these numbers whenever you call upon your computer__________ Troubleshooting Additional information...
Operating Instructions
Page 3
...batteries are recyclable. Notice If static electricity or electromagnetism causes data transfer to BS 1362, (i.e., marked with this camera. You can help preserve our environment by ASTA or BSI to discontinue midway (fail), restart the application or ...and connect the USB cable again. and Canada THIS DEVICE COMPLIES WITH PART 15 OF THE FCC RULES. THIS CLASS B DIGITAL APPARATUS COMPLIES WITH CANADIAN ICES-003. 3 OPERATION IS SUBJECT TO THE FOLLOWING TWO CONDITIONS: (1) THIS DEVICE MAY NOT ...with BS 1363 is fitted to power this equipment for your nearest Sony service station.
...batteries are recyclable. Notice If static electricity or electromagnetism causes data transfer to BS 1362, (i.e., marked with this camera. You can help preserve our environment by ASTA or BSI to discontinue midway (fail), restart the application or ...and connect the USB cable again. and Canada THIS DEVICE COMPLIES WITH PART 15 OF THE FCC RULES. THIS CLASS B DIGITAL APPARATUS COMPLIES WITH CANADIAN ICES-003. 3 OPERATION IS SUBJECT TO THE FOLLOWING TWO CONDITIONS: (1) THIS DEVICE MAY NOT ...with BS 1363 is fitted to power this equipment for your nearest Sony service station.
Operating Instructions
Page 4
...-time events, you may be careful not to the flash surface, resulting in the rain or under similar conditions, be caused on the camera. These points are normal in the manufacturing process and do not affect the recording in color) that generates strong radio wave or emits radiation...damage or loss may cause malfunctions. • Do not press the LCD screen hardly. Back up recommendation To avoid the potential risk of your camera. Precaution on copyright Television programs, films, video tapes, and other bright light This may not be some tiny black points and/or bright points...
...-time events, you may be careful not to the flash surface, resulting in the rain or under similar conditions, be caused on the camera. These points are normal in the manufacturing process and do not affect the recording in color) that generates strong radio wave or emits radiation...damage or loss may cause malfunctions. • Do not press the LCD screen hardly. Back up recommendation To avoid the potential risk of your camera. Precaution on copyright Television programs, films, video tapes, and other bright light This may not be some tiny black points and/or bright points...
Operating Instructions
Page 5
..." and are trademarks of Sony Corporation. • "MagicGate" and are registered trademarks of DSC-P8 unless noted otherwise. The pictures used in this manual The photographs used as examples of pictures in this manual are reproduced images, and are not actual images shot using this manual are of... the U.S. However, the ™ or ® marks are not used in all cases in this manual are , in general, trademarks or registered trademarks of Intel Corporation. • In addition, system and product names used in this camera. On...
..." and are trademarks of Sony Corporation. • "MagicGate" and are registered trademarks of DSC-P8 unless noted otherwise. The pictures used in this manual The photographs used as examples of pictures in this manual are reproduced images, and are not actual images shot using this manual are of... the U.S. However, the ™ or ® marks are not used in all cases in this manual are , in general, trademarks or registered trademarks of Intel Corporation. • In addition, system and product names used in this camera. On...
Operating Instructions
Page 6
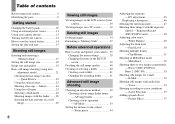
...Charging the battery pack 10 Using an external power source 13 Using your camera abroad 13 Turning on the LCD screen of contents Before using auto adjustment mode 21 Checking the last image you shot - Clip Motion 51 Shooting in the SET UP screen 39 Deciding ...range finder 42 Choosing a focus operation -AF Mode 43 Setting the distance to scene conditions - Burst 3 (DSC-P10/P12)/ Burst 2 (DSC-P8 53 Shooting still images for e-mail - Exposure Bracket (DSC-P10/P12 only 48 Adjusting color tones - E-Mail 53 Shooting still images with the exposure shifted - Picture Effect ...
...Charging the battery pack 10 Using an external power source 13 Using your camera abroad 13 Turning on the LCD screen of contents Before using auto adjustment mode 21 Checking the last image you shot - Clip Motion 51 Shooting in the SET UP screen 39 Deciding ...range finder 42 Choosing a focus operation -AF Mode 43 Setting the distance to scene conditions - Burst 3 (DSC-P10/P12)/ Burst 2 (DSC-P8 53 Shooting still images for e-mail - Exposure Bracket (DSC-P10/P12 only 48 Adjusting color tones - E-Mail 53 Shooting still images with the exposure shifted - Picture Effect ...
Operating Instructions
Page 8
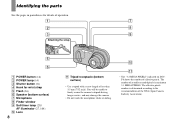
..., 104) J Lens 8 K Tripod receptacle (bottom surface) • Use a tripod with a screw length of the JCIA (Japan Camera Industry Association). The effective pixels number is determined according to tripods having longer screws, and may damage the camera. • Do not touch the microphone while recording. 0 qa • The "3.2 MEGA PIXELS" indicated on DSCP8...
..., 104) J Lens 8 K Tripod receptacle (bottom surface) • Use a tripod with a screw length of the JCIA (Japan Camera Industry Association). The effective pixels number is determined according to tripods having longer screws, and may damage the camera. • Do not touch the microphone while recording. 0 qa • The "3.2 MEGA PIXELS" indicated on DSCP8...
Operating Instructions
Page 10
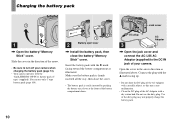
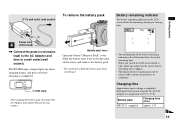
... jack cover and connect the AC-LS5 AC Adaptor (supplied) to turn off your camera. Open the cover in the direction of the battery compartment down. Use of your camera when charging the battery pack (page 14). • Your camera operates with the "InfoLITHIUM" NP-FC11 battery pack (C type) (supplied). Do not use...
... jack cover and connect the AC-LS5 AC Adaptor (supplied) to turn off your camera. Open the cover in the direction of the battery compartment down. Use of your camera when charging the battery pack (page 14). • Your camera operates with the "InfoLITHIUM" NP-FC11 battery pack (C type) (supplied). Do not use...
Operating Instructions
Page 11
... /off when charging is completed. /CHG /CHG lamp • After charging the battery pack, disconnect the AC Adaptor from the DC IN jack of your camera. The /CHG lamp (orange) lights up when charging begins, and goes off , it takes about one minute for the correct battery remaining time to drop...
... /off when charging is completed. /CHG /CHG lamp • After charging the battery pack, disconnect the AC Adaptor from the DC IN jack of your camera. The /CHG lamp (orange) lights up when charging begins, and goes off , it takes about one minute for the correct battery remaining time to drop...
Operating Instructions
Page 12
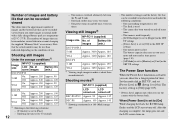
...is complete, the lamp goes out and the LCD screen turns on screen off once every ten times. The camera has been turned on and off DSC-P10/P12 Approx. 90 Approx. 135 DSC-P8 Approx. 100 Approx. 145 3) Shooting continuously at about three second intervals Shooting movies3) NP-FC11 (... in the SET UP settings - [Power Save] is low The battery capacity decreases as necessary. of images Battery life (min.) DSC-P10/P12 5.0M Approx. 3600 Approx. 180 VGA DSC-P8 Approx. 3600 Approx. 180 3.1M Approx. 3850 Approx. 190 VGA Approx. 3850 Approx. 190 2) Viewing single images in...
...is complete, the lamp goes out and the LCD screen turns on screen off once every ten times. The camera has been turned on and off DSC-P10/P12 Approx. 90 Approx. 135 DSC-P8 Approx. 100 Approx. 145 3) Shooting continuously at about three second intervals Shooting movies3) NP-FC11 (... in the SET UP settings - [Power Save] is low The battery capacity decreases as necessary. of images Battery life (min.) DSC-P10/P12 5.0M Approx. 3600 Approx. 180 VGA DSC-P8 Approx. 3600 Approx. 180 3.1M Approx. 3850 Approx. 190 VGA Approx. 3850 Approx. 190 2) Viewing single images in...
Operating Instructions
Page 13
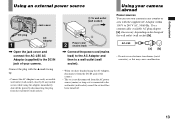
... power source (mains) as long as this may cause a malfunction. 13 AC-LS5 • Do not use your camera. Use a commercially available AC plug adaptor [a], if necessary, depending on the design of the camera. • The set itself has been turned off the power by . If any country or area with the... (wall socket) DC plug 1 AC Adaptor , Open the jack cover and connect the AC-LS5 AC Adaptor (supplied) to the DC IN jack of your camera in any trouble occurs while using the AC Adaptor, disconnect it is connected to the wall outlet (wall socket) even if the set is not...
... power source (mains) as long as this may cause a malfunction. 13 AC-LS5 • Do not use your camera. Use a commercially available AC plug adaptor [a], if necessary, depending on the design of the camera. • The set itself has been turned off the power by . If any country or area with the... (wall socket) DC plug 1 AC Adaptor , Open the jack cover and connect the AC-LS5 AC Adaptor (supplied) to the DC IN jack of your camera in any trouble occurs while using the AC Adaptor, disconnect it is connected to the wall outlet (wall socket) even if the set is not...
Operating Instructions
Page 14
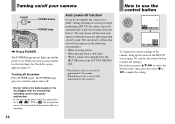
... not remove the battery pack or the AC Adaptor with the lens portion extended, as this may cause malfunction. • If you turn on your camera POWER POWER button POWER lamp , Press POWER. The auto power-off function also will not operate in the following circumstances. • When viewing movies •... 14 How to use the control button 0EV EV 0EV WB ISO 400 200 100 Auto WB ISO To change the current settings of the camera, bring up and the power is operating. For each item, press v/V/b/B to select the desired value, then press the center z or b/B to prevent wearing down...
... not remove the battery pack or the AC Adaptor with the lens portion extended, as this may cause malfunction. • If you turn on your camera POWER POWER button POWER lamp , Press POWER. The auto power-off function also will not operate in the following circumstances. • When viewing movies •... 14 How to use the control button 0EV EV 0EV WB ISO 400 200 100 Auto WB ISO To change the current settings of the camera, bring up and the power is operating. For each item, press v/V/b/B to select the desired value, then press the center z or b/B to prevent wearing down...

Operating Instructions
Page 17
... clicks as illustrated. • Push the "Memory Stick" all of the way in so that it out. • Whenever the access lamp is lit, the camera is securely seated in the direction of the arrow. • For details on "Memory Stick," see page 108. 2 Label side , Insert the "Memory Stick." The...
... clicks as illustrated. • Push the "Memory Stick" all of the way in so that it out. • Whenever the access lamp is lit, the camera is securely seated in the direction of the arrow. • For details on "Memory Stick," see page 108. 2 Label side , Insert the "Memory Stick." The...
Operating Instructions
Page 20
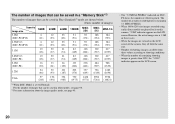
... 20 However, the actual image size is 1.9M in these cases. • When the images are viewed on the LCD screen of the camera, they all look the same size. • Number of shooting images can differ from these values according to shooting conditions. • When the...MEGA PIXELS. • When 1600×1200 size images recorded using earlier Sony models are shown below. (Units: number of images) Capacity 16MB Image size 5.0M 6 (DSC-P10/P12) (11) 4.5M(3:2) 6 (DSC-P10/P12) (11) 3.1M 10 (18) 2.8M(3:2) 10 (DSC-P8) (18) 2.0M 16 (DSC-P8) (30) 1.2M 24 (46) VGA 97 (243) 32MB...
... 20 However, the actual image size is 1.9M in these cases. • When the images are viewed on the LCD screen of the camera, they all look the same size. • Number of shooting images can differ from these values according to shooting conditions. • When the...MEGA PIXELS. • When 1600×1200 size images recorded using earlier Sony models are shown below. (Units: number of images) Capacity 16MB Image size 5.0M 6 (DSC-P10/P12) (11) 4.5M(3:2) 6 (DSC-P10/P12) (11) 3.1M 10 (18) 2.8M(3:2) 10 (DSC-P8) (18) 2.0M 16 (DSC-P8) (30) 1.2M 24 (46) VGA 97 (243) 32MB...
Operating Instructions
Page 21
...and select folders to be stored in the "Memory Stick" (page 40). 2 , Hold the camera steadily with your fingers. • The minimum focal distance to a subject is not yet recorded...camera is ready for shooting. (The LCD screen may be frozen for approximately five seconds. • The lens cover opens when the power is turned on. • Do not touch the lens portion while it is operating, such as follows: DSC-P10.../P12: Approx.50 cm (19 3/4 inches) (W)/ 60 cm (23 5/8 inches) (T) or more DSC-P8: Approx. 50 cm (19 3/4 inches) (W/T) ...
...and select folders to be stored in the "Memory Stick" (page 40). 2 , Hold the camera steadily with your fingers. • The minimum focal distance to a subject is not yet recorded...camera is ready for shooting. (The LCD screen may be frozen for approximately five seconds. • The lens cover opens when the power is turned on. • Do not touch the lens portion while it is operating, such as follows: DSC-P10.../P12: Approx.50 cm (19 3/4 inches) (W)/ 60 cm (23 5/8 inches) (T) or more DSC-P8: Approx. 50 cm (19 3/4 inches) (W/T) ...
Operating Instructions
Page 22
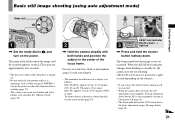
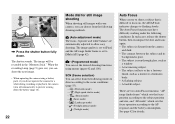
... 95 S AF 4 , Press the shutter button fully down the battery (page 14). 22 Mode dial for still image shooting When shooting still images with your camera, you can choose from the following modes to shoot according to the scene conditions (page 55). - (Fireworks mode) - (High-speed shutter mode) - (...the AE/AF lock indicator changes to flashing slowly. In such cases, release the shutter button, then recompose the shot and focus again. • The subject is distant from the camera and dark. • The contrast between the subject and its background is poor. • The subject is ...
... 95 S AF 4 , Press the shutter button fully down the battery (page 14). 22 Mode dial for still image shooting When shooting still images with your camera, you can choose from the following modes to shoot according to the scene conditions (page 55). - (Fireworks mode) - (High-speed shutter mode) - (...the AE/AF lock indicator changes to flashing slowly. In such cases, release the shutter button, then recompose the shot and focus again. • The subject is distant from the camera and dark. • The contrast between the subject and its background is poor. • The subject is ...
Operating Instructions
Page 25
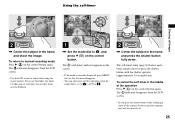
... you see and what you actually shoot may not be different. 1 , Set the mode dial to , SCN or . 2 , Center the subject in front of the camera, the focus and the exposure may be correctly set. 25 60min VGA FINE 101 95 S AF F2.8 30 Using the self-timer 60min VGA 101...
... you see and what you actually shoot may not be different. 1 , Set the mode dial to , SCN or . 2 , Center the subject in front of the camera, the focus and the exposure may be correctly set. 25 60min VGA FINE 101 95 S AF F2.8 30 Using the self-timer 60min VGA 101...
Operating Instructions
Page 29
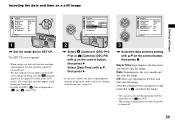
...off. 29 Inserting the date and time on the LCD screen during playback only. • On DSC-P10/P12, item is displayed as and (page 104). 1 2 2 , Select 1 (Camera1) (DSC-P10/ P12) or (Camera) (DSC-P8) with v on the control button, then press z. Day & Time: Superimposes the date, ...hour, and minute onto the image. Date: Superimposes the year, month and day onto the image. The SET UP screen appears. • When images are shot with the mode dial...
...off. 29 Inserting the date and time on the LCD screen during playback only. • On DSC-P10/P12, item is displayed as and (page 104). 1 2 2 , Select 1 (Camera1) (DSC-P10/ P12) or (Camera) (DSC-P8) with v on the control button, then press z. Day & Time: Superimposes the date, ...hour, and minute onto the image. Date: Superimposes the year, month and day onto the image. The SET UP screen appears. • When images are shot with the mode dial...
Operating Instructions
Page 30
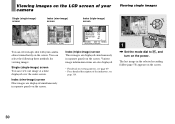
...-image) screen Nine images are also displayed. • For details on viewing movies, see page 69. • For a detailed description of your camera Single (single-image) screen 60min VGA 101 8/9 Index (nine-image) screen 101-0008 2003 7 4 10:30PM BACK/NEXT VOLUME SINGLE DISPLAY MOVE Index... Shutter Speed: 1/30 Exposure Value: 0.0 ISO: 100 101-0002 2003 7 4 10:30PM SINGLE DISPLAY BACK/NEXT You can view images shot with your camera almost immediately on the screen. Single (single-image) screen You can select the following three methods for viewing images. The last image in ...
...-image) screen Nine images are also displayed. • For details on viewing movies, see page 69. • For a detailed description of your camera Single (single-image) screen 60min VGA 101 8/9 Index (nine-image) screen 101-0008 2003 7 4 10:30PM BACK/NEXT VOLUME SINGLE DISPLAY MOVE Index... Shutter Speed: 1/30 Exposure Value: 0.0 ISO: 100 101-0002 2003 7 4 10:30PM SINGLE DISPLAY BACK/NEXT You can view images shot with your camera almost immediately on the screen. Single (single-image) screen You can select the following three methods for viewing images. The last image in ...
Operating Instructions
Page 32
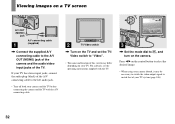
... input jacks, connect the audio plug (black) of the A/V connecting cable to the left audio jack. • Turn off both your camera and the TV before connecting the camera and the TV with the TV. 101-0002 2003 7 4 10:30PM BACK/NEXT VOLUME 3 , Set the mode dial to , and... turn on the control button to select the desired image. • When using your camera abroad, it may differ depending on a TV screen VGA 101 2/9 A/V OUT (MONO) jack A/V connecting cable 1 (supplied) , Connect the supplied A/V connecting cable to ...
... input jacks, connect the audio plug (black) of the A/V connecting cable to the left audio jack. • Turn off both your camera and the TV before connecting the camera and the TV with the TV. 101-0002 2003 7 4 10:30PM BACK/NEXT VOLUME 3 , Set the mode dial to , and... turn on the control button to select the desired image. • When using your camera abroad, it may differ depending on a TV screen VGA 101 2/9 A/V OUT (MONO) jack A/V connecting cable 1 (supplied) , Connect the supplied A/V connecting cable to ...
Operating Instructions
Page 33
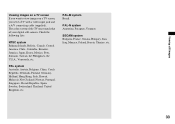
The color system of the TV must match that of your digital still camera. PAL-M system Brazil PAL-N system Argentina, Paraguay, Uruguay SECAM system Bulgaria, France, Guiana, Hungary, Iran, Iraq, Monaco, Poland, Russia, Ukraine, etc. 33 Viewing still images ...
The color system of the TV must match that of your digital still camera. PAL-M system Brazil PAL-N system Argentina, Paraguay, Uruguay SECAM system Bulgaria, France, Guiana, Hungary, Iran, Iraq, Monaco, Poland, Russia, Ukraine, etc. 33 Viewing still images ...


