
Operating Instructions
Page 54
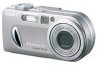
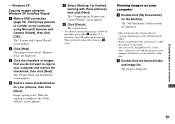
.... If you can shoot the next image. The menu appears. a Set the mode dial to an e-mail message, consult the User's Manual for your e-mail software. • For the number of images you can record in step 3. • For instructions on the LCD screen" (page 69). • For the number of...
.... If you can shoot the next image. The menu appears. a Set the mode dial to an e-mail message, consult the User's Manual for your e-mail software. • For the number of images you can record in step 3. • For instructions on the LCD screen" (page 69). • For the number of...
Operating Instructions
Page 61
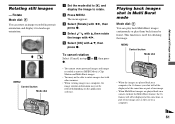
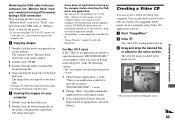
... mode dial to , and display the image to rotate images shot with b/B, then press z. d Select with v, then rotate...cameras. • When viewing images on a computer, the image rotation information may not be reflected depending on a camera... without the Multi Burst feature, the 16 frames will all be displayed at the same time, as part of one image. • When Multi Burst images are on a computer. 61 MENU Control button Mode dial • When the images are played back on a computer, the 16 frames you shot... able to rotate. Playing back images shot in Multi Burst mode Mode dial: ...
... mode dial to , and display the image to rotate images shot with b/B, then press z. d Select with v, then rotate...cameras. • When viewing images on a computer, the image rotation information may not be reflected depending on a camera... without the Multi Burst feature, the 16 frames will all be displayed at the same time, as part of one image. • When Multi Burst images are on a computer. 61 MENU Control button Mode dial • When the images are played back on a computer, the 16 frames you shot... able to rotate. Playing back images shot in Multi Burst mode Mode dial: ...
Operating Instructions
Page 76
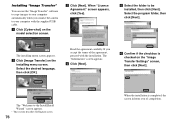
..., then click [Next]. The "Information" screen appears. Installing "Image Transfer" You can use the "Image Transfer" software to copy images to your computer automatically when you connect the camera to your computer with the installation. a Click [Cyber-shot] on the installing menu screen. f Confirm if the checkbox is completed, the screen informs you of...
..., then click [Next]. The "Information" screen appears. Installing "Image Transfer" You can use the "Image Transfer" software to copy images to your computer automatically when you connect the camera to your computer with the installation. a Click [Cyber-shot] on the installing menu screen. f Confirm if the checkbox is completed, the screen informs you of...
Operating Instructions
Page 77
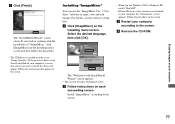
... installing menu screen and then follow the procedure. • The USB driver is not installed in order to use the "ImageMixer Ver. 1.5 for Sony" software to the InstallShield Wizard" screen appears. • This section describes the English screen. c Restart your computer, a screen that appear on the screen... "WinASPI". • If DirectX8.0a or a later version is needed in your computer g Click [Finish]. For details, see the software's help files. The "Welcome to copy, view and edit images. Select the desired language, then click [OK]. Follow the procedure on the screen...
... installing menu screen and then follow the procedure. • The USB driver is not installed in order to use the "ImageMixer Ver. 1.5 for Sony" software to the InstallShield Wizard" screen appears. • This section describes the English screen. c Restart your computer, a screen that appear on the screen... "WinASPI". • If DirectX8.0a or a later version is needed in your computer g Click [Finish]. For details, see the software's help files. The "Welcome to copy, view and edit images. Select the desired language, then click [OK]. Follow the procedure on the screen...
Operating Instructions
Page 81
...image file. d Select a name and destination for Sony" software to disconnect the USB cable and reconnect it. e Select [Nothing. For details, see the software's help files. The image is completed, the "Other Options" screen appears. The "Scanner and Camera Wizard" screen appears. The images stored on the ... other images, follow the procedure given under P on page 79 to view and edit images on your computer. The "Completing the Scanner and Camera Wizard" screen appears. When the copying is displayed. 81 f Click [Finish]. Click [Copy pictures to your computer - c Click the checkbox...
...image file. d Select a name and destination for Sony" software to disconnect the USB cable and reconnect it. e Select [Nothing. For details, see the software's help files. The image is completed, the "Other Options" screen appears. The "Scanner and Camera Wizard" screen appears. The images stored on the ... other images, follow the procedure given under P on page 79 to view and edit images on your computer. The "Completing the Scanner and Camera Wizard" screen appears. When the copying is displayed. 81 f Click [Finish]. Click [Copy pictures to your computer - c Click the checkbox...
Operating Instructions
Page 85
... "ImageMixer" b Click . The selected image is no application available to your computer See the operation manual supplied with the CD-ROM for Sony" software to copy images to your computer and to the menu screen. • This section describes the English screen. 85 Enjoying images on your computer...album to the hard disk icon. screen. 2 Change "Show" from [Recommended Applications] to [All Applications]. 3 Select [QuickTime Player] from your camera or turning off the power during a USB connection Drag and drop the drive icon or the "Memory Stick" icon to the "Trash" icon, then...
... "ImageMixer" b Click . The selected image is no application available to your computer See the operation manual supplied with the CD-ROM for Sony" software to copy images to your computer and to the menu screen. • This section describes the English screen. 85 Enjoying images on your computer...album to the hard disk icon. screen. 2 Change "Show" from [Recommended Applications] to [All Applications]. 3 Select [QuickTime Player] from your camera or turning off the power during a USB connection Drag and drop the drive icon or the "Memory Stick" icon to the "Trash" icon, then...
Operating Instructions
Page 93
... display is connected.] at [Basic] setting (page 80). played back on the HELP for the "ImageMixer Ver. 1.5 for Sony" application software, click on HELP. p Consult the computer or software manufacturer. The image and sound are playing back the movie directly from the "Memory Stick". p Click on a computer. -... the hard disk (pages 79 and 85). Cause • You are using the supplied USB cable (page 78). p Connect the camera and your computer and then play back the movie from the right side (page 17). An error message appears when you set correctly....
... display is connected.] at [Basic] setting (page 80). played back on the HELP for the "ImageMixer Ver. 1.5 for Sony" application software, click on HELP. p Consult the computer or software manufacturer. The image and sound are playing back the movie directly from the "Memory Stick". p Click on a computer. -... the hard disk (pages 79 and 85). Cause • You are using the supplied USB cable (page 78). p Connect the camera and your computer and then play back the movie from the right side (page 17). An error message appears when you set correctly....


