Operating Instructions
Page 1
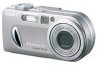
... number in the space provided below. Owner's Record The model and serial numbers are located on your Sony dealer regarding this manual thoroughly, and retain it for future reference. Model No. DSC-P8/P10/P12 © 2003 Sony Corporation 3-080-892-12(1) Getting started Shooting still images Viewing still images Deleting still images Before advanced operations Advanced still image shooting Advanced still image viewing Still image editing Enjoying movies Enjoying images on the bottom. Digital Still Camera Operating Instructions Before operating...
... number in the space provided below. Owner's Record The model and serial numbers are located on your Sony dealer regarding this manual thoroughly, and retain it for future reference. Model No. DSC-P8/P10/P12 © 2003 Sony Corporation 3-080-892-12(1) Getting started Shooting still images Viewing still images Deleting still images Before advanced operations Advanced still image shooting Advanced still image viewing Still image editing Enjoying movies Enjoying images on the bottom. Digital Still Camera Operating Instructions Before operating...
Operating Instructions
Page 4
... page 107 and follow the instructions on the camera. Or it before use the camera near a TV, radio, tuner. Exposing the LCD screen, the finder or the lens to direct sunlight for if recording or playback is not a malfunction. Notes on copyright Television programs, films, video tapes, and other bright light This may want to make a trial recording to make sure that generates strong radio...
... page 107 and follow the instructions on the camera. Or it before use the camera near a TV, radio, tuner. Exposing the LCD screen, the finder or the lens to direct sunlight for if recording or playback is not a malfunction. Notes on copyright Television programs, films, video tapes, and other bright light This may want to make a trial recording to make sure that generates strong radio...
Operating Instructions
Page 6
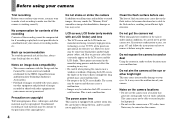
... two images continuously - Macro 24 Using the self-timer 25 Selecting a flash mode 26 Shooting images with the finder ......... 28 Inserting the date and time on a still image 29 6 Viewing still images Viewing images on the LCD screen of contents Before using your camera 4 Identifying the parts 8 Getting started Charging the battery pack 10 Using an external power source 13 Using your camera abroad 13 Turning on a TV screen 32 Deleting still images Deleting images 34 Formatting a "Memory Stick 37 Before advanced operations How to setup and operate your camera 14...
... two images continuously - Macro 24 Using the self-timer 25 Selecting a flash mode 26 Shooting images with the finder ......... 28 Inserting the date and time on a still image 29 6 Viewing still images Viewing images on the LCD screen of contents Before using your camera 4 Identifying the parts 8 Getting started Charging the battery pack 10 Using an external power source 13 Using your camera abroad 13 Turning on a TV screen 32 Deleting still images Deleting images 34 Formatting a "Memory Stick 37 Before advanced operations How to setup and operate your camera 14...
Operating Instructions
Page 7
... images - Playback zoom 59 Recording an enlarged image - Print (DPOF) mark 65 Enjoying movies Shooting movies 68 Viewing movies on the LCD screen ....... 69 Deleting movies 70 Editing movies 71 Cutting movies 72 Deleting unnecessary portions of movies 73 Enjoying images on your computer Copying images to your computer - Folder 58 Enlarging a portion of images that can be saved or shooting time 98 Menu items 100 SET UP items 104 Precautions 107 On "Memory Stick 108 On "InfoLITHIUM" battery pack .........109 Specifications...
... images - Playback zoom 59 Recording an enlarged image - Print (DPOF) mark 65 Enjoying movies Shooting movies 68 Viewing movies on the LCD screen ....... 69 Deleting movies 70 Editing movies 71 Cutting movies 72 Deleting unnecessary portions of movies 73 Enjoying images on your computer Copying images to your computer - Folder 58 Enlarging a portion of images that can be saved or shooting time 98 Menu items 100 SET UP items 104 Precautions 107 On "Memory Stick 108 On "InfoLITHIUM" battery pack .........109 Specifications...
Operating Instructions
Page 11
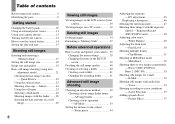
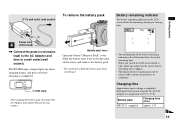
... a wall outlet (wall socket). To remove the battery pack Battery eject lever Open the battery/"Memory Stick" cover. Battery pack Charging time (min.) NP-FC11 (supplied) Approx. 150 11 Getting started 2 To wall outlet (wall socket) 1 Power cord 4 (mains lead) , Connect the power cord (mains lead) to the AC Adaptor and then to charge a completely discharged battery pack using the AC-LS5 AC Adaptor at a temperature of your camera.
... a wall outlet (wall socket). To remove the battery pack Battery eject lever Open the battery/"Memory Stick" cover. Battery pack Charging time (min.) NP-FC11 (supplied) Approx. 150 11 Getting started 2 To wall outlet (wall socket) 1 Power cord 4 (mains lead) , Connect the power cord (mains lead) to the AC Adaptor and then to charge a completely discharged battery pack using the AC-LS5 AC Adaptor at a temperature of your camera.
Operating Instructions
Page 12
... (supplied) size LCD No. The numbers of images that can be recorded or viewed take into account changing the supplied "Memory Stick" as you use . Quality] is set to [On] While charging the flash, the /CHG lamp flashes and the LCD screen turns off many times - The flash strobes once every two times - The surrounding temperature is switched alternately between the W and T ends - The camera has been turned on . When [Power Save] is set [Power Save] in (Setup 1) to...
... (supplied) size LCD No. The numbers of images that can be recorded or viewed take into account changing the supplied "Memory Stick" as you use . Quality] is set to [On] While charging the flash, the /CHG lamp flashes and the LCD screen turns off many times - The flash strobes once every two times - The surrounding temperature is switched alternately between the W and T ends - The camera has been turned on . When [Power Save] is set [Power Save] in (Setup 1) to...
Operating Instructions
Page 21
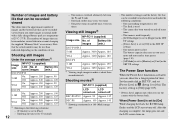
... POWER to turn on the power. AE/AF lock indicator 3 Flashes green t Light up , Press and hold the shutter button halfway down. Do not cover the lens, flash or microphone (page 8) with both hands and position the subject in the "Memory Stick" (page 40). 2 , Hold the camera steadily with your fingers. • The minimum focal distance to , and turn on the power or when the zoom function is working...
... POWER to turn on the power. AE/AF lock indicator 3 Flashes green t Light up , Press and hold the shutter button halfway down. Do not cover the lens, flash or microphone (page 8) with both hands and position the subject in the "Memory Stick" (page 40). 2 , Hold the camera steadily with your fingers. • The minimum focal distance to , and turn on the power or when the zoom function is working...
Operating Instructions
Page 29
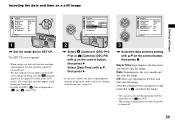
... images are shot with the date and time superimposed, the date and time cannot be removed later. • The date and time do not appear on the LCD screen during playback only. • On DSC-P10/P12, item is displayed as and (page 104). 1 2 2 , Select 1 (Camera1) (DSC-P10/ P12) or (Camera) (DSC-P8) with v on the control button, then press B. Select [Date/Time] with v/V, then press B. • If you select [Date], the date is turned off...
... images are shot with the date and time superimposed, the date and time cannot be removed later. • The date and time do not appear on the LCD screen during playback only. • On DSC-P10/P12, item is displayed as and (page 104). 1 2 2 , Select 1 (Camera1) (DSC-P10/ P12) or (Camera) (DSC-P8) with v on the control button, then press B. Select [Date/Time] with v/V, then press B. • If you select [Date], the date is turned off...
Operating Instructions
Page 37
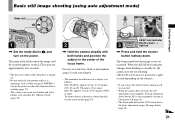
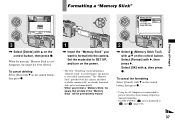
... format into the camera. Formatting a "Memory Stick" Deleting still images Delete Exit 101-0002 2003 7 4 10:30PM OK BACK/NEXT Memory Stick Tool Format: OK File Number: Cancel 1 Create REC. Set the mode dial to SET UP, and turn on the control button, then press z. • Using the AC Adaptor is recommended to prevent the power from turning off partway through formatting. • On DSC-P10/P12, item is also called "initialization." folder: Change REC...
... format into the camera. Formatting a "Memory Stick" Deleting still images Delete Exit 101-0002 2003 7 4 10:30PM OK BACK/NEXT Memory Stick Tool Format: OK File Number: Cancel 1 Create REC. Set the mode dial to SET UP, and turn on the control button, then press z. • Using the AC Adaptor is recommended to prevent the power from turning off partway through formatting. • On DSC-P10/P12, item is also called "initialization." folder: Change REC...

Operating Instructions
Page 50
... WB (Flash) mode). Normally, the camera makes these problems, but if recorded image colors appear unnatural, we recommend that flicker, the white balance adjustment function may not work correctly even though you adjust the white balance. c Select [ ] (Flash Level) with b/B, then select the desired setting with v/V. b Press MENU. Low: Makes the flash level lower than normal. The human eye can resolve these adjustments automatically, but digital still cameras cannot recognize the correct colors without adjustments. Flash Level Mode dial...
... WB (Flash) mode). Normally, the camera makes these problems, but if recorded image colors appear unnatural, we recommend that flicker, the white balance adjustment function may not work correctly even though you adjust the white balance. c Select [ ] (Flash Level) with b/B, then select the desired setting with v/V. b Press MENU. Low: Makes the flash level lower than normal. The human eye can resolve these adjustments automatically, but digital still cameras cannot recognize the correct colors without adjustments. Flash Level Mode dial...
Operating Instructions
Page 74
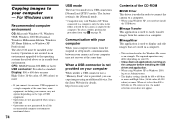
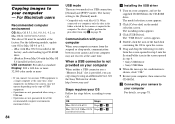
... 256 colors or less, the model selection screen does not appear. The factory setting is provided, you need not install the USB driver. http://www.sony.net/ 74 Contents of USB equipment. • Operations are not guaranteed when using Windows XP, you can copy images using Windows XP or Windows 2000, log on as Administrators. • The display settings should be installed at the same time. USB mode There are two modes for details. When connected to...
... 256 colors or less, the model selection screen does not appear. The factory setting is provided, you need not install the USB driver. http://www.sony.net/ 74 Contents of USB equipment. • Operations are not guaranteed when using Windows XP, you can copy images using Windows XP or Windows 2000, log on as Administrators. • The display settings should be installed at the same time. USB mode There are two modes for details. When connected to...
Operating Instructions
Page 75
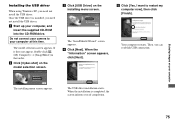
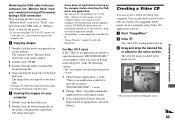
Do not connect your camera to restart my computer now], then click [Finish]. b Click [Cyber-shot] on the installing menu screen. d Click [Next]. Your computer restarts. The model selection screen appears. When the "Information" screen appears, click [Next]. When the installation is installed, you of completion. 75 a Start up your computer at this time. The USB driver installation starts. Then, you need not install the USB driver. If it does not appear, double-click (My...
Do not connect your camera to restart my computer now], then click [Finish]. b Click [Cyber-shot] on the installing menu screen. d Click [Next]. Your computer restarts. The model selection screen appears. When the "Information" screen appears, click [Next]. When the installation is installed, you of completion. 75 a Start up your computer at this time. The USB driver installation starts. Then, you need not install the USB driver. If it does not appear, double-click (My...
Operating Instructions
Page 84
... the hard disk containing the OS to open the screen. 5 Drag and drop the following models, update your OS to Mac OS 9.0 or 9.1. - iBook or Power Mac G4 with Mac OS X. OS Mac OS 8.5.1/8.6/9.0 Mac OS 9.1/9.2/Mac OS X (v10.0/v10.1/v10.2) Steps Steps 1 to 4 Steps 2 to 4 a Installing the USB driver 1 Turn on the model selection screen. See the Sony Website for a USB connection, [Normal] and [PTP]* modes. Copying images to your computer, then remove the...
... the hard disk containing the OS to open the screen. 5 Drag and drop the following models, update your OS to Mac OS 9.0 or 9.1. - iBook or Power Mac G4 with Mac OS X. OS Mac OS 8.5.1/8.6/9.0 Mac OS 9.1/9.2/Mac OS X (v10.0/v10.1/v10.2) Steps Steps 1 to 4 Steps 2 to 4 a Installing the USB driver 1 Turn on the model selection screen. See the Sony Website for a USB connection, [Normal] and [PTP]* modes. Copying images to your computer, then remove the...
Operating Instructions
Page 85
..." icon, then remove the USB cable or "Memory Stick" or turn off the power. • If you are copied to the menu screen. screen. 2 Change "Show" from [Recommended Applications] to [All Applications]. 3 Select [QuickTime Player] from your camera or turning off the power during a USB connection Drag and drop the drive icon or the "Memory Stick" icon to view images on your computer. Creating a Video CD You can use the "ImageMixer Ver. 1.5 for Sony" software to copy images...
..." icon, then remove the USB cable or "Memory Stick" or turn off the power. • If you are copied to the menu screen. screen. 2 Change "Show" from [Recommended Applications] to [All Applications]. 3 Select [QuickTime Player] from your camera or turning off the power during a USB connection Drag and drop the drive icon or the "Memory Stick" icon to view images on your computer. Creating a Video CD You can use the "ImageMixer Ver. 1.5 for Sony" software to copy images...
Operating Instructions
Page 89
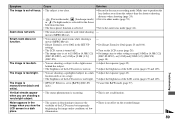
... the LCD screen is too low. Troubleshooting 89 Make sure to other modes (page 55). p Set image size to position the lens farther away from the subject than the shortest shooting distance when shooting (page 24). p Record in a dark p Adjust the exposure (page 45). Smart zoom does not function. • You cannot use smart zoom while shooting a movie (MPEG Movie). • [Smart Zoom] is set to [Off] in a dark place. • The camera is set...
... the LCD screen is too low. Troubleshooting 89 Make sure to other modes (page 55). p Set image size to position the lens farther away from the subject than the shortest shooting distance when shooting (page 24). p Record in a dark p Adjust the exposure (page 45). Smart zoom does not function. • You cannot use smart zoom while shooting a movie (MPEG Movie). • [Smart Zoom] is set to [Off] in a dark place. • The camera is set...
Operating Instructions
Page 92
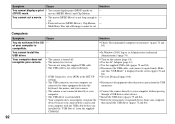
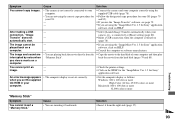
... USB driver is compatible. Make sure that "USB Mode" is not long enough to your computer with the USB cable before you connected the camera and your computer without passing through a USB hub or other than your camera. p Connect the camera directly to cut. • Protected movie (MPEG Movie), Clip Motion, Multi Burst files and still images cannot be cut a movie. p Delete the erroneously recognized device from the USB connectors. Symptom You cannot display a print...
... USB driver is compatible. Make sure that "USB Mode" is not long enough to your computer with the USB cable before you connected the camera and your computer without passing through a USB hub or other than your camera. p Connect the camera directly to cut. • Protected movie (MPEG Movie), Clip Motion, Multi Burst files and still images cannot be cut a movie. p Delete the erroneously recognized device from the USB connectors. Symptom You cannot display a print...
Operating Instructions
Page 93
... camera is turned on (page 78). p Connect the camera and your computer. • The computer display is connected.] at [Basic] setting (page 80). p If you view a movie on a computer. • You are playing back the movie directly from the "Memory Stick". p Consult the computer or software manufacturer. p Copy the movie to your computer and then play back the movie from the right side (page 17). After making a USB - connection, "Image Transfer" does not - p Make a USB connection...
... camera is turned on (page 78). p Connect the camera and your computer. • The computer display is connected.] at [Basic] setting (page 80). p If you view a movie on a computer. • You are playing back the movie directly from the "Memory Stick". p Consult the computer or software manufacturer. p Copy the movie to your computer and then play back the movie from the right side (page 17). After making a USB - connection, "Image Transfer" does not - p Make a USB connection...
Operating Instructions
Page 95
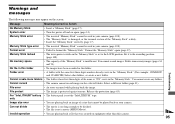
...; The file is not a movie (MPEG Movie). Memory Stick locked • The write-protect switch on the screen. Format error • Failed to the recording position (page 108). Warnings and messages The following messages may appear on the "Memory Stick" is set to the LOCK position. Select a different folder (page 41). File error • An error occurred while playing back the image. No file in this camera. 95 Troubleshooting System error Memory Stick error Memory Stick type error • Turn the power off...
...; The file is not a movie (MPEG Movie). Memory Stick locked • The write-protect switch on the screen. Format error • Failed to the recording position (page 108). Warnings and messages The following messages may appear on the "Memory Stick" is set to the LOCK position. Select a different folder (page 41). File error • An error occurred while playing back the image. No file in this camera. 95 Troubleshooting System error Memory Stick error Memory Stick type error • Turn the power off...
Operating Instructions
Page 108
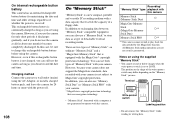
... camera cannot record or play back the data needed by the MagicGate function. Charging method Connect the camera to a wall outlet (mains) using the supplied "Memory Stick" • You cannot record or delete images when the write-protect switch is not subject to operate with your camera. You can still use the camera as long as you do not use the camera at all for 24 hours or more with your camera is set to...
... camera cannot record or play back the data needed by the MagicGate function. Charging method Connect the camera to a wall outlet (mains) using the supplied "Memory Stick" • You cannot record or delete images when the write-protect switch is not subject to operate with your camera. You can still use the camera as long as you do not use the camera at all for 24 hours or more with your camera is set to...

Operating Instructions
Page 116
.../off 14 Power Save 12, 105 Precautions 107 Print (DPOF) mark 65 Programmed mode 22 Protect 63 Q Quick Review 23 R Red Eye Reduction 27, 104 RESET button 87 Resize 65 Rotate 61 S Saturation 101 Scene Selection Beach mode 55 Fireworks mode 55 High-speed shutter mode 55 Landscape mode 55 Snow mode 55 Twilight mode 56 Twilight portrait mode 56 Self-diagnosis display 97 Self-timer 25 Setting date and time 15 image size 18, 19, 98 menu items 39...
.../off 14 Power Save 12, 105 Precautions 107 Print (DPOF) mark 65 Programmed mode 22 Protect 63 Q Quick Review 23 R Red Eye Reduction 27, 104 RESET button 87 Resize 65 Rotate 61 S Saturation 101 Scene Selection Beach mode 55 Fireworks mode 55 High-speed shutter mode 55 Landscape mode 55 Snow mode 55 Twilight mode 56 Twilight portrait mode 56 Self-diagnosis display 97 Self-timer 25 Setting date and time 15 image size 18, 19, 98 menu items 39...


