Operating Guide
Page 3
.... Refer all servicing to excessive shock by placing the set has been exposed to protect it from the wall outlet and disconnect the antenna or cable system. Never block the slots and openings by being dropped, or the cabinet has been damaged. - If liquid has been spilled or objects have the...
.... Refer all servicing to excessive shock by placing the set has been exposed to protect it from the wall outlet and disconnect the antenna or cable system. Never block the slots and openings by being dropped, or the cabinet has been damaged. - If liquid has been spilled or objects have the...
Operating Guide
Page 5
... particular installation. Reorient or relocate the receiving antenna. - The supplied interface cable must accept any changes or modifications not expressly approved in this manual could void... this device must be used with Part 15 of Conformity Trade Name: SONY Model No.: DCR-SR82 Responsible Party: Sony Electronics Inc. Declaration of California, USA only Perchlorate Material - Operation is... This device complies with the Handycam Station Model DCRA-C171 and AC Adaptor Model AC-L200/L200B. Notes DCR-SR42, DCR-SR62, DCR-SR82, DCR-SR200 and DCR-SR300 are designed to be determined...
... particular installation. Reorient or relocate the receiving antenna. - The supplied interface cable must accept any changes or modifications not expressly approved in this manual could void... this device must be used with Part 15 of Conformity Trade Name: SONY Model No.: DCR-SR82 Responsible Party: Sony Electronics Inc. Declaration of California, USA only Perchlorate Material - Operation is... This device complies with the Handycam Station Model DCRA-C171 and AC Adaptor Model AC-L200/L200B. Notes DCR-SR42, DCR-SR62, DCR-SR82, DCR-SR200 and DCR-SR300 are designed to be determined...

Operating Guide
Page 9
... the number of that you have the following items supplied with your camcorder. Handycam Handbook (PDF) "Operating Guide" (This manual) (1) 9 Rechargeable battery pack NP-FH40 (1) (p.11) (DCR-SR42/SR62/ SR82) NP-FH60 (1) (p.11) (DCR-SR200/SR300) Handycam Station (1) (p.11) A/V connecting cable (1) (p.25) USB cable (1) (p.27) CD-ROM "Handycam Application Software" (1) (p.26) - AC Adaptor (1) (p.11) Power cord (1) (p.11) Wireless Remote...
... the number of that you have the following items supplied with your camcorder. Handycam Handbook (PDF) "Operating Guide" (This manual) (1) 9 Rechargeable battery pack NP-FH40 (1) (p.11) (DCR-SR42/SR62/ SR82) NP-FH60 (1) (p.11) (DCR-SR200/SR300) Handycam Station (1) (p.11) A/V connecting cable (1) (p.25) USB cable (1) (p.27) CD-ROM "Handycam Application Software" (1) (p.26) - AC Adaptor (1) (p.11) Power cord (1) (p.11) Wireless Remote...

Operating Guide
Page 20
...video light, a flash, or a microphone. qh NIGHTSHOT switch*2 To record in mirror mode, open the LCD screen 90 degrees to the camcorder (1), then rotate it 180 degrees to optional accessories such as you press while the power is set the NIGHTSHOT switch to on. qd ...(Bottom surface) Attach the tripod (optional: the length of the displayed frame. Connecting to other devices 3 A/V OUT jack Connect with the A/V connecting cable. 4 REMOTE jack*3 Connect other optional accessories. 5 Active Interface Shoe *3 The Active Interface Shoe supplies power to the lens side (2). To cancel the...
...video light, a flash, or a microphone. qh NIGHTSHOT switch*2 To record in mirror mode, open the LCD screen 90 degrees to the camcorder (1), then rotate it 180 degrees to optional accessories such as you press while the power is set the NIGHTSHOT switch to on. qd ...(Bottom surface) Attach the tripod (optional: the length of the displayed frame. Connecting to other devices 3 A/V OUT jack Connect with the A/V connecting cable. 4 REMOTE jack*3 Connect other optional accessories. 5 Active Interface Shoe *3 The Active Interface Shoe supplies power to the lens side (2). To cancel the...
Operating Guide
Page 21
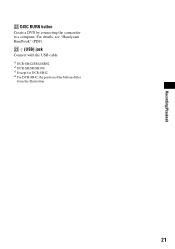
wd (USB) jack Connect with the USB cable. *1 DCR-SR42/SR62/SR82 *2 DCR-SR200/SR300 *3 Except for DCR-SR42 *4 For DCR-SR42, the position of the buttons differ from the illustration. 21 Recording/Playback ws DISC BURN button Create a DVD by connecting the camcorder to a computer. For details, see "Handycam Handbook" (PDF).
wd (USB) jack Connect with the USB cable. *1 DCR-SR42/SR62/SR82 *2 DCR-SR200/SR300 *3 Except for DCR-SR42 *4 For DCR-SR42, the position of the buttons differ from the illustration. 21 Recording/Playback ws DISC BURN button Create a DVD by connecting the camcorder to a computer. For details, see "Handycam Handbook" (PDF).
Operating Guide
Page 25
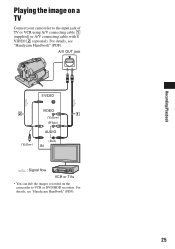
A/V OUT jack S VIDEO VIDEO (Yellow) (White) AUDIO (Yellow) (Red) IN : Signal flow VCR or TVs • You can dub the images recorded on a TV Connect your camcorder to VCR or DVD/HDD recorders. For details, see "Handycam Handbook" (PDF). For details, see "Handycam Handbook" (PDF). 25 Recording/Playback Playing the image on the camcorder to the input jack of TV or VCR using A/V connecting cable 1 (supplied) or A/V connecting cable with S VIDEO 2 (optional).
A/V OUT jack S VIDEO VIDEO (Yellow) (White) AUDIO (Yellow) (Red) IN : Signal flow VCR or TVs • You can dub the images recorded on a TV Connect your camcorder to VCR or DVD/HDD recorders. For details, see "Handycam Handbook" (PDF). For details, see "Handycam Handbook" (PDF). 25 Recording/Playback Playing the image on the camcorder to the input jack of TV or VCR using A/V connecting cable 1 (supplied) or A/V connecting cable with S VIDEO 2 (optional).

Operating Guide
Page 27
... You need to the power saving function of the license agreement] when you agree, then click [Next]. 8 Set the camcorder onto the Handycam Station, then turn the POWER switch to turn on. 9 Connect the Handycam Station to the computer. 2 Turn on the computer. • Log on as Administrators for installation. • Close all... your area and country/region, then click [Next]. • The software is reproduced in 2ch sound. • If you to restart your computer. Provide the camcorder and the Handycam Station, and a USB cable beforehand.
... You need to the power saving function of the license agreement] when you agree, then click [Next]. 8 Set the camcorder onto the Handycam Station, then turn the POWER switch to turn on. 9 Connect the Handycam Station to the computer. 2 Turn on the computer. • Log on as Administrators for installation. • Close all... your area and country/region, then click [Next]. • The software is reproduced in 2ch sound. • If you to restart your computer. Provide the camcorder and the Handycam Station, and a USB cable beforehand.

Operating Guide
Page 28
... of each item on the HOME MENU (HELP) 1 Press (HOME). 28 http://www.sony.net/registration/di/ • For the information about Picture Motion Browser, visit the following URL: http://www.sony.net/support-disoft/ Performing various functions - q; Depending on the screen, touch v/V to install... of your camcorder, then press (HOME) A (or B). 2 Touch the desired setup item. 3 Follow the guide on the screen for further operation. • If the item is created on the desktop. • Once you register on your computer. • For disconnecting the USB cable, see "Handycam Handbook" (PDF...
... of each item on the HOME MENU (HELP) 1 Press (HOME). 28 http://www.sony.net/registration/di/ • For the information about Picture Motion Browser, visit the following URL: http://www.sony.net/support-disoft/ Performing various functions - q; Depending on the screen, touch v/V to install... of your camcorder, then press (HOME) A (or B). 2 Touch the desired setup item. 3 Follow the guide on the screen for further operation. • If the item is created on the desktop. • Once you register on your computer. • For disconnecting the USB cable, see "Handycam Handbook" (PDF...


