Operating Guide
Page 1
3-098-548-11(1) Digital Video Camera Recorder Operating Guide DCR-SR42/SR62/SR82/SR200/SR300 For details on the advanced operations, please refer to "Handycam Handbook" (PDF). © 2007 Sony Corporation
3-098-548-11(1) Digital Video Camera Recorder Operating Guide DCR-SR42/SR62/SR82/SR200/SR300 For details on the advanced operations, please refer to "Handycam Handbook" (PDF). © 2007 Sony Corporation
Operating Guide
Page 3
... in safe operating condition. 3 Safety Check Upon completion of any service or repairs to the set is not likely to the set from overheating, these slots and openings must never be walked on an unstable cart, stand, tripod, bracket, or table. Cleaning Unplug the set exhibits a distinct change in performance - for this indicates a need for long periods of other controls may result...
... in safe operating condition. 3 Safety Check Upon completion of any service or repairs to the set is not likely to the set from overheating, these slots and openings must never be walked on an unstable cart, stand, tripod, bracket, or table. Cleaning Unplug the set exhibits a distinct change in performance - for this indicates a need for long periods of other controls may result...
Operating Guide
Page 5
... Part 15 of Conformity Trade Name: SONY Model No.: DCR-SR300 Responsible Party: Sony Electronics Inc. Address: 16530 Via Esprillo, San Diego, CA 92127 U.S.A Telephone number: 858-942-2230 This device complies with the Handycam Station Model DCRA-C171 and AC Adaptor Model AC-L200/L200B. Connect the equipment into an outlet on , the user is no guarantee that may cause undesired operation...
... Part 15 of Conformity Trade Name: SONY Model No.: DCR-SR300 Responsible Party: Sony Electronics Inc. Address: 16530 Via Esprillo, San Diego, CA 92127 U.S.A Telephone number: 858-942-2230 This device complies with the Handycam Station Model DCRA-C171 and AC Adaptor Model AC-L200/L200B. Connect the equipment into an outlet on , the user is no guarantee that may cause undesired operation...

Operating Guide
Page 7
... internal hard disk from Windows XP. Doing so may vary depending on the operating system of the computer. * Refer to change without any problems. • Compensation for illustrating the operating procedures. Note on disposal/transfer • If you perform [ FORMAT]* or formatting the hard disk of the camcorder, you destroy the actual body of the camcorder. Change the screen language before using the camcorder at high altitudes • Do not turn...
... internal hard disk from Windows XP. Doing so may vary depending on the operating system of the computer. * Refer to change without any problems. • Compensation for illustrating the operating procedures. Note on disposal/transfer • If you perform [ FORMAT]* or formatting the hard disk of the camcorder, you destroy the actual body of the camcorder. Change the screen language before using the camcorder at high altitudes • Do not turn...

Operating Guide
Page 9
...(DCR-SR42/SR62/ SR82) NP-FH60 (1) (p.11) (DCR-SR200/SR300) Handycam Station (1) (p.11) A/V connecting cable (1) (p.25) USB cable (1) (p.27) CD-ROM "Handycam Application Software" (1) (p.26) - Picture Motion Browser (Software) - The number in the parentheses indicates the number of that you have the following items supplied with your camcorder. AC Adaptor (1) (p.11) Power cord (1) (p.11) Wireless Remote Commander (1) (except for DCR-SR42) A button-type lithium battery is already installed. Handycam Handbook (PDF) "Operating Guide" (This manual) (1) 9 Getting Started Step 1: Checking...
...(DCR-SR42/SR62/ SR82) NP-FH60 (1) (p.11) (DCR-SR200/SR300) Handycam Station (1) (p.11) A/V connecting cable (1) (p.25) USB cable (1) (p.27) CD-ROM "Handycam Application Software" (1) (p.26) - Picture Motion Browser (Software) - The number in the parentheses indicates the number of that you have the following items supplied with your camcorder. AC Adaptor (1) (p.11) Power cord (1) (p.11) Wireless Remote Commander (1) (except for DCR-SR42) A button-type lithium battery is already installed. Handycam Handbook (PDF) "Operating Guide" (This manual) (1) 9 Getting Started Step 1: Checking...

Operating Guide
Page 12
... set to [SP]. *2 When the LCD backlight turns on the camcorder. Recording/Playback time: Approximate time (min.) available when you use your camcorder. • Do not use the AC Adaptor placed in low temperatures. • The available recording and playback time will not be shorter depending on / off and zooming. To charge the battery pack using only the AC Adaptor Turn the POWER switch to OFF (CHG), then connect the AC Adaptor directly...
... set to [SP]. *2 When the LCD backlight turns on the camcorder. Recording/Playback time: Approximate time (min.) available when you use your camcorder. • Do not use the AC Adaptor placed in low temperatures. • The available recording and playback time will not be shorter depending on / off and zooming. To charge the battery pack using only the AC Adaptor Turn the POWER switch to OFF (CHG), then connect the AC Adaptor directly...
Operating Guide
Page 15
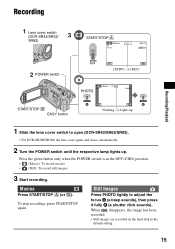
.../STOP A (or B). Still Images Press PHOTO lightly to open (DCR-SR42/SR62/SR82). • For DCR-SR200/SR300, the lens cover opens and closes automatically. 2 Turn the POWER switch until the respective lamp lights up 1 Slide the lens cover switch to adjust the focus A (a beep sounds), then press it fully B (a shutter click sounds). Recording Lens cover switch (DCR-SR42/SR62/ SR82) START/STOP A Recording/Playback POWER switch PHOTO [STBY] t [REC] START/STOP B EASY button Flashing t Lights up . Press the green button only when the POWER switch is in the default setting...
.../STOP A (or B). Still Images Press PHOTO lightly to open (DCR-SR42/SR62/SR82). • For DCR-SR200/SR300, the lens cover opens and closes automatically. 2 Turn the POWER switch until the respective lamp lights up 1 Slide the lens cover switch to adjust the focus A (a beep sounds), then press it fully B (a shutter click sounds). Recording Lens cover switch (DCR-SR42/SR62/ SR82) START/STOP A Recording/Playback POWER switch PHOTO [STBY] t [REC] START/STOP B EASY button Flashing t Lights up . Press the green button only when the POWER switch is in the default setting...

Operating Guide
Page 16
... not remove the battery or AC Adaptor. • You can capture up to a "Memory Stick Duo." DCR-SR42: 5,900 ([VGA (0.3M)]) DCR-SR62/SR82: 1,800 ([1.0M]) DCR-SR200: 480 ([4.0M]) DCR-SR300: 315 ([6.1M]) • All numbers measured when using a "Memory Stick Duo" made by pressing PHOTO during Easy Handycam operation. On Easy Handycam operation By pressing the EASY button, nearly all settings on the image quality or the image size. The number of recordable images varies...
... not remove the battery or AC Adaptor. • You can capture up to a "Memory Stick Duo." DCR-SR42: 5,900 ([VGA (0.3M)]) DCR-SR62/SR82: 1,800 ([1.0M]) DCR-SR200: 480 ([4.0M]) DCR-SR300: 315 ([6.1M]) • All numbers measured when using a "Memory Stick Duo" made by pressing PHOTO during Easy Handycam operation. On Easy Handycam operation By pressing the EASY button, nearly all settings on the image quality or the image size. The number of recordable images varies...

Operating Guide
Page 20
... RESET to display .. Zoom buttons Press for the flash. When you press while the power is set to on your camcorder. The accessory can be less than 5.5 mm (7/32 in.)) to 5 times the original size (Playback zoom). • When you touch the screen during playback zoom, the point you touched will be displayed in the center of the screw must be turned on or off as a video light, a flash, or a microphone. Connecting...
... RESET to display .. Zoom buttons Press for the flash. When you press while the power is set to on your camcorder. The accessory can be less than 5.5 mm (7/32 in.)) to 5 times the original size (Playback zoom). • When you touch the screen during playback zoom, the point you touched will be displayed in the center of the screw must be turned on or off as a video light, a flash, or a microphone. Connecting...
Operating Guide
Page 23
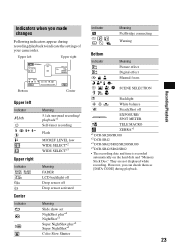
... ZEBRA*1 *1 DCR-SR200/SR300 *2 DCR-SR42 *3 DCR-SR62/SR82/SR200/SR300 *4 DCR-SR42/SR62/SR82 • The recording date and time is recorded automatically on the hard disk and "Memory Stick Duo." Backlight n White balance SteadyShot off Drop sensor activated Meaning Slide show set NightShot plus*4 NightShot*1 Super NightShot plus*4 Super NightShot*1 Color Slow Shutter Indicator E Meaning PictBridge connecting Warning Bottom Indicator 9 Meaning Picture effect Digital effect Manual focus SCENE SELECTION . However, you made changes Following...
... ZEBRA*1 *1 DCR-SR200/SR300 *2 DCR-SR42 *3 DCR-SR62/SR82/SR200/SR300 *4 DCR-SR42/SR62/SR82 • The recording date and time is recorded automatically on the hard disk and "Memory Stick Duo." Backlight n White balance SteadyShot off Drop sensor activated Meaning Slide show set NightShot plus*4 NightShot*1 Super NightShot plus*4 Super NightShot*1 Color Slow Shutter Indicator E Meaning PictBridge connecting Warning Bottom Indicator 9 Meaning Picture effect Digital effect Manual focus SCENE SELECTION . However, you made changes Following...

Operating Guide
Page 24
... "Handycam Handbook" (PDF). To delete all still images on the camcorder as a DVD-R or a computer. The selected still image is marked with . 3 Touch t [YES] t . • To delete all movies or still images at one time In step 3, touch [ DELETE ALL] or [ DELETE ALL] t [YES] t [YES] t . You can save images on the hard disk of image you can save images imported to VCR or DVD/HDD devices. Deleting the images on the hard disk 1 On the (HOME MENU), touch (OTHERS) t [DELETE]. 2 Touch [ DELETE]. 3 Touch [ DELETE] (movies...
... "Handycam Handbook" (PDF). To delete all still images on the camcorder as a DVD-R or a computer. The selected still image is marked with . 3 Touch t [YES] t . • To delete all movies or still images at one time In step 3, touch [ DELETE ALL] or [ DELETE ALL] t [YES] t [YES] t . You can save images on the hard disk of image you can save images imported to VCR or DVD/HDD devices. Deleting the images on the hard disk 1 On the (HOME MENU), touch (OTHERS) t [DELETE]. 2 Touch [ DELETE]. 3 Touch [ DELETE] (movies...
Operating Guide
Page 26
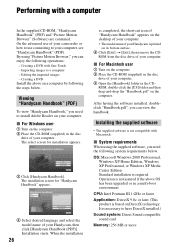
... Macintosh user 1 Turn on your computer. 3 Open the [Handbook] folder in the disc drive of your Handycam, then click [Handycam Handbook (PDF)]. x System requirements When using "Picture Motion Browser," you need to have DirectX installed.) Sound system: Direct Sound compatible sound card Memory: 256 MB or more By using the supplied software, you can view the handbook. Performing with One Touch - Creating a DVD Install the above OS has been upgraded or in the disc drive of your computer. Viewing "Handycam Handbook" (PDF) To view "Handycam Handbook," you can...
... Macintosh user 1 Turn on your computer. 3 Open the [Handbook] folder in the disc drive of your Handycam, then click [Handycam Handbook (PDF)]. x System requirements When using "Picture Motion Browser," you need to have DirectX installed.) Sound system: Direct Sound compatible sound card Memory: 256 MB or more By using the supplied software, you can view the handbook. Performing with One Touch - Creating a DVD Install the above OS has been upgraded or in the disc drive of your computer. Viewing "Handycam Handbook" (PDF) To view "Handycam Handbook," you can...

Operating Guide
Page 27
Recording/Playback Hard disk: Available free hard disk space for installation required: Approximately 600 MB (for creating a DVD, 5 GB or more may be required) Display: DirectX 7 or later-compatible video card, Minimum 1024 × 768 dots, High Color (16 bit color) Others: USB port (this time. Otherwise, the software will not be dropped from movies, resulting in a computer environment where the operations are not guaranteed, even on . 9 Connect the Handycam Station to your...
Recording/Playback Hard disk: Available free hard disk space for installation required: Approximately 600 MB (for creating a DVD, 5 GB or more may be required) Display: DirectX 7 or later-compatible video card, Minimum 1024 × 768 dots, High Color (16 bit color) Others: USB port (this time. Otherwise, the software will not be dropped from movies, resulting in a computer environment where the operations are not guaranteed, even on . 9 Connect the Handycam Station to your...

Operating Guide
Page 28
... a DVD - qa Remove the CD-ROM from the disc drive of each item on the desktop. To see "Handycam Handbook" (PDF). Windows Media Format 9 Series Runtime (Windows 2000 only) Software required to install the required software. - The short-cut icons, such as [ ] (Picture Motion Browser), appear on the HOME MENU (HELP) 1 Press (HOME). 28 For details, see "Handycam Handbook" (PDF). 1 Turn on your camcorder, then press (HOME) A (or B). 2 Touch the desired setup item. 3 Follow the guide...
... a DVD - qa Remove the CD-ROM from the disc drive of each item on the desktop. To see "Handycam Handbook" (PDF). Windows Media Format 9 Series Runtime (Windows 2000 only) Software required to install the required software. - The short-cut icons, such as [ ] (Picture Motion Browser), appear on the HOME MENU (HELP) 1 Press (HOME). 28 For details, see "Handycam Handbook" (PDF). 1 Turn on your camcorder, then press (HOME) A (or B). 2 Touch the desired setup item. 3 Follow the guide...
Operating Guide
Page 29
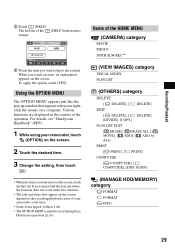
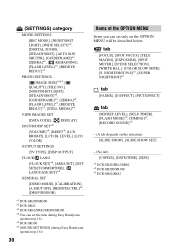
... "Handycam Handbook" (PDF). 1 While using your camcorder at the time. • Some items appear without a tab. • The OPTION MENU cannot be used during Easy Handycam operation (p.16). To apply the option, touch [YES]. Various functions are displayed in the context of the HOME MENU (CAMERA) category MOVIE PHOTO SMTH SLW REC*1 (VIEW IMAGES) category VISUAL INDEX PLAYLIST (OTHERS) category DELETE [ DELETE], [ DELETE] EDIT [ DELETE], [ DELETE], [DIVIDE], [COPY] PLAYLIST EDIT [ ERASE], [ ERASE ALL], [ MOVE], [ ADD], [ ADD by date...
... "Handycam Handbook" (PDF). 1 While using your camcorder at the time. • Some items appear without a tab. • The OPTION MENU cannot be used during Easy Handycam operation (p.16). To apply the option, touch [YES]. Various functions are displayed in the context of the HOME MENU (CAMERA) category MOVIE PHOTO SMTH SLW REC*1 (VIEW IMAGES) category VISUAL INDEX PLAYLIST (OTHERS) category DELETE [ DELETE], [ DELETE] EDIT [ DELETE], [ DELETE], [DIVIDE], [COPY] PLAYLIST EDIT [ ERASE], [ ERASE ALL], [ MOVE], [ ADD], [ ADD by date...
Operating Guide
Page 30
... [WHITE BAL.], [COLOR SLOW SHTR], [S. (SETTINGS) category MOVIE SETTINGS [REC MODE], [NIGHTSHOT LIGHT], [WIDE SELECT]*2, [DIGITAL ZOOM], [STEADYSHOT], [AUTO SLW SHUTTR], [GUIDEFRAME]*1, [ZEBRA]*1, [ REMAINING], [FLASH LEVEL]*1, [REDEYE REDUC]*1 PHOTO SETTINGS [ IMAGE SIZE]*3*4, [ QUALITY], [FILE NO.], [NIGHTSHOT LIGHT], [STEADYSHOT]*5, [GUIDEFRAME]*1, [ZEBRA]*1, [FLASH LEVEL]*3, [REDEYE REDUC]*3, [STILL MEDIA]*4 VIEW IMAGES SET [DATA CODE], [ DISPLAY] SOUND/DISP SET*6 [VOLUME]*4, [BEEP]*4, [LCD BRIGHT], [LCD BL LEVEL], [LCD COLOR] OUTPUT SETTINGS [TV TYPE], [DISP OUTPUT] CLOCK/ LANG [CLOCK SET...
... [WHITE BAL.], [COLOR SLOW SHTR], [S. (SETTINGS) category MOVIE SETTINGS [REC MODE], [NIGHTSHOT LIGHT], [WIDE SELECT]*2, [DIGITAL ZOOM], [STEADYSHOT], [AUTO SLW SHUTTR], [GUIDEFRAME]*1, [ZEBRA]*1, [ REMAINING], [FLASH LEVEL]*1, [REDEYE REDUC]*1 PHOTO SETTINGS [ IMAGE SIZE]*3*4, [ QUALITY], [FILE NO.], [NIGHTSHOT LIGHT], [STEADYSHOT]*5, [GUIDEFRAME]*1, [ZEBRA]*1, [FLASH LEVEL]*3, [REDEYE REDUC]*3, [STILL MEDIA]*4 VIEW IMAGES SET [DATA CODE], [ DISPLAY] SOUND/DISP SET*6 [VOLUME]*4, [BEEP]*4, [LCD BRIGHT], [LCD BL LEVEL], [LCD COLOR] OUTPUT SETTINGS [TV TYPE], [DISP OUTPUT] CLOCK/ LANG [CLOCK SET...

Operating Guide
Page 31
... turned on. Buttons do not operate your Sony dealer will be deleted. This is extremely high/low. Troubleshooting Troubleshooting If you run into any loss of hard disk data. • During repair, we may be required to troubleshoot the problem. Be sure to "Handycam Handbook" (PDF). For details on Easy Handycam operation, refer to save the data on the internal hard disk (see "Handycam Handbook" (PDF)) on other media (backup) before sending your camcorder for repair • Your camcorder may check...
... turned on. Buttons do not operate your Sony dealer will be deleted. This is extremely high/low. Troubleshooting Troubleshooting If you run into any loss of hard disk data. • During repair, we may be required to troubleshoot the problem. Be sure to "Handycam Handbook" (PDF). For details on Easy Handycam operation, refer to save the data on the internal hard disk (see "Handycam Handbook" (PDF)) on other media (backup) before sending your camcorder for repair • Your camcorder may check...
Operating Guide
Page 34
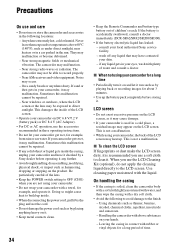
... LCD screen. x To clean the LCD screen If fingerprints or dust make the LCD screen dirty, it . Using chemicals such as under direct sunlight, near heaters or in a car parked in a cold place, a residual image may cause damage. • If your camcorder, it . • Keep metal contacts clean. 34 • Keep the Remote Commander and button-type battery out of the lens. • Keep the POWER switch setting to the LCD screen...
... LCD screen. x To clean the LCD screen If fingerprints or dust make the LCD screen dirty, it . Using chemicals such as under direct sunlight, near heaters or in a car parked in a cold place, a residual image may cause damage. • If your camcorder, it . • Keep metal contacts clean. 34 • Keep the Remote Commander and button-type battery out of the lens. • Keep the POWER switch setting to the LCD screen...
Operating Guide
Page 35
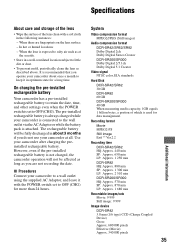
... the pre-installed rechargeable battery is attached. System Video compression format MPEG2/JPEG (Still images) Audio compression format DCR-SR42/SR62/SR82 Dolby Digital 2ch Dolby Digital Stereo Creator DCR-SR200/SR300 Dolby Digital 2/5.1ch Dolby Digital 5.1 Creator Video signal NTSC color, EIA standards Hard Disk DCR-SR42/SR62 30 GB DCR-SR82 60 GB DCR-SR200/SR300 40 GB When measuring media capacity, 1GB equals 1 billion bytes, a portion of the lens clean with the POWER switch set to...
... the pre-installed rechargeable battery is attached. System Video compression format MPEG2/JPEG (Still images) Audio compression format DCR-SR42/SR62/SR82 Dolby Digital 2ch Dolby Digital Stereo Creator DCR-SR200/SR300 Dolby Digital 2/5.1ch Dolby Digital 5.1 Creator Video signal NTSC color, EIA standards Hard Disk DCR-SR42/SR62 30 GB DCR-SR82 60 GB DCR-SR200/SR300 40 GB When measuring media capacity, 1GB equals 1 billion bytes, a portion of the lens clean with the POWER switch set to...
Operating Guide
Page 37
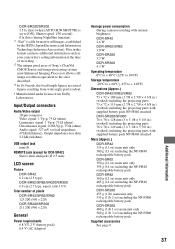
...) USB output jack mini-B REMOTE jack (except for still images, established by the JEITA (Japan Electronics and Information Technology Industries Association). DCR-SR200/SR300 1.5 lx (lux) (when [AUTO SLW SHUTTR] is set to [ON], Shutter speed 1/30 second) 0 lx (lux) (during NightShot function) *1 "Exif" is a file format for DCR-SR42) Stereo mini-minijack (Ø 2.5 mm) LCD screen Picture DCR-SR42 6.2 cm (2.5 type) DCR-SR62/SR82/SR200/SR300 6.9 cm (2.7 type, aspect ratio 16:9) Total number of Sony...
...) USB output jack mini-B REMOTE jack (except for still images, established by the JEITA (Japan Electronics and Information Technology Industries Association). DCR-SR200/SR300 1.5 lx (lux) (when [AUTO SLW SHUTTR] is set to [ON], Shutter speed 1/30 second) 0 lx (lux) (during NightShot function) *1 "Exif" is a file format for DCR-SR42) Stereo mini-minijack (Ø 2.5 mm) LCD screen Picture DCR-SR42 6.2 cm (2.5 type) DCR-SR62/SR82/SR200/SR300 6.9 cm (2.7 type, aspect ratio 16:9) Total number of Sony...


