
Operating Guide
Page 3
...and serial numbers are cautioned that any interference received, including interference that interference will not occur in order to comply with the Handycam Station Model DCRA-C131 and AC Adaptor Model AC-L200. AC- If this equipment does cause harmful interference to correct the...antenna. - Consult the dealer or an experienced radio/TV technician for help. Refer to Part 15 of Conformity Trade Name: SONY Model No.: DCR-PC55 Responsible Party: Sony Electronics Inc. However, there is no guarantee that may not cause harmful interference, and (2) this product. Record the serial ...
...and serial numbers are cautioned that any interference received, including interference that interference will not occur in order to comply with the Handycam Station Model DCRA-C131 and AC Adaptor Model AC-L200. AC- If this equipment does cause harmful interference to correct the...antenna. - Consult the dealer or an experienced radio/TV technician for help. Refer to Part 15 of Conformity Trade Name: SONY Model No.: DCR-PC55 Responsible Party: Sony Electronics Inc. However, there is no guarantee that may not cause harmful interference, and (2) this product. Record the serial ...
Operating Guide
Page 4
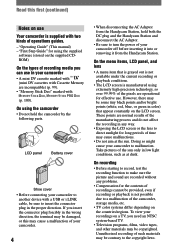
...starting to record, test the recording function to make sure the picture and sound are operational for using the camcorder • Do not hold both the DC plug and the Handycam Station and disconnect the AC Adaptor. • Be sure to insert the connector plug in low light conditions... • Television programs, films, video tapes, and other materials may be sure to turn the power of your camcorder off before inserting it into or removing it from the Handycam Station, hold the camcorder by the following parts. LCD panel Battery cover Shoe cover • Before connecting your...
...starting to record, test the recording function to make sure the picture and sound are operational for using the camcorder • Do not hold both the DC plug and the Handycam Station and disconnect the AC Adaptor. • Be sure to insert the connector plug in low light conditions... • Television programs, films, video tapes, and other materials may be sure to turn the power of your camcorder off before inserting it into or removing it from the Handycam Station, hold the camcorder by the following parts. LCD panel Battery cover Shoe cover • Before connecting your...
Operating Guide
Page 6
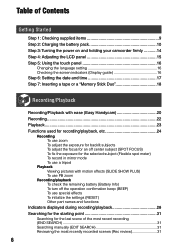
... Contents Getting Started Step 1: Checking supplied items 9 Step 2: Charging the battery pack 10 Step 3: Turning the power on and holding your camcorder firmly ...........14 Step 4: Adjusting the LCD panel 15 Step 5: Using the touch panel 16 Changing the language setting 16 Checking the ...6: Setting the date and time 17 Step 7: Inserting a tape or a "Memory Stick Duo 18 Recording/Playback Recording/Playback with ease (Easy Handycam 20 Recording 22 Playback 23 Functions used for recording/playback, etc 24 Recording To use zoom To adjust the exposure for backlit subjects To adjust...
... Contents Getting Started Step 1: Checking supplied items 9 Step 2: Charging the battery pack 10 Step 3: Turning the power on and holding your camcorder firmly ...........14 Step 4: Adjusting the LCD panel 15 Step 5: Using the touch panel 16 Changing the language setting 16 Checking the ...6: Setting the date and time 17 Step 7: Inserting a tape or a "Memory Stick Duo 18 Recording/Playback Recording/Playback with ease (Easy Handycam 20 Recording 22 Playback 23 Functions used for recording/playback, etc 24 Recording To use zoom To adjust the exposure for backlit subjects To adjust...
Operating Guide
Page 9
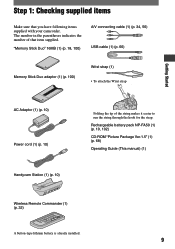
... adaptor (1) (p. 100) Wrist strap (1) • To attach the Wrist strap Getting Started AC Adaptor (1) (p. 10) Power cord (1) (p. 10) Handycam Station (1) (p. 10) Folding the tip of that you have following items supplied with your camcorder. The number in the parentheses indicates the number of the string makes it easier to run the string...
... adaptor (1) (p. 100) Wrist strap (1) • To attach the Wrist strap Getting Started AC Adaptor (1) (p. 10) Power cord (1) (p. 10) Handycam Station (1) (p. 10) Folding the tip of that you have following items supplied with your camcorder. The number in the parentheses indicates the number of the string makes it easier to run the string...
Operating Guide
Page 10
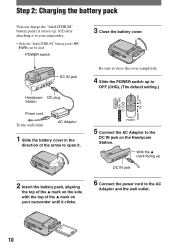
... it clicks. 6 Connect the power cord to the AC Adaptor and the wall outlet. 10 POWER switch 3 Close the battery cover. DC IN jack Handycam DC plug Station Power cord To the wall outlet AC Adaptor 1 Slide the battery cover in the direction of the mark on the... Handycam Station. With the mark facing up to OFF (CHG). (The default setting.) 5 Connect the AC Adaptor to the DC IN jack on your camcorder. • Only the "InfoLITHIUM" battery pack (NPFA50) can charge the "InfoLITHIUM" battery ...
... it clicks. 6 Connect the power cord to the AC Adaptor and the wall outlet. 10 POWER switch 3 Close the battery cover. DC IN jack Handycam DC plug Station Power cord To the wall outlet AC Adaptor 1 Slide the battery cover in the direction of the mark on the... Handycam Station. With the mark facing up to OFF (CHG). (The default setting.) 5 Connect the AC Adaptor to the DC IN jack on your camcorder. • Only the "InfoLITHIUM" battery pack (NPFA50) can charge the "InfoLITHIUM" battery ...
Operating Guide
Page 11
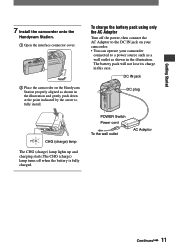
... lights up and charging starts.The CHG (charge) lamp turns off the power, then connect the AC Adaptor to the DC IN jack on the Handycam Station properly aligned as shown in the illustration and gently push down at the point indicated by the arrow to a power source such as a wall... is fully charged. DC IN jack DC plug POWER Switch Power cord To the wall outlet AC Adaptor Continued 11 Getting Started 7 Install the camcorder onto the Handycam Station. Open the interface connector cover. Place the...
... lights up and charging starts.The CHG (charge) lamp turns off the power, then connect the AC Adaptor to the DC IN jack on the Handycam Station properly aligned as shown in the illustration and gently push down at the point indicated by the arrow to a power source such as a wall... is fully charged. DC IN jack DC plug POWER Switch Power cord To the wall outlet AC Adaptor Continued 11 Getting Started 7 Install the camcorder onto the Handycam Station. Open the interface connector cover. Place the...
Operating Guide
Page 12
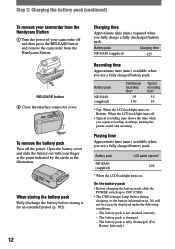
...panel opened* NP-FA50 (supplied) 105 * When the LCD backlight turns on /off and then press the RELEASE button and remove the camcorder from the Handycam Station. Bottom: When the LCD backlight turns off the power. The battery pack is fully discharged. (For Battery Info only.) 12 ...min.) available when you repeat recording start/stop, turning the power on . Step 2: Charging the battery pack (continued) To remove your camcorder from the Handycam Station Turn the power of your finger at the point indicated by the circle in the illustration. To remove the battery ...
...panel opened* NP-FA50 (supplied) 105 * When the LCD backlight turns on /off and then press the RELEASE button and remove the camcorder from the Handycam Station. Bottom: When the LCD backlight turns off the power. The battery pack is fully discharged. (For Battery Info only.) 12 ...min.) available when you repeat recording start/stop, turning the power on . Step 2: Charging the battery pack (continued) To remove your camcorder from the Handycam Station Turn the power of your finger at the point indicated by the circle in the illustration. To remove the battery ...
Operating Guide
Page 13
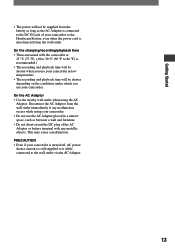
...between a wall and furniture. • Do not short-circuit the DC plug of your camcorder. On the AC Adaptor • Use the nearby wall outlet when using your camcorder. • Do not use your camcorder or the Handycam Station, even when the power cord is still supplied to it while connected to the... DC IN jack of the AC Adaptor or battery terminal with the camcorder at 25 °C (77 °F). (10...
...between a wall and furniture. • Do not short-circuit the DC plug of your camcorder. On the AC Adaptor • Use the nearby wall outlet when using your camcorder. • Do not use your camcorder or the Handycam Station, even when the power cord is still supplied to it while connected to the... DC IN jack of the AC Adaptor or battery terminal with the camcorder at 25 °C (77 °F). (10...
Operating Guide
Page 16
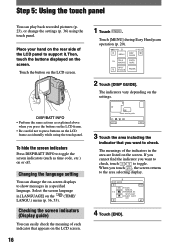
.... DISP GUIDE END 3 Touch the area including the indicator that appears on the LCD frame accidentally while using the touch panel. Touch [MENU] during Easy Handycam operation (p. 20). 60min MENU 0:00:00 DISP GUIDE 1/3 TELE MACRO EXPOSURE SPOT FOCUS FADER 2 Touch [DISP GUIDE]. The indicators vary depending on the screen. If...
.... DISP GUIDE END 3 Touch the area including the indicator that appears on the LCD frame accidentally while using the touch panel. Touch [MENU] during Easy Handycam operation (p. 20). 60min MENU 0:00:00 DISP GUIDE 1/3 TELE MACRO EXPOSURE SPOT FOCUS FADER 2 Touch [DISP GUIDE]. The indicators vary depending on the screen. If...

Operating Guide
Page 20
... become available and screen font C size increases for easy viewing, even first time users can enjoy easy operation. Easy Handycam operation ON 3 Start recording. MENU Flashing Lights up in the direction of the camera E settings are automatically adjusted...]. Recording still images : Light up the CAMERA-TAPE lamp. Press fully to select a recording medium. A DB Recording with ease (Easy Handycam) With this Easy Handycam operation, most of the arrow repeatedly to turn on the respective lamp to record. To stop recording, press (or )...
... become available and screen font C size increases for easy viewing, even first time users can enjoy easy operation. Easy Handycam operation ON 3 Start recording. MENU Flashing Lights up in the direction of the camera E settings are automatically adjusted...]. Recording still images : Light up the CAMERA-TAPE lamp. Press fully to select a recording medium. A DB Recording with ease (Easy Handycam) With this Easy Handycam operation, most of the arrow repeatedly to turn on the respective lamp to record. To stop recording, press (or )...
Operating Guide
Page 21
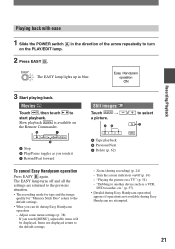
..., then touch to select C MENU - Adjust some menu settings (p. 38) If you touch it Rewind/Fast forward To cancel Easy Handycam operation Press EASY again. "Playing the picture on the Remote Commander. "Dubbing to another device such as you touch [MENU], adjustable ...AB Tape playback Previous/Next Delete (p. 62) / to start playback. Zoom (during Easy Handycam operation - Easy Handycam operation ON Recording/Playback 3 Start playing back. The EASY lamp turns off (p. 16) - Items not displayed return to the default settings...
..., then touch to select C MENU - Adjust some menu settings (p. 38) If you touch it Rewind/Fast forward To cancel Easy Handycam operation Press EASY again. "Playing the picture on the Remote Commander. "Dubbing to another device such as you touch [MENU], adjustable ...AB Tape playback Previous/Next Delete (p. 62) / to start playback. Zoom (during Easy Handycam operation - Easy Handycam operation ON Recording/Playback 3 Start playing back. The EASY lamp turns off (p. 16) - Items not displayed return to the default settings...
Operating Guide
Page 25
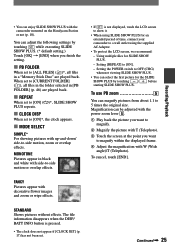
...SHOW PLUS repeats. CLOCK DISP When set to [ON]*, the clock appears. MODE SELECT SIMPLE* For showing pictures with the camcorder mounted on the Handycam Station or not (p. 10). The file information disappears when the DISP/ BATT INFO button is pressed. • The clock does not ...If is not displayed, touch the LCD screen to show it. • When using SLIDE SHOW PLUS for an extended period of time, connect your camcorder to a wall outlet using the supplied AC Adaptor. • To protect the LCD screen, we recommend: - FANCY Pictures appear with W (Wide ...
...SHOW PLUS repeats. CLOCK DISP When set to [ON]*, the clock appears. MODE SELECT SIMPLE* For showing pictures with the camcorder mounted on the Handycam Station or not (p. 10). The file information disappears when the DISP/ BATT INFO button is pressed. • The clock does not ...If is not displayed, touch the LCD screen to show it. • When using SLIDE SHOW PLUS for an extended period of time, connect your camcorder to a wall outlet using the supplied AC Adaptor. • To protect the LCD screen, we recommend: - FANCY Pictures appear with W (Wide ...
Operating Guide
Page 32
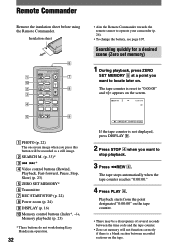
... button will not function correctly if there is not displayed, press DISPLAY . 2 Press STOP when you want to operate your camcorder (p. 26). • To change the battery, see page 107. The tape stops automatically when the tape counter reaches "0:00:00." 4...(p. 24) DISPLAY (p. 16) Memory control buttons (Index*, -/+, Memory playback) (p. 23) * These buttons do not work during Easy Handycam operation. 32 • Aim the Remote Commander towards the remote sensor to stop playback. 3 Press REW . Remote Commander Remove the insulation sheet ...
... button will not function correctly if there is not displayed, press DISPLAY . 2 Press STOP when you want to operate your camcorder (p. 26). • To change the battery, see page 107. The tape stops automatically when the tape counter reaches "0:00:00." 4...(p. 24) DISPLAY (p. 16) Memory control buttons (Index*, -/+, Memory playback) (p. 23) * These buttons do not work during Easy Handycam operation. 32 • Aim the Remote Commander towards the remote sensor to stop playback. 3 Press REW . Remote Commander Remove the insulation sheet ...
Operating Guide
Page 34
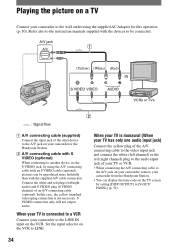
...be reproduced more faithfully than with the supplied A/V cable connection. When your TV is not necessary. Playing the picture on a TV Connect your camcorder or the Handycam Station. A/V connecting cable with S VIDEO (optional) When connecting to another device via the S VIDEO jack, by using the ...optional). In this operation (p. 10). S VIDEO connection only will not output audio. When your TV is connected to a VCR Connect your camcorder from the Handycam Station. • You can be connected. Refer also to the instruction manuals supplied with the devices to LINE.
...be reproduced more faithfully than with the supplied A/V cable connection. When your TV is not necessary. Playing the picture on a TV Connect your camcorder or the Handycam Station. A/V connecting cable with S VIDEO (optional) When connecting to another device via the S VIDEO jack, by using the ...optional). In this operation (p. 10). S VIDEO connection only will not output audio. When your TV is connected to a VCR Connect your camcorder from the Handycam Station. • You can be connected. Refer also to the instruction manuals supplied with the devices to LINE.
Operating Guide
Page 39
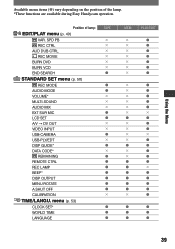
Position of the lamp. *These functions are available during Easy Handycam operation. menu (p. 53) CLOCK SET* WORLD TIME LANGUAGE MEM PLAY/EDIT × × × × × × &#...
Position of the lamp. *These functions are available during Easy Handycam operation. menu (p. 53) CLOCK SET* WORLD TIME LANGUAGE MEM PLAY/EDIT × × × × × × &#...
Operating Guide
Page 52
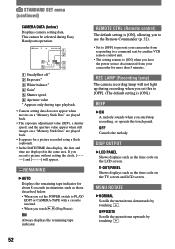
...Scrolls the menu items upwards by touching . STANDARD SET menu (continued) CAMERA DATA (below . • When you set this to prevent your camcorder for a picture recorded using a flash (optional). • In the DATE/TIME data display, the date and time are displayed in ... you start/stop recording, or operate the touch panel. REC LAMP (Recording lamp) The camera recording lamp will appear. This cannot be selected during Easy Handycam operation. 60min 1 0:00:00:00 2 6 5 AUTO 100 AWB F1. 8 9dB 3 4 SteadyShot off* Exposure* White balance* ...
...Scrolls the menu items upwards by touching . STANDARD SET menu (continued) CAMERA DATA (below . • When you set this to prevent your camcorder for a picture recorded using a flash (optional). • In the DATE/TIME data display, the date and time are displayed in ... you start/stop recording, or operate the touch panel. REC LAMP (Recording lamp) The camera recording lamp will appear. This cannot be selected during Easy Handycam operation. 60min 1 0:00:00:00 2 6 5 AUTO 100 AWB F1. 8 9dB 3 4 SteadyShot off* Exposure* White balance* ...
Operating Guide
Page 56
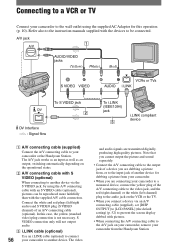
... A/V jack works as an input as well as an output, switching automatically depending on your camcorder, remove your camcorder from your camcorder. • When you are connecting your camcorder to a monaural device, connect the yellow plug of the A/V connecting cable to the video ... jack 3 i.LINK compliant device A/V connecting cable (supplied) Connect the A/V connecting cable to your camcorder or the Handycam Station. Connecting to a VCR or TV Connect your camcorder to the wall outlet using the A/V connecting cable with an S VIDEO cable (optional), pictures can be reproduced ...
... A/V jack works as an input as well as an output, switching automatically depending on your camcorder, remove your camcorder from your camcorder. • When you are connecting your camcorder to a monaural device, connect the yellow plug of the A/V connecting cable to the video ... jack 3 i.LINK compliant device A/V connecting cable (supplied) Connect the A/V connecting cable to your camcorder or the Handycam Station. Connecting to a VCR or TV Connect your camcorder to the wall outlet using the A/V connecting cable with an S VIDEO cable (optional), pictures can be reproduced ...
Operating Guide
Page 60
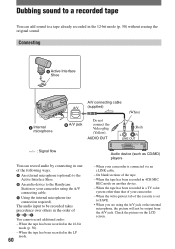
... the LCD screen. When the tape has been recorded in a TV color system other than that of your camcorder using the A/V jack or the internal microphone, the picture will not be recorded takes precedence over others in ...the order of You cannot record additional audio: - When your camcorder is set to SAVE. • When you are using the A/V connecting cable. Using the internal microphone (... microphone (optional) to the Active Interface Shoe. An audio device to the Handycam Station or your camcorder. -
... the LCD screen. When the tape has been recorded in a TV color system other than that of your camcorder using the A/V jack or the internal microphone, the picture will not be recorded takes precedence over others in ...the order of You cannot record additional audio: - When your camcorder is set to SAVE. • When you are using the A/V connecting cable. Using the internal microphone (... microphone (optional) to the Active Interface Shoe. An audio device to the Handycam Station or your camcorder. -
Operating Guide
Page 61
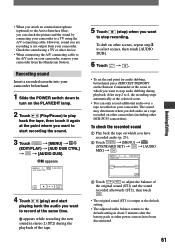
... playback of the original sound (ST1) and the sound recorded afterwards (ST2), then touch . • The original sound (ST1) is not output from your camcorder from the Handycam Station. • When you attach an external microphone (optional) to the Active Interface Shoe, you can only record additional audio over a tape recorded on... start playing back the audio you want to record at the same time. To check the recorded sound Play back the tape on other camcorders (including other DCR-PC55 camcorders).
... playback of the original sound (ST1) and the sound recorded afterwards (ST2), then touch . • The original sound (ST1) is not output from your camcorder from the Handycam Station. • When you attach an external microphone (optional) to the Active Interface Shoe, you can only record additional audio over a tape recorded on... start playing back the audio you want to record at the same time. To check the recorded sound Play back the tape on other camcorders (including other DCR-PC55 camcorders).
Operating Guide
Page 63
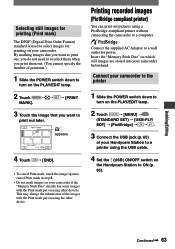
...Dubbing/Editing Continued 63 This may change the information of your Handycam Station to a printer using the USB cable. 4 Set the (USB) ON/OFF switch on which still images are stored into your camcorder beforehand. Connect the supplied AC Adaptor to a computer. Insert the "...Memory Stick Duo" on the Handycam Station to ON (p. 65). Connect your camcorder. Selecting still images for printing (Print mark) The DPOF (Digital Print ...
...Dubbing/Editing Continued 63 This may change the information of your Handycam Station to a printer using the USB cable. 4 Set the (USB) ON/OFF switch on which still images are stored into your camcorder beforehand. Connect the supplied AC Adaptor to a computer. Insert the "...Memory Stick Duo" on the Handycam Station to ON (p. 65). Connect your camcorder. Selecting still images for printing (Print mark) The DPOF (Digital Print ...


