Operating Guide
Page 3
... DCR-PC55 is to provide reasonable protection against harmful interference in the space provided below is connected. - Record the serial number in a residential installation. AC- Owner's Record The model and serial numbers are designed to be used with the equipment in this product. Refer to correct the interference by turning the equipment off and on, the user is subject to operate this device must be used with the Handycam...
... DCR-PC55 is to provide reasonable protection against harmful interference in the space provided below is connected. - Record the serial number in a residential installation. AC- Owner's Record The model and serial numbers are designed to be used with the equipment in this product. Refer to correct the interference by turning the equipment off and on, the user is subject to operate this device must be used with the Handycam...
Operating Guide
Page 5
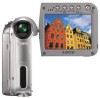
Change the screen language before using a digital still camera, and therefore may appear different. • The on-screen displays in Germany, and Sony Corporation, and produces superior images. On this manual • The images of the LCD screen used in this manual for illustration purposes are used for Modulation Transfer Function. About the Carl Zeiss lens Your camcorder is equipped with a Carl Zeiss lens, which was developed jointly by Carl Zeiss, in each...
Change the screen language before using a digital still camera, and therefore may appear different. • The on-screen displays in Germany, and Sony Corporation, and produces superior images. On this manual • The images of the LCD screen used in this manual for illustration purposes are used for Modulation Transfer Function. About the Carl Zeiss lens Your camcorder is equipped with a Carl Zeiss lens, which was developed jointly by Carl Zeiss, in each...
Operating Guide
Page 6
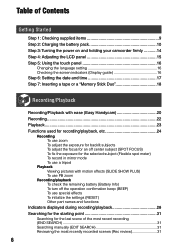
... 1: Checking supplied items 9 Step 2: Charging the battery pack 10 Step 3: Turning the power on and holding your camcorder firmly ...........14 Step 4: Adjusting the LCD panel 15 Step 5: Using the touch panel 16 Changing the language setting 16 Checking the screen indicators (Display guide 16 Step 6: Setting the date and time 17 Step 7: Inserting a tape or a "Memory Stick Duo 18 Recording/Playback Recording/Playback with ease (Easy Handycam 20 Recording 22 Playback 23 Functions used for recording/playback, etc 24 Recording To use zoom To adjust the...
... 1: Checking supplied items 9 Step 2: Charging the battery pack 10 Step 3: Turning the power on and holding your camcorder firmly ...........14 Step 4: Adjusting the LCD panel 15 Step 5: Using the touch panel 16 Changing the language setting 16 Checking the screen indicators (Display guide 16 Step 6: Setting the date and time 17 Step 7: Inserting a tape or a "Memory Stick Duo 18 Recording/Playback Recording/Playback with ease (Easy Handycam 20 Recording 22 Playback 23 Functions used for recording/playback, etc 24 Recording To use zoom To adjust the...
Operating Guide
Page 12
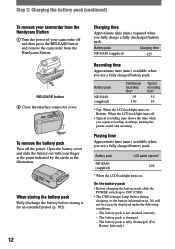
... the illustration. Bottom: When the LCD backlight turns off. • Typical recording time shows the time when you use a fully charged battery pack. Playing time Approximate time (min.) available when you repeat recording start/stop, turning the power on/off the power. Battery pack LCD panel opened* NP-FA50 (supplied) 105 * When the LCD backlight turns on . On the battery pack • Before changing the battery pack, slide the POWER switch up to OFF (CHG). •...
... the illustration. Bottom: When the LCD backlight turns off. • Typical recording time shows the time when you use a fully charged battery pack. Playing time Approximate time (min.) available when you repeat recording start/stop, turning the power on/off the power. Battery pack LCD panel opened* NP-FA50 (supplied) 105 * When the LCD backlight turns on . On the battery pack • Before changing the battery pack, slide the POWER switch up to OFF (CHG). •...
Operating Guide
Page 28
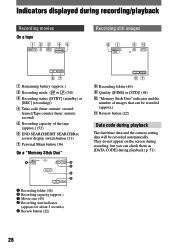
... SEARCH/Rec review display switch button (31) Personal Menu button (36) On a "Memory Stick Duo" A B C D E Recording folder (46) Recording capacity (approx.) Movie size (45) Recording start indicator (appears for about 5 seconds) Review button (22) P-MENU qa 7 Recording folder (46) Quality ([FINE] or [STD]) (44) "Memory Stick Duo" indicator and the number of images that can check them as [DATA CODE] during playback The date/time data and the camera setting data will be recorded...
... SEARCH/Rec review display switch button (31) Personal Menu button (36) On a "Memory Stick Duo" A B C D E Recording folder (46) Recording capacity (approx.) Movie size (45) Recording start indicator (appears for about 5 seconds) Review button (22) P-MENU qa 7 Recording folder (46) Quality ([FINE] or [STD]) (44) "Memory Stick Duo" indicator and the number of images that can check them as [DATA CODE] during playback The date/time data and the camera setting data will be recorded...
Operating Guide
Page 43
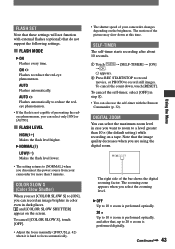
.... Press REC START/STOP to record movies, or PHOTO to reduce the red-eye phenomenon. Note that do not support the following settings. FLASH MODE ON Flashes every time. Continued 43 Using the Menu To cancel [COLOR SLOW S], touch [OFF]. • Adjust the focus manually ([FOCUS], p. 42) when it is not capable of preventing the redeye phenomenon, you can select only [ON] or [AUTO]. FLASH LEVEL HIGH( ) Makes...
.... Press REC START/STOP to record movies, or PHOTO to reduce the red-eye phenomenon. Note that do not support the following settings. FLASH MODE ON Flashes every time. Continued 43 Using the Menu To cancel [COLOR SLOW S], touch [OFF]. • Adjust the focus manually ([FOCUS], p. 42) when it is not capable of preventing the redeye phenomenon, you can select only [ON] or [AUTO]. FLASH LEVEL HIGH( ) Makes...
Operating Guide
Page 48
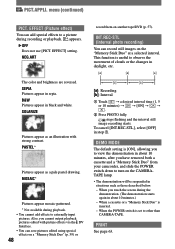
... use [PICT. DEMO MODE The default setting is inserted. - Also, you touch the screen during the demonstration. (The demonstration starts again in about 10 minutes, after you have removed both a cassette and a "Memory Stick Duo" from your camcorder, and slide the POWER switch down to observe the movement of clouds or the changes in situations such as a pale pastel drawing. menu (continued) PICT. SOLARIZE Pictures...
... use [PICT. DEMO MODE The default setting is inserted. - Also, you touch the screen during the demonstration. (The demonstration starts again in about 10 minutes, after you have removed both a cassette and a "Memory Stick Duo" from your camcorder, and slide the POWER switch down to observe the movement of clouds or the changes in situations such as a pale pastel drawing. menu (continued) PICT. SOLARIZE Pictures...
Operating Guide
Page 50
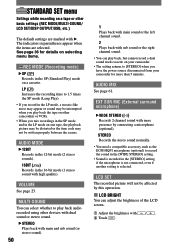
... camcorders or VCRs. • When you have the power source disconnected from your camcorder for details on selecting menu items. REC MODE (Recording mode) SP () Records in the SP (Standard Play) mode on one tape, the playback picture may be distorted or the time code may not be affected by connecting a microphone (optional). STANDARD SET menu Settings while recording on a tape or other basic settings (REC MODE/MULTI-SOUND/ LCD SET/DISP OUTPUT/USB, etc.) The default settings are selected. AUDIO MODE...
... camcorders or VCRs. • When you have the power source disconnected from your camcorder for details on selecting menu items. REC MODE (Recording mode) SP () Records in the SP (Standard Play) mode on one tape, the playback picture may be distorted or the time code may not be affected by connecting a microphone (optional). STANDARD SET menu Settings while recording on a tape or other basic settings (REC MODE/MULTI-SOUND/ LCD SET/DISP OUTPUT/USB, etc.) The default settings are selected. AUDIO MODE...
Operating Guide
Page 56
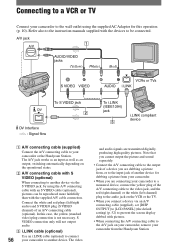
... instruction manuals supplied with the supplied A/V cable connection. S VIDEO connection only will not output audio. i.LINK cable (optional) Use an i.LINK cable (optional) to connect 56 your camcorder from the Handycam Station. The A/V jack works as an input as well as an output, switching automatically depending on your camcorder, remove your camcorder to another device via an A/V connecting cable (supplied), set [DISP OUTPUT] to [LCD PANEL] (the default setting) (p. 52) to prevent the screen display dubbed with pictures. • When connecting...
... instruction manuals supplied with the supplied A/V cable connection. S VIDEO connection only will not output audio. i.LINK cable (optional) Use an i.LINK cable (optional) to connect 56 your camcorder from the Handycam Station. The A/V jack works as an input as well as an output, switching automatically depending on your camcorder, remove your camcorder to another device via an A/V connecting cable (supplied), set [DISP OUTPUT] to [LCD PANEL] (the default setting) (p. 52) to prevent the screen display dubbed with pictures. • When connecting...
Operating Guide
Page 57
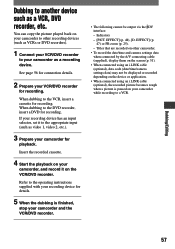
... camcorder. • To record the date/time and camera settings data when connected by the A/V connecting cable (supplied), display them on the screen (p. 51). • When connected using an i.LINK cable (optional), the recorded picture becomes rough when a picture is finished, stop your camcorder for recording. EFFECT] (p. 48), [D. If your recording device has an input selector, set it on your VCR/DVD recorder for playback. See page 56 for connection details. 2 Prepare your camcorder while recording to the operating instructions supplied with your recording device...
... camcorder. • To record the date/time and camera settings data when connected by the A/V connecting cable (supplied), display them on the screen (p. 51). • When connected using an i.LINK cable (optional), the recorded picture becomes rough when a picture is finished, stop your camcorder for recording. EFFECT] (p. 48), [D. If your recording device has an input selector, set it on your VCR/DVD recorder for playback. See page 56 for connection details. 2 Prepare your camcorder while recording to the operating instructions supplied with your recording device...
Operating Guide
Page 61
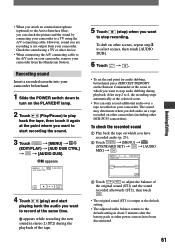
... SET MEMORY on other camcorders (including other DCR-PC55 camcorders). • When you attach an external microphone (optional) to the Active Interface Shoe, you can only record additional audio over a tape recorded on your camcorder, remove your camcorder from your camcorder. The sound may deteriorate when you are recording is output at the selected scene. • You can check the picture and the sound by connecting your camcorder. However, sound you dub audio on a tape recorded on the Remote...
... SET MEMORY on other camcorders (including other DCR-PC55 camcorders). • When you attach an external microphone (optional) to the Active Interface Shoe, you can only record additional audio over a tape recorded on your camcorder, remove your camcorder from your camcorder. The sound may deteriorate when you are recording is output at the selected scene. • You can check the picture and the sound by connecting your camcorder. However, sound you dub audio on a tape recorded on the Remote...
Operating Guide
Page 72
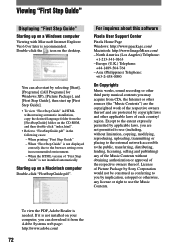
... - To view the PDF, Adobe Reader is not installed automatically. Viewing "First Step Guide" Displaying "First Step Guide" Starting up [First Step Guide]. • To view "First Step Guide" in recommended environment. - For inquires about this software Pixela User Support Center Pixela Home Page Windows: http://www.ppackage.com/ Macintosh: http://www.ImageMixer.com/ - Asia (Philippines) Telephone: +63-2-438-0090 On Copyrights Music works, sound recording or...
... - To view the PDF, Adobe Reader is not installed automatically. Viewing "First Step Guide" Displaying "First Step Guide" Starting up [First Step Guide]. • To view "First Step Guide" in recommended environment. - For inquires about this software Pixela User Support Center Pixela Home Page Windows: http://www.ppackage.com/ Macintosh: http://www.ImageMixer.com/ - Asia (Philippines) Telephone: +63-2-438-0090 On Copyrights Music works, sound recording or...
Operating Guide
Page 76
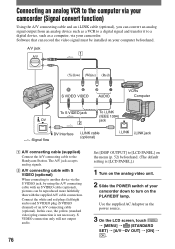
... cable (optional), you can convert an analog signal output from an analog device such as a VCR to a digital signal and transfer it to a digital device, such as the power source. 3 On the LCD screen, touch [MENU] (STANDARD SET) [A/VDV OUT] [ON] . In this case, the yellow (standard video) plug connection is [LCD PANEL].) 1 Turn on the PLAY/EDIT lamp. A/V jack 1 (Yellow) (White) (Red) VCRs Computer To S VIDEO...
... cable (optional), you can convert an analog signal output from an analog device such as a VCR to a digital signal and transfer it to a digital device, such as the power source. 3 On the LCD screen, touch [MENU] (STANDARD SET) [A/VDV OUT] [ON] . In this case, the yellow (standard video) plug connection is [LCD PANEL].) 1 Turn on the PLAY/EDIT lamp. A/V jack 1 (Yellow) (White) (Red) VCRs Computer To S VIDEO...

Operating Guide
Page 78
... from your Sony dealer. The camcorder does not operate even when the power is because the power has been turned on or off . • During recording or communicating with another device via USB cable, you run into any problems using a sharp-pointed object. (If you cancel the Easy Handycam operation. [DEMO MODE] does not start. • Eject the cassette and "Memory Stick Duo" from the wall outlet or remove the battery pack...
... from your Sony dealer. The camcorder does not operate even when the power is because the power has been turned on or off . • During recording or communicating with another device via USB cable, you run into any problems using a sharp-pointed object. (If you cancel the Easy Handycam operation. [DEMO MODE] does not start. • Eject the cassette and "Memory Stick Duo" from the wall outlet or remove the battery pack...
Operating Guide
Page 85
This is not a malfunction. is not compatible with a 4ch microphone (4CH MIC REC). Your camcorder is displayed on the screen. • The tape you are using an S VIDEO plug, make sure the red and white plugs of the A/V connecting cable are playing was recorded on another device with 4ch microphone recording. Continued 85 Horizontal lines appear on the picture. Date Search does not work correctly. • If one day's recording is less than that case...
This is not a malfunction. is not compatible with a 4ch microphone (4CH MIC REC). Your camcorder is displayed on the screen. • The tape you are using an S VIDEO plug, make sure the red and white plugs of the A/V connecting cable are playing was recorded on another device with 4ch microphone recording. Continued 85 Horizontal lines appear on the picture. Date Search does not work correctly. • If one day's recording is less than that case...
Operating Guide
Page 90
... Device], [? For copying and viewing pictures recorded on a tape - [USB Audio Device] in the [Sound, video and game controllers] folder - [USB Device] in the [Other devices] folder - [USB Composite Device] in the disc drive of your computer. 8 Follow the steps below to install the USB driver correctly. For Windows 98/Windows 98SE/Windows Me When copying or playing the pictures on a tape using the USB cable. • The USB driver has been registered incorrectly as Administrator. 1 Check that your camcorder is connected to delete them , then click [Remove...
... Device], [? For copying and viewing pictures recorded on a tape - [USB Audio Device] in the [Sound, video and game controllers] folder - [USB Device] in the [Other devices] folder - [USB Composite Device] in the disc drive of your computer. 8 Follow the steps below to install the USB driver correctly. For Windows 98/Windows 98SE/Windows Me When copying or playing the pictures on a tape using the USB cable. • The USB driver has been registered incorrectly as Administrator. 1 Check that your camcorder is connected to delete them , then click [Remove...

Operating Guide
Page 91
... [Sound, video and game controller] folder - [Composite USB Device] in the [Other devices] folder For copying and viewing pictures recorded on a "Memory Stick Duo" - [? Sony DSC] may vary depending on the computer. 3 Click [Open]. 4 Double-click [Driver]. 5 Double-click [Setup.exe]. • Deleting anything other than [USB Composite Device], [USB Audio Device], [Composite USB Device], [? mark in the [Other devices] folder 5 When the [Confirm Device Removal] screen appears, click [OK]. 6 Turn off the power of your camcorder, disconnect the USB cable...
... [Sound, video and game controller] folder - [Composite USB Device] in the [Other devices] folder For copying and viewing pictures recorded on a "Memory Stick Duo" - [? Sony DSC] may vary depending on the computer. 3 Click [Open]. 4 Double-click [Driver]. 5 Double-click [Setup.exe]. • Deleting anything other than [USB Composite Device], [USB Audio Device], [Composite USB Device], [? mark in the [Other devices] folder 5 When the [Confirm Device Removal] screen appears, click [OK]. 6 Turn off the power of your camcorder, disconnect the USB cable...
Operating Guide
Page 99
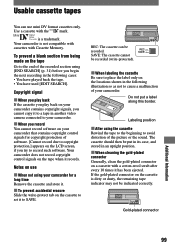
... LCD screen, if you begin the next recording in an upright position. When cleaning the gold-plated connector Generally, clean the gold-plated connector on the cassette to set it has been ejected. If the gold-plated connector on use mini DV format cassettes only. Your camcorder is not compatible with cassettes with the mark. Gold-plated connector Additional Information 99 Use a cassette with Cassette Memory. REC: The cassette can use...
... LCD screen, if you begin the next recording in an upright position. When cleaning the gold-plated connector Generally, clean the gold-plated connector on the cassette to set it has been ejected. If the gold-plated connector on use mini DV format cassettes only. Your camcorder is not compatible with cassettes with the mark. Gold-plated connector Additional Information 99 Use a cassette with Cassette Memory. REC: The cassette can use...
Operating Guide
Page 110
... SEARCH/EDIT SEARCH/Rec review display switch button 28 ERASE ALL ERASE 45 Pictures 62 EXPOSURE 41, 86 EXT SUR MIC 50 EDIT/PLAY menu 49 F FADER 46, 87 FILE NO. (File number) ...... 45 FINE 44 First Step Guide 66, 72 Fixing the exposure 24 FLASH LEVEL 43, 83 FLASH MODE 43 FLASH (Flash motion) ........ 47 FLASH SET 43 FOCUS 42, 83 Folder NEW FOLDER 46 PB FOLDER (Playback folder 46 REC FOLDER (Recording folder) ........ 46 FORMAT 45, 100 Frame...
... SEARCH/EDIT SEARCH/Rec review display switch button 28 ERASE ALL ERASE 45 Pictures 62 EXPOSURE 41, 86 EXT SUR MIC 50 EDIT/PLAY menu 49 F FADER 46, 87 FILE NO. (File number) ...... 45 FINE 44 First Step Guide 66, 72 Fixing the exposure 24 FLASH LEVEL 43, 83 FLASH MODE 43 FLASH (Flash motion) ........ 47 FLASH SET 43 FOCUS 42, 83 Folder NEW FOLDER 46 PB FOLDER (Playback folder 46 REC FOLDER (Recording folder) ........ 46 FORMAT 45, 100 Frame...

Operating Guide
Page 112
... 49 Slow 49 Playing time 12 PORTRAIT (Soft portrait) ... 40 Power cord 9 POWER switch 14 Previous/Next image button 29 Print 63 Print mark 63 PROGRAM AE 40, 86 P.MENU .... menu (Picture Application menu 46 PICT. See Personal Menu R Rechargeable battery pack See Battery Recording 22 Recording capacity 28 Cassette 28 Memory Stick 28 Recording time 12, 45 112 REC CTRL (Recording control 58 REC FOLDER (Recording folder 46 REC LAMP 52 REC lamp (Recording lamp 26 REC MODE (Recording mode 50 Rec review 31 REC START/STOP 22...
... 49 Slow 49 Playing time 12 PORTRAIT (Soft portrait) ... 40 Power cord 9 POWER switch 14 Previous/Next image button 29 Print 63 Print mark 63 PROGRAM AE 40, 86 P.MENU .... menu (Picture Application menu 46 PICT. See Personal Menu R Rechargeable battery pack See Battery Recording 22 Recording capacity 28 Cassette 28 Memory Stick 28 Recording time 12, 45 112 REC CTRL (Recording control 58 REC FOLDER (Recording folder 46 REC LAMP 52 REC lamp (Recording lamp 26 REC MODE (Recording mode 50 Rec review 31 REC START/STOP 22...


