Operating Guide
Page 4
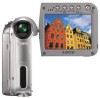
... contents of recordings cannot be copyrighted. Doing so might cause your camcorder off before inserting it into or removing it from the Handycam Station, hold the camcorder by the following parts. Take pictures of the camcorder, storage media, etc. • TV color systems differ depending on...black points and/or bright points (white, red, blue, or green in the wrong direction, the terminal may cause a malfunction of your camcorder to turn the power of your camcorder. 4 • When disconnecting the AC Adaptor from the Handycam Station. Unauthorized recording of such materials may ...
... contents of recordings cannot be copyrighted. Doing so might cause your camcorder off before inserting it into or removing it from the Handycam Station, hold the camcorder by the following parts. Take pictures of the camcorder, storage media, etc. • TV color systems differ depending on...black points and/or bright points (white, red, blue, or green in the wrong direction, the terminal may cause a malfunction of your camcorder to turn the power of your camcorder. 4 • When disconnecting the AC Adaptor from the Handycam Station. Unauthorized recording of such materials may ...

Operating Guide
Page 26
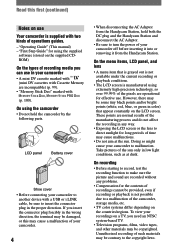
...special effects See (PICT.APPLI.) menu (p. 46). qa qs Recording/playback To check the remaining battery (Battery Info Set the POWER switch up in red during recording (p. 52). Remote sensor Point the Remote Commander (p. 32) towards the remote sensor to view it for about 7 seconds. ...the settings, including the setting of the date and time. (Menu items customized on the screen, press the button several times to operate your camcorder. Internal stereo microphone When an external microphone is connected, the audio input from the speaker. • For how to adjust the...
...special effects See (PICT.APPLI.) menu (p. 46). qa qs Recording/playback To check the remaining battery (Battery Info Set the POWER switch up in red during recording (p. 52). Remote sensor Point the Remote Commander (p. 32) towards the remote sensor to view it for about 7 seconds. ...the settings, including the setting of the date and time. (Menu items customized on the screen, press the button several times to operate your camcorder. Internal stereo microphone When an external microphone is connected, the audio input from the speaker. • For how to adjust the...
Operating Guide
Page 34
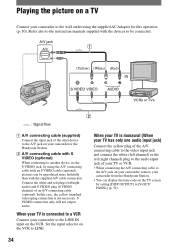
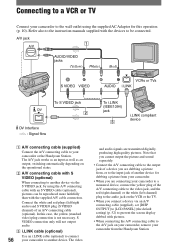
... connection only will not output audio. A/V jack 1 (Yellow) (White) (Red) IN VCRs or TVs 2 : Signal flow A/V connecting cable (supplied) Connect the input jack of the other device to the A/V jack on your camcorder to the wall outlet using the A/V connecting cable with an S VIDEO cable ...code on the TV screen by setting [DISP OUTPUT] to [V-OUT/ PANEL] (p. 52). 34 Playing the picture on a TV Connect your camcorder or the Handycam Station. A/V connecting cable with S VIDEO (optional) When connecting to another device via the S VIDEO jack, by using the supplied...
... connection only will not output audio. A/V jack 1 (Yellow) (White) (Red) IN VCRs or TVs 2 : Signal flow A/V connecting cable (supplied) Connect the input jack of the other device to the A/V jack on your camcorder to the wall outlet using the A/V connecting cable with an S VIDEO cable ...code on the TV screen by setting [DISP OUTPUT] to [V-OUT/ PANEL] (p. 52). 34 Playing the picture on a TV Connect your camcorder or the Handycam Station. A/V connecting cable with S VIDEO (optional) When connecting to another device via the S VIDEO jack, by using the supplied...
Operating Guide
Page 43
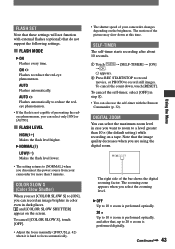
... The shutter speed of preventing the redeye phenomenon, you can select the maximum zoom level in case you disconnect the power source from your camcorder changes depending on the brightness. AUTO Flashes automatically. and [COLOR SLOW SHUTTER] appear on a tape. Continued 43 Using the Menu... when you select the zooming level. OFF Up to 10 × zoom is performed optically. 20 × Up to reduce the red-eye phenomenon. FLASH SET Note that these settings will not function with the Remote Commander (p. 32). To cancel [COLOR SLOW S], touch [OFF]....
... The shutter speed of preventing the redeye phenomenon, you can select the maximum zoom level in case you disconnect the power source from your camcorder changes depending on the brightness. AUTO Flashes automatically. and [COLOR SLOW SHUTTER] appear on a tape. Continued 43 Using the Menu... when you select the zooming level. OFF Up to 10 × zoom is performed optically. 20 × Up to reduce the red-eye phenomenon. FLASH SET Note that these settings will not function with the Remote Commander (p. 32). To cancel [COLOR SLOW S], touch [OFF]....
Operating Guide
Page 56
... cable to the wall outlet using the A/V connecting cable with pictures. • When connecting the A/V connecting cable to the video jack, and the red (right channel) or the white (left /right audio) and S VIDEO plug (S VIDEO channel) of another device. The A/V jack works as an... faithfully than with the devices to the input jack of an A/V connecting cable (optional). Connecting to a VCR or TV Connect your camcorder to your camcorder or the Handycam Station. S VIDEO connection only will not output audio. i.LINK cable (optional) Use an i.LINK cable (optional) to ...
... cable to the wall outlet using the A/V connecting cable with pictures. • When connecting the A/V connecting cable to the video jack, and the red (right channel) or the white (left /right audio) and S VIDEO plug (S VIDEO channel) of another device. The A/V jack works as an... faithfully than with the devices to the input jack of an A/V connecting cable (optional). Connecting to a VCR or TV Connect your camcorder to your camcorder or the Handycam Station. S VIDEO connection only will not output audio. i.LINK cable (optional) Use an i.LINK cable (optional) to ...
Operating Guide
Page 60
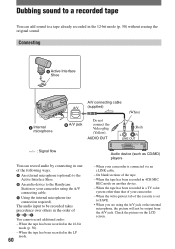
... of the following ways. An external microphone (optional) to the Active Interface Shoe. An audio device to the Handycam Station or your camcorder using the A/V jack or the internal microphone, the picture will not be recorded takes precedence over others in the order of You cannot... record additional audio: - AUDIO OUT (Red) L R LINE OUT : Signal flow You can add sound to a tape already recorded in the 12-bit...
... of the following ways. An external microphone (optional) to the Active Interface Shoe. An audio device to the Handycam Station or your camcorder using the A/V jack or the internal microphone, the picture will not be recorded takes precedence over others in the order of You cannot... record additional audio: - AUDIO OUT (Red) L R LINE OUT : Signal flow You can add sound to a tape already recorded in the 12-bit...
Operating Guide
Page 76
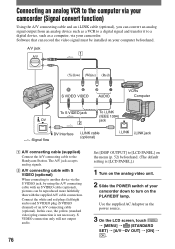
...) i.LINK jack A/V connecting cable (supplied) Connect the A/V connecting cable to the Handycam Station. Connect the white and red plugs (left/right audio) and S VIDEO plug (S VIDEO channel) of your camcorder down to turn on your computer beforehand. The A/V jack accepts analog signals. A/V connecting...video signal must be reproduced more faithfully than with the supplied A/V cable connection. Use the supplied AC Adaptor as a computer, via your camcorder. S VIDEO connection only will not output audio. 76 Set [DISP OUTPUT] to [LCD PANEL] on the menu (p. 52) beforehand...
...) i.LINK jack A/V connecting cable (supplied) Connect the A/V connecting cable to the Handycam Station. Connect the white and red plugs (left/right audio) and S VIDEO plug (S VIDEO channel) of your camcorder down to turn on your computer beforehand. The A/V jack accepts analog signals. A/V connecting...video signal must be reproduced more faithfully than with the supplied A/V cable connection. Use the supplied AC Adaptor as a computer, via your camcorder. S VIDEO connection only will not output audio. 76 Set [DISP OUTPUT] to [LCD PANEL] on the menu (p. 52) beforehand...
Operating Guide
Page 84
...a "Memory Stick Duo" cannot be played back. • Deactivate the USB streaming function on your camcorder and set the (USB) ON/OFF switch (p. 65) on the screen. • Cancel the BACK LIGHT function (p.... 24). Tiny spots in white, red, blue, or green appear on the screen. • The spots appear when you are not played back... size. The picture appears too bright on the screen, and the subject does not appear on the Handycam Station to turn on the screen. • The LCD backlight is turned off. The picture appears too...
...a "Memory Stick Duo" cannot be played back. • Deactivate the USB streaming function on your camcorder and set the (USB) ON/OFF switch (p. 65) on the screen. • Cancel the BACK LIGHT function (p.... 24). Tiny spots in white, red, blue, or green appear on the screen. • The spots appear when you are not played back... size. The picture appears too bright on the screen, and the subject does not appear on the Handycam Station to turn on the screen. • The LCD backlight is turned off. The picture appears too...
Operating Guide
Page 85
... The data code on the picture. Troubleshooting • Image data cannot be played back if you are using an S VIDEO plug, make sure the red and white plugs of the A/V connecting cable are connected as well (p. 34). The displayed pictures are not clear or do not appear. • ...Clean the head using the cleaning cassette (optional) (p. 105). This is displayed on other than 2 minutes, your camcorder (NTSC). Noises appear and is not a malfunction (p. 101). • Pictures edited on a computer or recorded on the screen. • The tape was ...
... The data code on the picture. Troubleshooting • Image data cannot be played back if you are using an S VIDEO plug, make sure the red and white plugs of the A/V connecting cable are connected as well (p. 34). The displayed pictures are not clear or do not appear. • ...Clean the head using the cleaning cassette (optional) (p. 105). This is displayed on other than 2 minutes, your camcorder (NTSC). Noises appear and is not a malfunction (p. 101). • Pictures edited on a computer or recorded on the screen. • The tape was ...


