Operating Guide
Page 3
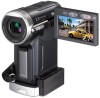
... Note DCR-PC1000 is to be used in a residential installation. Record the serial number in a particular installation. Increase the separation between the equipment and receiver. - LCD panel • The camcorder is ... malfunction of operations guides. - This equipment generates, uses, and can be used with the Handycam Station Model DCRA-C140 and AC Power Adaptor Model AC-L200. Continued 3 AC... has been tested and found to comply with two kinds of your Sony dealer regarding this equipment does cause harmful interference to radio or television reception, which the...
... Note DCR-PC1000 is to be used in a residential installation. Record the serial number in a particular installation. Increase the separation between the equipment and receiver. - LCD panel • The camcorder is ... malfunction of operations guides. - This equipment generates, uses, and can be used with the Handycam Station Model DCRA-C140 and AC Power Adaptor Model AC-L200. Continued 3 AC... has been tested and found to comply with two kinds of your Sony dealer regarding this equipment does cause harmful interference to radio or television reception, which the...
Operating Guide
Page 4
... in color) that is grayed out is equipped with a Carl Zeiss lens, which was developed jointly by Carl Zeiss, in Germany, and Sony Corporation, and produces superior images. It adopts the MTF measurement system for video cameras and offers a quality typical of the sun only in ...lens. Unauthorized recording of such materials may be contrary to a malfunction of light from a subject coming into the Handycam Station or remove the camcorder from the Handycam Station holding both the camcorder and the DC plug. • Be sure to slide the POWER switch up to malfunction. The number value ...
... in color) that is grayed out is equipped with a Carl Zeiss lens, which was developed jointly by Carl Zeiss, in Germany, and Sony Corporation, and produces superior images. It adopts the MTF measurement system for video cameras and offers a quality typical of the sun only in ...lens. Unauthorized recording of such materials may be contrary to a malfunction of light from a subject coming into the Handycam Station or remove the camcorder from the Handycam Station holding both the camcorder and the DC plug. • Be sure to slide the POWER switch up to malfunction. The number value ...
Operating Guide
Page 5
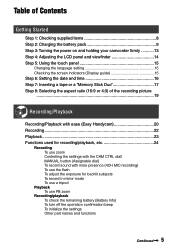
...Contents Getting Started Step 1: Checking supplied items 8 Step 2: Charging the battery pack 9 Step 3: Turning the power on and holding your camcorder firmly ...........13 Step 4: Adjusting the LCD panel and viewfinder 14 Step 5: Using the touch panel 15 Changing the ... Stick Duo 17 Step 8: Selecting the aspect ratio (16:9 or 4:3) of the recording picture ...19 Recording/Playback Recording/Playback with ease (Easy Handycam 20 Recording 22 Playback 23 Functions used for recording/playback, etc 24 Recording To use zoom Controlling the settings with the CAM CTRL dial/ MANUAL...
...Contents Getting Started Step 1: Checking supplied items 8 Step 2: Charging the battery pack 9 Step 3: Turning the power on and holding your camcorder firmly ...........13 Step 4: Adjusting the LCD panel and viewfinder 14 Step 5: Using the touch panel 15 Changing the ... Stick Duo 17 Step 8: Selecting the aspect ratio (16:9 or 4:3) of the recording picture ...19 Recording/Playback Recording/Playback with ease (Easy Handycam 20 Recording 22 Playback 23 Functions used for recording/playback, etc 24 Recording To use zoom Controlling the settings with the CAM CTRL dial/ MANUAL...
Operating Guide
Page 8
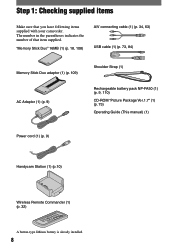
... Duo adaptor (1) (p. 109) AC Adaptor (1) (p. 9) Shoulder Strap (1) Rechargeable battery pack NP-FA50 (1) (p. 9, 110) CD-ROM "Picture Package Ver.1.7" (1) (p. 73) Operating Guide (This manual) (1) Power cord (1) (p. 9) Handycam Station (1) (p.10) Wireless Remote Commander (1) (p. 32) A button-type lithium battery is already installed. 8 Step 1: Checking supplied items Make sure that item supplied. The number in...
... Duo adaptor (1) (p. 109) AC Adaptor (1) (p. 9) Shoulder Strap (1) Rechargeable battery pack NP-FA50 (1) (p. 9, 110) CD-ROM "Picture Package Ver.1.7" (1) (p. 73) Operating Guide (This manual) (1) Power cord (1) (p. 9) Handycam Station (1) (p.10) Wireless Remote Commander (1) (p. 32) A button-type lithium battery is already installed. 8 Step 1: Checking supplied items Make sure that item supplied. The number in...

Operating Guide
Page 10
... off when the battery pack is facing up. /CHG (charge) lamp The CHG (charge) lamp lights up and charging starts. Be sure to insert the camcorder to the end. 5 Connect the AC Adaptor to the DC IN jack on the DC plug is fully charged. Be sure that the mark.... The mark faces up. 6 Connect the power cord to (CHG) OFF. (The default setting.) 7 Insert the camcorder into the Handycam Station, close the DC IN jack cover on the camcorder. 10 Step2:Charging the battery pack (Continued) 4 Slide the POWER switch up to the AC Adaptor and the wall outlet. • When...
... off when the battery pack is facing up. /CHG (charge) lamp The CHG (charge) lamp lights up and charging starts. Be sure to insert the camcorder to the end. 5 Connect the AC Adaptor to the DC IN jack on the DC plug is fully charged. Be sure that the mark.... The mark faces up. 6 Connect the power cord to (CHG) OFF. (The default setting.) 7 Insert the camcorder into the Handycam Station, close the DC IN jack cover on the camcorder. 10 Step2:Charging the battery pack (Continued) 4 Slide the POWER switch up to the AC Adaptor and the wall outlet. • When...

Operating Guide
Page 11
...the battery pack Fully discharge the battery before storing it for an extended period (p. 110). To use an outside power source You can operate your camcorder using the AC Adaptor Slide the POWER switch up to (CHG)OFF. The battery pack will not lose its charge in this case. To ... Then connect the AC Adaptor directly to (CHG)OFF. To the wall outlet Power cord AC Adaptor To remove your camcorder from the Handycam Station Turn off the power, then remove the camcorder from the wall outlet by making the same connections as you do when charging the battery pack. Getting Started To...
...the battery pack Fully discharge the battery before storing it for an extended period (p. 110). To use an outside power source You can operate your camcorder using the AC Adaptor Slide the POWER switch up to (CHG)OFF. The battery pack will not lose its charge in this case. To ... Then connect the AC Adaptor directly to (CHG)OFF. To the wall outlet Power cord AC Adaptor To remove your camcorder from the Handycam Station Turn off the power, then remove the camcorder from the wall outlet by making the same connections as you do when charging the battery pack. Getting Started To...

Operating Guide
Page 12
... shows the time when you use a fully charged battery pack. The battery pack is not attached correctly. - PRECAUTION • Even if your camcorder or the Handycam Station, even when the power cord is closed 115 140 215 260 * When the LCD backlight turns on . Bottom: Recording time when recording...immediately if any metallic objects. The battery pack is turned off . On the AC Adaptor • Use the nearby wall outlet when using your camcorder. • Do not use the AC Adaptor placed in low temperatures. • The recording and playback time will not be shorter when you...
... shows the time when you use a fully charged battery pack. The battery pack is not attached correctly. - PRECAUTION • Even if your camcorder or the Handycam Station, even when the power cord is closed 115 140 215 260 * When the LCD backlight turns on . Bottom: Recording time when recording...immediately if any metallic objects. The battery pack is turned off . On the AC Adaptor • Use the nearby wall outlet when using your camcorder. • Do not use the AC Adaptor placed in low temperatures. • The recording and playback time will not be shorter when you...
Operating Guide
Page 15
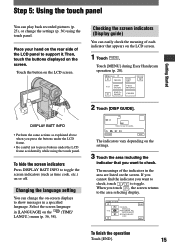
... the (TIME/ LANGU.) menu (p. 36, 58). Place your hand on the rear side of the indicators in [LANGUAGE] on the screen. Touch [MENU] during Easy Handycam operation (p. 20). 6 0 min MENU DIAL SET 0:00:00 1/3 DISP GUIDE EXPOSURE TELE MACRO FADER 2 Touch [DISP GUIDE].
... the (TIME/ LANGU.) menu (p. 36, 58). Place your hand on the rear side of the indicators in [LANGUAGE] on the screen. Touch [MENU] during Easy Handycam operation (p. 20). 6 0 min MENU DIAL SET 0:00:00 1/3 DISP GUIDE EXPOSURE TELE MACRO FADER 2 Touch [DISP GUIDE].

Operating Guide
Page 20
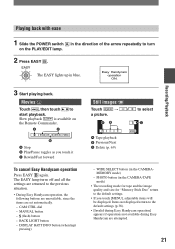
... 3Start recording. Recording movies : Light up the CAMERA-MEMORY lamp. To stop recording, press (or ) again. 20 Easy Handycam operation ON. lightly to 19) before operation. When disappears, the image has been recorded. Recording still images : Light up the CAMERA-TAPE ...click MENU FlashingLights up in steps 1 to 8 (p. 8 to adjust the focus. C B Recording with ease (Easy Handycam) With this Easy Handycam operation, most of the arrow repeatedly to turn on the respective lamp to record. The EASY lights up Press and hold Press fully...
... 3Start recording. Recording movies : Light up the CAMERA-MEMORY lamp. To stop recording, press (or ) again. 20 Easy Handycam operation ON. lightly to 19) before operation. When disappears, the image has been recorded. Recording still images : Light up the CAMERA-TAPE ...click MENU FlashingLights up in steps 1 to 8 (p. 8 to adjust the focus. C B Recording with ease (Easy Handycam) With this Easy Handycam operation, most of the arrow repeatedly to turn on the respective lamp to record. The EASY lights up Press and hold Press fully...
Operating Guide
Page 21
... the arrow repeatedly to the default settings. • If you touch it Rewind/Fast forward To cancel Easy Handycam operation Press EASY again. Easy Handycam operation ON. A C B Stop Play/Pause toggles as you touch [MENU], adjustable items will...the default settings (p.38). • [Invalid during Easy Handycam operation] appears if operations not available during Easy Handycam are set automatically. - Items not displayed return to the previous situation. • During Easy Handycam operation, the following buttons are unavailable, since the items ...
... the arrow repeatedly to the default settings. • If you touch it Rewind/Fast forward To cancel Easy Handycam operation Press EASY again. Easy Handycam operation ON. A C B Stop Play/Pause toggles as you touch [MENU], adjustable items will...the default settings (p.38). • [Invalid during Easy Handycam operation] appears if operations not available during Easy Handycam are set automatically. - Items not displayed return to the previous situation. • During Easy Handycam operation, the following buttons are unavailable, since the items ...
Operating Guide
Page 34
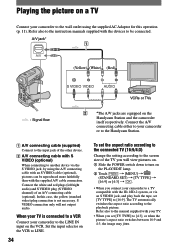
...by using the supplied AC Adaptor for this case, the yellow (standard video) plug connection is connected to a VCR Connect your camcorder or to the Handycam Station. A/V connecting cable (supplied) Connect to the input jack of the other device. A/V connecting cable with...), pictures can be connected. Refer also to the manual supplied with your camcorder to a TV compatible with the devices to be reproduced more faithfully than with the supplied A/V cable connection. Set the input selector on the Handycam Station and the camcorder itself respectively.
...by using the supplied AC Adaptor for this case, the yellow (standard video) plug connection is connected to a VCR Connect your camcorder or to the Handycam Station. A/V connecting cable (supplied) Connect to the input jack of the other device. A/V connecting cable with...), pictures can be connected. Refer also to the manual supplied with your camcorder to a TV compatible with the devices to be reproduced more faithfully than with the supplied A/V cable connection. Set the input selector on the Handycam Station and the camcorder itself respectively.

Operating Guide
Page 35
...; You can display the time code on a 4:3 TV not compatible with the 16:9 signal, set [TV TYPE] to [V-OUT/ PANEL] (p. 57). 35 When your camcorder and the Handycam Station at the same time. Recording/Playback • On some 4:3 TVs, the still image recorded in 4:3 aspect ratio may not appear in 16:9 aspect...
...; You can display the time code on a 4:3 TV not compatible with the 16:9 signal, set [TV TYPE] to [V-OUT/ PANEL] (p. 57). 35 When your camcorder and the Handycam Station at the same time. Recording/Playback • On some 4:3 TVs, the still image recorded in 4:3 aspect ratio may not appear in 16:9 aspect...

Operating Guide
Page 37
Using the Menu After finishing the settings, touch (close) to [FOCUS], [EXPOSURE], [AE SHIFT] or [WB SHIFT] using the CAM CTRL dial (p. 61). • During Easy Handycam operation, if you decide not to change the setting, touch to return to the previous screen. • You can also change the settings to hide the menu screen. If you press [MENU] on the screen, the buttons for the menu items available for the operation are displayed. 37
Using the Menu After finishing the settings, touch (close) to [FOCUS], [EXPOSURE], [AE SHIFT] or [WB SHIFT] using the CAM CTRL dial (p. 61). • During Easy Handycam operation, if you decide not to change the setting, touch to return to the previous screen. • You can also change the settings to hide the menu screen. If you press [MENU] on the screen, the buttons for the menu items available for the operation are displayed. 37

Operating Guide
Page 38
... EXP.FOCUS - menu (p. 48) FADER SLIDE SHOW - MOVIE SET - NEW FOLDER - ON OFF - FORMAT - D. EFFECT FRAME REC MEMORY PLAY/EDIT Easy Handycam - - - - - - - - - - - - - - - - - - - - - - - - - - - OFF 38 PB FOLDER - OFF - FILE NO. - AUTO...
... EXP.FOCUS - menu (p. 48) FADER SLIDE SHOW - MOVIE SET - NEW FOLDER - ON OFF - FORMAT - D. EFFECT FRAME REC MEMORY PLAY/EDIT Easy Handycam - - - - - - - - - - - - - - - - - - - - - - - - - - - OFF 38 PB FOLDER - OFF - FILE NO. - AUTO...
Operating Guide
Page 39
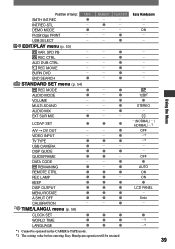
... CALIBRATION - - 5min - DEMO MODE PictBridge PRINT - ON - - PLAY/EDIT - - - Easy Handycam - - REC CTRL - - - AUD DUB CTRL - - - OFF DATA CODE - - REMAINING - AUTO ... -*2 -*2 *1 Cannot be operated in the CAMERA-TAPE mode. *2 The setting value before entering Easy Handycam operation will be retained. 39 DISP GUIDE - USB SELECT - EDIT/PLAY menu (p. 53) VAR. END...
... CALIBRATION - - 5min - DEMO MODE PictBridge PRINT - ON - - PLAY/EDIT - - - Easy Handycam - - REC CTRL - - - AUD DUB CTRL - - - OFF DATA CODE - - REMAINING - AUTO ... -*2 -*2 *1 Cannot be operated in the CAMERA-TAPE mode. *2 The setting value before entering Easy Handycam operation will be retained. 39 DISP GUIDE - USB SELECT - EDIT/PLAY menu (p. 53) VAR. END...

Operating Guide
Page 57
... default setting is [ON], allowing you to use the Remote Commander (p. 32). • Set to [OFF] to prevent your camcorder from your camcorder for more than 5 minutes. This cannot be selected during Easy Handycam operation. 6 0 min 1 0 : 0 0 : 0 0 : 0 0 2 6 5 AUTO 100 AWB F1. 8 9 dB 3 4 SteadyShot off* Exposure* White balance* Gain* Shutter...
... default setting is [ON], allowing you to use the Remote Commander (p. 32). • Set to [OFF] to prevent your camcorder from your camcorder for more than 5 minutes. This cannot be selected during Easy Handycam operation. 6 0 min 1 0 : 0 0 : 0 0 : 0 0 2 6 5 AUTO 100 AWB F1. 8 9 dB 3 4 SteadyShot off* Exposure* White balance* Gain* Shutter...

Operating Guide
Page 63
...the devices to a monaural device, connect the yellow plug of the following connections. Connect your camcorder or the Handycam Station. The video and audio signals are equipped on the Handycam Station and the camcorder itself respectively. A/V jack* 1 A/V AUDIO/ VIDEO jacks (Yellow) (White) (Red) ...input as well as an output, switching automatically depending on the VCR or the TV. • When you are connecting your camcorder or to the Handycam Station. A/V connecting cable (supplied) Connect the A/V connecting cable to another device via an A/V connecting cable (...
...the devices to a monaural device, connect the yellow plug of the following connections. Connect your camcorder or the Handycam Station. The video and audio signals are equipped on the Handycam Station and the camcorder itself respectively. A/V jack* 1 A/V AUDIO/ VIDEO jacks (Yellow) (White) (Red) ...input as well as an output, switching automatically depending on the VCR or the TV. • When you are connecting your camcorder or to the Handycam Station. A/V connecting cable (supplied) Connect the A/V connecting cable to another device via an A/V connecting cable (...

Operating Guide
Page 67
... the tape has been recorded in a TV color system other than that of your camcorder or to the Handycam Station. Audio device (such as CD/MD) players - Check the picture on the Handycam Station and the camcorder itself respectively. On blank sections of the tape. - When the write-protect tab ...of the following ways. An external microphone (optional) to the Active Interface Shoe. An audio device to the Handycam Station or your camcorder using the A/V jack or the internal microphone, the picture will not be recorded takes precedence over others in the order of You ...
... the tape has been recorded in a TV color system other than that of your camcorder or to the Handycam Station. Audio device (such as CD/MD) players - Check the picture on the Handycam Station and the camcorder itself respectively. On blank sections of the tape. - When the write-protect tab ...of the following ways. An external microphone (optional) to the Active Interface Shoe. An audio device to the Handycam Station or your camcorder using the A/V jack or the internal microphone, the picture will not be recorded takes precedence over others in the order of You ...

Operating Guide
Page 70
... the information of the images with the Print mark put on using a PictBridge compliant printer without connecting the camcorder to a computer. Connect the AC Adaptor to the Handycam Station to the Handycam Station. Connect your camcorder. Marking images on the "Memory Stick Duo" with specific information (Image protection/Print mark) (Continued) Selecting still...
... the information of the images with the Print mark put on using a PictBridge compliant printer without connecting the camcorder to a computer. Connect the AC Adaptor to the Handycam Station to the Handycam Station. Connect your camcorder. Marking images on the "Memory Stick Duo" with specific information (Image protection/Print mark) (Continued) Selecting still...

Operating Guide
Page 71
...the operating instructions for details. • We cannot guarantee the printing of model or manufacturer. 71 Set the USB ON/OFF switch to your camcorder from the beginning. • If you print a still image recorded with a 16:9 ratio, left and right ends of copies to a...still images without using a computer by the Camera & Imaging Products Association (CIPA). Operating the POWER switch. - Removing the "Memory Stick Duo" from the Handycam Staiton or the printer. - When printing is on the screen. Printing 1 Select the image to be printed with / . 2 Touch [COPIES]. ...
...the operating instructions for details. • We cannot guarantee the printing of model or manufacturer. 71 Set the USB ON/OFF switch to your camcorder from the beginning. • If you print a still image recorded with a 16:9 ratio, left and right ends of copies to a...still images without using a computer by the Camera & Imaging Products Association (CIPA). Operating the POWER switch. - Removing the "Memory Stick Duo" from the Handycam Staiton or the printer. - When printing is on the screen. Printing 1 Select the image to be printed with / . 2 Touch [COPIES]. ...


