Operating Guide
Page 2
... received, including interference that may cause undesired operation. This Class B digital apparatus complies with Part 15 of Conformity Trade Name: SONY Model No.: DCR-PC1000 Responsible Party: Sony Electronics Inc. Bernardo Dr, San Diego, CA 92127 U.S.A. Telephone No.: 858-942-2230 This device complies with Canadian ICES-003. Operation is intended to alert the user to the presence of uninsulated "dangerous...
... received, including interference that may cause undesired operation. This Class B digital apparatus complies with Part 15 of Conformity Trade Name: SONY Model No.: DCR-PC1000 Responsible Party: Sony Electronics Inc. Bernardo Dr, San Diego, CA 92127 U.S.A. Telephone No.: 858-942-2230 This device complies with Canadian ICES-003. Operation is intended to alert the user to the presence of uninsulated "dangerous...
Operating Guide
Page 3
... not installed and used in your camcorder to another device with a USB or i.LINK cable, be used with the instructions, may cause harmful interference to insert the connector plug in this manual could void your camcorder. Reorient or relocate the receiving antenna. - This equipment generates, uses, and can use Your camcorder is supplied with the limits for a digital device pursuant to Subpart B of Part 15 of recording media you...
... not installed and used in your camcorder to another device with a USB or i.LINK cable, be used with the instructions, may cause harmful interference to insert the connector plug in this manual could void your camcorder. Reorient or relocate the receiving antenna. - This equipment generates, uses, and can use Your camcorder is supplied with the limits for a digital device pursuant to Subpart B of Part 15 of recording media you...
Operating Guide
Page 4
... if recording or playback is T*-coated to make sure the picture and sound are operational for your recordings on the countries/regions. Change the screen language before using a digital still camera, and therefore may appear different. • The on the LCD screen and the viewfinder. The number value indicates the amount of a Carl Zeiss lens. Take pictures of the sun only in any problems. • Compensation for video cameras...
... if recording or playback is T*-coated to make sure the picture and sound are operational for your recordings on the countries/regions. Change the screen language before using a digital still camera, and therefore may appear different. • The on the LCD screen and the viewfinder. The number value indicates the amount of a Carl Zeiss lens. Take pictures of the sun only in any problems. • Compensation for video cameras...
Operating Guide
Page 5
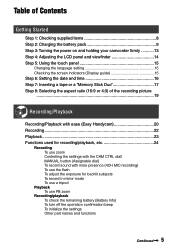
... panel 15 Changing the language setting 15 Checking the screen indicators (Display guide 15 Step 6: Setting the date and time 16 Step 7: Inserting a tape or a "Memory Stick Duo 17 Step 8: Selecting the aspect ratio (16:9 or 4:3) of the recording picture ...19 Recording/Playback Recording/Playback with ease (Easy Handycam 20 Recording 22 Playback 23 Functions used for recording/playback, etc 24 Recording To use zoom Controlling the settings with the CAM CTRL dial/ MANUAL button (Assignable dial) To record sound with more presence (4CH MIC recording) To use the...
... panel 15 Changing the language setting 15 Checking the screen indicators (Display guide 15 Step 6: Setting the date and time 16 Step 7: Inserting a tape or a "Memory Stick Duo 17 Step 8: Selecting the aspect ratio (16:9 or 4:3) of the recording picture ...19 Recording/Playback Recording/Playback with ease (Easy Handycam 20 Recording 22 Playback 23 Functions used for recording/playback, etc 24 Recording To use zoom Controlling the settings with the CAM CTRL dial/ MANUAL button (Assignable dial) To record sound with more presence (4CH MIC recording) To use the...
Operating Guide
Page 24
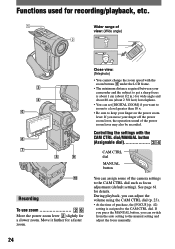
... focus adjustment (default setting). During playback, you can adjust the volume using the CAM CTRL dial (p. 23). • At the time of the power zoom lever may also be recorded. Close view: (Telephoto) • You cannot change the zoom speed with the CAM CTRL dial/MANUAL button (Assignable dial CAM CTRL dial MANUAL button You can set [DIGITAL ZOOM] if you move your camcorder and the subject to get a sharp focus is assigned to the manual setting and adjust the focus manually...
... focus adjustment (default setting). During playback, you can adjust the volume using the CAM CTRL dial (p. 23). • At the time of the power zoom lever may also be recorded. Close view: (Telephoto) • You cannot change the zoom speed with the CAM CTRL dial/MANUAL button (Assignable dial CAM CTRL dial MANUAL button You can set [DIGITAL ZOOM] if you move your camcorder and the subject to get a sharp focus is assigned to the manual setting and adjust the focus manually...
Operating Guide
Page 28
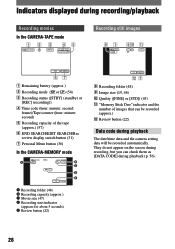
.../Rec review display switch button (31) Personal Menu button (36) In the CAMERA-MEMORY mode A B C D E Recording folder (48) Recording capacity (approx.) Movie size (47) Recording start indicator (appears for about 5 seconds) Review button (22) P-MENU qs 7 Recording folder (48) Image size (19, 46) Quality ([FINE] or [STD]) (45) "Memory Stick Duo" indicator and the number of images that can check them as [DATA CODE] during playback The date/time data and the camera setting data...
.../Rec review display switch button (31) Personal Menu button (36) In the CAMERA-MEMORY mode A B C D E Recording folder (48) Recording capacity (approx.) Movie size (47) Recording start indicator (appears for about 5 seconds) Review button (22) P-MENU qs 7 Recording folder (48) Image size (19, 46) Quality ([FINE] or [STD]) (45) "Memory Stick Duo" indicator and the number of images that can check them as [DATA CODE] during playback The date/time data and the camera setting data...
Operating Guide
Page 39
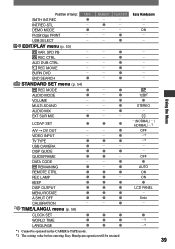
... OUT - - OFF VIDEO INPUT - - -*2 TV TYPE -*2 USB CAMERA - - - A.SHUT OFF CALIBRATION - - 5min - Position of lamp: TAPE SMTH INT.REC INT.REC-STL - SPD PB - - - EXT SUR MIC - - USB SELECT - Using the Menu STANDARD SET menu (p. 54) REC MODE - AUDIO MODE - 12BIT VOLUME - - MULTI-SOUND - - STEREO AUDIO MIX - - - DISP...
... OUT - - OFF VIDEO INPUT - - -*2 TV TYPE -*2 USB CAMERA - - - A.SHUT OFF CALIBRATION - - 5min - Position of lamp: TAPE SMTH INT.REC INT.REC-STL - SPD PB - - - EXT SUR MIC - - USB SELECT - Using the Menu STANDARD SET menu (p. 54) REC MODE - AUDIO MODE - 12BIT VOLUME - - MULTI-SOUND - - STEREO AUDIO MIX - - - DISP...
Operating Guide
Page 50
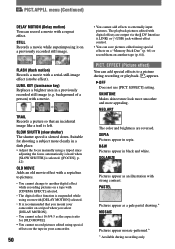
... during recording or playback. EFFECT (Picture effect) You can save pictures edited using a tripod since adjusting the focus automatically is hard when [SLOW SHUTTR] is suspended while using special effects on a previously recorded still image. background of a person) with a serial-still-image effect (strobe effect). menu (Continued) DELAY MOTION (Delay motion) You can record a movie with digital effects are reversed. SEPIA Pictures appear in a dark place. • Adjust the focus manually using special effects on a "Memory Stick Duo...
... during recording or playback. EFFECT (Picture effect) You can save pictures edited using a tripod since adjusting the focus automatically is hard when [SLOW SHUTTR] is suspended while using special effects on a previously recorded still image. background of a person) with a serial-still-image effect (strobe effect). menu (Continued) DELAY MOTION (Delay motion) You can record a movie with digital effects are reversed. SEPIA Pictures appear in a dark place. • Adjust the focus manually using special effects on a "Memory Stick Duo...

Operating Guide
Page 51
... clouds or the changes of daylight. A picture (approximately 6 frames) is recorded, and your camcorder using special effects on a "Memory Stick Duo" (p. 66) or record them on the tape, after shooting has begun. • Sounds are output via the DV Interface (i.LINK) or (USB) jack without effect control. • You can save pictures edited using the Remote Commander to 120 seconds) . Touch [REC START]. Connect your camcorder has shot several...
... clouds or the changes of daylight. A picture (approximately 6 frames) is recorded, and your camcorder using special effects on a "Memory Stick Duo" (p. 66) or record them on the tape, after shooting has begun. • Sounds are output via the DV Interface (i.LINK) or (USB) jack without effect control. • You can save pictures edited using the Remote Commander to 120 seconds) . Touch [REC START]. Connect your camcorder has shot several...
Operating Guide
Page 55
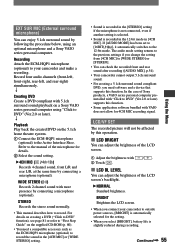
... DVD" (Ver.2.0 or later). Playback Play back the created DVD on creating a DVD ("Click to DVD" function), see page 81 or refer to outside power sources, [BRIGHT] is automatically selected for 4CH MIC recording signal. STEREO Records the stereo sound normally. • This manual describes how to your camcorder to "First Step Guide" on the supplied CD-ROM (p. 80). • You need software and a device that supports this operation. LCD...
... DVD" (Ver.2.0 or later). Playback Play back the created DVD on creating a DVD ("Click to DVD" function), see page 81 or refer to outside power sources, [BRIGHT] is automatically selected for 4CH MIC recording signal. STEREO Records the stereo sound normally. • This manual describes how to your camcorder to "First Step Guide" on the supplied CD-ROM (p. 80). • You need software and a device that supports this operation. LCD...
Operating Guide
Page 72
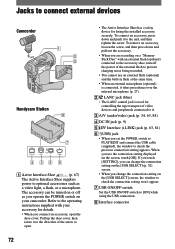
... [USB SELECT] screen, the window to check the connection setting won't appear. USB ON/OFF switch Set the USB ON/OFF switch to the operating instructions supplied with an external flash (optional) connected to the accessory shoe, turn off as a video light, a flash, or a microphone. When you change the connection setting on your accessory for fixing the installed accessory securely. Refer to [ON] while using the USB connection. Interface connector To remove...
... [USB SELECT] screen, the window to check the connection setting won't appear. USB ON/OFF switch Set the USB ON/OFF switch to the operating instructions supplied with an external flash (optional) connected to the accessory shoe, turn off as a video light, a flash, or a microphone. When you change the connection setting on your accessory for fixing the installed accessory securely. Refer to [ON] while using the USB connection. Interface connector To remove...
Operating Guide
Page 73
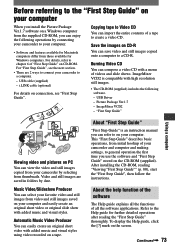
... a menu of a tape to general operation the first time you can select your camcorder by date. Video and still images are 2 ways to connect your camcorder to on your camcorder and computer and making settings, to create a video CD. USB Driver - "First Step Guide" Using a computer Viewing video and pictures on the screen. ImageMixer VCD2 - This "First Step Guide" describes basic operations, from video and still images saved on a tape. About the help function of the software The Help guide explains...
... a menu of a tape to general operation the first time you can select your camcorder by date. Video and still images are 2 ways to connect your camcorder to on your camcorder and computer and making settings, to create a video CD. USB Driver - "First Step Guide" Using a computer Viewing video and pictures on the screen. ImageMixer VCD2 - This "First Step Guide" describes basic operations, from video and still images saved on a tape. About the help function of the software The Help guide explains...

Operating Guide
Page 80
Starting up [First Step Guide]. • To view "First Step Guide" in HTML without limitation, copying, modifying, reproducing, uploading, transmitting or placing to the external network accessible to the public, transferring, distributing, lending, licensing, selling and publishing) any license or right to use (including, without using automatic installation, copy the desired language folder from the [FirstStepGuide] folder on the CD-ROM, and then double-click...
Starting up [First Step Guide]. • To view "First Step Guide" in HTML without limitation, copying, modifying, reproducing, uploading, transmitting or placing to the external network accessible to the public, transferring, distributing, lending, licensing, selling and publishing) any license or right to use (including, without using automatic installation, copy the desired language folder from the [FirstStepGuide] folder on the CD-ROM, and then double-click...
Operating Guide
Page 84
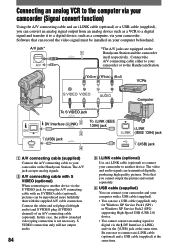
... cable (optional) Use an i.LINK cable (optional) to connect your camcorder to another device. Note that can record the video signal must be reproduced more faithfully than with a USB cable (supplied). • You can use a USB cable (supplied) only for Windows XP Service Pack1 (SP1) or Windows XP Service Pack2 (SP2) supporting High-Speed USB (USB 2.0) device. • You cannot convert an analog signal to a digital device, such as a VCR to a digital signal and transfer it to digital...
... cable (optional) Use an i.LINK cable (optional) to connect your camcorder to another device. Note that can record the video signal must be reproduced more faithfully than with a USB cable (supplied). • You can use a USB cable (supplied) only for Windows XP Service Pack1 (SP1) or Windows XP Service Pack2 (SP2) supporting High-Speed USB (USB 2.0) device. • You cannot convert an analog signal to a digital device, such as a VCR to a digital signal and transfer it to digital...
Operating Guide
Page 86
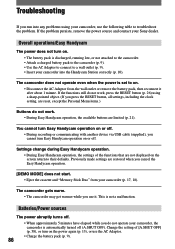
... work, press the RESET button (p. 26) using a sharp-pointed object. (If you cannot turn Easy Handycam operation on or off. • During recording or communicating with another device via USB cable (supplied), you press the RESET button, all settings, including the clock setting, are reset, except the Personal Menu items.) Buttons do not operate your camcorder into any problems using your Sony dealer. This is automatically turned off . The camcorder does not operate even when the power...
... work, press the RESET button (p. 26) using a sharp-pointed object. (If you cannot turn Easy Handycam operation on or off. • During recording or communicating with another device via USB cable (supplied), you press the RESET button, all settings, including the clock setting, are reset, except the Personal Menu items.) Buttons do not operate your camcorder into any problems using your Sony dealer. This is automatically turned off . The camcorder does not operate even when the power...
Operating Guide
Page 94
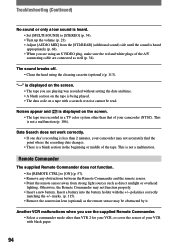
...). • When you are using the cleaning cassette (optional) (p. 113). The sound breaks off. • Clean the head using an S VIDEO plug, make sure the red and white plugs of the A/V connecting cable are playing was recorded without setting the date and time. • A blank section on the tape is being played. • The data code on the screen. • The tape was recorded in the beginning or middle of your camcorder (NTSC). polarities correctly matching the +/- Otherwise...
...). • When you are using the cleaning cassette (optional) (p. 113). The sound breaks off. • Clean the head using an S VIDEO plug, make sure the red and white plugs of the A/V connecting cable are playing was recorded without setting the date and time. • A blank section on the tape is being played. • The data code on the screen. • The tape was recorded in the beginning or middle of your camcorder (NTSC). polarities correctly matching the +/- Otherwise...
Operating Guide
Page 108
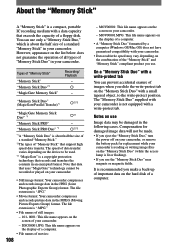
... of your camcorder. Types of a floppy disk. The file extension is ".JPG." • Movie format: Your camcorder compresses and records picture data in your camcorder. - MOV00001.MPG: This file name appears on the display of a computer. • A "Memory Stick Duo" formatted by a computer (Windows OS/Mac OS) does not have guaranteed compatibility with your camcorder is reading or writing image files on the device to the...
... of your camcorder. Types of a floppy disk. The file extension is ".JPG." • Movie format: Your camcorder compresses and records picture data in your camcorder. - MOV00001.MPG: This file name appears on the display of a computer. • A "Memory Stick Duo" formatted by a computer (Windows OS/Mac OS) does not have guaranteed compatibility with your camcorder is reading or writing image files on the device to the...
Operating Guide
Page 114
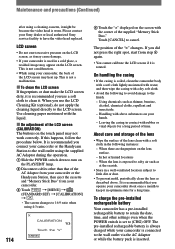
... during the operation. Slide the POWER switch down to clean it may cause damage. • If your camcorder, the back of the supplied "Memory Stick Duo." It is recommended you use a soft cloth to turn on the PLAY/EDIT lamp. Disconnect cables other settings even when the POWER switch is used in a cold place, a residual image may appear on the LCD screen, as it . Using chemicals such...
... during the operation. Slide the POWER switch down to clean it may cause damage. • If your camcorder, the back of the supplied "Memory Stick Duo." It is recommended you use a soft cloth to turn on the PLAY/EDIT lamp. Disconnect cables other settings even when the POWER switch is used in a cold place, a residual image may appear on the LCD screen, as it . Using chemicals such...
Operating Guide
Page 119
... Main sound 54 MANUAL button 61 MEMORY SET menu.......... 45 "Memory Stick 52, 108 "Memory Stick Duo 17 FORMAT 47 Insert/Eject 18 Number of recordable pictures 46 Recordable time 47 Write-protect tab......... 108 Memory Stick Duo adaptor 8, 109 "Memory Stick Duo" slot .... 18 Menu 36 CAMERA SET menu ... 40 EDIT/PLAY menu ........ 53 MEMORY SET menu .. 45 Menu items 38 Personal Menu ........ 36, 59 PICT.APPLI. See Display indicators ImageMixer VCD2 73 Image delete button 29 Image protection 69 Image quality (QUALITY) .. 45 Image size (IMAGE SIZE) .. 46 Movie 47 Still image...
... Main sound 54 MANUAL button 61 MEMORY SET menu.......... 45 "Memory Stick 52, 108 "Memory Stick Duo 17 FORMAT 47 Insert/Eject 18 Number of recordable pictures 46 Recordable time 47 Write-protect tab......... 108 Memory Stick Duo adaptor 8, 109 "Memory Stick Duo" slot .... 18 Menu 36 CAMERA SET menu ... 40 EDIT/PLAY menu ........ 53 MEMORY SET menu .. 45 Menu items 38 Personal Menu ........ 36, 59 PICT.APPLI. See Display indicators ImageMixer VCD2 73 Image delete button 29 Image protection 69 Image quality (QUALITY) .. 45 Image size (IMAGE SIZE) .. 46 Movie 47 Still image...
Operating Guide
Page 121
... switch 72 USB SELECT 52 Using abroad 106 V VAR.SPD PB (Various speed playback 53 VF B.LIGHT (Viewfinder brightness)........ 56 VF WIDE DISP (Viewfinder wide 56 Video head 113 VIDEO INPUT 56 Video operation buttons ....... 29 Viewfinder 14 Brightness 56 Viewfinder lens adjustment lever 14 VOLUME 54 Volume 23 V-OUT/PANEL 57 W Warning indicators 101 Warning messages 101 WB SHIFT (White Balance Shift 42 WHITE BAL. (White balance 41 White Balance...
... switch 72 USB SELECT 52 Using abroad 106 V VAR.SPD PB (Various speed playback 53 VF B.LIGHT (Viewfinder brightness)........ 56 VF WIDE DISP (Viewfinder wide 56 Video head 113 VIDEO INPUT 56 Video operation buttons ....... 29 Viewfinder 14 Brightness 56 Viewfinder lens adjustment lever 14 VOLUME 54 Volume 23 V-OUT/PANEL 57 W Warning indicators 101 Warning messages 101 WB SHIFT (White Balance Shift 42 WHITE BAL. (White balance 41 White Balance...


