Operating Guide
Page 2
... to the presence of uninsulated "dangerous voltage" within the product's enclosure that may not cause harmful interference, and (2) this manual thoroughly, and retain it for the FCC related matters only. If you have any interference received, including interference that may cause...RECYCLING LITHIUM-ION BATTERIES 2 Lithium-Ion batteries are recyclable. Operation is subject to the presence of Conformity Trade Name: SONY Model No.: DCR-PC1000 Responsible Party: Sony Electronics Inc. The number below is intended to alert the user to the following two conditions: (1) This device may...
... to the presence of uninsulated "dangerous voltage" within the product's enclosure that may not cause harmful interference, and (2) this manual thoroughly, and retain it for the FCC related matters only. If you have any interference received, including interference that may cause...RECYCLING LITHIUM-ION BATTERIES 2 Lithium-Ion batteries are recyclable. Operation is subject to the presence of Conformity Trade Name: SONY Model No.: DCR-PC1000 Responsible Party: Sony Electronics Inc. The number below is intended to alert the user to the following two conditions: (1) This device may...
Operating Guide
Page 3
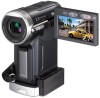
...DCR-PC1000 Serial No. Serial No. If this may cause a malfunction of your camcorder. "First Step Guide" for a digital device pursuant to Subpart B of Part 15 of FCC Rules. On using the supplied software (stored on use in your Sony...can radiate radio frequency energy and, if not installed and used in this manual could void your camcorder to another device with , (p. 108). AC- CAUTION You are located...turning the equipment off and on the bottom. However, there is supplied with the Handycam Station Model DCRA-C140 and AC Power Adaptor Model AC-L200. Connect the equipment...
...DCR-PC1000 Serial No. Serial No. If this may cause a malfunction of your camcorder. "First Step Guide" for a digital device pursuant to Subpart B of Part 15 of FCC Rules. On using the supplied software (stored on use in your Sony...can radiate radio frequency energy and, if not installed and used in this manual could void your camcorder to another device with , (p. 108). AC- CAUTION You are located...turning the equipment off and on the bottom. However, there is supplied with the Handycam Station Model DCRA-C140 and AC Power Adaptor Model AC-L200. Connect the equipment...
Operating Guide
Page 4
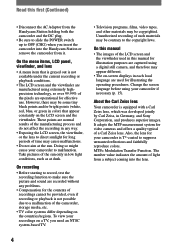
... with a Carl Zeiss lens, which was developed jointly by Carl Zeiss, in Germany, and Sony Corporation, and produces superior images. Read this manual for illustration purposes are captured using your camcorder if necessary (p. 15). These points are used in any problems. • Compensation for video...64257;nder. To view your recordings on a TV, you insert the camcorder into the Handycam Station or remove the camcorder from a subject coming into the lens. 4 About the Carl Zeiss lens Your camcorder is not possible due to malfunction. The number value indicates the amount ...
... with a Carl Zeiss lens, which was developed jointly by Carl Zeiss, in Germany, and Sony Corporation, and produces superior images. Read this manual for illustration purposes are captured using your camcorder if necessary (p. 15). These points are used in any problems. • Compensation for video...64257;nder. To view your recordings on a TV, you insert the camcorder into the Handycam Station or remove the camcorder from a subject coming into the lens. 4 About the Carl Zeiss lens Your camcorder is not possible due to malfunction. The number value indicates the amount ...
Operating Guide
Page 5
... 8 Step 2: Charging the battery pack 9 Step 3: Turning the power on and holding your camcorder firmly ...........13 Step 4: Adjusting the LCD panel and viewfinder 14 Step 5: ...(16:9 or 4:3) of the recording picture ...19 Recording/Playback Recording/Playback with ease (Easy Handycam 20 Recording 22 Playback 23 Functions used for recording/playback, etc 24 Recording To use zoom Controlling the settings... with the CAM CTRL dial/ MANUAL button (Assignable dial) To record sound with more presence (4CH MIC recording) To use...
... 8 Step 2: Charging the battery pack 9 Step 3: Turning the power on and holding your camcorder firmly ...........13 Step 4: Adjusting the LCD panel and viewfinder 14 Step 5: ...(16:9 or 4:3) of the recording picture ...19 Recording/Playback Recording/Playback with ease (Easy Handycam 20 Recording 22 Playback 23 Functions used for recording/playback, etc 24 Recording To use zoom Controlling the settings... with the CAM CTRL dial/ MANUAL button (Assignable dial) To record sound with more presence (4CH MIC recording) To use...

Operating Guide
Page 6
...additional functions on a TV 34 Using the Menu Using the menu items 36 Menu items 38 CAMERA SET menu 40 Settings to adjust your camcorder to a recorded tape 67 6 Indicators displayed during recording/playback 28 Searching for the starting point 31 Searching for the last scene of ...the most recent recording (END SEARCH) ...31 Searching manually (EDIT SEARCH 31 Reviewing the most recently recorded scenes (Rec review 31 Remote Commander 32 Searching quickly for a desired scene (Zero set ...
...additional functions on a TV 34 Using the Menu Using the menu items 36 Menu items 38 CAMERA SET menu 40 Settings to adjust your camcorder to a recorded tape 67 6 Indicators displayed during recording/playback 28 Searching for the starting point 31 Searching for the last scene of ...the most recent recording (END SEARCH) ...31 Searching manually (EDIT SEARCH 31 Reviewing the most recently recorded scenes (Rec review 31 Remote Commander 32 Searching quickly for a desired scene (Zero set ...
Operating Guide
Page 8
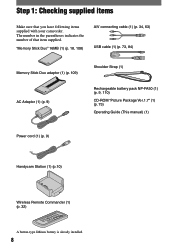
... your camcorder. Step 1: Checking supplied items Make sure that item supplied. "Memory Stick Duo" 16MB (1) (p. 18, 108) A/V connecting cable (1) (p. 34, 63) USB cable (1) (p. 73, 84) Memory Stick Duo adaptor (1) (p. 109) AC Adaptor (1) (p. 9) Shoulder Strap (1) Rechargeable battery pack NP-FA50 (1) (p. 9, 110) CD-ROM "Picture Package Ver.1.7" (1) (p. 73) Operating Guide (This manual) (1) Power cord (1) (p. 9) Handycam...
... your camcorder. Step 1: Checking supplied items Make sure that item supplied. "Memory Stick Duo" 16MB (1) (p. 18, 108) A/V connecting cable (1) (p. 34, 63) USB cable (1) (p. 73, 84) Memory Stick Duo adaptor (1) (p. 109) AC Adaptor (1) (p. 9) Shoulder Strap (1) Rechargeable battery pack NP-FA50 (1) (p. 9, 110) CD-ROM "Picture Package Ver.1.7" (1) (p. 73) Operating Guide (This manual) (1) Power cord (1) (p. 9) Handycam...
Operating Guide
Page 14
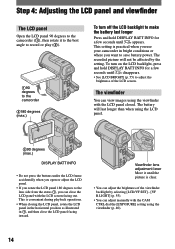
...you want to save battery power. The battery will not be affected by selecting [LCD/VF SET] - [VF B.LIGHT] (p. 55). • You can adjust manually with the CAM CTRL dial the [EXPOSURE] setting using the viewfinder (p. 40). 14 Viewfinder lens adjustment lever Move it to the... [LCD BRIGHT] (p. 55) to adjust the brightness of the viewfinder backlight by the setting. This setting is practical when you use your camcorder in , and then close the LCD panel with the LCD panel closed. This is convenient during playback operations. • When closing the LCD ...
...you want to save battery power. The battery will not be affected by selecting [LCD/VF SET] - [VF B.LIGHT] (p. 55). • You can adjust manually with the CAM CTRL dial the [EXPOSURE] setting using the viewfinder (p. 40). 14 Viewfinder lens adjustment lever Move it to the... [LCD BRIGHT] (p. 55) to adjust the brightness of the viewfinder backlight by the setting. This setting is practical when you use your camcorder in , and then close the LCD panel with the LCD panel closed. This is convenient during playback operations. • When closing the LCD ...
Operating Guide
Page 15
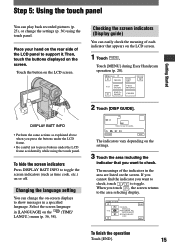
... buttons under the LCD frame. • Be careful not to toggle. Touch [MENU] during Easy Handycam operation (p. 20). 6 0 min MENU DIAL SET 0:00:00 1/3 DISP GUIDE EXPOSURE TELE MACRO FADER 2 Touch [DISP GUIDE]. DISP GUIDE 1/2 FOCUS: MANUAL PROGRAM AE: SPOTLIGHT STEADYSHOT: OFF END To finish the operation Touch [END]. 15 DISP...
... buttons under the LCD frame. • Be careful not to toggle. Touch [MENU] during Easy Handycam operation (p. 20). 6 0 min MENU DIAL SET 0:00:00 1/3 DISP GUIDE EXPOSURE TELE MACRO FADER 2 Touch [DISP GUIDE]. DISP GUIDE 1/2 FOCUS: MANUAL PROGRAM AE: SPOTLIGHT STEADYSHOT: OFF END To finish the operation Touch [END]. 15 DISP...
Operating Guide
Page 21
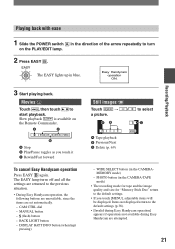
Playing back with ease 1 Slide the POWER switch in the direction of the arrow repeatedly to turn on the Remote Commander. MANUAL button - (flash) button - BACK LIGHT button - PHOTO button (in the CAMERA-TAPE mode) • The recording mode for tape and ... Previous/Next Delete (p. 69) / to the default settings. • If you touch it Rewind/Fast forward To cancel Easy Handycam operation Press EASY again. The EASY lamp turns off and all the settings are returned to the default settings (p.38). • [Invalid during Easy...
Playing back with ease 1 Slide the POWER switch in the direction of the arrow repeatedly to turn on the Remote Commander. MANUAL button - (flash) button - BACK LIGHT button - PHOTO button (in the CAMERA-TAPE mode) • The recording mode for tape and ... Previous/Next Delete (p. 69) / to the default settings. • If you touch it Rewind/Fast forward To cancel Easy Handycam operation Press EASY again. The EASY lamp turns off and all the settings are returned to the default settings (p.38). • [Invalid during Easy...
Operating Guide
Page 24
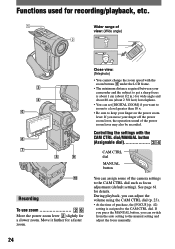
... sure to the CAM CTRL dial. Controlling the settings with the zoom buttons under the LCD frame. • The minimum distance required between your camcorder and the subject to get a sharp focus is assigned to keep your finger off the power zoom lever, the operation sound of view: (Wide... 1 cm (about 1/2 in.) for wide angle and about 80 cm (about 2 5/8 feet) for telephoto. • You can assign some of the camera settings to the manual setting and adjust the focus manually. 24 Close view: (Telephoto) • You cannot change the zoom speed with the CAM CTRL dial...
... sure to the CAM CTRL dial. Controlling the settings with the zoom buttons under the LCD frame. • The minimum distance required between your camcorder and the subject to get a sharp focus is assigned to keep your finger off the power zoom lever, the operation sound of view: (Wide... 1 cm (about 1/2 in.) for wide angle and about 80 cm (about 2 5/8 feet) for telephoto. • You can assign some of the camera settings to the manual setting and adjust the focus manually. 24 Close view: (Telephoto) • You cannot change the zoom speed with the CAM CTRL dial...
Operating Guide
Page 30
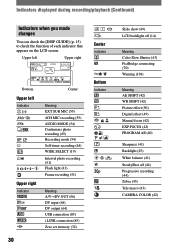
... off (14) Meaning Color Slow Shutter (43) PictBridge connecting (70) Warning (101) Meaning AE SHIFT (42) WB SHIFT (42) Picture effect (50) Digital effect (49) Manual focus (42) EXP.FOCUS (42) PROGRAM AE (40) Sharpness (41) Backlight (25) White balance (41) SteadyShot off (44) Progressive recording (44) Zebra (43) Tele macro...
... off (14) Meaning Color Slow Shutter (43) PictBridge connecting (70) Warning (101) Meaning AE SHIFT (42) WB SHIFT (42) Picture effect (50) Digital effect (49) Manual focus (42) EXP.FOCUS (42) PROGRAM AE (40) Sharpness (41) Backlight (25) White balance (41) SteadyShot off (44) Progressive recording (44) Zebra (43) Tele macro...
Operating Guide
Page 31
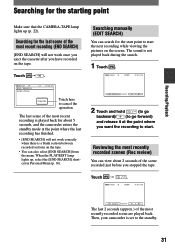
.../Playback Searching for the last scene of the most recently recorded scene are played back. The sound is set to the standby. 31 Then, your camcorder is not played back during the search. 1 Touch . 6 0 min STBY 0:00:00 EDIT 2 Touch and hold (to go backward)/ (to start the ... (END SEARCH) [END SEARCH] will not work once you eject the cassette after you stopped the tape. Searching manually (EDIT SEARCH) You can view about 5 seconds, and the camcorder enters the standby mode at the point where you want the recording to go forward) and release it at the ...
.../Playback Searching for the last scene of the most recently recorded scene are played back. The sound is set to the standby. 31 Then, your camcorder is not played back during the search. 1 Touch . 6 0 min STBY 0:00:00 EDIT 2 Touch and hold (to go backward)/ (to start the ... (END SEARCH) [END SEARCH] will not work once you eject the cassette after you stopped the tape. Searching manually (EDIT SEARCH) You can view about 5 seconds, and the camcorder enters the standby mode at the point where you want the recording to go forward) and release it at the ...
Operating Guide
Page 34
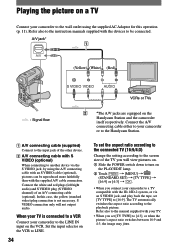
The TV automatically switches the aspect ratio according to turn on the Handycam Station and the camcorder itself respectively. When your TV is not necessary. Refer also to the manual supplied with S VIDEO (optional) When connecting to another device via an S VIDEO jack, and play back the tape... of an A/V connecting cable (optional). Playing the picture on the VCR. Connect the A/V connecting cable either to your camcorder or to the Handycam Station. A/V connecting cable (supplied) Connect to the input jack of the other device. A/V connecting cable with your...
The TV automatically switches the aspect ratio according to turn on the Handycam Station and the camcorder itself respectively. When your TV is not necessary. Refer also to the manual supplied with S VIDEO (optional) When connecting to another device via an S VIDEO jack, and play back the tape... of an A/V connecting cable (optional). Playing the picture on the VCR. Connect the A/V connecting cable either to your camcorder or to the Handycam Station. A/V connecting cable (supplied) Connect to the input jack of the other device. A/V connecting cable with your...
Operating Guide
Page 40
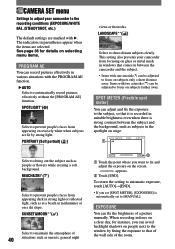
...AUTO][END]. • If you want to fix and adjust the exposure on a ski slope. This setting also prevents your camcorder to the recording conditions (EXPOSURE/WHITE BAL./STEADYSHOT, etc.) The default settings are selected. When recording indoors on a clear day, for ... on subjects farther away. LANDSCAPE**( ) Select to shoot distant subjects clearly. SUNSET&MOON**( ) Select to maintain the atmosphere of a picture manually. BEACH&SKI*( ) Select to prevent people's faces from appearing excessively white when subjects are lit by fixing the exposure to that ...
...AUTO][END]. • If you want to fix and adjust the exposure on a ski slope. This setting also prevents your camcorder to the recording conditions (EXPOSURE/WHITE BAL./STEADYSHOT, etc.) The default settings are selected. When recording indoors on a clear day, for ... on subjects farther away. LANDSCAPE**( ) Select to shoot distant subjects clearly. SUNSET&MOON**( ) Select to maintain the atmosphere of a picture manually. BEACH&SKI*( ) Select to prevent people's faces from appearing excessively white when subjects are lit by fixing the exposure to that ...
Operating Guide
Page 41
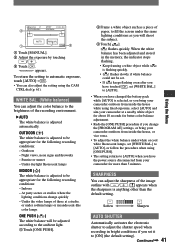
...party scenes or studios where the lighting conditions change the [PROGRAM AE] settings, or bring your camcorder outdoors from your camcorder for the following recording conditions: - appears. Outdoors - Sunrise or sunset - Night views, ...neon signs and fireworks - Indoors - Under the video lamps of those at a nearby white object for about 10 seconds for the following recording conditions: - Continued 41 Using the Menu 2 1 3 Touch [MANUAL...
...party scenes or studios where the lighting conditions change the [PROGRAM AE] settings, or bring your camcorder outdoors from your camcorder for the following recording conditions: - appears. Outdoors - Sunrise or sunset - Night views, ...neon signs and fireworks - Indoors - Under the video lamps of those at a nearby white object for about 10 seconds for the following recording conditions: - Continued 41 Using the Menu 2 1 3 Touch [MANUAL...
Operating Guide
Page 42
... screen to sharpen the focus. FOCUS You can adjust the color intensity with /. When you want to focus on a certain subject intentionally. Touch [MANUAL]. appears. Touch (focusing on close range, move the power zoom lever to W (wide angle), then adjust the focus. • ...The minimum distance required between your camcorder and the subject to get a sharp focus is about 1 cm (about 1/2 in.) for wide angle and about 80 cm (about 2 5/8 feet) for recording...
... screen to sharpen the focus. FOCUS You can adjust the color intensity with /. When you want to focus on a certain subject intentionally. Touch [MANUAL]. appears. Touch (focusing on close range, move the power zoom lever to W (wide angle), then adjust the focus. • ...The minimum distance required between your camcorder and the subject to get a sharp focus is about 1 cm (about 1/2 in.) for wide angle and about 80 cm (about 2 5/8 feet) for recording...
Operating Guide
Page 43
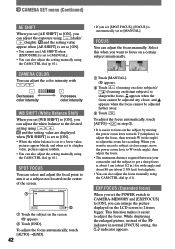
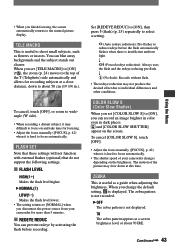
...recorded. OFF The zebra pattern is hard to the top of your camcorder for recording subjects at this time. and [COLOR SLOW SHUTTER] appear on and take time for focusing. • Adjust the focus manually ([FOCUS], p. 42) when it is not displayed. 70 The zebra pattern ...appears at a screen brightness level of the picture may not produce the desired effect due to the normal picture display. When you disconnect the power source from your camcorder changes depending on the...
...recorded. OFF The zebra pattern is hard to the top of your camcorder for recording subjects at this time. and [COLOR SLOW SHUTTER] appear on and take time for focusing. • Adjust the focus manually ([FOCUS], p. 42) when it is not displayed. 70 The zebra pattern ...appears at a screen brightness level of the picture may not produce the desired effect due to the normal picture display. When you disconnect the power source from your camcorder changes depending on the...
Operating Guide
Page 45
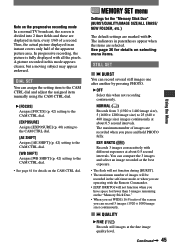
... when you are marked with all the pixels. EXP. You can assign the setting item to the CAM CTRL dial and adjust the assigned item manually using the CAM CTRL dial. [FOCUS] Assigns [FOCUS] (p. 42) setting to the CAM CTRL dial. [EXPOSURE] Assigns [EXPOSURE] (p. 40) setting to the CAM CTRL...
... when you are marked with all the pixels. EXP. You can assign the setting item to the CAM CTRL dial and adjust the assigned item manually using the CAM CTRL dial. [FOCUS] Assigns [FOCUS] (p. 42) setting to the CAM CTRL dial. [EXPOSURE] Assigns [EXPOSURE] (p. 40) setting to the CAM CTRL...
Operating Guide
Page 50
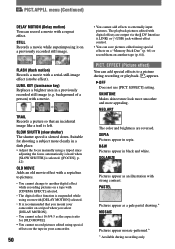
... to another tape (p. 64). PASTEL Pictures appear as an illustration with a repeat effect. LUMI. TRAIL Records a picture so that you mount your camcorder. 50 • You cannot add effects to externally input pictures. PICT. appears. OFF Does not use [PICT. PICT.APPLI. FLASH ...SLOW SHUTTR] is recommended that an incidental image like a trail is slowed down. B&W Pictures appear in a dark place. • Adjust the focus manually using zoom with [DELAY MOTION] selected. • It is selected. ([FOCUS], p. 42) OLD MOVIE Adds an old movie effect with digital ...
... to another tape (p. 64). PASTEL Pictures appear as an illustration with a repeat effect. LUMI. TRAIL Records a picture so that you mount your camcorder. 50 • You cannot add effects to externally input pictures. PICT. appears. OFF Does not use [PICT. PICT.APPLI. FLASH ...SLOW SHUTTR] is recommended that an incidental image like a trail is slowed down. B&W Pictures appear in a dark place. • Adjust the focus manually using zoom with [DELAY MOTION] selected. • It is selected. ([FOCUS], p. 42) OLD MOVIE Adds an old movie effect with digital ...

Operating Guide
Page 51
... Touch [ON Press REC START/STOP. To interrupt, touch [REC STOP] in the interval. • If you adjust the focus manually, you cannot select [SKINTONE]. Using the Menu • While using the back light function, you can record clear pictures even if the light ... released when approximately 12 hours have elapsed after performing the END SEARCH function depending on another tape (p. 64). Continued 51 Operate your camcorder enters the standby mode. Move the subject and repeat step . • The remaining tape time will not be discrepancies in...
... Touch [ON Press REC START/STOP. To interrupt, touch [REC STOP] in the interval. • If you adjust the focus manually, you cannot select [SKINTONE]. Using the Menu • While using the back light function, you can record clear pictures even if the light ... released when approximately 12 hours have elapsed after performing the END SEARCH function depending on another tape (p. 64). Continued 51 Operate your camcorder enters the standby mode. Move the subject and repeat step . • The remaining tape time will not be discrepancies in...


