
Operating Instructions
Page 1
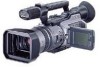
Model No. DCR-VX2100 Model No. AC- Serial No. DCR-VX2100 ©2003 Sony Corporation 3-087-414-11 (1) Digital Video Camera Recorder Operating Instructions Before operating the unit, please read this product. Refer to these numbers whenever you call upon your Sony dealer regarding this manual thoroughly, and retain it for future reference. Serial No. Record the serial number in the space provided below. Owner's Record The model and serial numbers are located on the bottom.
Model No. DCR-VX2100 Model No. AC- Serial No. DCR-VX2100 ©2003 Sony Corporation 3-087-414-11 (1) Digital Video Camera Recorder Operating Instructions Before operating the unit, please read this product. Refer to these numbers whenever you call upon your Sony dealer regarding this manual thoroughly, and retain it for future reference. Serial No. Record the serial number in the space provided below. Owner's Record The model and serial numbers are located on the bottom.

Operating Instructions
Page 7
...a car parked in any way. •Do not directly shoot the sun. Keep your camcorder to malfunction. Doing so might cause your camcorder away from rain and sea water. Take pictures of the camcorder, video tape, etc. 7 Sometimes this manual Note on a TV, you need an NTSC system-...the recording in the sun or under direct sunlight [b]. •Be careful when placing the camera near a window or outdoors. Getting Started Using this malfunction cannot be repaired [a]. •Never leave your camcorder exposed to temperatures above 60 °C (140 °F), such as dusk. •Do...
...a car parked in any way. •Do not directly shoot the sun. Keep your camcorder to malfunction. Doing so might cause your camcorder away from rain and sea water. Take pictures of the camcorder, video tape, etc. 7 Sometimes this manual Note on a TV, you need an NTSC system-...the recording in the sun or under direct sunlight [b]. •Be careful when placing the camera near a window or outdoors. Getting Started Using this malfunction cannot be repaired [a]. •Never leave your camcorder exposed to temperatures above 60 °C (140 °F), such as dusk. •Do...
Operating Instructions
Page 27
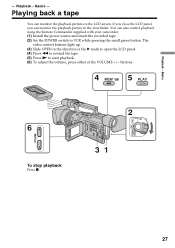
buttons . 4 REW 5 PLAY VOLUME 6 To stop playback Press x. 2 POWER 31 MEMORY OFF CAMERA (CHG) VCR 27 The video control buttons light up. (3) Slide OPEN in the viewfinder. Basics - Playing back a tape You can monitor the playback picture in the direction of the VOLUME ... the LCD panel, you can monitor the playback picture on the LCD screen. You can also control playback using the Remote Commander supplied with your camcorder. (1) Install the power source and insert the recorded tape. (2) Set the POWER switch to start playback. (6) To adjust the volume, press either of the B...
buttons . 4 REW 5 PLAY VOLUME 6 To stop playback Press x. 2 POWER 31 MEMORY OFF CAMERA (CHG) VCR 27 The video control buttons light up. (3) Slide OPEN in the viewfinder. Basics - Playing back a tape You can monitor the playback picture in the direction of the VOLUME ... the LCD panel, you can monitor the playback picture on the LCD screen. You can also control playback using the Remote Commander supplied with your camcorder. (1) Install the power source and insert the recorded tape. (2) Set the POWER switch to start playback. (6) To adjust the volume, press either of the B...

Operating Instructions
Page 32
...lightly. The sound during tape photo recording. While the digital effect function is useful when you do tape photo recording using a video printer (optional). The recorded image may be blurred. When you print images using the Remote Commander Press PHOTO on tapes with ...viewfinder. This is recorded for about seven seconds and your camcorder can record still images on the Remote Commander. Besides the operation described here, your camcorder returns to standby mode. To do tape photo recording during normal CAMERA recording You cannot check an image on a 60minute cassette...
...lightly. The sound during tape photo recording. While the digital effect function is useful when you do tape photo recording using a video printer (optional). The recorded image may be blurred. When you print images using the Remote Commander Press PHOTO on tapes with ...viewfinder. This is recorded for about seven seconds and your camcorder can record still images on the Remote Commander. Besides the operation described here, your camcorder returns to standby mode. To do tape photo recording during normal CAMERA recording You cannot check an image on a 60minute cassette...

Operating Instructions
Page 47
...or in the viewfinder. When ND OFF flashes on the LCD screen or in the viewfinder The ND filter is necessary. If you use the video flash light (optional) Set the ND FILTER selector to OFF when you can record a picture clearly by adjusting light amounts, even if you ... under too bright conditions. This phenomenon is now deactivated. When ND 2 flashes, set the ND FILTER selector to 1/32 of the quantity of a video camera recorder. We recommend that the indicator disappears from the LCD or viewfinder screen. The ND filter is quite common with manual adjustment Using the ND...
...or in the viewfinder. When ND OFF flashes on the LCD screen or in the viewfinder The ND filter is necessary. If you use the video flash light (optional) Set the ND FILTER selector to OFF when you can record a picture clearly by adjusting light amounts, even if you ... under too bright conditions. This phenomenon is now deactivated. When ND 2 flashes, set the ND FILTER selector to 1/32 of the quantity of a video camera recorder. We recommend that the indicator disappears from the LCD or viewfinder screen. The ND filter is quite common with manual adjustment Using the ND...
Operating Instructions
Page 51
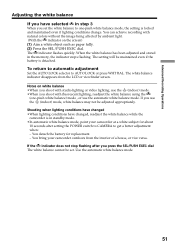
...setting is locked and maintained even if lighting conditions change. If the indicator does not stop flashing after setting the POWER switch to CAMERA to get a better adjustment when: - When the white balance has been adjusted and stored in the memory, the indicator stops ...mode. 51 The indicator flashes quickly. You can achieve recording with studio lighting or video lighting, use the n (indoor) mode, white balance may not be adjusted appropriately. If you set . You bring your camcorder at a white subject for replacement. - The white balance indicator disappears from the ...
...setting is locked and maintained even if lighting conditions change. If the indicator does not stop flashing after setting the POWER switch to CAMERA to get a better adjustment when: - When the white balance has been adjusted and stored in the memory, the indicator stops ...mode. 51 The indicator flashes quickly. You can achieve recording with studio lighting or video lighting, use the n (indoor) mode, white balance may not be adjusted appropriately. If you set . You bring your camcorder at a white subject for replacement. - The white balance indicator disappears from the ...

Operating Instructions
Page 77
...by infrared rays emitter To edit using the A/V cable, this procedure is required. (1) Set the POWER switch to select the IR SETUP code of your camcorder. (2) Turn the power of the connected VCR on the VCR. Set the IR SETUP code (8) Turn the SEL/PUSH EXEC dial to select IR SETUP... dial. (7) Turn the SEL/PUSH EXEC dial to LINE. See "About the IR SETUP code " on your VCR, then press the dial. When you connect a video camera recorder, set the input selector to select IR, then press the dial. L I NK [MENU] : END OTHERS ED I T SET CONTROL ADJ TEST "CUT-I N" "CUT-OUT" I R SETUP...
...by infrared rays emitter To edit using the A/V cable, this procedure is required. (1) Set the POWER switch to select the IR SETUP code of your camcorder. (2) Turn the power of the connected VCR on the VCR. Set the IR SETUP code (8) Turn the SEL/PUSH EXEC dial to select IR SETUP... dial. (7) Turn the SEL/PUSH EXEC dial to LINE. See "About the IR SETUP code " on your VCR, then press the dial. When you connect a video camera recorder, set the input selector to select IR, then press the dial. L I NK [MENU] : END OTHERS ED I T SET CONTROL ADJ TEST "CUT-I N" "CUT-OUT" I R SETUP...
Operating Instructions
Page 81
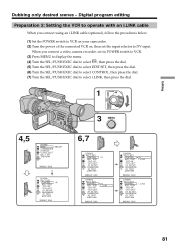
When you connect using an i.LINK cable (optional), follow the procedures below. (1) Set the POWER switch to VCR on your camcorder. (2) Turn the power of the connected VCR on, then set its POWER switch to VCR. (3) Press MENU to display the menu.... RETURN I R i . Digital program editing Preparation 2: Setting the VCR to operate with an i.LINK cable When you connect a video camera recorder, set the input selector to select i.LINK, then press the dial. 1 VCR POWER MEMORY OFF CAMERA (CHG) 4,5 OTHERS BEEP MELODY COMMANDER D I SPLAY V I DEO ED I T ED I T SET RETURN [MENU] : END ...
When you connect using an i.LINK cable (optional), follow the procedures below. (1) Set the POWER switch to VCR on your camcorder. (2) Turn the power of the connected VCR on, then set its POWER switch to VCR. (3) Press MENU to display the menu.... RETURN I R i . Digital program editing Preparation 2: Setting the VCR to operate with an i.LINK cable When you connect a video camera recorder, set the input selector to select i.LINK, then press the dial. 1 VCR POWER MEMORY OFF CAMERA (CHG) 4,5 OTHERS BEEP MELODY COMMANDER D I SPLAY V I DEO ED I T ED I T SET RETURN [MENU] : END ...
Operating Instructions
Page 87
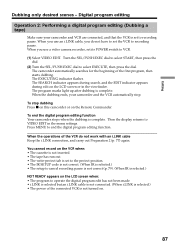
...: • The program to recording pause. The EXECUTING indicator flashes. Then the display returns to VCR. (1) Select VIDEO EDIT. When the dubbing ends, your camcorder and VCR are connected, and that the VCR is complete. Press MENU to select EXECUTE, then press the dial.... you use an i.LINK cable, you use a video camera recorder, set to recording pause. Digital program editing Operation 2: Performing a digital program editing (Dubbing a tape) Make sure your camcorder and the VCR automatically stop dubbing Press x on this camcorder or on the LCD screen or in the menu ...
...: • The program to recording pause. The EXECUTING indicator flashes. Then the display returns to VCR. (1) Select VIDEO EDIT. When the dubbing ends, your camcorder and VCR are connected, and that the VCR is complete. Press MENU to select EXECUTE, then press the dial.... you use an i.LINK cable, you use a video camera recorder, set to recording pause. Digital program editing Operation 2: Performing a digital program editing (Dubbing a tape) Make sure your camcorder and the VCR automatically stop dubbing Press x on this camcorder or on the LCD screen or in the menu ...

Operating Instructions
Page 115
...LAMP z ON To light up the camera recording lamps at CAMERA the front and rear of the camcorder may reflect on the TV or VCR (except using an i.LINK cable). COLOR BAR z OFF Does not display the color bar. VIDEO EDIT To make programs and perform video editing (p. 84). When recording a ...Icon/item Mode Meaning POWER switch BEEP z MELODY NORMAL To chime a melody in the following situations: MEMORY When you press DISPLAY with your camcorder. CAMERA To beep in normal operations, VCR and beep a warning sound for dubbing in the menu settings, the picture from a TV or VCR will...
...LAMP z ON To light up the camera recording lamps at CAMERA the front and rear of the camcorder may reflect on the TV or VCR (except using an i.LINK cable). COLOR BAR z OFF Does not display the color bar. VIDEO EDIT To make programs and perform video editing (p. 84). When recording a ...Icon/item Mode Meaning POWER switch BEEP z MELODY NORMAL To chime a melody in the following situations: MEMORY When you press DISPLAY with your camcorder. CAMERA To beep in normal operations, VCR and beep a warning sound for dubbing in the menu settings, the picture from a TV or VCR will...

Operating Instructions
Page 124
...Memory Photo recording Note on the LCD screen or in the viewfinder. (3) Press PHOTO deeply. PHOTO 3 PHOTO 1 2 POWER MEMORY VCR OFF CAMERA (CHG) To cancel self-timer recording Press (self-timer) so that the LOCK switch is finished. - You cannot cancel the self-timer recording using... a video flash light (optional) The video flash light does not work in standby mode. Make sure that the indicator disappears from 10 with the self-timer. Recording still...
...Memory Photo recording Note on the LCD screen or in the viewfinder. (3) Press PHOTO deeply. PHOTO 3 PHOTO 1 2 POWER MEMORY VCR OFF CAMERA (CHG) To cancel self-timer recording Press (self-timer) so that the LOCK switch is finished. - You cannot cancel the self-timer recording using... a video flash light (optional) The video flash light does not work in standby mode. Make sure that the indicator disappears from 10 with the self-timer. Recording still...

Operating Instructions
Page 136
...recording and a "Memory Stick" for playback into your camcorder. Copying an image recorded on a "Memory Stick" to tapes You can copy still images or titles recorded on your camcorder. (1) Set the POWER switch to VCR. (2) Using the video control buttons, search for the point where you have... more to copy, repeat steps 4 and 5. 1 VCR POWER MEMORY OFF CAMERA (CHG) 3 REC 4 PLAY 2 136 5 PAUSE To stop...
...recording and a "Memory Stick" for playback into your camcorder. Copying an image recorded on a "Memory Stick" to tapes You can copy still images or titles recorded on your camcorder. (1) Set the POWER switch to VCR. (2) Using the video control buttons, search for the point where you have... more to copy, repeat steps 4 and 5. 1 VCR POWER MEMORY OFF CAMERA (CHG) 3 REC 4 PLAY 2 136 5 PAUSE To stop...
Operating Instructions
Page 144
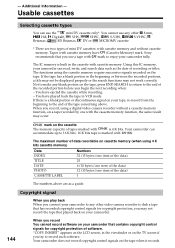
- Additional Information - Tapes with cassette memory have ejected the cassette while recording. - Sony recommends that contains copyright control signals for copyright protection of tapes marked with mark to record such software. Not to make any blank...COPY INHIBIT" appears on the LCD screen, in the cassette with cassette memory and without a cassette memory function, on your camcorder fully. Using this IC memory, your camcorder to any other video camera recorder to the end of recording or titles. mark on the TV screen if you begin the next recording when: - Your...
- Additional Information - Tapes with cassette memory have ejected the cassette while recording. - Sony recommends that contains copyright control signals for copyright protection of tapes marked with mark to record such software. Not to make any blank...COPY INHIBIT" appears on the LCD screen, in the cassette with cassette memory and without a cassette memory function, on your camcorder fully. Using this IC memory, your camcorder to any other video camera recorder to the end of recording or titles. mark on the TV screen if you begin the next recording when: - Your...

Operating Instructions
Page 149
...light. c Set it to AUTO LOCK, or cancel the manual adjustment. (p. 44) In the playback mode Symptom The tape does not move when a video control button is no cassette memory. c Use a tape with cassette memory. (p. 67, 144) • CM SEARCH is not bright even if you... set the POWER switch to CAMERA or DEMO MODE is set to 1 or 2. The image is set to OFF in the menu settings without a cassette inserted, your camcorder automatically starts the demonstration. The demonstration stops. c Clean the heads using the Sony DVM12CL cleaning cassette (optional). (p. 159) &#...
...light. c Set it to AUTO LOCK, or cancel the manual adjustment. (p. 44) In the playback mode Symptom The tape does not move when a video control button is no cassette memory. c Use a tape with cassette memory. (p. 67, 144) • CM SEARCH is not bright even if you... set the POWER switch to CAMERA or DEMO MODE is set to 1 or 2. The image is set to OFF in the menu settings without a cassette inserted, your camcorder automatically starts the demonstration. The demonstration stops. c Clean the heads using the Sony DVM12CL cleaning cassette (optional). (p. 159) &#...
Operating Instructions
Page 163
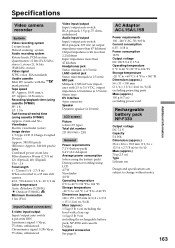
Specifications Video camera recorder System Video recording system 2 rotary heads Helical scanning system Audio recording system Rotary heads, PCM system Quantization: 12 bits (Fs 32 kHz, stereo 1, stereo 2), 16 bits (Fs48 kHz, stereo) Video signal NTSC color, EIA standards Usable cassette... Adaptor) Average power consumption (when using the battery pack) During camera recording using cassette DVM60) Approx. 2 min and 30 s Viewfinder Electric viewfinder (color) Image device 1/3 type CCD (3 Charge Coupled Device) Approx. 380 000 pixels (Effective: Approx. 340 000 pixels) Lens Combined power...
Specifications Video camera recorder System Video recording system 2 rotary heads Helical scanning system Audio recording system Rotary heads, PCM system Quantization: 12 bits (Fs 32 kHz, stereo 1, stereo 2), 16 bits (Fs48 kHz, stereo) Video signal NTSC color, EIA standards Usable cassette... Adaptor) Average power consumption (when using the battery pack) During camera recording using cassette DVM60) Approx. 2 min and 30 s Viewfinder Electric viewfinder (color) Image device 1/3 type CCD (3 Charge Coupled Device) Approx. 380 000 pixels (Effective: Approx. 340 000 pixels) Lens Combined power...

Operating Instructions
Page 166
Camera recording lamp (p. 16) ra REC START/STOP button (p. 19) rs Lens rd Hood with a lens cap (p. 167) rf Lens hood fixing screw 166 ek Handle ... START/STOP button (p. 19) el Remote sensor/infrared ray emitter r; ra rs rd rf eg Handle zoom lever (p. 21) eh Handle zoom switch (p. 21) ej Video control buttons (p. 27, 30, 85) C SLOW (slow playback) AUDIO DUB (dubbing) x STOP (stop) m REW (rewind) N PLAY (playback) M FF (Fast-forward) X PAUSE (pause) z REC (recording) The...
Camera recording lamp (p. 16) ra REC START/STOP button (p. 19) rs Lens rd Hood with a lens cap (p. 167) rf Lens hood fixing screw 166 ek Handle ... START/STOP button (p. 19) el Remote sensor/infrared ray emitter r; ra rs rd rf eg Handle zoom lever (p. 21) eh Handle zoom switch (p. 21) ej Video control buttons (p. 27, 30, 85) C SLOW (slow playback) AUDIO DUB (dubbing) x STOP (stop) m REW (rewind) N PLAY (playback) M FF (Fast-forward) X PAUSE (pause) z REC (recording) The...

Operating Instructions
Page 169
... as an audio input jack for controlling the tape transport of Sony Corporation and indicates that the length of the tripod screw is in -power" microphone connected, and is yf Carrying handle yg Remote sensor yh Camera recording lamp (p. 16) yj CUSTOM PRESET button (p. 54) ...yk Viewfinder adjustment lever (p. 20) yl Hook for Local Application Control Bus System. is i (headphones) jack When you cannot attach the tripod securely and the screw may damage your camcorder is i.LINK compatible. uh Microphone (p. 96) uj S VIDEO ...
... as an audio input jack for controlling the tape transport of Sony Corporation and indicates that the length of the tripod screw is in -power" microphone connected, and is yf Carrying handle yg Remote sensor yh Camera recording lamp (p. 16) yj CUSTOM PRESET button (p. 54) ...yk Viewfinder adjustment lever (p. 20) yl Hook for Local Application Control Bus System. is i (headphones) jack When you cannot attach the tripod securely and the screw may damage your camcorder is i.LINK compatible. uh Microphone (p. 96) uj S VIDEO ...

Operating Instructions
Page 174
... Audio dubbing 95 AUDIO LEVEL 52 AUDIO MIX 111 AUDIO MODE 113 AUTO SHTR 110 BACK LIGHT 23 Battery pack 9 BEEP 115 C, D Camera chromakey 125 Cassette memory 6, 144 Charging battery 10 Charging the built-in rechargeable battery ........ 160 Clock set 14 COLOR BAR 115 Connection (dubbing... Remaining battery time indicator 22 Remaining tape indicator .... 22 Remote Commander .......... 170 Remote control jack (LANC) 169 Remote sensor 166 RESET 153 S VIDEO jack 31, 74, 89 SEL/PUSH EXEC dial ....... 109 Self-diagnosis display ........ 154 Self-timer 25, 33, 124 Skip scan 30 Slide...
... Audio dubbing 95 AUDIO LEVEL 52 AUDIO MIX 111 AUDIO MODE 113 AUTO SHTR 110 BACK LIGHT 23 Battery pack 9 BEEP 115 C, D Camera chromakey 125 Cassette memory 6, 144 Charging battery 10 Charging the built-in rechargeable battery ........ 160 Clock set 14 COLOR BAR 115 Connection (dubbing... Remaining battery time indicator 22 Remaining tape indicator .... 22 Remote Commander .......... 170 Remote control jack (LANC) 169 Remote sensor 166 RESET 153 S VIDEO jack 31, 74, 89 SEL/PUSH EXEC dial ....... 109 Self-diagnosis display ........ 154 Self-timer 25, 33, 124 Skip scan 30 Slide...


