
Camera Operations Guide
Page 2
... shock hazard, do not expose the unit to the collection and recycling location nearest you. Read this first Before operating the unit, please read this manual thoroughly, and retain it for future reference. b Notice • If static electricity or electromagnetism causes data transfer to the presence of rechargeable batteries, call toll...
... shock hazard, do not expose the unit to the collection and recycling location nearest you. Read this first Before operating the unit, please read this manual thoroughly, and retain it for future reference. b Notice • If static electricity or electromagnetism causes data transfer to the presence of rechargeable batteries, call toll...
Camera Operations Guide
Page 3
.... For disposal or recycling information, please contact your camcorder. However, there may be some tiny black points and...which can be used in Digital8 system only on standard 8 mm and Hi8 , Digital8 video cassettes in accordance with...DCR-TRV480 Responsible Party: Sony Electronics Inc. b Notes: • This equipment has been tested and found to the copyright laws. For customers in a residential installation. Model No. Notes on use . To view your recordings on a TV, you have any changes or modifications not expressly approved in this manual could void your Sony...
.... For disposal or recycling information, please contact your camcorder. However, there may be some tiny black points and...which can be used in Digital8 system only on standard 8 mm and Hi8 , Digital8 video cassettes in accordance with...DCR-TRV480 Responsible Party: Sony Electronics Inc. b Notes: • This equipment has been tested and found to the copyright laws. For customers in a residential installation. Model No. Notes on use . To view your recordings on a TV, you have any changes or modifications not expressly approved in this manual could void your Sony...
Camera Operations Guide
Page 4
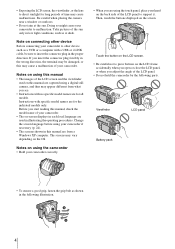
... used in the proper direction. Before you start reading this manual are from what you are used on connecting other device Before connecting your camcorder to other device such as shown in this manual, check the model name of your camcorder correctly. • When you see. • Instructions with... with a USB or i.LINK cable, be damaged, or this manual are for the indicated models only. The screens may be sure to press buttons on the back side of the LCD panel. • Do not hold the camcorder by the following illustration. 4 Notes on using the touch panel...
... used in the proper direction. Before you start reading this manual are from what you are used on connecting other device Before connecting your camcorder to other device such as shown in this manual, check the model name of your camcorder correctly. • When you see. • Instructions with... with a USB or i.LINK cable, be damaged, or this manual are for the indicated models only. The screens may be sure to press buttons on the back side of the LCD panel. • Do not hold the camcorder by the following illustration. 4 Notes on using the touch panel...
Camera Operations Guide
Page 6
... backlit subjects 37 Fixing the exposure for an off-center subject - Easy Handycam 54 Making full use of recording - Zero set memory 60 Searching for a scene by date of Easy Handycam operation 55 Various playback functions 56 Magnifying pictures - EDIT SEARCH 47 Reviewing ...a scene - MEMORY MIX 45 Searching for the starting point 47 Searching for a desired scene - Flexible spot meter 38 Adjusting the exposure manually 38 Recording in various modes 50 Viewing recordings with ease - FADER 42 Using special effects - Rec review 48 Playback Viewing movies recorded on...
... backlit subjects 37 Fixing the exposure for an off-center subject - Easy Handycam 54 Making full use of recording - Zero set memory 60 Searching for a scene by date of Easy Handycam operation 55 Various playback functions 56 Magnifying pictures - EDIT SEARCH 47 Reviewing ...a scene - MEMORY MIX 45 Searching for the starting point 47 Searching for a desired scene - Flexible spot meter 38 Adjusting the exposure manually 38 Recording in various modes 50 Viewing recordings with ease - FADER 42 Using special effects - Rec review 48 Playback Viewing movies recorded on...

Camera Operations Guide
Page 8
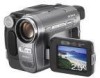
Troubleshooting Troubleshooting 118 Warning indicators and messages .......132 Additional Information Using your camcorder abroad 136 Usable cassette tapes 137 About the "Memory Stick 138 About the "InfoLITHIUM" battery pack 140 About i.LINK 141 Maintenance and precautions 142 Specification 145 Quick Reference Identifying parts and controls 148 Index 154 Two operating instructions are supplied with your camcorder: • Camera Operations Guide (This manual) • "First Step Guide" for using the supplied applications (included in the supplied CD-ROM) 8
Troubleshooting Troubleshooting 118 Warning indicators and messages .......132 Additional Information Using your camcorder abroad 136 Usable cassette tapes 137 About the "Memory Stick 138 About the "InfoLITHIUM" battery pack 140 About i.LINK 141 Maintenance and precautions 142 Specification 145 Quick Reference Identifying parts and controls 148 Index 154 Two operating instructions are supplied with your camcorder: • Camera Operations Guide (This manual) • "First Step Guide" for using the supplied applications (included in the supplied CD-ROM) 8
Camera Operations Guide
Page 15
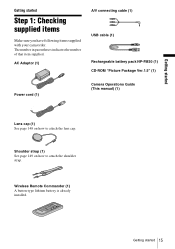
... is already installed. AC Adaptor (1) A/V connecting cable (1) USB cable (1) Rechargeable battery pack NP-FM30 (1) CD-ROM "Picture Package Ver.1.5" (1) Power cord (1) Camera Operations Guide (This manual) (1) Lens cap (1) See page 148 on how to attach the lens cap. Getting started Step 1: Checking supplied items Make sure you have following items supplied...
... is already installed. AC Adaptor (1) A/V connecting cable (1) USB cable (1) Rechargeable battery pack NP-FM30 (1) CD-ROM "Picture Package Ver.1.5" (1) Power cord (1) Camera Operations Guide (This manual) (1) Lens cap (1) See page 148 on how to attach the lens cap. Getting started Step 1: Checking supplied items Make sure you have following items supplied...
Camera Operations Guide
Page 37
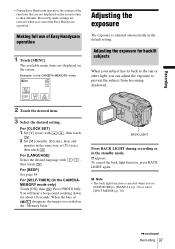
..., the image is adjusted automatically in the default setting. Recording • During Easy Handycam operation, the settings of the functions that are restored when you cancel the Easy Handycam operation. Previously made settings are not displayed on the screen return to their defaults....-TIMER] (In the CAMERAMEMORY mode only) Touch [ON], then . b Note • The back light function is canceled when you can adjust the exposure to [MANUAL] (p. 38) or select [SPOT METER] (p. 38). ,continued Recording 37 For [LANGUAGE] Select the desired language with / , then touch . 2 Set [M] ...
..., the image is adjusted automatically in the default setting. Recording • During Easy Handycam operation, the settings of the functions that are restored when you cancel the Easy Handycam operation. Previously made settings are not displayed on the screen return to their defaults....-TIMER] (In the CAMERAMEMORY mode only) Touch [ON], then . b Note • The back light function is canceled when you can adjust the exposure to [MANUAL] (p. 38) or select [SPOT METER] (p. 38). ,continued Recording 37 For [LANGUAGE] Select the desired language with / , then touch . 2 Set [M] ...

Camera Operations Guide
Page 38
...automatically set to automatic exposure Follow steps 1 and 2, then select [AUTO] in the standby mode. 2 Touch [EXPOSURE]. Adjusting the exposure manually You can adjust and fix the exposure to the subject, so that it is recorded in suitable brightness even when there is not displayed ... shadows on the screen, touch / . Color Slow Shutter function - Or set to [AUTO] (p. 38). 3 Touch [MANUAL]. 60min EXPOSURE: STBY 0:00:00 MANUAL AUTO MANUAL OK 38 Recording If the item is strong contrast between the subject and the background (such as subjects in the limelight on...
...automatically set to automatic exposure Follow steps 1 and 2, then select [AUTO] in the standby mode. 2 Touch [EXPOSURE]. Adjusting the exposure manually You can adjust and fix the exposure to the subject, so that it is recorded in suitable brightness even when there is not displayed ... shadows on the screen, touch / . Color Slow Shutter function - Or set to [AUTO] (p. 38). 3 Touch [MANUAL]. 60min EXPOSURE: STBY 0:00:00 MANUAL AUTO MANUAL OK 38 Recording If the item is strong contrast between the subject and the background (such as subjects in the limelight on...
Camera Operations Guide
Page 40
...recommended. The maximum shooting distance using the Super NightShot plus functions. • You cannot use the Color Slow Shutter function together with your camcorder changes depending on the menu. and ["NIGHTSHOT PLUS"] appear. 3 Touch . 4 Touch [SUPER NSPLUS]. To cancel Color Slow Shutter, ...Touch [COLOR SLOW S]. This may cause a malfunction. • The Color Slow Shutter function may slow down at this time. • Adjust the focus manually when it from the (CAMERA SET) menu. 5 Touch [ON], then . b Notes • Do not use the NightShot plus/Super NightShot plus ,...
...recommended. The maximum shooting distance using the Super NightShot plus functions. • You cannot use the Color Slow Shutter function together with your camcorder changes depending on the menu. and ["NIGHTSHOT PLUS"] appear. 3 Touch . 4 Touch [SUPER NSPLUS]. To cancel Color Slow Shutter, ...Touch [COLOR SLOW S]. This may cause a malfunction. • The Color Slow Shutter function may slow down at this time. • Adjust the focus manually when it from the (CAMERA SET) menu. 5 Touch [ON], then . b Notes • Do not use the NightShot plus/Super NightShot plus ,...

Camera Operations Guide
Page 41
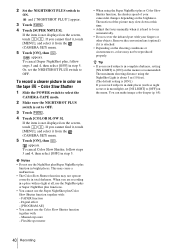
... a stationary subject using a tripod. 1 Touch during recording or in the standby mode. 2 Touch [FOCUS]. SPOT FOCUS You can adjust the focus manually according to aim it at a subject not located in the center of the screen. 1 Touch during recording or in the standby mode. 2 Touch ...[SPOT FOCUS]. z Tip • If you set [SPOT FOCUS], [FOCUS] is automatically set [FOCUS] to [MANUAL]. Use this function in the default setting. To record a subject with [PROGRAM AE]. SPOT FOCUS STBY 0:00:00 AUTO END 4 Touch [END]. - b Note ...
... a stationary subject using a tripod. 1 Touch during recording or in the standby mode. 2 Touch [FOCUS]. SPOT FOCUS You can adjust the focus manually according to aim it at a subject not located in the center of the screen. 1 Touch during recording or in the standby mode. 2 Touch ...[SPOT FOCUS]. z Tip • If you set [SPOT FOCUS], [FOCUS] is automatically set [FOCUS] to [MANUAL]. Use this function in the default setting. To record a subject with [PROGRAM AE]. SPOT FOCUS STBY 0:00:00 AUTO END 4 Touch [END]. - b Note ...

Camera Operations Guide
Page 42
... : To focus on close subjects. : To focus on the subject when you want to record a close-up image of a scene - 3 Touch [MANUAL]. FADER You can add the following effects to currently recording pictures. [BLACK FADER] To adjust the focus automatically Follow steps 1 and 2, then touch [AUTO]...focus on distant subjects. 9 changes to when the focus cannot be adjusted any closer. 60min FOCUS: STBY 0:00:00 MANUAL Recording a picture using various effects AUTO MANUAL OK Tips for recording. • When you use the zoom function. When fading out, the picture gradually changes from ...
... : To focus on close subjects. : To focus on the subject when you want to record a close-up image of a scene - 3 Touch [MANUAL]. FADER You can add the following effects to currently recording pictures. [BLACK FADER] To adjust the focus automatically Follow steps 1 and 2, then touch [AUTO]...focus on distant subjects. 9 changes to when the focus cannot be adjusted any closer. 60min FOCUS: STBY 0:00:00 MANUAL Recording a picture using various effects AUTO MANUAL OK Tips for recording. • When you use the zoom function. When fading out, the picture gradually changes from ...

Camera Operations Guide
Page 45
... then record the superimposed pictures on a tape or a "Memory Stick." (You cannot superimpose a still image on a tape. Adjust the focus manually using a tripod to the Picture effect ([PICT. FADER function - MEMORY MIX function • You cannot use [SLOW SHUTTR]/[OLD MOVIE] together ... Shutter function - EFFECT], p. 71). Still image Movie Blue ,continued Recording 45 Super NightShot plus function - For details, refer to steady the camcorder. 5 Touch . Shoot the movie with color and brightness reversed or a picture that looks like a pastel drawing while recording on a tape -...
... then record the superimposed pictures on a tape or a "Memory Stick." (You cannot superimpose a still image on a tape. Adjust the focus manually using a tripod to the Picture effect ([PICT. FADER function - MEMORY MIX function • You cannot use [SLOW SHUTTR]/[OLD MOVIE] together ... Shutter function - EFFECT], p. 71). Still image Movie Blue ,continued Recording 45 Super NightShot plus function - For details, refer to steady the camcorder. 5 Touch . Shoot the movie with color and brightness reversed or a picture that looks like a pastel drawing while recording on a tape -...
Camera Operations Guide
Page 47
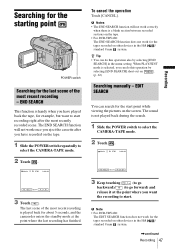
...the most recent recording - EDIT SEARCH You can do this operation also by selecting [END SEARCH] short-cut on . (p. 62) Searching manually - b Note • For DCR-TRV480: The EDIT SEARCH function does not work for the tapes recorded on other devices in the Hi8 / standard 8 mm system. The last ...the starting point POWER switch Searching for the last scene of the most recent recording is played back for about 5 seconds, and the camcorder enters the standby mode at the point where you have played back the tape, for example, but want the recording to select the CAMERA...
...the most recent recording - EDIT SEARCH You can do this operation also by selecting [END SEARCH] short-cut on . (p. 62) Searching manually - b Note • For DCR-TRV480: The EDIT SEARCH function does not work for the tapes recorded on other devices in the Hi8 / standard 8 mm system. The last ...the starting point POWER switch Searching for the last scene of the most recent recording is played back for about 5 seconds, and the camcorder enters the standby mode at the point where you have played back the tape, for example, but want the recording to select the CAMERA...
Camera Operations Guide
Page 59
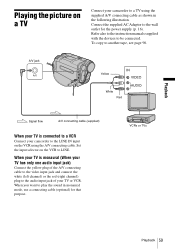
Playback Playing the picture on a TV Connect your camcorder to a TV using the A/V connecting cable. Refer also to the instruction manuals supplied with the devices to LINE. When your TV is connected to play the sound in the following illustration. A/V jack Yellow White Red Signal flow A/V ... cable to the video input jack and connect the white (left channel) or the red (right channel) plug to the audio input jack of your camcorder to the LINE IN input on the VCR to be connected. VCRs or TVs Playback 59 Set the input selector on the VCR using the...
Playback Playing the picture on a TV Connect your camcorder to a TV using the A/V connecting cable. Refer also to the instruction manuals supplied with the devices to LINE. When your TV is connected to play the sound in the following illustration. A/V jack Yellow White Red Signal flow A/V ... cable to the video input jack and connect the white (left channel) or the red (right channel) plug to the audio input jack of your camcorder to the LINE IN input on the VCR to be connected. VCRs or TVs Playback 59 Set the input selector on the VCR using the...
Camera Operations Guide
Page 66
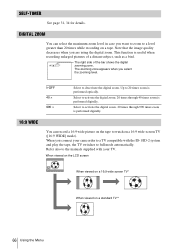
... recording enlarged pictures of the bar shows the digital zooming zone. This function is performed digitally. Up to full mode automatically. Refer also to the manuals supplied with the ID-1/ID-2 system and play the tape, the TV switches to 20 times zoom is performed digitally. 16:9 WIDE You can select.... Note that the image quality decreases when you want to zoom to a TV compatible with your TV. The zooming zone appears when you connect your camcorder to a level greater than 20 times while recording on a tape. Select to deactivate the digital zoom.
... recording enlarged pictures of the bar shows the digital zooming zone. This function is performed digitally. Up to full mode automatically. Refer also to the manuals supplied with the ID-1/ID-2 system and play the tape, the TV switches to 20 times zoom is performed digitally. 16:9 WIDE You can select.... Note that the image quality decreases when you want to zoom to a TV compatible with your TV. The zooming zone appears when you connect your camcorder to a level greater than 20 times while recording on a tape. Select to deactivate the digital zoom.

Camera Operations Guide
Page 74
... 84). To cancel interval photo recording, select [OFF] in step 7. To cancel interval recording, select [OFF] in step 3. 74 Using the Menu Your camcorder will shoot a still image at a selected interval and record it on the screen. 9 Press REC START/STOP. flashes. 5 Press PHOTO fully. GOFF ON ...starts. INT. To record moving pictures on a "Memory Stick" in the selected interval. 8 Touch . z Tips • If you adjust the focus manually, you may be able to ±6 frames from the selected time. GOFF ON ( To deactivate interval recording. ) To record still images on a ...
... 84). To cancel interval photo recording, select [OFF] in step 7. To cancel interval recording, select [OFF] in step 3. 74 Using the Menu Your camcorder will shoot a still image at a selected interval and record it on the screen. 9 Press REC START/STOP. flashes. 5 Press PHOTO fully. GOFF ON ...starts. INT. To record moving pictures on a "Memory Stick" in the selected interval. 8 Touch . z Tips • If you adjust the focus manually, you may be able to ±6 frames from the selected time. GOFF ON ( To deactivate interval recording. ) To record still images on a ...

Camera Operations Guide
Page 107
... your computer 107 Operation is not assured if the above OS has been upgraded. About "First Step Guide" "First Step Guide" is an instruction manual you use the software stored on the CD-ROM (supplied). After installing the CD-ROM, reading "Installing the software and "First Step Guide" on..., from initial hookup of all the software applications. About the help function of the software The Help guide explains all the functions of your camcorder and computer and making settings, to general operation the first time you can refer to have DirectX installed.) Windows Media Player 7.0 or later ...
... your computer 107 Operation is not assured if the above OS has been upgraded. About "First Step Guide" "First Step Guide" is an instruction manual you use the software stored on the CD-ROM (supplied). After installing the CD-ROM, reading "Installing the software and "First Step Guide" on..., from initial hookup of all the software applications. About the help function of the software The Help guide explains all the functions of your camcorder and computer and making settings, to general operation the first time you can refer to have DirectX installed.) Windows Media Player 7.0 or later ...

Camera Operations Guide
Page 109
... system on the computer, a message appears notifying you agree, then click [Next]. 8 Select where to your computer 109 In such a case, manually copy "First Step Guide" to save the software, then click [Next]. Using with your computer ,continued Using with the InstallShield Wizard. If the ...2 Turn on the computer before installing the software. 3 Place the CD-ROM in the disc drive of the license agreement] when you that your camcorder is not connected to the message instructions. For Windows 2000/Windows XP Log on as (E:)) may vary depending on the computer. 4 Click [Install]....
... system on the computer, a message appears notifying you agree, then click [Next]. 8 Select where to your computer 109 In such a case, manually copy "First Step Guide" to save the software, then click [Next]. Using with your computer ,continued Using with the InstallShield Wizard. If the ...2 Turn on the computer before installing the software. 3 Place the CD-ROM in the disc drive of the license agreement] when you that your camcorder is not connected to the message instructions. For Windows 2000/Windows XP Log on as (E:)) may vary depending on the computer. 4 Click [Install]....

Camera Operations Guide
Page 113
...tape. For system and operation requirements, visit the following procedures describe how to DVD Ver.1.2" (Sony original software) or later installed. You cannot use an i.LINK cable for this manual. The following URL: - All other countries. • Pentium is automatically copied and written... to write DVDs. Creating a DVD (Direct Access to "Click to DVD") to i.LINK (IEEE1394) connector i.LINK cable (optional) Using with your camcorder to a Sony VAIO series...
...tape. For system and operation requirements, visit the following procedures describe how to DVD Ver.1.2" (Sony original software) or later installed. You cannot use an i.LINK cable for this manual. The following URL: - All other countries. • Pentium is automatically copied and written... to write DVDs. Creating a DVD (Direct Access to "Click to DVD") to i.LINK (IEEE1394) connector i.LINK cable (optional) Using with your camcorder to a Sony VAIO series...
Camera Operations Guide
Page 121
... menu. (p. 66) The auto focus does not function. Cancel [PROGRAM AE] in the soft portrait or sports lesson mode. Adjust the focus manually. (p. 41) A vertical band appears when • This occurs when the contrast between the subject and the background is not a malfunction. This... [A.SHUT OFF] in color occurs. Recording Troubleshooting If you are using a "Memory Stick" for auto focus. Remove the cassette and leave your camcorder, the camcorder is not a malfunction. This is automatically turned off. cSlide the POWER switch to [OFF] on again. (p. 19) Or use the AC Adaptor...
... menu. (p. 66) The auto focus does not function. Cancel [PROGRAM AE] in the soft portrait or sports lesson mode. Adjust the focus manually. (p. 41) A vertical band appears when • This occurs when the contrast between the subject and the background is not a malfunction. This... [A.SHUT OFF] in color occurs. Recording Troubleshooting If you are using a "Memory Stick" for auto focus. Remove the cassette and leave your camcorder, the camcorder is not a malfunction. This is automatically turned off. cSlide the POWER switch to [OFF] on again. (p. 19) Or use the AC Adaptor...


