Camera Operations Guide
Page 6
... effect 51 Viewing recordings on a tape 49 Playing back in various modes from a "Memory Stick 53 Playing back with added effects - Easy Handycam 54 Making full use of the most recently recorded scenes - Date search 60 6 FADER 42 Using special effects - MEMORY MIX 45 Searching for...the date/time and camera settings data - Zero set memory 60 Searching for the last scene of Easy Handycam operation 55 Various playback functions 56 Magnifying pictures - Rec review 48 Playback Viewing movies recorded on a "Memory Stick 52 Playing back in various modes 50 Viewing recordings with...
... effect 51 Viewing recordings on a tape 49 Playing back in various modes from a "Memory Stick 53 Playing back with added effects - Easy Handycam 54 Making full use of the most recently recorded scenes - Date search 60 6 FADER 42 Using special effects - MEMORY MIX 45 Searching for...the date/time and camera settings data - Zero set memory 60 Searching for the last scene of Easy Handycam operation 55 Various playback functions 56 Magnifying pictures - Rec review 48 Playback Viewing movies recorded on a "Memory Stick 52 Playing back in various modes 50 Viewing recordings with...

Camera Operations Guide
Page 26
...recording. To record on the LCD screen and the Camera recording lamp lights up , and your camcorder is finished, then [YES]. To delete the movie, touch after playback is set to (CHG...Press OPEN and open the LCD panel. OPEN REC START/STOP POWER switch z Tip • Performing Easy Handycam operation, even first time users can record movies on a "Memory Stick," the movie will be recorded ... movies You can record easily. When you are recording on a tape or a "Memory Stick." Review Touch . To turn the power off Slide the POWER switch up , and the currently selected recording...
...recording. To record on the LCD screen and the Camera recording lamp lights up , and your camcorder is finished, then [YES]. To delete the movie, touch after playback is set to (CHG...Press OPEN and open the LCD panel. OPEN REC START/STOP POWER switch z Tip • Performing Easy Handycam operation, even first time users can record movies on a "Memory Stick," the movie will be recorded ... movies You can record easily. When you are recording on a tape or a "Memory Stick." Review Touch . To turn the power off Slide the POWER switch up , and the currently selected recording...
Camera Operations Guide
Page 27
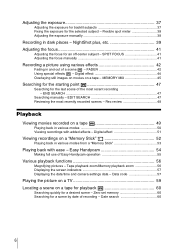
... to (CHG) OFF. • In the default setting, when you opened or closed the LCD panel, it . When you do not operate the camcorder for a while. Indicators displayed during recording on a "Memory Stick" The indicators will not be recorded on the tape. C Recording status ([REC] (...on a tape The indicators will not be recorded on the "Memory Stick." G Personal Menu button (p. 62) H END SEARCH/EDIT SEARCH/Rec review display switch button (p. 47) A Recording folder B Remaining battery The indicated time may not be correct depending on the Personal Menu. Recording b Note...
... to (CHG) OFF. • In the default setting, when you opened or closed the LCD panel, it . When you do not operate the camcorder for a while. Indicators displayed during recording on a "Memory Stick" The indicators will not be recorded on the tape. C Recording status ([REC] (...on a tape The indicators will not be recorded on the "Memory Stick." G Personal Menu button (p. 62) H END SEARCH/EDIT SEARCH/Rec review display switch button (p. 47) A Recording folder B Remaining battery The indicated time may not be correct depending on the Personal Menu. Recording b Note...
Camera Operations Guide
Page 32
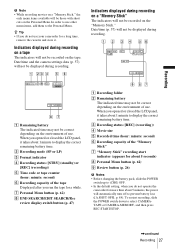
... To turn the power off Slide the POWER switch up . You will hear a light beeping sound when the focus and brightness settings are adjusted. Review Touch . Touch to return to (CHG) OFF. Before recording, follow steps 1 to the grip belt. 3 Slide the POWER switch repeatedly until the... number of disappears, the image is recorded on a "Memory Stick." Recording still images - OPEN PHOTO POWER switch z Tip • Performing Easy Handycam operation, even first time users can be recorded varies depending on the image quality setting and the recording environment. 5 Press PHOTO fully.
... To turn the power off Slide the POWER switch up . You will hear a light beeping sound when the focus and brightness settings are adjusted. Review Touch . Touch to return to (CHG) OFF. Before recording, follow steps 1 to the grip belt. 3 Slide the POWER switch repeatedly until the... number of disappears, the image is recorded on a "Memory Stick." Recording still images - OPEN PHOTO POWER switch z Tip • Performing Easy Handycam operation, even first time users can be recorded varies depending on the image quality setting and the recording environment. 5 Press PHOTO fully.
Camera Operations Guide
Page 33
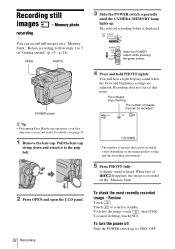
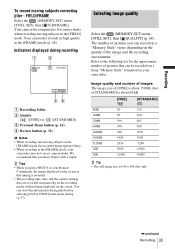
... can view this information during recording 60min FINE 101 P-MENU A Recording folder B Quality ([FINE]) or ([STANDARD]) C Personal Menu button (p. 62) D Review button (p. 32) b Notes • When recording fast-moving subjects in the [FRAME] mode, the recorded image appears blurry. • When recording in... environment. z Tips • When you press PHOTO on your Remote Commander, the image displayed on your camcorder may not correct camera-shake. You can be recorded on a Sony "Memory Stick" formatted on the screen at that you can record on a "Memory Stick" varies depending ...
... can view this information during recording 60min FINE 101 P-MENU A Recording folder B Quality ([FINE]) or ([STANDARD]) C Personal Menu button (p. 62) D Review button (p. 32) b Notes • When recording fast-moving subjects in the [FRAME] mode, the recorded image appears blurry. • When recording in... environment. z Tips • When you press PHOTO on your Remote Commander, the image displayed on your camcorder may not correct camera-shake. You can be recorded on a Sony "Memory Stick" formatted on the screen at that you can record on a "Memory Stick" varies depending ...
Camera Operations Guide
Page 48
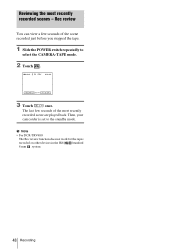
b Note • For DCR-TRV480: The Rec review function does not work for the tapes recorded on other devices in the Hi8 /standard 8 mm system. 48 Recording Then, your camcorder is set to select the CAMERA-TAPE mode. 2 Touch . 60min STBY 0:00:00 EDIT 3 Touch once. Reviewing the most recently recorded scene are played back. The last few seconds of the most recently recorded scenes - Rec review You can view a few seconds of the scene recorded just before you stopped the tape. 1 Slide the POWER switch repeatedly to the standby mode.
b Note • For DCR-TRV480: The Rec review function does not work for the tapes recorded on other devices in the Hi8 /standard 8 mm system. 48 Recording Then, your camcorder is set to select the CAMERA-TAPE mode. 2 Touch . 60min STBY 0:00:00 EDIT 3 Touch once. Reviewing the most recently recorded scene are played back. The last few seconds of the most recently recorded scenes - Rec review You can view a few seconds of the scene recorded just before you stopped the tape. 1 Slide the POWER switch repeatedly to the standby mode.
Camera Operations Guide
Page 49
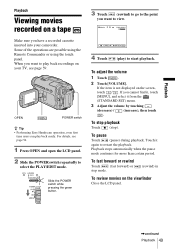
... stops automatically when the pause mode continues for more than certain period. To pause Touch (pause) during playback. OPEN POWER switch z Tip • Performing Easy Handycam operation, even first time users can play ) to restart the playback. Touch it from the (STANDARD SET) menu. 3 Adjust the volume by touching (decrease) / (... to the point you cannot find it, touch [MENU], and select it again to start playback. To stop playback Touch (stop mode. (rewind) in To review movies on your camcorder. To fast forward or rewind Touch (fast forward) or stop ).
... stops automatically when the pause mode continues for more than certain period. To pause Touch (pause) during playback. OPEN POWER switch z Tip • Performing Easy Handycam operation, even first time users can play ) to restart the playback. Touch it from the (STANDARD SET) menu. 3 Adjust the volume by touching (decrease) / (... to the point you cannot find it, touch [MENU], and select it again to start playback. To stop playback Touch (stop mode. (rewind) in To review movies on your camcorder. To fast forward or rewind Touch (fast forward) or stop ).
Camera Operations Guide
Page 155
...81 LCD screen 4 LCD SET 81 LP (Long Play) See Recording mode (REC MODE) Luminance key (LUMI. EDIT 76 R REC FOLDER 70 Rec review 48 Recording capacity Display 27 REMAINING ....... 68, 83 Recording lamp (REC LAMP 83 Recording mode (REC MODE) ....... 27, 79 Recording time 18, 28... Remote Commander........ 151 REMOTE CTRL ........ 83 Remote sensor 150 RESET 148 Review 26, 32 S Self-diagnosis display ..... 132 Self-timer recording (SELF-TIMER) .... 31, 34 Shoulder strap 149 Skip scan 50 SLIDE SHOW 72 Slow ...
...81 LCD screen 4 LCD SET 81 LP (Long Play) See Recording mode (REC MODE) Luminance key (LUMI. EDIT 76 R REC FOLDER 70 Rec review 48 Recording capacity Display 27 REMAINING ....... 68, 83 Recording lamp (REC LAMP 83 Recording mode (REC MODE) ....... 27, 79 Recording time 18, 28... Remote Commander........ 151 REMOTE CTRL ........ 83 Remote sensor 150 RESET 148 Review 26, 32 S Self-diagnosis display ..... 132 Self-timer recording (SELF-TIMER) .... 31, 34 Shoulder strap 149 Skip scan 50 SLIDE SHOW 72 Slow ...

