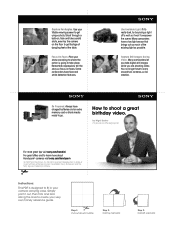
How to shoot a great birthday video.
Page 1
... dangling feet at the table. You no longer have a low light sensor that brings out as possible. Sony, Handycam and the Sony logo are shooting video. Many camcorders have to carry around outline Step 2: Fold top half back Step 3: Fold left side back All rights reserved.... Step 1: Cut out around two cameras, so be creative. How to learn more about Handycam® cameras visit sony.com/handycam © 2009 Sony Electronics Inc. ...
... dangling feet at the table. You no longer have a low light sensor that brings out as possible. Sony, Handycam and the Sony logo are shooting video. Many camcorders have to carry around outline Step 2: Fold top half back Step 3: Fold left side back All rights reserved.... Step 1: Cut out around two cameras, so be creative. How to learn more about Handycam® cameras visit sony.com/handycam © 2009 Sony Electronics Inc. ...

How to take great vacation video.
Page 1
... batteries and extra memory card or blank media for camera shake. How to learn more about Handycam® cameras visit sony.com/handycam © 2009 Sony Electronics Inc. All rights reserved. Step 1: Cut out around your video. Sony, Handycam and the Sony logo are trademarks of a conversation detracts from your camcorder to go. Don't Talk While You Are Recording. Remember...
... batteries and extra memory card or blank media for camera shake. How to learn more about Handycam® cameras visit sony.com/handycam © 2009 Sony Electronics Inc. All rights reserved. Step 1: Cut out around your video. Sony, Handycam and the Sony logo are trademarks of a conversation detracts from your camcorder to go. Don't Talk While You Are Recording. Remember...

Camera Operations Guide
Page 1
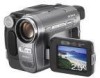
Camera Operations Guide [US] 2-515-268-12(1) Camera Operations Guide Read this first Digital Video Camera Recorder DCR-TRV380/TRV480 TM SERIES © 2005 Sony Corporation
Camera Operations Guide [US] 2-515-268-12(1) Camera Operations Guide Read this first Digital Video Camera Recorder DCR-TRV380/TRV480 TM SERIES © 2005 Sony Corporation
Camera Operations Guide
Page 4
... computer. Change the screen language before using a digital still camera, and thus may be sure to other device such as a VCR or a computer with no specific model names are captured using your camcorder. Be careful when placing the camera near a window or outdoors. • Do not aim at... dusk. Doing so might cause your camcorder correctly. • When you see. • Instructions with a USB or i.LINK...
... computer. Change the screen language before using a digital still camera, and thus may be sure to other device such as a VCR or a computer with no specific model names are captured using your camcorder. Be careful when placing the camera near a window or outdoors. • Do not aim at... dusk. Doing so might cause your camcorder correctly. • When you see. • Instructions with a USB or i.LINK...
Camera Operations Guide
Page 6
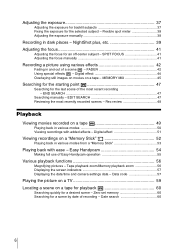
...Date search 60 6 MEMORY MIX 45 Searching for the starting point 47 Searching for the last scene of Easy Handycam operation 55 Various playback functions 56 Magnifying pictures - NightShot plus, etc 39 Adjusting the focus 41 Adjusting the...a scene - Rec review 48 Playback Viewing movies recorded on a "Memory Stick 52 Playing back in dark places - Easy Handycam 54 Making full use of the most recently recorded scenes - Data code 57 Playing the picture on a TV 59 Locating ... zoom 56 Displaying the screen indicators 57 Displaying the date/time and camera settings data -
...Date search 60 6 MEMORY MIX 45 Searching for the starting point 47 Searching for the last scene of Easy Handycam operation 55 Various playback functions 56 Magnifying pictures - NightShot plus, etc 39 Adjusting the focus 41 Adjusting the...a scene - Rec review 48 Playback Viewing movies recorded on a "Memory Stick 52 Playing back in dark places - Easy Handycam 54 Making full use of the most recently recorded scenes - Data code 57 Playing the picture on a TV 59 Locating ... zoom 56 Displaying the screen indicators 57 Displaying the date/time and camera settings data -
Camera Operations Guide
Page 7
... from a tape to a "Memory Stick 92 Dubbing still images from a "Memory Stick" to the computer via your camcorder - Digital convert function 116 ,continued 7 Advanced operations Using the Menu Selecting menu items 62 Using the (CAMERA SET) menu - PICT. Digital program editing 94 Deleting recorded pictures 101 Marking recorded images with your computer... compliant printer 104 Using with specific information - PROGRAM AE/16:9 WIDE, etc 64 Using the (MEMORY SET) menu - REC MODE/MULTI-SOUND/AUDIO MIX/USB-CAMERA, etc 79 Using the (TIME/LANGU.) menu -
... from a tape to a "Memory Stick 92 Dubbing still images from a "Memory Stick" to the computer via your camcorder - Digital convert function 116 ,continued 7 Advanced operations Using the Menu Selecting menu items 62 Using the (CAMERA SET) menu - PICT. Digital program editing 94 Deleting recorded pictures 101 Marking recorded images with your computer... compliant printer 104 Using with specific information - PROGRAM AE/16:9 WIDE, etc 64 Using the (MEMORY SET) menu - REC MODE/MULTI-SOUND/AUDIO MIX/USB-CAMERA, etc 79 Using the (TIME/LANGU.) menu -

Camera Operations Guide
Page 8
Troubleshooting Troubleshooting 118 Warning indicators and messages .......132 Additional Information Using your camcorder abroad 136 Usable cassette tapes 137 About the "Memory Stick 138 About the "InfoLITHIUM" battery pack 140 About i.LINK 141 Maintenance and precautions 142 Specification 145 Quick Reference Identifying parts and controls 148 Index 154 Two operating instructions are supplied with your camcorder: • Camera Operations Guide (This manual) • "First Step Guide" for using the supplied applications (included in the supplied CD-ROM) 8
Troubleshooting Troubleshooting 118 Warning indicators and messages .......132 Additional Information Using your camcorder abroad 136 Usable cassette tapes 137 About the "Memory Stick 138 About the "InfoLITHIUM" battery pack 140 About i.LINK 141 Maintenance and precautions 142 Specification 145 Quick Reference Identifying parts and controls 148 Index 154 Two operating instructions are supplied with your camcorder: • Camera Operations Guide (This manual) • "First Step Guide" for using the supplied applications (included in the supplied CD-ROM) 8
Camera Operations Guide
Page 11
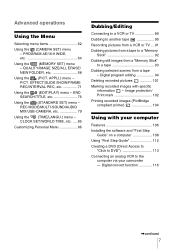
START/STOP 4 View the recorded picture on . a Slide the POWER switch repeatedly until the PLAY/EDIT lamp lights up the CAMERA-TAPE lamp. Lens cap is not set the date and time, see page 21. d Press REC START/ STOP. You can also use REC START/ STOP ...of the LCD panel. The date and time is not attached when you purchase your camcorder (p. 148). b Press OPEN and open the LCD panel. The power turns on the LCD screen. c Touch (play) to standby mode, press REC START/STOP again...
START/STOP 4 View the recorded picture on . a Slide the POWER switch repeatedly until the PLAY/EDIT lamp lights up the CAMERA-TAPE lamp. Lens cap is not set the date and time, see page 21. d Press REC START/ STOP. You can also use REC START/ STOP ...of the LCD panel. The date and time is not attached when you purchase your camcorder (p. 148). b Press OPEN and open the LCD panel. The power turns on the LCD screen. c Touch (play) to standby mode, press REC START/STOP again...
Camera Operations Guide
Page 13
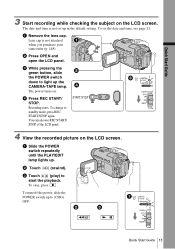
A short beep sound is heard when the focus is not attached when you purchase your camcorder (p. 148). b Touch . a Remove the lens cap. The power turns on the LCD screen. a Slide the POWER switch repeatedly until the CAMERA-MEMORY lamp lights up . c Touch (next) or (previous) to (CHG) OFF. Lens cap is adjusted. A shutter...
A short beep sound is heard when the focus is not attached when you purchase your camcorder (p. 148). b Touch . a Remove the lens cap. The power turns on the LCD screen. a Slide the POWER switch repeatedly until the CAMERA-MEMORY lamp lights up . c Touch (next) or (previous) to (CHG) OFF. Lens cap is adjusted. A shutter...
Camera Operations Guide
Page 15
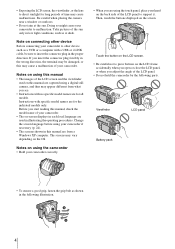
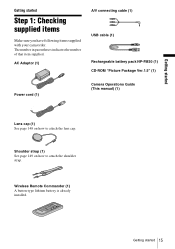
... strap. Getting started Step 1: Checking supplied items Make sure you have following items supplied with your camcorder. AC Adaptor (1) A/V connecting cable (1) USB cable (1) Rechargeable battery pack NP-FM30 (1) CD-ROM "Picture Package Ver.1.5" (1) Power cord (1) Camera Operations Guide (This manual) (1) Lens cap (1) See page 148 on how to attach the lens cap...
... strap. Getting started Step 1: Checking supplied items Make sure you have following items supplied with your camcorder. AC Adaptor (1) A/V connecting cable (1) USB cable (1) Rechargeable battery pack NP-FM30 (1) CD-ROM "Picture Package Ver.1.5" (1) Power cord (1) Camera Operations Guide (This manual) (1) Lens cap (1) See page 148 on how to attach the lens cap...
Camera Operations Guide
Page 19
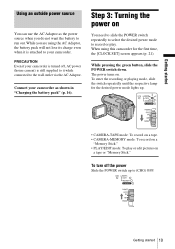
... the desired power mode lights up to (CHG) OFF. PRECAUTION Even if your camcorder. Step 3: Turning the power on . Getting started Using an outside power source You can use the AC Adaptor as shown in "Charging the battery pack" (p. ... You need to slide the POWER switch repeatedly to select the desired power mode to your camcorder is turned off the power Slide the POWER switch up . • CAMERA-TAPE mode: To record on a tape. • CAMERA-MEMORY mode: To record on a "Memory Stick." • PLAY/EDIT mode: To play . To enter the...
... the desired power mode lights up to (CHG) OFF. PRECAUTION Even if your camcorder. Step 3: Turning the power on . Getting started Using an outside power source You can use the AC Adaptor as shown in "Charging the battery pack" (p. ... You need to slide the POWER switch repeatedly to select the desired power mode to your camcorder is turned off the power Slide the POWER switch up . • CAMERA-TAPE mode: To record on a tape. • CAMERA-MEMORY mode: To record on a "Memory Stick." • PLAY/EDIT mode: To play . To enter the...
Camera Operations Guide
Page 21
...viewing. To use the large-capacity battery pack When you can adjust the exposure (p. 37) and fader (p. 42) while checking the image on your camcorder. In that case, charge the rechargeable battery (p. 145) and then set . • [EXPOSURE]: Adjust with / and touch . • [FADER...appears on your camcorder, extend the viewfinder and pull it repeatedly to the optimal angle for the first time. 3 Touch . 60min MENU 1/3 FADER SPOT METER -:--:-- Have the LCD panel rotated 180 degrees and closed with the screen facing out. Proceed to CAMERA-TAPE or CAMERA-MEMORY (p. 19...
...viewing. To use the large-capacity battery pack When you can adjust the exposure (p. 37) and fader (p. 42) while checking the image on your camcorder. In that case, charge the rechargeable battery (p. 145) and then set . • [EXPOSURE]: Adjust with / and touch . • [FADER...appears on your camcorder, extend the viewfinder and pull it repeatedly to the optimal angle for the first time. 3 Touch . 60min MENU 1/3 FADER SPOT METER -:--:-- Have the LCD panel rotated 180 degrees and closed with the screen facing out. Proceed to CAMERA-TAPE or CAMERA-MEMORY (p. 19...
Camera Operations Guide
Page 22
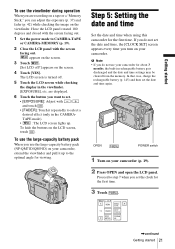
...out and opens up to 12:00PM. This may cause a malfunction of your camcorder is 3/4 of the arrow and open the lid until it to the year 2079. 8 Set [M] (month), [D] (day), hour and minute in Digital8 system only. For midnight, set it clicks. CLOCK SET -:--:-- DATE 2005Y ... Hi8 tape. 1 Slide the OPEN/EJECT lever in the direction of the indicated time on standard 8 mm , Hi8 and Digital8 cassettes in the same way as write-protection), see page 137. CAMERA SET PROGRAM AE SPOT METER EXPOSURE OK 5 Select (TIME/LANGU.) with / , then touch . 60min -:--:--
...out and opens up to 12:00PM. This may cause a malfunction of your camcorder is 3/4 of the arrow and open the lid until it to the year 2079. 8 Set [M] (month), [D] (day), hour and minute in Digital8 system only. For midnight, set it clicks. CLOCK SET -:--:-- DATE 2005Y ... Hi8 tape. 1 Slide the OPEN/EJECT lever in the direction of the indicated time on standard 8 mm , Hi8 and Digital8 cassettes in the same way as write-protection), see page 137. CAMERA SET PROGRAM AE SPOT METER EXPOSURE OK 5 Select (TIME/LANGU.) with / , then touch . 60min -:--:--

Camera Operations Guide
Page 26
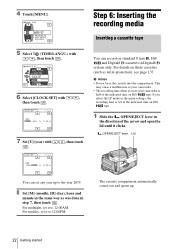
...while pressing the green button. OPEN REC START/STOP POWER switch z Tip • Performing Easy Handycam operation, even first time users can record movies on the LCD screen and the Camera recording lamp lights up. Pull the lens cap string down and attach it to stop recording. ... touch [NO]. p. 24). Camera recording lamp 3 Select the recording mode. Slide the POWER switch while pressing the green button. 4 Press REC START/STOP. To check the most recently recorded MPEG movie - To turn the power off Slide the POWER switch up , and your camcorder is finished, then [YES].
...while pressing the green button. OPEN REC START/STOP POWER switch z Tip • Performing Easy Handycam operation, even first time users can record movies on the LCD screen and the Camera recording lamp lights up. Pull the lens cap string down and attach it to stop recording. ... touch [NO]. p. 24). Camera recording lamp 3 Select the recording mode. Slide the POWER switch while pressing the green button. 4 Press REC START/STOP. To check the most recently recorded MPEG movie - To turn the power off Slide the POWER switch up , and your camcorder is finished, then [YES].
Camera Operations Guide
Page 27
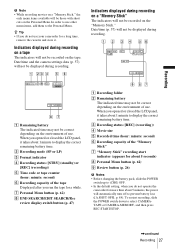
...tape Displayed after you do not use other menu items, add them to display the correct remaining battery time. When you do not operate the camcorder for about 5 seconds) H Personal Menu button (p. 62) I Review button (p. 26) b Notes • Before changing the battery pack..., slide the POWER switch up to select CAMERATAPE or CAMERA-MEMORY, and then press REC START/STOP. ,continued Recording 27 B Recording mode (SP or LP) C Format indicator D Recording status ([STBY] (standby) or [...
...tape Displayed after you do not use other menu items, add them to display the correct remaining battery time. When you do not operate the camcorder for about 5 seconds) H Personal Menu button (p. 62) I Review button (p. 26) b Notes • Before changing the battery pack..., slide the POWER switch up to select CAMERATAPE or CAMERA-MEMORY, and then press REC START/STOP. ,continued Recording 27 B Recording mode (SP or LP) C Format indicator D Recording status ([STBY] (standby) or [...
Camera Operations Guide
Page 28
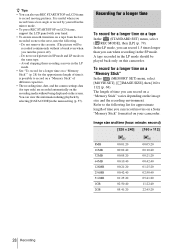
... • To press REC START/STOP on LCD frame, support the LCD panel with your camcorder. The length of time you can also use REC START/STOP on LCD frame to the ...Recording for a longer time To record for approximate length of time you can record movies on a Sony "Memory Stick" formatted on your hand. • To ensure smooth transition on a tape from the... recorded scene to record on a "Memory Stick" of different capacities. • The recording time, date, and the camera settings data (for a longer time on a "Memory Stick" In the (MEMORY SET) menu, select [MOVIE SET],...
... • To press REC START/STOP on LCD frame, support the LCD panel with your camcorder. The length of time you can also use REC START/STOP on LCD frame to the ...Recording for a longer time To record for approximate length of time you can record movies on a Sony "Memory Stick" formatted on your hand. • To ensure smooth transition on a tape from the... recorded scene to record on a "Memory Stick" of different capacities. • The recording time, date, and the camera settings data (for a longer time on a "Memory Stick" In the (MEMORY SET) menu, select [MOVIE SET],...
Camera Operations Guide
Page 29
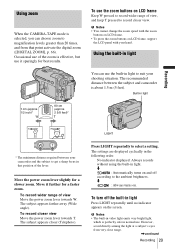
... the digital zoom ([DIGITAL ZOOM], p. 66). Built-in light 1 cm (approx. 1/2 inch)* 80 cm (approx. 2 5/8 feet)* Recording * The minimum distance required between the subject and camcorder is effective, but use it further for a slower zoom. Move the power zoom lever slightly for a faster zoom. The settings are displayed cyclically in light... zoom buttons on . b Notes • The built-in video light emits very bright light, which is perfectly safe in normal use. Using zoom When the CAMERA-TAPE mode is selected, you can use the built-in light to suit your shooting situation.
... the digital zoom ([DIGITAL ZOOM], p. 66). Built-in light 1 cm (approx. 1/2 inch)* 80 cm (approx. 2 5/8 feet)* Recording * The minimum distance required between the subject and camcorder is effective, but use it further for a slower zoom. Move the power zoom lever slightly for a faster zoom. The settings are displayed cyclically in light... zoom buttons on . b Notes • The built-in video light emits very bright light, which is perfectly safe in normal use. Using zoom When the CAMERA-TAPE mode is selected, you can use the built-in light to suit your shooting situation.

Camera Operations Guide
Page 30
...mode. • The built-in light is turned off in light off and remove the battery pack to the camcorder while you use your subject can share the image being recorded. • The battery pack discharges quickly while the ... after the tape has run out. • When you record them. in the following cases: - When you and your camcorder, turn the LCD panel towards the subject. Interval time of the subject appears on /off when you do not use the... leave it stays on for more than 5 minutes with the POWER switch set to CAMERA-MEMORY. - When it on in light is working. -
...mode. • The built-in light is turned off in light off and remove the battery pack to the camcorder while you use your subject can share the image being recorded. • The battery pack discharges quickly while the ... after the tape has run out. • When you record them. in the following cases: - When you and your camcorder, turn the LCD panel towards the subject. Interval time of the subject appears on /off when you do not use the... leave it stays on for more than 5 minutes with the POWER switch set to CAMERA-MEMORY. - When it on in light is working. -

Camera Operations Guide
Page 31
... step 3. To stop recording, press REC START/ STOP. appears. 60min STBY 0:00:00 P-MENU Recording 31 To cancel the count down indication begins from the (CAMERA SET) menu. 60min STBY SELF-TIMER: OFF 0:00:00 OFF ON 3 Touch [ON], then . REC START/STOP 1 Touch . 2 Touch [SELF-TIMER]. If you can start...
... step 3. To stop recording, press REC START/ STOP. appears. 60min STBY 0:00:00 P-MENU Recording 31 To cancel the count down indication begins from the (CAMERA SET) menu. 60min STBY SELF-TIMER: OFF 0:00:00 OFF ON 3 Touch [ON], then . REC START/STOP 1 Touch . 2 Touch [SELF-TIMER]. If you can start...
Camera Operations Guide
Page 32
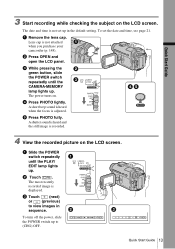
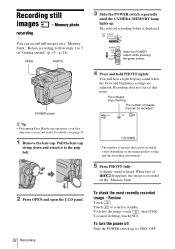
... Press PHOTO fully. Pull the lens cap string down and attach it to the grip belt. 3 Slide the POWER switch repeatedly until the CAMERA-MEMORY lamp lights up to (CHG) OFF. You will hear a light beeping sound when the focus and brightness settings are adjusted. Recording ...selected recording folder is heard. The number of disappears, the image is recorded on a "Memory Stick." OPEN PHOTO POWER switch z Tip • Performing Easy Handycam operation, even first time users can record easily. p. 24). Recording still images - Touch to return to 7 in "Getting started" (p. 15 - Slide the...
... Press PHOTO fully. Pull the lens cap string down and attach it to the grip belt. 3 Slide the POWER switch repeatedly until the CAMERA-MEMORY lamp lights up to (CHG) OFF. You will hear a light beeping sound when the focus and brightness settings are adjusted. Recording ...selected recording folder is heard. The number of disappears, the image is recorded on a "Memory Stick." OPEN PHOTO POWER switch z Tip • Performing Easy Handycam operation, even first time users can record easily. p. 24). Recording still images - Touch to return to 7 in "Getting started" (p. 15 - Slide the...


