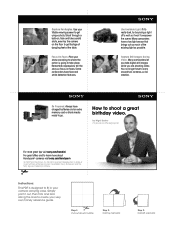
How to shoot a great birthday video.
Page 1
...through a balloon, hide and take digital still images while you are trademarks of Sony. How to go. Sony, Handycam and the Sony logo are shooting video. All rights reserved. Capture Fun Angles. Many camcorders let you take candid shots, even lay the camera on faces. Plan your ...very own handy reference guide. Simply print it won't overpower the scene. Some camcorders have charged batteries ...
...through a balloon, hide and take digital still images while you are trademarks of Sony. How to go. Sony, Handycam and the Sony logo are shooting video. All rights reserved. Capture Fun Angles. Many camcorders let you take candid shots, even lay the camera on faces. Plan your ...very own handy reference guide. Simply print it won't overpower the scene. Some camcorders have charged batteries ...

How to take great vacation video.
Page 1
...half back Step 3: Fold left side back Some camcorders have charged batteries and extra memory card or blank media for camera shake. How to compensate for your camcorder ready to create your camcorder to take great vacation video. Some camcorders feature a built-in low light. Keep Your Shot... Steady. Play with your camcorder's settings before your camera carrying case. Write down the date, time of day and where you're shooting so you 're not afraid to learn more about Handycam® cameras visit sony.com/handycam © 2009 Sony Electronics Inc. Reproduction in ...
...half back Step 3: Fold left side back Some camcorders have charged batteries and extra memory card or blank media for camera shake. How to compensate for your camcorder ready to create your camcorder to take great vacation video. Some camcorders feature a built-in low light. Keep Your Shot... Steady. Play with your camcorder's settings before your camera carrying case. Write down the date, time of day and where you're shooting so you 're not afraid to learn more about Handycam® cameras visit sony.com/handycam © 2009 Sony Electronics Inc. Reproduction in ...
Camera Operations Guide
Page 5
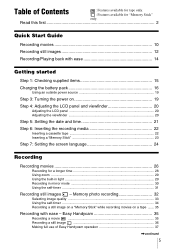
... cassette tape 22 Inserting a "Memory Stick 23 Step 7: Setting the screen language 24 Recording Recording movies 26 Recording for "Memory Stick" only. Easy Handycam 35 Recording a movie 35 Recording a still image 36 Making full use of Contents : Features available for tape only. : Features available for a longer...Recording movies 10 Recording still images 12 Recording/Playing back with ease 14 Getting started Step 1: Checking supplied items 15 Charging the battery pack 16 Using an outside power source 19 Step 3: Turning the power on a tape ....... 35 Recording with ease -
... cassette tape 22 Inserting a "Memory Stick 23 Step 7: Setting the screen language 24 Recording Recording movies 26 Recording for "Memory Stick" only. Easy Handycam 35 Recording a movie 35 Recording a still image 36 Making full use of Contents : Features available for tape only. : Features available for a longer...Recording movies 10 Recording still images 12 Recording/Playing back with ease 14 Getting started Step 1: Checking supplied items 15 Charging the battery pack 16 Using an outside power source 19 Step 3: Turning the power on a tape ....... 35 Recording with ease -
Camera Operations Guide
Page 10
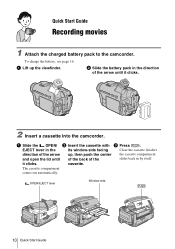
Quick Start Guide Recording movies 1 Attach the charged battery pack to the camcorder. it clicks. 2 Insert a cassette into the camcorder. OPEN/EJECT lever Window-side 10 Quick Start Guide a Slide the OPEN/ b Insert the cassette with c Press . To charge the battery, see page 16. EJECT lever in the its window-side facing Close the cassette...
Quick Start Guide Recording movies 1 Attach the charged battery pack to the camcorder. it clicks. 2 Insert a cassette into the camcorder. OPEN/EJECT lever Window-side 10 Quick Start Guide a Slide the OPEN/ b Insert the cassette with c Press . To charge the battery, see page 16. EJECT lever in the its window-side facing Close the cassette...
Camera Operations Guide
Page 12
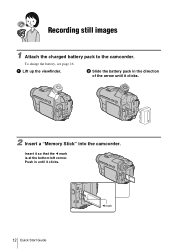
a Lift up the viewfinder. Insert it clicks. 2 Insert a "Memory Stick" into the camcorder. b Slide the battery pack in until it so that the b mark is at the bottom left corner. To charge the battery, see page 16. Recording still images 1 Attach the charged battery pack to the camcorder. Push in the direction of the arrow until it clicks. 12 Quick Start Guide b mark
a Lift up the viewfinder. Insert it clicks. 2 Insert a "Memory Stick" into the camcorder. b Slide the battery pack in until it so that the b mark is at the bottom left corner. To charge the battery, see page 16. Recording still images 1 Attach the charged battery pack to the camcorder. Push in the direction of the arrow until it clicks. 12 Quick Start Guide b mark
Camera Operations Guide
Page 16
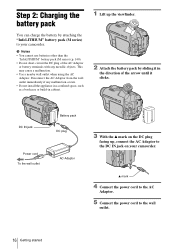
... the DC IN jack on the DC plug facing up the viewfinder. 2 Attach the battery pack by attaching the "InfoLITHIUM" battery pack (M series) to your camcorder. DC IN jack Battery pack DC plug Power cord To the wall outlet AC Adaptor 3 With the v mark on your...
... the DC IN jack on the DC plug facing up the viewfinder. 2 Attach the battery pack by attaching the "InfoLITHIUM" battery pack (M series) to your camcorder. DC IN jack Battery pack DC plug Power cord To the wall outlet AC Adaptor 3 With the v mark on your...

Camera Operations Guide
Page 17
...the BATT (battery) release button down. See page 141 about 7 seconds. B Approximate possible recording time using the viewfinder. ,continued Getting started After charging the battery The CHG (charge) lamp turns off . 1 Set the POWER switch to (CHG) OFF. 2 Press OPEN and open the LCD panel. 3 Press DISPLAY/BATT INFO...approximate remaining amount of power left in the direction of the battery pack. Disconnect the AC Adaptor from the DC IN jack. The CHG (charge) lamp lights up to (CHG) OFF. 2 Lift up the battery pack completely before storing it for a long time, use the battery ...
...the BATT (battery) release button down. See page 141 about 7 seconds. B Approximate possible recording time using the viewfinder. ,continued Getting started After charging the battery The CHG (charge) lamp turns off . 1 Set the POWER switch to (CHG) OFF. 2 Press OPEN and open the LCD panel. 3 Press DISPLAY/BATT INFO...approximate remaining amount of power left in the direction of the battery pack. Disconnect the AC Adaptor from the DC IN jack. The CHG (charge) lamp lights up to (CHG) OFF. 2 Lift up the battery pack completely before storing it for a long time, use the battery ...

Camera Operations Guide
Page 18
... repeatedly record, start/stop, slide the POWER switch to the DC IN jack of minutes when recording while you use your camcorder in the Digital8 system. The actual battery life may be correctly displayed in following conditions. - Playing time Approximate number of minutes available when ...your camcorder, even if its power cord is disconnected from the battery pack when the AC Adaptor is connected to change the power mode, and zoom. The battery pack is not attached correctly. - For DCR-TRV480: The playing time of minutes available when you use a fully charged battery...
... repeatedly record, start/stop, slide the POWER switch to the DC IN jack of minutes when recording while you use your camcorder in the Digital8 system. The actual battery life may be correctly displayed in following conditions. - Playing time Approximate number of minutes available when ...your camcorder, even if its power cord is disconnected from the battery pack when the AC Adaptor is connected to change the power mode, and zoom. The battery pack is not attached correctly. - For DCR-TRV480: The playing time of minutes available when you use a fully charged battery...
Camera Operations Guide
Page 19
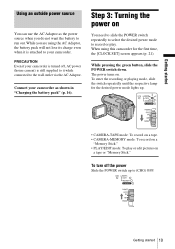
... switch repeatedly to select the desired power mode to record or play or edit pictures on a tape or "Memory Stick." Getting started 19 Connect your camcorder. To turn off , AC power (house current) is still supplied to run out. Step 3: Turning the power on . To enter the recording or...When using the AC Adaptor, the battery pack will not lose its charge even when it while connected to (CHG) OFF. PRECAUTION Even if your camcorder is attached to your camcorder as the power source when you are using this camcorder for the desired power mode lights up to the wall outlet via ...
... switch repeatedly to select the desired power mode to record or play or edit pictures on a tape or "Memory Stick." Getting started 19 Connect your camcorder. To turn off , AC power (house current) is still supplied to run out. Step 3: Turning the power on . To enter the recording or...When using the AC Adaptor, the battery pack will not lose its charge even when it while connected to (CHG) OFF. PRECAUTION Even if your camcorder is attached to your camcorder as the power source when you are using this camcorder for the desired power mode lights up to the wall outlet via ...
Camera Operations Guide
Page 21
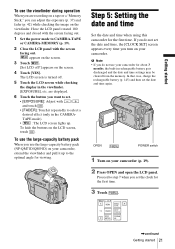
...The LCD screen lights up to the optimal angle for the first time. 3 Touch . 60min MENU 1/3 FADER SPOT METER -:--:-- In that case, charge the rechargeable battery (p. 145) and then set the clock for viewing. SURE SPOT FOCUS PRGRAM AE ,continued Getting started To use the viewfinder during ...). 2 Press OPEN and open the LCD panel. To use the large-capacity battery pack When you use your camcorder. Proceed to step 7 when you turn on your camcorder, extend the viewfinder and pull it repeatedly to CAMERA-TAPE or CAMERA-MEMORY (p. 19). 2 Close the LCD panel with / and...
...The LCD screen lights up to the optimal angle for the first time. 3 Touch . 60min MENU 1/3 FADER SPOT METER -:--:-- In that case, charge the rechargeable battery (p. 145) and then set the clock for viewing. SURE SPOT FOCUS PRGRAM AE ,continued Getting started To use the viewfinder during ...). 2 Press OPEN and open the LCD panel. To use the large-capacity battery pack When you use your camcorder. Proceed to step 7 when you turn on your camcorder, extend the viewfinder and pull it repeatedly to CAMERA-TAPE or CAMERA-MEMORY (p. 19). 2 Close the LCD panel with / and...

Camera Operations Guide
Page 118
...from a wall outlet or remove the battery pack, then reconnect it after about 1 minute. cAttach a charged battery pack to the camcorder. (p. 16) cUse the AC Adaptor to connect to the wall outlet. (p. 19) The camcorder does not operate even when the power is set to [ON]. (p. 83) cInsert a battery into any..., running low, or not attached to troubleshoot the problem. If the functions still do not work, press the RESET button using your Sony dealer. If the problem Overall operations persists, remove the power source and contact your camcorder, use the following table to the...
...from a wall outlet or remove the battery pack, then reconnect it after about 1 minute. cAttach a charged battery pack to the camcorder. (p. 16) cUse the AC Adaptor to connect to the wall outlet. (p. 19) The camcorder does not operate even when the power is set to [ON]. (p. 83) cInsert a battery into any..., running low, or not attached to troubleshoot the problem. If the functions still do not work, press the RESET button using your Sony dealer. If the problem Overall operations persists, remove the power source and contact your camcorder, use the following table to the...
Camera Operations Guide
Page 119
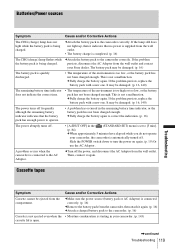
... attach it again. (p. 16) cAttach a charged battery pack to the camcorder. (p. 16) Cassette is not ejected even when the • Moisture condensation is starting in the (STANDARD SET) menu is set to [5 min]. (p. 84) cWhen approximately 5 minutes have elapsed while you do not operate your Sony dealer. Batteries/Power sources Symptom Cause and...
... attach it again. (p. 16) cAttach a charged battery pack to the camcorder. (p. 16) Cassette is not ejected even when the • Moisture condensation is starting in the (STANDARD SET) menu is set to [5 min]. (p. 84) cWhen approximately 5 minutes have elapsed while you do not operate your Sony dealer. Batteries/Power sources Symptom Cause and...
Camera Operations Guide
Page 140
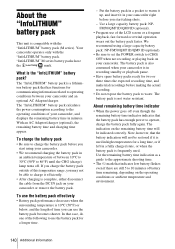
... expected recording time, and make trial recordings before you start taking shots. - The battery pack is also consumed when your camcorder. • We recommend charging the battery pack in an ambient temperature of the following to water. The battery pack is the "InfoLITHIUM" battery pack? ...the battery pack. With an AC Adaptor/charger (optional), the remaining battery time and charging time appear. Put the battery pack in your camcorder and an optional AC Adaptor/charger. If you charge the battery pack outside of this temperature range, you can use the battery pack ...
... expected recording time, and make trial recordings before you start taking shots. - The battery pack is also consumed when your camcorder. • We recommend charging the battery pack in an ambient temperature of the following to water. The battery pack is the "InfoLITHIUM" battery pack? ...the battery pack. With an AC Adaptor/charger (optional), the remaining battery time and charging time appear. Put the battery pack in your camcorder and an optional AC Adaptor/charger. If you charge the battery pack outside of this temperature range, you can use the battery pack ...
Camera Operations Guide
Page 141
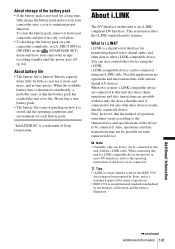
.... • To discharge the battery pack on your camcorder once a year to this unit is limited. Battery capacity drops little by many corporations. • IEEE 1394 is i.LINK? When two or more familiar term for a long time, fully charge the battery pack and use it in tape recording standby... and as time passes. About storage of the battery pack • If the battery pack is a trademark of Sony Corporation. To store the battery pack, remove it from your camcorder and put it more and more DV Interfaces, refer to the operating instructions of the device to other devices via...
.... • To discharge the battery pack on your camcorder once a year to this unit is limited. Battery capacity drops little by many corporations. • IEEE 1394 is i.LINK? When two or more familiar term for a long time, fully charge the battery pack and use it in tape recording standby... and as time passes. About storage of the battery pack • If the battery pack is a trademark of Sony Corporation. To store the battery pack, remove it from your camcorder and put it more and more DV Interfaces, refer to the operating instructions of the device to other devices via...

Camera Operations Guide
Page 145
... month to keep it will be affected as long as you do not use your camcorder about 3 months if you are not recording the date. To charge the pre-installed rechargeable battery Your camcorder has a pre-installed rechargeable battery to retain the date, time, and other settings ...even when the POWER switch is recommended you operate your camcorder. Hi8/ Digital8 video cassette) SP: 60 min LP: 90...
... month to keep it will be affected as long as you do not use your camcorder about 3 months if you are not recording the date. To charge the pre-installed rechargeable battery Your camcorder has a pre-installed rechargeable battery to retain the date, time, and other settings ...even when the POWER switch is recommended you operate your camcorder. Hi8/ Digital8 video cassette) SP: 60 min LP: 90...

Camera Operations Guide
Page 148
J Viewfinder (p. 3, 20) K CHG (charge) lamp (p. 16) L LIGHT button (p. 29) M Access lamp (p. 23, 138) N Battery pack (p. 16) O "Memory Stick" slot (p. 23) P BACK LIGHT button (p. 37) The BACK LIGHT button is not available during Easy Handycam operation. (z mark on LCD frame (p. 29) I RESET button If you... press RESET, all the settings including the date and time, except the Personal Menu items, return to the default. Quick Reference Identifying parts and controls Camcorder A EASY button (p. 14,...
J Viewfinder (p. 3, 20) K CHG (charge) lamp (p. 16) L LIGHT button (p. 29) M Access lamp (p. 23, 138) N Battery pack (p. 16) O "Memory Stick" slot (p. 23) P BACK LIGHT button (p. 37) The BACK LIGHT button is not available during Easy Handycam operation. (z mark on LCD frame (p. 29) I RESET button If you... press RESET, all the settings including the date and time, except the Personal Menu items, return to the default. Quick Reference Identifying parts and controls Camcorder A EASY button (p. 14,...

Camera Operations Guide
Page 154
... key (CAMTM CHROMA 45 Camera settings data display 57 Cassette 22, 137 CD-ROM 106 Charging the battery Battery pack 16 Pre-installed rechargeable battery 145 Clock set (CLOCK SET)...... 21,...116 Digital effect (D.EFFECT)..........44, 51 Digital program editing (PROG.EDIT 94 DIGITAL ZOOM 66 Digital8 system 137 Direct Access to "Click to DVD".........113 DirectX 9.0c 110 Display DISPLAY 84 ...43 Dual sound track tape ........79 Dubbing (REC CTRL).......91 DV Interface 113, 116 E Easy Handycam ...........35, 54 EDIT SEARCH 47 END SEARCH 47, 77 Erase ALL ERASE (still image)...........69 ...
... key (CAMTM CHROMA 45 Camera settings data display 57 Cassette 22, 137 CD-ROM 106 Charging the battery Battery pack 16 Pre-installed rechargeable battery 145 Clock set (CLOCK SET)...... 21,...116 Digital effect (D.EFFECT)..........44, 51 Digital program editing (PROG.EDIT 94 DIGITAL ZOOM 66 Digital8 system 137 Direct Access to "Click to DVD".........113 DirectX 9.0c 110 Display DISPLAY 84 ...43 Dual sound track tape ........79 Dubbing (REC CTRL).......91 DV Interface 113, 116 E Easy Handycam ...........35, 54 EDIT SEARCH 47 END SEARCH 47, 77 Erase ALL ERASE (still image)...........69 ...


