
Camera Operations Guide
Page 2
... To prevent fire or shock hazard, do not expose the unit to discontinue midway (fail), restart the application or disconnect and connect the communication cable (USB, etc.) again. 2 Read this first Before operating the unit, please read this manual thoroughly, and retain it for future reference. b Notice • If static electricity...
... To prevent fire or shock hazard, do not expose the unit to discontinue midway (fail), restart the application or disconnect and connect the communication cable (USB, etc.) again. 2 Read this first Before operating the unit, please read this manual thoroughly, and retain it for future reference. b Notice • If static electricity...
Camera Operations Guide
Page 4
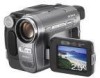
... only in low light conditions, such as shown in the following parts. Change the screen language before using the touch panel, place your camcorder if necessary (p. 24). • The screens shown in the proper direction. Instructions with no specific model names are for all models.... plug in this may appear different from a Windows XP computer. Note on connecting other device Before connecting your camcorder to other device such as a VCR or a computer with a USB or i.LINK cable, be damaged, or this manual are from what you see. • Instructions with specific...
... only in low light conditions, such as shown in the following parts. Change the screen language before using the touch panel, place your camcorder if necessary (p. 24). • The screens shown in the proper direction. Instructions with no specific model names are for all models.... plug in this may appear different from a Windows XP computer. Note on connecting other device Before connecting your camcorder to other device such as a VCR or a computer with a USB or i.LINK cable, be damaged, or this manual are from what you see. • Instructions with specific...
Camera Operations Guide
Page 7
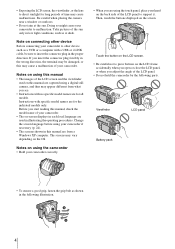
Digital program editing 94 Deleting recorded pictures 101 Marking recorded images with your camcorder - EFFECT/SLIDE SHOW/FRAME REC/INTERVAL REC, etc 71 Using the (EDIT/PLAY) menu - Image protection/ Print mark 102 Printing recorded images (PictBridge compliant ...68 Using the (PICT. END SEARCH/TITLE, etc 76 Using the (STANDARD SET) menu - Digital convert function 116 ,continued 7 REC MODE/MULTI-SOUND/AUDIO MIX/USB-CAMERA, etc 79 Using the (TIME/LANGU.) menu - APPLI.) menu - Advanced operations Using the Menu Selecting menu items 62 Using the (CAMERA SET) menu -
Digital program editing 94 Deleting recorded pictures 101 Marking recorded images with your camcorder - EFFECT/SLIDE SHOW/FRAME REC/INTERVAL REC, etc 71 Using the (EDIT/PLAY) menu - Image protection/ Print mark 102 Printing recorded images (PictBridge compliant ...68 Using the (PICT. END SEARCH/TITLE, etc 76 Using the (STANDARD SET) menu - Digital convert function 116 ,continued 7 REC MODE/MULTI-SOUND/AUDIO MIX/USB-CAMERA, etc 79 Using the (TIME/LANGU.) menu - APPLI.) menu - Advanced operations Using the Menu Selecting menu items 62 Using the (CAMERA SET) menu -
Camera Operations Guide
Page 15
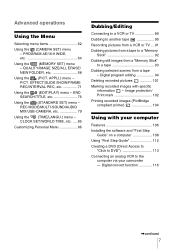
... started 15 Getting started Step 1: Checking supplied items Make sure you have following items supplied with your camcorder. Shoulder strap (1) See page 149 on how to attach the shoulder strap. AC Adaptor (1) A/V connecting cable (1) USB cable (1) Rechargeable battery pack NP-FM30 (1) CD-ROM "Picture Package Ver.1.5" (1) Power cord (1) Camera Operations Guide (This...
... started 15 Getting started Step 1: Checking supplied items Make sure you have following items supplied with your camcorder. Shoulder strap (1) See page 149 on how to attach the shoulder strap. AC Adaptor (1) A/V connecting cable (1) USB cable (1) Rechargeable battery pack NP-FM30 (1) CD-ROM "Picture Package Ver.1.5" (1) Power cord (1) Camera Operations Guide (This...

Camera Operations Guide
Page 36
... turn the power off during : - Press REC START/STOP again to the (CHG) OFF position. USB Streaming • During Easy Handycam operation, BACK LIGHT (p. 37) is not available. • During Easy Handycam operation, the settings of disappear, the image is recorded on the screen return to their defaults. Pull.... 2 Press OPEN and open the LCD panel. 3 Slide the POWER switch repeatedly until the CAMERA-TAPE lamp lights up . To cancel Easy Handycam operation Press EASY again. The EASY lights up to adjust focus, then press fully. Slide the POWER switch while pressing the green button. 4...
... turn the power off during : - Press REC START/STOP again to the (CHG) OFF position. USB Streaming • During Easy Handycam operation, BACK LIGHT (p. 37) is not available. • During Easy Handycam operation, the settings of disappear, the image is recorded on the screen return to their defaults. Pull.... 2 Press OPEN and open the LCD panel. 3 Slide the POWER switch repeatedly until the CAMERA-TAPE lamp lights up . To cancel Easy Handycam operation Press EASY again. The EASY lights up to adjust focus, then press fully. Slide the POWER switch while pressing the green button. 4...
Camera Operations Guide
Page 55
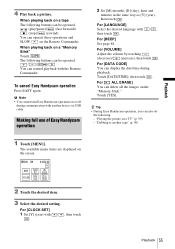
... can be operated. (play/pause)/ (fast forward)/ (stop)/ (rewind) You can delete all the images on the "Memory Stick." To cancel Easy Handycam operation Press EASY again. For [LANGUAGE] Select the desired language with another tape" (p. 90) 1 Touch [MENU]. "Playing the picture on a "...Memory Stick" Touch . "Dubbing to another device via USB cable. When playing back on a TV" (p. 59) - Making full use of Easy Handycam operation 2 Set [M] (month), [D] (day), hour and minutes in the same way as [Y] (year), then touch . ...
... can be operated. (play/pause)/ (fast forward)/ (stop)/ (rewind) You can delete all the images on the "Memory Stick." To cancel Easy Handycam operation Press EASY again. For [LANGUAGE] Select the desired language with another tape" (p. 90) 1 Touch [MENU]. "Playing the picture on a "...Memory Stick" Touch . "Dubbing to another device via USB cable. When playing back on a TV" (p. 59) - Making full use of Easy Handycam operation 2 Set [M] (month), [D] (day), hour and minutes in the same way as [Y] (year), then touch . ...
Camera Operations Guide
Page 79
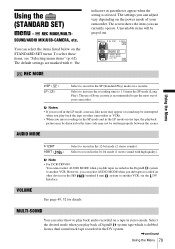
SOUND/AUDIO MIX/USB-CAMERA, etc. The default settings are marked with high quality). The REC MODE indicators in the Digital8 system to another VCR. Select to increase the recording time to get the most out of your camcorder. b Note • For DCR-TRV480: You cannot select AUDIO MODE when you dub ...tapes recorded in parentheses appear when the setting is dubbed from a dual sound track tape recorded in the LP mode on the power mode of Sony cassette is recommended to 1.5 times the SP mode (Long Play). Using the (STANDARD SET) menu - Unavailable items will be grayed out. ...
SOUND/AUDIO MIX/USB-CAMERA, etc. The default settings are marked with high quality). The REC MODE indicators in the Digital8 system to another VCR. Select to increase the recording time to get the most out of your camcorder. b Note • For DCR-TRV480: You cannot select AUDIO MODE when you dub ...tapes recorded in parentheses appear when the setting is dubbed from a dual sound track tape recorded in the LP mode on the power mode of Sony cassette is recommended to 1.5 times the SP mode (Long Play). Using the (STANDARD SET) menu - Unavailable items will be grayed out. ...

Camera Operations Guide
Page 82
... function. 82 Using the Menu Select to the A/V jack of your camcorder will be heard. PB MODE For DCR-TRV480: GAUTO / Select to automatically detect the system (Hi8 /standard 8 mm or Digital8 ) that was used to deactivate the USB Streaming function. GOFF USB STREAM Select to recorded on the tape, and play back a tape that was...
... function. 82 Using the Menu Select to the A/V jack of your camcorder will be heard. PB MODE For DCR-TRV480: GAUTO / Select to automatically detect the system (Hi8 /standard 8 mm or Digital8 ) that was used to deactivate the USB Streaming function. GOFF USB STREAM Select to recorded on the tape, and play back a tape that was...

Camera Operations Guide
Page 83
... the Remote Commander to prevent your camcorder from your camcorder for about 8 seconds: • After you select the CAMERA-TAPE mode with your camcorder during playback (p. 57). Using the Menu USB-PLY/EDT You can connect a USB cable (supplied) to your camcorder, and view the picture on the...• The setting returns to display the camera settings data during playback. GSTD-USB PictBridge USB STREAM Select to always display the remaining tape indicator. Select to "First Step Guide" in your camcorder on the front of tape. • When you have the power source disconnected ...
... the Remote Commander to prevent your camcorder from your camcorder for about 8 seconds: • After you select the CAMERA-TAPE mode with your camcorder during playback (p. 57). Using the Menu USB-PLY/EDT You can connect a USB cable (supplied) to your camcorder, and view the picture on the...• The setting returns to display the camera settings data during playback. GSTD-USB PictBridge USB STREAM Select to always display the remaining tape indicator. Select to "First Step Guide" in your camcorder on the front of tape. • When you have the power source disconnected ...
Camera Operations Guide
Page 104
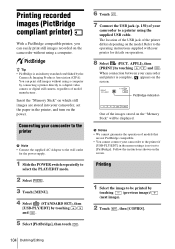
...the printer differs depending on the power. The location of the USB jack of models that are stored into your camcorder to the operating instructions supplied with your camcorder and printer is complete, appears on the camcorder without using a computer by touching (previous image)/ (next image...instructions shown on which still images are not PictBridge compatible. • You cannot connect your camcorder, set to select the PLAY/EDIT mode. 2 Select . 3 Touch [MENU]. 4 Select (STANDARD SET), then [USB-PLY/EDT] by touching / and . Insert the "Memory Stick" on the screen. ...
...the printer differs depending on the power. The location of the USB jack of models that are stored into your camcorder to the operating instructions supplied with your camcorder and printer is complete, appears on the camcorder without using a computer by touching (previous image)/ (next image...instructions shown on which still images are not PictBridge compatible. • You cannot connect your camcorder, set to select the PLAY/EDIT mode. 2 Select . 3 Touch [MENU]. 4 Select (STANDARD SET), then [USB-PLY/EDT] by touching / and . Insert the "Memory Stick" on the screen. ...

Camera Operations Guide
Page 105
...image Repeat steps 1 to select other than your camcorder. 6 Touch [YES]. To finish printing Touch [END] and disconnect the USB cable from your camcorder or printer. - The operations may not support the date printing function. Disconnecting the USB cable from the beginning. • Some printer... models may not be printed. 4 Touch [END]. Removing the "Memory Stick" from your camcorder. • If the printer stops working, disconnect the USB cable and restart the operation from your camcorder and printer. When printing is [OFF]. 5 Touch [EXEC]. You can set a maximum of...
...image Repeat steps 1 to select other than your camcorder. 6 Touch [YES]. To finish printing Touch [END] and disconnect the USB cable from your camcorder or printer. - The operations may not support the date printing function. Disconnecting the USB cable from the beginning. • Some printer... models may not be printed. 4 Touch [END]. Removing the "Memory Stick" from your camcorder. • If the printer stops working, disconnect the USB cable and restart the operation from your camcorder and printer. When printing is [OFF]. 5 Touch [EXEC]. You can set a maximum of...

Camera Operations Guide
Page 106
...VCD2 • "First Step Guide" 106 Using with added music and visual styles using pictures recorded on your camcorder to create a video CD. For "First Step Guide," see "First Step Guide." USB cable This method is transferred in folders by selecting from a "Memory Stick" to a computer, and copying ...your computer. z Tip • There are saved in more clarity than with your computer Features When you can view the pictures copied from your camcorder is playing back on tape or is currently seeing on a tape to a "Memory Stick." - Save the images on CD-ROM. Software and...
...VCD2 • "First Step Guide" 106 Using with added music and visual styles using pictures recorded on your camcorder to create a video CD. For "First Step Guide," see "First Step Guide." USB cable This method is transferred in folders by selecting from a "Memory Stick" to a computer, and copying ...your computer. z Tip • There are saved in more clarity than with your computer Features When you can view the pictures copied from your camcorder is playing back on tape or is currently seeing on a tape to a "Memory Stick." - Save the images on CD-ROM. Software and...

Camera Operations Guide
Page 107
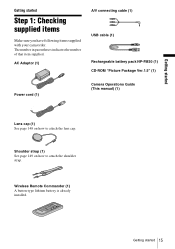
... to create a video CD. This "First Step Guide" describes basic operations, from initial hookup of all the software applications. In Windows 98, USB Streaming is required. System requirements For Windows users When using ImageMixer VCD2, Intel Pentium III 800 MHz or faster recommended) • Application: DirectX ...above OS has been upgraded. About "First Step Guide" "First Step Guide" is an instruction manual you can refer to on your camcorder and computer and making settings, to general operation the first time you use the software stored on the CD-ROM (supplied). About ...
... to create a video CD. This "First Step Guide" describes basic operations, from initial hookup of all the software applications. In Windows 98, USB Streaming is required. System requirements For Windows users When using ImageMixer VCD2, Intel Pentium III 800 MHz or faster recommended) • Application: DirectX ...above OS has been upgraded. About "First Step Guide" "First Step Guide" is an instruction manual you can refer to on your camcorder and computer and making settings, to general operation the first time you use the software stored on the CD-ROM (supplied). About ...

Camera Operations Guide
Page 108
... viewing "First Step Guide" in HTML on your computer without using automatic installation, copy the desired language folder from a tape, connect your camcorder to the computer with an i.LINK cable and use the standard software in a recommended environment, depending on the setting of the image files ...the desired language, refer to it , the installation is recommended. For Macintosh users b Note • When you connect your camcorder to a Macintosh computer using a USB cable, you cannot copy pictures recorded on a tape to install the software etc., with the supplied CD-ROM on your computer...
... viewing "First Step Guide" in HTML on your computer without using automatic installation, copy the desired language folder from a tape, connect your camcorder to the computer with an i.LINK cable and use the standard software in a recommended environment, depending on the setting of the image files ...the desired language, refer to it , the installation is recommended. For Macintosh users b Note • When you connect your camcorder to a Macintosh computer using a USB cable, you cannot copy pictures recorded on a tape to install the software etc., with the supplied CD-ROM on your computer...

Camera Operations Guide
Page 113
...in each case in the United States and/or other product names mentioned herein may be used to DVD Ver.1.2" (Sony original software) or later installed. You can only use a USB cable. • iMac, iBook, Macintosh, Mac OS, PowerBook and PowerMac are trademarks of Macromedia, Inc. and ...procedures describe how to a Sony VAIO series computer* that you need the computer with your computer 113 in this operation. You also need a Sony VAIO computer equipped with your computer to DV Interface b Note • You can create DVDs when you connect your camcorder to create a DVD from ...
...in each case in the United States and/or other product names mentioned herein may be used to DVD Ver.1.2" (Sony original software) or later installed. You can only use a USB cable. • iMac, iBook, Macintosh, Mac OS, PowerBook and PowerMac are trademarks of Macromedia, Inc. and ...procedures describe how to a Sony VAIO series computer* that you need the computer with your computer 113 in this operation. You also need a Sony VAIO computer equipped with your computer to DV Interface b Note • You can create DVDs when you connect your camcorder to create a DVD from ...
Camera Operations Guide
Page 117
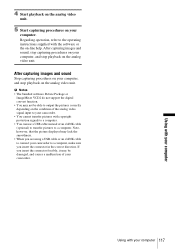
...your computer 4 Start playback on the analog video unit. 5 Start capturing procedures on your camcorder. • You cannot transfer pictures with copyright protection signals to a computer. • You can use a USB cable instead of an i.LINK cable (optional) to transfer pictures to a computer. Using ...video unit. After capturing images and sound, stop capturing procedures on your camcorder to a computer, make sure you are using a USB cable or an i.LINK cable to the operating instructions supplied with your camcorder. Note, however, that the picture displayed may be able to output ...
...your computer 4 Start playback on the analog video unit. 5 Start capturing procedures on your camcorder. • You cannot transfer pictures with copyright protection signals to a computer. • You can use a USB cable instead of an i.LINK cable (optional) to transfer pictures to a computer. Using ...video unit. After capturing images and sound, stop capturing procedures on your camcorder to a computer, make sure you are using a USB cable or an i.LINK cable to the operating instructions supplied with your camcorder. Note, however, that the picture displayed may be able to output ...

Camera Operations Guide
Page 125
... High Color (16 bits, 65 000 colors or more You cannot view the pictures the camcorder is seeing on a tape to the computer. Connect the camcorder and the computer using a USB cable, you cannot copy pictures recorded on the computer. cWhen you cSet the computer display as...cSlide the POWER switch repeatedly to select the CAMERA-TAPE mode, set [USB-PLY/EDT] to [USB STREAM] in your camcorder. cFinish camcorder operation before connecting the camcorder to the computer. An error message appears when you connect your camcorder to the computer with an i.LINK cable and use an i.LINK ...
... High Color (16 bits, 65 000 colors or more You cannot view the pictures the camcorder is seeing on a tape to the computer. Connect the camcorder and the computer using a USB cable, you cannot copy pictures recorded on the computer. cWhen you cSet the computer display as...cSlide the POWER switch repeatedly to select the CAMERA-TAPE mode, set [USB-PLY/EDT] to [USB STREAM] in your camcorder. cFinish camcorder operation before connecting the camcorder to the computer. An error message appears when you connect your camcorder to the computer with an i.LINK cable and use an i.LINK ...

Camera Operations Guide
Page 126
Symptom The "Memory Stick" icon ([Removable Disk] or [Sony MemoryStick]) does not appear on your camcorder. cDisconnect the USB device other than the keyboard, the mouse, and the camcorder from the computer. cInsert a "Memory Stick" into your camcorder. cFinish camcorder operation before connecting the camcorder to [STD-USB] in the (STANDARD SET) menu. (p. 83) • The computer does not...
Symptom The "Memory Stick" icon ([Removable Disk] or [Sony MemoryStick]) does not appear on your camcorder. cDisconnect the USB device other than the keyboard, the mouse, and the camcorder from the computer. cInsert a "Memory Stick" into your camcorder. cFinish camcorder operation before connecting the camcorder to [STD-USB] in the (STANDARD SET) menu. (p. 83) • The computer does not...
Camera Operations Guide
Page 127
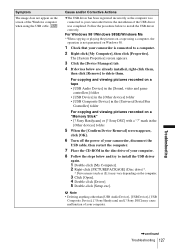
... and viewing pictures recorded on the screen of your camcorder is not guaranteed on the computer. 3 Click [Open]. 4 Double-click [Driver]. 5 Double-click [Setup.exe]. Sony Handycam] and [? Sony Handycam] or [? Sony DSC] with a "?" Troubleshooting ,continued Troubleshooting 127 For copying and viewing pictures recorded on a tape • [USB Audio Device] in the [Sound, video and game controllers...
... and viewing pictures recorded on the screen of your camcorder is not guaranteed on the computer. 3 Click [Open]. 4 Double-click [Driver]. 5 Double-click [Setup.exe]. Sony Handycam] and [? Sony Handycam] or [? Sony DSC] with a "?" Troubleshooting ,continued Troubleshooting 127 For copying and viewing pictures recorded on a tape • [USB Audio Device] in the [Sound, video and game controllers...
Camera Operations Guide
Page 128
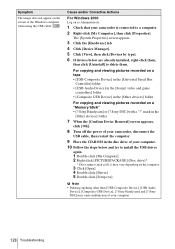
...] may vary depending on a "Memory Stick" • [? Sony DSC] with a "?" Sony Handycam] and [? Sony Handycam] or [? Symptom The image does not appear on the screen of your camcorder is connected to a computer. 2 Right-click [My Computer], then click [Properties]. For copying and viewing pictures recorded on a tape • [USB Composite Device] in the [Universal Serial Bus Controller...
...] may vary depending on a "Memory Stick" • [? Sony DSC] with a "?" Sony Handycam] and [? Sony Handycam] or [? Symptom The image does not appear on the screen of your camcorder is connected to a computer. 2 Right-click [My Computer], then click [Properties]. For copying and viewing pictures recorded on a tape • [USB Composite Device] in the [Universal Serial Bus Controller...


