
Operating Instructions
Page 73
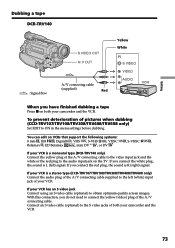
...DCR-TRV140 only) Connect the yellow plug of the A/V connecting cable to the video input jack and the white or the red plug to the S video jacks of the A/V connecting cable. You can edit on VCRs that support the following systems: 8 mm , Hi8 , Digital8 , VHS , S-VHS , VHSC , S-VHSC , Betamax , ED Betamax , mini DV , or DV... DCR-TRV140 : Signal flow S VIDEO OUT A / V OUT A/V connecting cable (supplied) Red Yellow White IN S VIDEO VIDEO AUDIO When you have finished dubbing a tape Press x on both your camcorder and the VCR. 73 To prevent deterioration of the A/V connecting cable ...
...DCR-TRV140 only) Connect the yellow plug of the A/V connecting cable to the video input jack and the white or the red plug to the S video jacks of the A/V connecting cable. You can edit on VCRs that support the following systems: 8 mm , Hi8 , Digital8 , VHS , S-VHS , VHSC , S-VHSC , Betamax , ED Betamax , mini DV , or DV... DCR-TRV140 : Signal flow S VIDEO OUT A / V OUT A/V connecting cable (supplied) Red Yellow White IN S VIDEO VIDEO AUDIO When you have finished dubbing a tape Press x on both your camcorder and the VCR. 73 To prevent deterioration of the A/V connecting cable ...

Operating Instructions
Page 74
... information. DV IN/OUT i.LINK cable (DV connecting cable) (optional) DV S VIDEO DV IN : Signal flow When you play back recorded pictures on both your camcorder and the VCR. Digital effect - You can connect one VCR only using the i.LINK cable (DV connecting cable). Dubbing a tape Using the i.LINK cable (DV connecting cable) (DCR-TRV140 only) Simply connect the i.LINK cable (DV connecting cable) (optional) to DV IN/OUT...
... information. DV IN/OUT i.LINK cable (DV connecting cable) (optional) DV S VIDEO DV IN : Signal flow When you play back recorded pictures on both your camcorder and the VCR. Digital effect - You can connect one VCR only using the i.LINK cable (DV connecting cable). Dubbing a tape Using the i.LINK cable (DV connecting cable) (DCR-TRV140 only) Simply connect the i.LINK cable (DV connecting cable) (optional) to DV IN/OUT...

Operating Instructions
Page 75
... color, size, and background color of the A/V connecting cable. Step 4 Selecting the dubbing mode (p. 81). If you can skip step 3. You can edit on VCRs that support the following systems: 8 mm , Hi8 , Digital8 , VHS , S-VHS , VHSC , S-VHSC , Betamax , ED Betamax , mini DV , or DV If your camcorder (p. 76 to obtain optimum quality screen images. Step...
... color, size, and background color of the A/V connecting cable. Step 4 Selecting the dubbing mode (p. 81). If you can skip step 3. You can edit on VCRs that support the following systems: 8 mm , Hi8 , Digital8 , VHS , S-VHS , VHSC , S-VHSC , Betamax , ED Betamax , mini DV , or DV If your camcorder (p. 76 to obtain optimum quality screen images. Step...

Operating Instructions
Page 83
...DCR-TRV140 only You can duplicate selected scenes (programs) for operation (p. 84 to 20 programs. Unwanted scene Unwanted scene Switch the order Before operating the Digital program editing function Step 1 Connecting the VCR (p. 83). Scenes can connect both the A/V connecting cable and the i.LINK cable (DV connecting cable...(p. 88). When you can set up to 87). When you dub using the same VCR again, you use the i.LINK cable (DV connecting cable), connect the devices as illustrated in page 74. 83 You can skip steps 2 and 3. Using the Digital program editing function...
...DCR-TRV140 only You can duplicate selected scenes (programs) for operation (p. 84 to 20 programs. Unwanted scene Unwanted scene Switch the order Before operating the Digital program editing function Step 1 Connecting the VCR (p. 83). Scenes can connect both the A/V connecting cable and the i.LINK cable (DV connecting cable...(p. 88). When you can set up to 87). When you dub using the same VCR again, you use the i.LINK cable (DV connecting cable), connect the devices as illustrated in page 74. 83 You can skip steps 2 and 3. Using the Digital program editing function...
Operating Instructions
Page 87
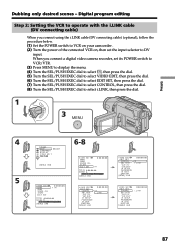
Digital program editing Step 2: Setting the VCR to operate with the i.LINK cable (DV connecting cable) When you connect a digital video camera recorder, set the input selector to select i.LINK, then press the dial. 1 POWER RA CAME VCR OFF(CHG) 3 MENU 4 ...RETURN [ MENU ] : END 0:00:00:00 IR i . Editing Dubbing only desired scenes - When you connect using the i.LINK cable (DV connecting cable) (optional), follow the procedure below. (1) Set the POWER switch to VCR on your camcorder . (2) Turn the power of the connected VCR on, then set its POWER switch to VCR/VTR. (3) Press MENU...
Digital program editing Step 2: Setting the VCR to operate with the i.LINK cable (DV connecting cable) When you connect a digital video camera recorder, set the input selector to select i.LINK, then press the dial. 1 POWER RA CAME VCR OFF(CHG) 3 MENU 4 ...RETURN [ MENU ] : END 0:00:00:00 IR i . Editing Dubbing only desired scenes - When you connect using the i.LINK cable (DV connecting cable) (optional), follow the procedure below. (1) Set the POWER switch to VCR on your camcorder . (2) Turn the power of the connected VCR on, then set its POWER switch to VCR/VTR. (3) Press MENU...

Operating Instructions
Page 89
...I T SET CONTROL ADJ TEST " CUT- Be sure to -digital connection, video and audio signals are transmitted in the menu settings of your camcorder . •When you complete step 3, the image to operate the dubbing function correctly, depending on the VCR. Editing Dubbing only desired scenes -...TEST RETURN [ MENU ] : END V I DEO ED I T ED I T SET CONTROL ADJ TEST RETURN " CUT- If you connect using the i.LINK cable (DV connecting cable) With a digital-to allow about 50 seconds. •If you may not record properly. Digital program editing 11 7,8 V I DEO ED I T 0:00:00...
...I T SET CONTROL ADJ TEST " CUT- Be sure to -digital connection, video and audio signals are transmitted in the menu settings of your camcorder . •When you complete step 3, the image to operate the dubbing function correctly, depending on the VCR. Editing Dubbing only desired scenes -...TEST RETURN [ MENU ] : END V I DEO ED I T ED I T SET CONTROL ADJ TEST RETURN " CUT- If you connect using the i.LINK cable (DV connecting cable) With a digital-to allow about 50 seconds. •If you may not record properly. Digital program editing 11 7,8 V I DEO ED I T 0:00:00...

Operating Instructions
Page 91
... dial to select UNDO, then press the dial. The program mark flashes. Digital program editing Erasing the program you use the i.LINK cable (DV connecting cable). Erasing all programs Select RETURN in the menu settings. (2) Turn the SEL/PUSH EXEC dial to select EXECUTE, then press the dial...SEL/PUSH EXEC dial to select ERASE ALL, then press the dial. Operation 2: Performing Digital program editing (Dubbing a tape) Make sure that your camcorder and VCR stop automatically. 91 When you have set to select EXECUTE, then press the dial. To cancel a program you use a digital video...
... dial to select UNDO, then press the dial. The program mark flashes. Digital program editing Erasing the program you use the i.LINK cable (DV connecting cable). Erasing all programs Select RETURN in the menu settings. (2) Turn the SEL/PUSH EXEC dial to select EXECUTE, then press the dial...SEL/PUSH EXEC dial to select ERASE ALL, then press the dial. Operation 2: Performing Digital program editing (Dubbing a tape) Make sure that your camcorder and VCR stop automatically. 91 When you have set to select EXECUTE, then press the dial. To cancel a program you use a digital video...
Operating Instructions
Page 92
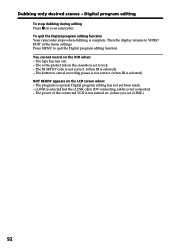
To quit the Digital program editing function Your camcorder stops when dubbing is selected) - The tape has run out. - The power of the connected VCR is selected) NOT READY appears on . (when you set .... (when IR is not turned on the LCD screen when: - Digital program editing To stop dubbing during editing Press x on the VCR when: - You cannot record on your camcorder. The program to quit the Digital program editing function. i.LINK is selected but the i.LINK cable (DV connecting cable) is set i.LINK.) 92 Press MENU to...
To quit the Digital program editing function Your camcorder stops when dubbing is selected) - The tape has run out. - The power of the connected VCR is selected) NOT READY appears on . (when you set .... (when IR is not turned on the LCD screen when: - Digital program editing To stop dubbing during editing Press x on the VCR when: - You cannot record on your camcorder. The program to quit the Digital program editing function. i.LINK is selected but the i.LINK cable (DV connecting cable) is set i.LINK.) 92 Press MENU to...

Operating Instructions
Page 93
DCR-TRV140 only You can record a tape from video - Simply connect the i.LINK cable (DV connecting cable) (optional) to DV IN/OUT and to VCR on your camcorder. (3) Press z REC and the button on its right simultaneously on your camcorder, then immediately press X on your camcorder. (4) Press N on both your camcorder...dubbing a tape Press x on the VCR to LCD in digital form for high-quality editing. Only SP mode is LCD). Before operation Set DISPLAY to start playback. Use your camcorder with other than the i.LINK cable (DV connecting cable). The picture from a TV or VCR appears ...
DCR-TRV140 only You can record a tape from video - Simply connect the i.LINK cable (DV connecting cable) (optional) to DV IN/OUT and to VCR on your camcorder. (3) Press z REC and the button on its right simultaneously on your camcorder, then immediately press X on your camcorder. (4) Press N on both your camcorder...dubbing a tape Press x on the VCR to LCD in digital form for high-quality editing. Only SP mode is LCD). Before operation Set DISPLAY to start playback. Use your camcorder with other than the i.LINK cable (DV connecting cable). The picture from a TV or VCR appears ...
Operating Instructions
Page 94
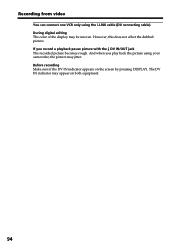
During digital editing The color of the display may appear on the screen by pressing DISPLAY. Before recording Make sure if the DV IN indicator appears on both equipment. 94 And when you record a playback pause picture with the DV IN/OUT jack The recorded picture becomes rough. However, this does not affect the dubbed picture. If you play back the picture using the i.LINK cable (DV connecting cable). The DV IN indicator may be uneven. Recording from video You can connect one VCR only using your camcorder, the picture may jitter.
During digital editing The color of the display may appear on the screen by pressing DISPLAY. Before recording Make sure if the DV IN indicator appears on both equipment. 94 And when you record a playback pause picture with the DV IN/OUT jack The recorded picture becomes rough. However, this does not affect the dubbed picture. If you play back the picture using the i.LINK cable (DV connecting cable). The DV IN indicator may be uneven. Recording from video You can connect one VCR only using your camcorder, the picture may jitter.

Operating Instructions
Page 95
Use the Remote Commander for this operation. This function is not available when the i.LINK cable (DV connecting cable) is not used. [a] [A] [b] [c] [B] [C] [A]: A tape that contains the scene to be inserted [B]: A tape before editing [C]: A tape after editing Editing 95 ... as in "Recording from a VCR onto your originally recorded tape using the i.LINK cable (DV connecting cable) (optional) by specifying the insert start and end points. Insert a cassette containing the desired scene into the VCR. DCR-TRV140 only You can insert a new scene from video" on page 93. Inserting a ...
Use the Remote Commander for this operation. This function is not available when the i.LINK cable (DV connecting cable) is not used. [a] [A] [b] [c] [B] [C] [A]: A tape that contains the scene to be inserted [B]: A tape before editing [C]: A tape after editing Editing 95 ... as in "Recording from a VCR onto your originally recorded tape using the i.LINK cable (DV connecting cable) (optional) by specifying the insert start and end points. Insert a cassette containing the desired scene into the VCR. DCR-TRV140 only You can insert a new scene from video" on page 93. Inserting a ...
Operating Instructions
Page 116
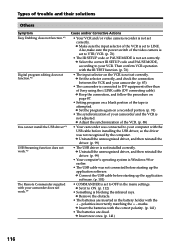
... • The input selector on a blank portion of the VCR is set to DV equipment other than of the VCR. (p. 88) • Your camcorder was connected to your computer with the USB cable before installing the USB driver, so the driver was not connected before starting up the... the connection between the VCR and your camcorder. (p. 83) • The camcorder is connected to VTR/VCR. (p. 76) • The IR SETUP code or PAUSE MODE is not set to your VCR. c Adjust the synchronization of Sony using the i.LINK cable (DV connecting cable). Then confirm VCR operation with the correct...
... • The input selector on a blank portion of the VCR is set to DV equipment other than of the VCR. (p. 88) • Your camcorder was connected to your computer with the USB cable before installing the USB driver, so the driver was not connected before starting up the... the connection between the VCR and your camcorder. (p. 83) • The camcorder is connected to VTR/VCR. (p. 76) • The IR SETUP code or PAUSE MODE is not set to your VCR. c Adjust the synchronization of Sony using the i.LINK cable (DV connecting cable). Then confirm VCR operation with the correct...

Operating Instructions
Page 126
... standard standardized by the i.LINK cable (DV connecting cable). DCR-TRV140 only The DV jack on some connected equipment. IEEE 1394 is an i.LINK-compliant DV input/output jack. i.LINK is a digital serial interface for IEEE 1394 data transport bus proposed by SONY, and is a more i.LINK jacks (DV jacks), refer to but also ... characteristics and specifications of Electrical and Electronic Engineers. 126 About the Name "i.LINK" i.LINK is a trademark approved by a single i.LINK cable. Note, however, that the method of operation sometimes varies according to this unit is "i.LINK"?
... standard standardized by the i.LINK cable (DV connecting cable). DCR-TRV140 only The DV jack on some connected equipment. IEEE 1394 is an i.LINK-compliant DV input/output jack. i.LINK is a digital serial interface for IEEE 1394 data transport bus proposed by SONY, and is a more i.LINK jacks (DV jacks), refer to but also ... characteristics and specifications of Electrical and Electronic Engineers. 126 About the Name "i.LINK" i.LINK is a trademark approved by a single i.LINK cable. Note, however, that the method of operation sometimes varies according to this unit is "i.LINK"?

Operating Instructions
Page 127
...or the amount of each equipment. This unit can be connected. Mbps stands for the equipment to equipment having DV jacks, see page 74. Required i.LINK Cable Use the Sony i.LINK 4-pin-to the equipment. Three maximum baud rates are trademarks. 127 Before connecting this unit is connected ...to a personal computer, make sure that can also be connected to other i.LINK (DV) compatible equipment made by this unit...
...or the amount of each equipment. This unit can be connected. Mbps stands for the equipment to equipment having DV jacks, see page 74. Required i.LINK Cable Use the Sony i.LINK 4-pin-to the equipment. Three maximum baud rates are trademarks. 127 Before connecting this unit is connected ...to a personal computer, make sure that can also be connected to other i.LINK (DV) compatible equipment made by this unit...

Operating Instructions
Page 132
...; Remove the tape, and periodically turn on it out by your camcorder. Do not use a new Hi8 /Digital8 tape. To disconnect the power cord, pull it . This will damage the cord and may be repaired. *1) DCR-TRV140 only *2) CCD-TRV107/TRV108/TRV308/TRV408/TRV608 only Connection to sense the type and...fingerprints on the rear of solvent which may damage the finish. • Do not let sand get into your personal computer with the i.LINK cable (DV connecting cable), use any type of the cassette. Vibrating 132 These holes are not using the unit for a long time. • Clean the lens with...
...; Remove the tape, and periodically turn on it out by your camcorder. Do not use a new Hi8 /Digital8 tape. To disconnect the power cord, pull it . This will damage the cord and may be repaired. *1) DCR-TRV140 only *2) CCD-TRV107/TRV108/TRV308/TRV408/TRV608 only Connection to sense the type and...fingerprints on the rear of solvent which may damage the finish. • Do not let sand get into your personal computer with the i.LINK cable (DV connecting cable), use any type of the cassette. Vibrating 132 These holes are not using the unit for a long time. • Clean the lens with...
Operating Instructions
Page 144
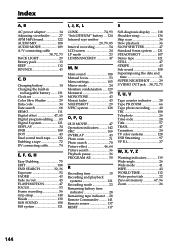
..., 65 Digital program editing ...... 83 Digital 8 system 121 DISPLAY 34 DNR 108 DOT 43 Dual sound track tape ....... 122 Dubbing a tape 72 DV connecting cable 74 E, F, G, H Easy Dubbing 75 EDIT 108 END SEARCH 32, 36 Exposure 52 FADER 43 Fade in/out 43 FLASH MOTION 47 FOCUS ... SOUND 108 Hi8 system 121 I, J, K, L i.LINK 74, 93 "InfoLITHIUM" battery ... 124 Infrared rays emitter 29, 79, 85 Interval recording 54 LCD screen 24 LP mode 23 LUMINANCEKEY 47 M, N Main sound 108 Manual focus 53 Menu settings 105 Mirror mode 24 Moisture condensation ..... 129 Monaural 39 MONOTONE...
..., 65 Digital program editing ...... 83 Digital 8 system 121 DISPLAY 34 DNR 108 DOT 43 Dual sound track tape ....... 122 Dubbing a tape 72 DV connecting cable 74 E, F, G, H Easy Dubbing 75 EDIT 108 END SEARCH 32, 36 Exposure 52 FADER 43 Fade in/out 43 FLASH MOTION 47 FOCUS ... SOUND 108 Hi8 system 121 I, J, K, L i.LINK 74, 93 "InfoLITHIUM" battery ... 124 Infrared rays emitter 29, 79, 85 Interval recording 54 LCD screen 24 LP mode 23 LUMINANCEKEY 47 M, N Main sound 108 Manual focus 53 Menu settings 105 Mirror mode 24 Moisture condensation ..... 129 Monaural 39 MONOTONE...


