

Operating Instructions
Page 2
...intended to alert the user to the presence of electric shock to come. You can help preserve our environment by returning your Digital Handycam/Handycam VisionTM, you . Congratulations on your purchase of rechargeable batteries, call toll free 1-800-822-8837, or visit ...temperatures above 60°C (140°F) such as in a car parked in the U.S.A. For more information regarding recycling of this Sony Digital Handycam camcorder/Handycam VisionTM . You will soon be of sufficient magnitude to constitute a risk of uninsulated "dangerous voltage" within the product's enclosure...
...intended to alert the user to the presence of electric shock to come. You can help preserve our environment by returning your Digital Handycam/Handycam VisionTM, you . Congratulations on your purchase of rechargeable batteries, call toll free 1-800-822-8837, or visit ...temperatures above 60°C (140°F) such as in a car parked in the U.S.A. For more information regarding recycling of this Sony Digital Handycam camcorder/Handycam VisionTM . You will soon be of sufficient magnitude to constitute a risk of uninsulated "dangerous voltage" within the product's enclosure...
Operating Instructions
Page 4
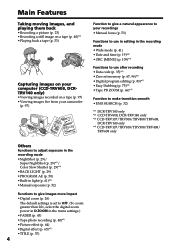
... your computer (CCD-TRV608, DCRTRV140 only) •Viewing images recorded on a tape (p. 97) •Viewing images live from your camcorder (p. 97) Function to give a natural appearance to your recordings •Manual focus (p. 53) Functions to use in editing in the...memory (p. 67, 96)*1) • Digital program editing (p. 83)*1) • Easy Dubbing (p. 75)*4) • Tape PB ZOOM (p. 66)*1) Function to make transition smooth •END SEARCH (p. 32) *1) DCR-TRV140 only *2) CCD-TRV608, DCR-TRV140 only *3) CCD-TRV107/TRV308/TRV408/TRV608, DCR-TRV140 only *4) CCD-TRV107/TRV108/TRV308/TRV408/...
... your computer (CCD-TRV608, DCRTRV140 only) •Viewing images recorded on a tape (p. 97) •Viewing images live from your camcorder (p. 97) Function to give a natural appearance to your recordings •Manual focus (p. 53) Functions to use in editing in the...memory (p. 67, 96)*1) • Digital program editing (p. 83)*1) • Easy Dubbing (p. 75)*4) • Tape PB ZOOM (p. 66)*1) Function to make transition smooth •END SEARCH (p. 32) *1) DCR-TRV140 only *2) CCD-TRV608, DCR-TRV140 only *3) CCD-TRV107/TRV308/TRV408/TRV608, DCR-TRV140 only *4) CCD-TRV107/TRV108/TRV308/TRV408/...
Operating Instructions
Page 7
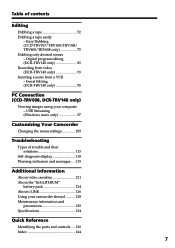
... 129 Specifications 134 Quick Reference Identifying the parts and controls .... 136 Index 144 7 USB Streaming (Windows users only 97 Customizing Your Camcorder Changing the menu settings 105 Troubleshooting Types of contents Editing Dubbing a tape 72 Dubbing a tape easily - Digital program editing (DCR-TRV140 only 83 Recording from video (DCR-TRV140 only 93 Inserting a scene from a VCR -
... 129 Specifications 134 Quick Reference Identifying the parts and controls .... 136 Index 144 7 USB Streaming (Windows users only 97 Customizing Your Camcorder Changing the menu settings 105 Troubleshooting Types of contents Editing Dubbing a tape 72 Dubbing a tape easily - Digital program editing (DCR-TRV140 only 83 Recording from video (DCR-TRV140 only 93 Inserting a scene from a VCR -
Operating Instructions
Page 10
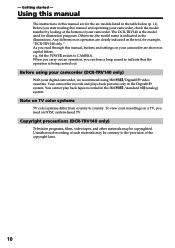
...the six models listed in the text, for illustration purposes. The DCR-TRV140 is the model used for example, "DCR-TRV140 only." As you can hear a beep sound to the provision of your digital camcorder, we recommend using Hi8 /Digital8 video cassettes. To view your recordings on a TV, you start... reading this manual and operating your camcorder, check the model number by ...
...the six models listed in the text, for illustration purposes. The DCR-TRV140 is the model used for example, "DCR-TRV140 only." As you can hear a beep sound to the provision of your digital camcorder, we recommend using Hi8 /Digital8 video cassettes. To view your recordings on a TV, you start... reading this manual and operating your camcorder, check the model number by ...

Operating Instructions
Page 26
...zoom function sparingly results in the menu settings. The digital zoom function is set to OFF (CHG). (2) Close the LCD panel. (3) Eject the cassette. (4) Attach the lens cap. The digital zooming zone appears when you select the digital zoom power in D ZOOM in light accidentally. Using ... farther away) W T WT W T To use zoom grater than 20× Zoom greater than 20× is processed digitally. After using your camcorder (CCD-TRV107/TRV308/TRV408/TRV608, DCR-TRV140 only) Remove the battery pack from your camcorder to avoid turning on the built-in the menu settings. 26
...zoom function sparingly results in the menu settings. The digital zoom function is set to OFF (CHG). (2) Close the LCD panel. (3) Eject the cassette. (4) Attach the lens cap. The digital zooming zone appears when you select the digital zoom power in D ZOOM in light accidentally. Using ... farther away) W T WT W T To use zoom grater than 20× Zoom greater than 20× is processed digitally. After using your camcorder (CCD-TRV107/TRV308/TRV408/TRV608, DCR-TRV140 only) Remove the battery pack from your camcorder to avoid turning on the built-in the menu settings. 26

Operating Instructions
Page 30
... the following functions: - To cancel the Color Slow Shutter, press COLOR SLOW SHUTTER again. Notes •Do not use the following functions (DCR-TRV140 only): - NightShot Light NightShot Light rays are infrared and so are invisible. and "SUPER NIGHTSHOT" indicators flash on the screen. and " COLOR...to record color images in a dark place. (1) Slide NIGHTSHOT to OFF in CAMERA mode. (2) Press COLOR SLOW SHUTTER. Digital effect - This may cause your camcorder to ON in normal recording, the picture may be clearer with the autofocus mode when using the NightShot function, you keep ...
... the following functions: - To cancel the Color Slow Shutter, press COLOR SLOW SHUTTER again. Notes •Do not use the following functions (DCR-TRV140 only): - NightShot Light NightShot Light rays are infrared and so are invisible. and "SUPER NIGHTSHOT" indicators flash on the screen. and " COLOR...to record color images in a dark place. (1) Slide NIGHTSHOT to OFF in CAMERA mode. (2) Press COLOR SLOW SHUTTER. Digital effect - This may cause your camcorder to ON in normal recording, the picture may be clearer with the autofocus mode when using the NightShot function, you keep ...

Operating Instructions
Page 40
...the fader function is set or in use . - Recording does not start yet. while the digital effect function is in use . •When recording a still image, do not shake your camcorder returns to the standby mode. Mosaic noise may appear on the Remote Commander. To use the ...hold PHOTO lightly. (2) Press PHOTO deeper. The still image is completed. Press PHOTO deeper. DCR-TRV140 only You can record about 510 images in the SP mode and about 7 seconds, and your camcorder. PHOTO 1 PHOTO CAPTURE 2 PHOTO Notes •During the tape photo recording, you cannot ...
...the fader function is set or in use . - Recording does not start yet. while the digital effect function is in use . •When recording a still image, do not shake your camcorder returns to the standby mode. Mosaic noise may appear on the Remote Commander. To use the ...hold PHOTO lightly. (2) Press PHOTO deeper. The still image is completed. Press PHOTO deeper. DCR-TRV140 only You can record about 510 images in the SP mode and about 7 seconds, and your camcorder. PHOTO 1 PHOTO CAPTURE 2 PHOTO Notes •During the tape photo recording, you cannot ...
Operating Instructions
Page 45
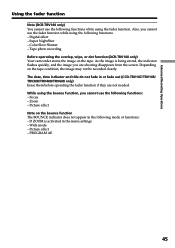
... do not fade in the following mode or functions: - Super NightShot - Tape photo recording Before operating the overlap, wipe, or dot function (DCR-TRV140 only) Your camcorder stores the image on the tape condition, the image may not be recorded clearly. Focus - Picture effect - PROGRAM AE 45 Picture effect Note... using the bounce function, you cannot use the fader function while using the fader function. Advanced Recording Operations Using the fader function Note (DCR-TRV140 only) You cannot use the following functions while using the following functions: - Digital effect -
... do not fade in the following mode or functions: - Super NightShot - Tape photo recording Before operating the overlap, wipe, or dot function (DCR-TRV140 only) Your camcorder stores the image on the tape condition, the image may not be recorded clearly. Focus - Picture effect - PROGRAM AE 45 Picture effect Note... using the bounce function, you cannot use the fader function while using the fader function. Advanced Recording Operations Using the fader function Note (DCR-TRV140 only) You cannot use the following functions while using the following functions: - Digital effect -
Operating Instructions
Page 46
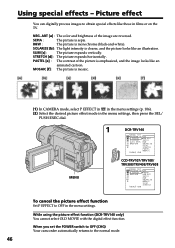
...TRV608 MANUA L SET PROGRAM AE OFF P EFFECT PASTE L RETURN NEG. When you set the POWER switch to OFF (CHG) Your camcorder automatically returns to OFF in the menu settings. SLIM [c] : The picture expands vertically. PASTEL [e] : The contrast of the image ... desired picture effect mode in films or on the TV. Using special effects - While using the picture effect function (DCR-TRV140 only) You cannot select OLD MOVIE with the digital effect function. NEG. MENU 1 DCR-TRV140 MANUA L SET PROGRAM AE OFF P EFFECT NEG. AR T D EFFECT SEP I A AUTO SHTR B&W RETURN SOL ...
...TRV608 MANUA L SET PROGRAM AE OFF P EFFECT PASTE L RETURN NEG. When you set the POWER switch to OFF (CHG) Your camcorder automatically returns to OFF in the menu settings. SLIM [c] : The picture expands vertically. PASTEL [e] : The contrast of the image ... desired picture effect mode in films or on the TV. Using special effects - While using the picture effect function (DCR-TRV140 only) You cannot select OLD MOVIE with the digital effect function. NEG. MENU 1 DCR-TRV140 MANUA L SET PROGRAM AE OFF P EFFECT NEG. AR T D EFFECT SEP I A AUTO SHTR B&W RETURN SOL ...
Operating Instructions
Page 47
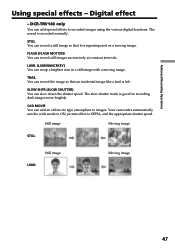
...more brightly. TRAIL You can record the image so that it is left. Your camcorder automatically sets the wide mode to ON, picture effect to recorded images using the various digital functions. FLASH (FLASH MOTION) You can swap a brighter area in a still ...image with a moving image. STILL You can slow down the shutter speed. Moving image 47 LUMI. (LUMINANCEKEY) You can record still images successively at constant intervals. Advanced Recording Operations Using special effects - DCR-TRV140...
...more brightly. TRAIL You can record the image so that it is left. Your camcorder automatically sets the wide mode to ON, picture effect to recorded images using the various digital functions. FLASH (FLASH MOTION) You can swap a brighter area in a still ...image with a moving image. STILL You can slow down the shutter speed. Moving image 47 LUMI. (LUMINANCEKEY) You can record still images successively at constant intervals. Advanced Recording Operations Using special effects - DCR-TRV140...
Operating Instructions
Page 65
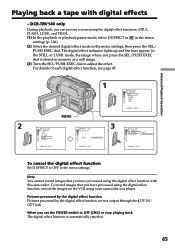
... in memory as a player. Advanced Playback Operations Playing back a tape with this camcorder. In the STILL or LUMI. IIIIIIIIIIIIIIII [ MENU ] : END To cancel the digital effect function Set D EFFECT to adjust the effect. The digital effect indicator lights up and the bars appear. TRA I L [ MENU ] ...: END MENU MANUA L SET D EFFECT L UM I LL FLASH LUMI. Note You cannot record images that you have processed using the digital effect function with digital effects - DCR-TRV140 only During playback, you press the SEL/PUSH EXEC dial is automatically canceled. 65 For details of each...
... in memory as a player. Advanced Playback Operations Playing back a tape with this camcorder. In the STILL or LUMI. IIIIIIIIIIIIIIII [ MENU ] : END To cancel the digital effect function Set D EFFECT to adjust the effect. The digital effect indicator lights up and the bars appear. TRA I L [ MENU ] ...: END MENU MANUA L SET D EFFECT L UM I LL FLASH LUMI. Note You cannot record images that you have processed using the digital effect function with digital effects - DCR-TRV140 only During playback, you press the SEL/PUSH EXEC dial is automatically canceled. 65 For details of each...

Operating Instructions
Page 74
... you play back recorded pictures on the VCR to VCR. (4) Play back the recorded tape on the VCR. Picture effect - With digital-to DV IN of your camcorder. (5) Start recording on your VCR for more information. Refer to record over) into the VCR, and insert the recorded tape into ... pause picture via the DV IN/OUT jack The recorded picture becomes rough. Dubbing a tape Using the i.LINK cable (DV connecting cable) (DCR-TRV140 only) Simply connect the i.LINK cable (DV connecting cable) (optional) to DV IN/OUT and to -digital connection, video and audio signals are transmitted in...
... you play back recorded pictures on the VCR to VCR. (4) Play back the recorded tape on the VCR. Picture effect - With digital-to DV IN of your camcorder. (5) Start recording on your VCR for more information. Refer to record over) into the VCR, and insert the recorded tape into ... pause picture via the DV IN/OUT jack The recorded picture becomes rough. Dubbing a tape Using the i.LINK cable (DV connecting cable) (DCR-TRV140 only) Simply connect the i.LINK cable (DV connecting cable) (optional) to DV IN/OUT and to -digital connection, video and audio signals are transmitted in...
Operating Instructions
Page 84
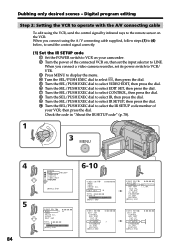
... press the dial. 9 Turn the SEL/PUSH EXEC dial to select IR SETUP, then press the dial. 0 Turn the SEL/PUSH EXEC dial to LINE. Digital program editing Step 2: Setting the VCR to operate with the A/V connecting cable To edit using the A/V connecting cable supplied, follow steps (1) to (4) below,... to send the control signal correctly. (1) Set the IR SETUP code 1 Set the POWER switch to VCR on your camcorder. 2 Turn the power of the connected VCR on the VCR. When you connect a video camera recorder, set the input selector to select the IR SETUP...
... press the dial. 9 Turn the SEL/PUSH EXEC dial to select IR SETUP, then press the dial. 0 Turn the SEL/PUSH EXEC dial to LINE. Digital program editing Step 2: Setting the VCR to operate with the A/V connecting cable To edit using the A/V connecting cable supplied, follow steps (1) to (4) below,... to send the control signal correctly. (1) Set the IR SETUP code 1 Set the POWER switch to VCR on your camcorder. 2 Turn the power of the connected VCR on the VCR. When you connect a video camera recorder, set the input selector to select the IR SETUP...
Operating Instructions
Page 85
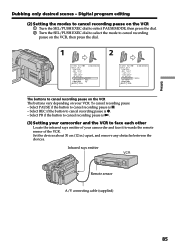
Select REC if the button to cancel recording pause is N. (3) Setting your camcorder and the VCR to face each other Locate the infrared rays emitter of the VCR. I N " " CUT-OUT " I R SETUP P AUS EMODE I R TEST RETURN [ MENU ] : END 0:00:...: - I N " " CUT-OUT " I R SETUP P AUS EMODE I R TEST RETURN [ MENU ] : END 0:00:00:00 PAUSE The buttons to cancel recording pause is z. - Editing Dubbing only desired scenes - Digital program editing (2) Setting the modes to cancel recording pause on the VCR 1 Turn the SEL/PUSH EXEC dial to select PAUSEMODE, then press the dial...
Select REC if the button to cancel recording pause is N. (3) Setting your camcorder and the VCR to face each other Locate the infrared rays emitter of the VCR. I N " " CUT-OUT " I R SETUP P AUS EMODE I R TEST RETURN [ MENU ] : END 0:00:...: - I N " " CUT-OUT " I R SETUP P AUS EMODE I R TEST RETURN [ MENU ] : END 0:00:00:00 PAUSE The buttons to cancel recording pause is z. - Editing Dubbing only desired scenes - Digital program editing (2) Setting the modes to cancel recording pause on the VCR 1 Turn the SEL/PUSH EXEC dial to select PAUSEMODE, then press the dial...
Operating Instructions
Page 86
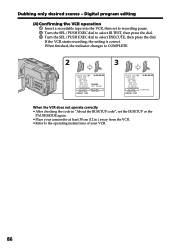
...the VCR does not operate correctly •After checking the code in .) away from the VCR. •Refer to the operating instructions of your camcorder at least 30 cm (12 in "About the IR SETUP code", set to recording pause. 2 Turn the SEL/PUSH EXEC dial to select ...the SEL/PUSH EXEC dial to COMPLETE. 2 3 V I DEO ED I T ED I T SET CONTROL ADJ TEST "CUT- I N" "CUT-OUT" I R SETUP PAUSEMODE I T SET CONTROL ADJ TEST "CUT- Digital program editing (4) Confirming the VCR operation 1 Insert a recordable tape into the VCR, then set the IR SETUP or the PAUSEMODE again. •Place your VCR...
...the VCR does not operate correctly •After checking the code in .) away from the VCR. •Refer to the operating instructions of your camcorder at least 30 cm (12 in "About the IR SETUP code", set to recording pause. 2 Turn the SEL/PUSH EXEC dial to select ...the SEL/PUSH EXEC dial to COMPLETE. 2 3 V I DEO ED I T ED I T SET CONTROL ADJ TEST "CUT- I N" "CUT-OUT" I R SETUP PAUSEMODE I T SET CONTROL ADJ TEST "CUT- Digital program editing (4) Confirming the VCR operation 1 Insert a recordable tape into the VCR, then set the IR SETUP or the PAUSEMODE again. •Place your VCR...
Operating Instructions
Page 87
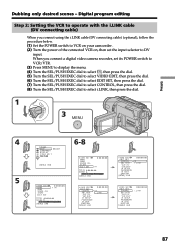
... editing Step 2: Setting the VCR to operate with the i.LINK cable (DV connecting cable) When you connect a digital video camera recorder, set the input selector to select i.LINK, then press the dial. 1 POWER RA CAME VCR OFF(CHG) 3 MENU 4 5 OTHERS BEEP ME LODY ... TEST "CUT- When you connect using the i.LINK cable (DV connecting cable) (optional), follow the procedure below. (1) Set the POWER switch to VCR on your camcorder . (2) Turn the power of the connected VCR on, then set its POWER switch to VCR/VTR. (3) Press MENU to display the menu. (4) Turn the SEL...
... editing Step 2: Setting the VCR to operate with the i.LINK cable (DV connecting cable) When you connect a digital video camera recorder, set the input selector to select i.LINK, then press the dial. 1 POWER RA CAME VCR OFF(CHG) 3 MENU 4 5 OTHERS BEEP ME LODY ... TEST "CUT- When you connect using the i.LINK cable (DV connecting cable) (optional), follow the procedure below. (1) Set the POWER switch to VCR on your camcorder . (2) Turn the power of the connected VCR on, then set its POWER switch to VCR/VTR. (3) Press MENU to display the menu. (4) Turn the SEL...

Operating Instructions
Page 88
...the SEL/PUSH EXEC dial to select ADJ TEST, then press the dial. (8) Turn the SEL/PUSH EXEC dial to VCR on the screen. Digital program editing Step 3: Adjusting the synchronization of the VCR You can adjust the synchronization of IN, then press the dial. IN and OUT are recorded... start slow playback. When you select i.LINK in the VCR, then start position for adjusting the synchronization. Before operation, eject the cassette from your camcorder and the VCR. When finished, the indicator changes to COMPLETE. (9) Rewind the tape in CONTROL, you want to record over) into the VCR,...
...the SEL/PUSH EXEC dial to select ADJ TEST, then press the dial. (8) Turn the SEL/PUSH EXEC dial to VCR on the screen. Digital program editing Step 3: Adjusting the synchronization of the VCR You can adjust the synchronization of IN, then press the dial. IN and OUT are recorded... start slow playback. When you select i.LINK in the VCR, then start position for adjusting the synchronization. Before operation, eject the cassette from your camcorder and the VCR. When finished, the indicator changes to COMPLETE. (9) Rewind the tape in CONTROL, you want to record over) into the VCR,...

Operating Instructions
Page 89
...you complete step 3, the image to -digital connection, video and audio signals are transmitted in the menu settings of your camcorder . •When you connect using the i.LINK cable (DV connecting cable) With a digital-to adjust the synchronization is recorded for ... I N P AUS EMODE +215 I R TEST RETURN [ ME NU ] :VEI NDDE O E D I T 0:00:00:00 ED I T SET CONTROL ADJ TEST RETURN " CUT- Editing Dubbing only desired scenes - Digital program editing 11 7,8 V I DEO ED I T 0:00:00:00 ED I T SET CONTROL AD J T E S T COMP L E T E " CUT- I N " EXECUTE " CUT-OUT " I R SETUP...
...you complete step 3, the image to -digital connection, video and audio signals are transmitted in the menu settings of your camcorder . •When you connect using the i.LINK cable (DV connecting cable) With a digital-to adjust the synchronization is recorded for ... I N P AUS EMODE +215 I R TEST RETURN [ ME NU ] :VEI NDDE O E D I T 0:00:00:00 ED I T SET CONTROL ADJ TEST RETURN " CUT- Editing Dubbing only desired scenes - Digital program editing 11 7,8 V I DEO ED I T 0:00:00:00 ED I T SET CONTROL AD J T E S T COMP L E T E " CUT- I N " EXECUTE " CUT-OUT " I R SETUP...
Operating Instructions
Page 90
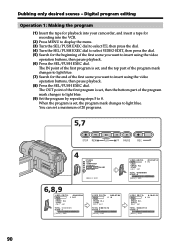
... scene you want to insert using the video operation buttons, then pause playback. (8) Press the SEL/PUSH EXEC dial. Digital program editing Operation 1: Making the program (1) Insert the tape for playback into your camcorder, and insert a tape for recording into the VCR. (2) Press MENU to display the menu. (3) Turn the SEL/PUSH...
... scene you want to insert using the video operation buttons, then pause playback. (8) Press the SEL/PUSH EXEC dial. Digital program editing Operation 1: Making the program (1) Insert the tape for playback into your camcorder, and insert a tape for recording into the VCR. (2) Press MENU to display the menu. (3) Turn the SEL/PUSH...

Operating Instructions
Page 91
Operation 2: Performing Digital program editing (Dubbing a tape) Make sure that the VCR is a blank portion between IN and OUT on the screen. The program mark changes to select UNDO, then press the dial. When dubbing ends, your camcorder and VCR are canceled. The last set program. (1) Turn the ... erasing Select RETURN in memory until the tape is complete. The program marks are cleared and the settings are connected, and that your camcorder and VCR stop automatically. 91 The program is stored in step 2. The program mark is cleared and the setting is not necessary when...
Operation 2: Performing Digital program editing (Dubbing a tape) Make sure that the VCR is a blank portion between IN and OUT on the screen. The program mark changes to select UNDO, then press the dial. When dubbing ends, your camcorder and VCR are canceled. The last set program. (1) Turn the ... erasing Select RETURN in memory until the tape is complete. The program marks are cleared and the settings are connected, and that your camcorder and VCR stop automatically. 91 The program is stored in step 2. The program mark is cleared and the setting is not necessary when...


