
Operating Instructions
Page 63
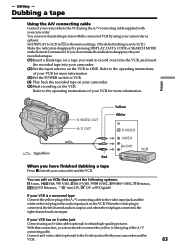
... VCR to LCD.) Make the indicators disappear by using the A/V connecting cable supplied with your camcorder as a player. If your VCR has an S video jack Connect using an S video cable (optional) to the VCR using your camcorder. You can edit on VCRs that support the following systems: 8 mm, Hi8, VHS,... S-VHS, VHSC, S-VHSC, Betamax, ED Betamax, mini DV, DV or Digital8 If your VCR is a monaural...
... VCR to LCD.) Make the indicators disappear by using the A/V connecting cable supplied with your camcorder as a player. If your VCR has an S video jack Connect using an S video cable (optional) to the VCR using your camcorder. You can edit on VCRs that support the following systems: 8 mm, Hi8, VHS,... S-VHS, VHSC, S-VHSC, Betamax, ED Betamax, mini DV, DV or Digital8 If your VCR is a monaural...
Operating Instructions
Page 64
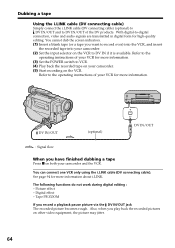
Tape PB ZOOM If you play back the recorded pictures on both your VCR for high-quality editing. The following functions do not work during digital editing : - Also, when you record a playback pause picture via the DV IN/OUT jack The recorded picture becomes rough. You cannot dub the screen...the POWER switch to VCR. (4) Play back the recorded tape on your camcorder. (2) Set the input selector on the VCR. You can connect one VCR only using the i.LINK cable (DV connecting cable). DV IN/OUT (optional) DV S VIDEO DV IN/OUT : Signal flow When you want to record over) into ...
Tape PB ZOOM If you play back the recorded pictures on both your VCR for high-quality editing. The following functions do not work during digital editing : - Also, when you record a playback pause picture via the DV IN/OUT jack The recorded picture becomes rough. You cannot dub the screen...the POWER switch to VCR. (4) Play back the recorded tape on your camcorder. (2) Set the input selector on the VCR. You can connect one VCR only using the i.LINK cable (DV connecting cable). DV IN/OUT (optional) DV S VIDEO DV IN/OUT : Signal flow When you want to record over) into ...
Operating Instructions
Page 66
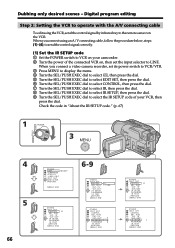
...: END I N " " CUT-OUT " I R SETUP 4 P AUS EMODE I R ADJ TEST " CUT- I N " " CUT-OUT " I R SETUP P AUS EMODE I R ADJ TEST " CUT- When you connect a video camera recorder, set its power switch to VCR/VTR. 3 Press MENU to display the menu. 4 Turn the SEL/PUSH EXEC dial to select , then press... by infrared ray to the remote sensor on your camcorder. 2 Turn the power of your VCR, then press the dial. Digital program editing Step 2: Setting the VCR to operate with the A/V connecting cable To edit using an A/V connecting cable, follow the procedure below, steps (1)~(4), to send...
...: END I N " " CUT-OUT " I R SETUP 4 P AUS EMODE I R ADJ TEST " CUT- I N " " CUT-OUT " I R SETUP P AUS EMODE I R ADJ TEST " CUT- When you connect a video camera recorder, set its power switch to VCR/VTR. 3 Press MENU to display the menu. 4 Turn the SEL/PUSH EXEC dial to select , then press... by infrared ray to the remote sensor on your camcorder. 2 Turn the power of your VCR, then press the dial. Digital program editing Step 2: Setting the VCR to operate with the A/V connecting cable To edit using an A/V connecting cable, follow the procedure below, steps (1)~(4), to send...
Operating Instructions
Page 70
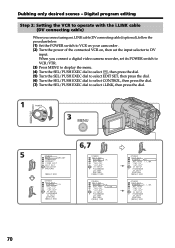
... ] : END i . Dubbing only desired scenes - When you connect using an i.LINK cable (DV connecting cable) (optional), follow the procedure below. (1) Set the POWER switch to VCR on your camcorder . (2) Turn the power of the connected VCR on, then set its POWER switch to ...MENU ] : END OTHERS ED I T SET CONTROL I R TEST RETURN [ MENU ] : END IR i . L I NK 70 Digital program editing Step 2: Setting the VCR to operate with the i.LINK cable (DV connecting cable) When you connect a digital video camera recorder, set the input selector to select i.LINK, then press the dial.
... ] : END i . Dubbing only desired scenes - When you connect using an i.LINK cable (DV connecting cable) (optional), follow the procedure below. (1) Set the POWER switch to VCR on your camcorder . (2) Turn the power of the connected VCR on, then set its POWER switch to ...MENU ] : END OTHERS ED I T SET CONTROL I R TEST RETURN [ MENU ] : END IR i . L I NK 70 Digital program editing Step 2: Setting the VCR to operate with the i.LINK cable (DV connecting cable) When you connect a digital video camera recorder, set the input selector to select i.LINK, then press the dial.

Operating Instructions
Page 72
Be sure to allow about 50 seconds. • If you connect using an i.LINK cable (DV connecting cable) With a digital-to-digital connection, video and audio signals are transmitted in the menu settings of the tape may not be able to operate the dubbing function ... ADJ TEST RETURN " CUT- If you start recording from the very beginning of the tape, the first few seconds of your camcorder . • When you may not record properly. Digital program editing 7 3,4 OTHERS ED I T SET CONTROL ADJ TEST " CUT- Set CONTROL to adjust the syncronicity is recorded for high-quality...
Be sure to allow about 50 seconds. • If you connect using an i.LINK cable (DV connecting cable) With a digital-to-digital connection, video and audio signals are transmitted in the menu settings of the tape may not be able to operate the dubbing function ... ADJ TEST RETURN " CUT- If you start recording from the very beginning of the tape, the first few seconds of your camcorder . • When you may not record properly. Digital program editing 7 3,4 OTHERS ED I T SET CONTROL ADJ TEST " CUT- Set CONTROL to adjust the syncronicity is recorded for high-quality...
Operating Instructions
Page 74
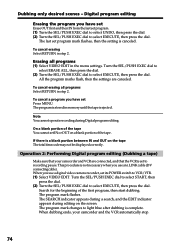
... VIDEO EDIT. Turn the SEL/PUSH EXEC dial to select START, then press the dial. (2) Turn the SEL/PUSH EXEC dial to select EXECUTE, then press the dial. The program is stored in step 2. The program mark flashes. All the program marks flash, then the settings are connected, and that your camcorder and...
... VIDEO EDIT. Turn the SEL/PUSH EXEC dial to select START, then press the dial. (2) Turn the SEL/PUSH EXEC dial to select EXECUTE, then press the dial. The program is stored in step 2. The program mark flashes. All the program marks flash, then the settings are connected, and that your camcorder and...
Operating Instructions
Page 75
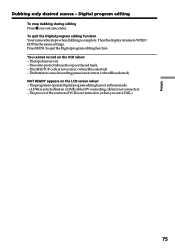
... not connected. - i.LINK is selected but an i.LINK cable (DV connecting cable) is selected) - Thetapehasrunout. - TheprogramtooperateDigitalprogrameditinghasnotyetbeenmade. - Thebuttontocancelrecordingpauseisnotcorrect.(whenIRisselected) NOT READY appears on the VCR when: - You cannot record on the LCD screen when: - To quit the Digital program editing function Your camcorder stops when dubbing is not turned on your camcorder. Editing Dubbing only desired scenes -
... not connected. - i.LINK is selected but an i.LINK cable (DV connecting cable) is selected) - Thetapehasrunout. - TheprogramtooperateDigitalprogrameditinghasnotyetbeenmade. - Thebuttontocancelrecordingpauseisnotcorrect.(whenIRisselected) NOT READY appears on the VCR when: - You cannot record on the LCD screen when: - To quit the Digital program editing function Your camcorder stops when dubbing is not turned on your camcorder. Editing Dubbing only desired scenes -
Operating Instructions
Page 76
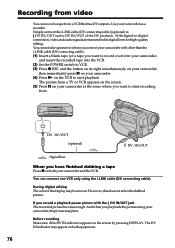
... flow When you want to -digital connection, video and audio signals are transmitted in when you play back the picture using the i.LINK cable (DV connecting cable). And when you connect your camcorder and the VCR. You cannot take a picture in digital form for high-quality editing. Before recording Make sure if the DV IN...
... flow When you want to -digital connection, video and audio signals are transmitted in when you play back the picture using the i.LINK cable (DV connecting cable). And when you connect your camcorder and the VCR. You cannot take a picture in digital form for high-quality editing. Before recording Make sure if the DV IN...

Operating Instructions
Page 77
Inserting a scene from a VCR onto your camcorder with other than the i. Insert a cassette containing the desired scene to insert into the VCR. Use the Remote Commander for this operation. You cannot insert a scene when you connect your originally recorded tape using the i.LINK cable (DV connecting cable) (optional) by specifying the insert start and end points. LINK cable (DV connecting cable). [a] [b] [c] Editing 77 Insert Editing You can insert a new scene from a VCR - Connections are the same as in "Recording from video" on page 76.
Inserting a scene from a VCR onto your camcorder with other than the i. Insert a cassette containing the desired scene to insert into the VCR. Use the Remote Commander for this operation. You cannot insert a scene when you connect your originally recorded tape using the i.LINK cable (DV connecting cable) (optional) by specifying the insert start and end points. LINK cable (DV connecting cable). [a] [b] [c] Editing 77 Insert Editing You can insert a new scene from a VCR - Connections are the same as in "Recording from video" on page 76.
Operating Instructions
Page 100
...place a heavy object on it out by your personal computer When recording the image processed or edited by the plug. This will damage the cord and may be damaged. • Alwayskeepmetalcontactsclean....the i.LINK cable (DV connecting cable), use your camcorder is resting on or against something; AC power adaptor • Unplug the unit from the wall outlet when you use a new Hi8 /Digital8 tape. Do.... Sand or dust may cause your camcorder. To disconnect the power cord, pull it . AM receivers and video equipment disturb AM reception and video operation. • The unit becomes ...
...place a heavy object on it out by your personal computer When recording the image processed or edited by the plug. This will damage the cord and may be damaged. • Alwayskeepmetalcontactsclean....the i.LINK cable (DV connecting cable), use your camcorder is resting on or against something; AC power adaptor • Unplug the unit from the wall outlet when you use a new Hi8 /Digital8 tape. Do.... Sand or dust may cause your camcorder. To disconnect the power cord, pull it . AM receivers and video equipment disturb AM reception and video operation. • The unit becomes ...
Operating Instructions
Page 110
... 16 Data code 28 Date search 59 DEMO 83 DIGITAL EFFECT .......... 41, 56 Digital program editing ...... 65 Digital 8 system 92 DISPLAY 28 DOT 37 Dual sound track tape ......... 92 Dubbing a tape 63 DV connecting cable 64 E END SEARCH 26, 30 Exposure 46 F, G, H FADER 37 Fade in/out ...scan 30 Slow playback 30 SLOW SHUTTER 41 STEADYSHOT 80 Stereo tape 92 STILL 41 Sub sound 81 SUPER LASER LINK .......... 32 SUPER NIGHTSHOT .......... 25 S VIDEO OUT jack .. 31, 35, 63 T, U, V Tape counter indicator ........ 23 Tape PB ZOOM 57 Tape photo recording .......... 34 Telephoto 21 Time ...
... 16 Data code 28 Date search 59 DEMO 83 DIGITAL EFFECT .......... 41, 56 Digital program editing ...... 65 Digital 8 system 92 DISPLAY 28 DOT 37 Dual sound track tape ......... 92 Dubbing a tape 63 DV connecting cable 64 E END SEARCH 26, 30 Exposure 46 F, G, H FADER 37 Fade in/out ...scan 30 Slow playback 30 SLOW SHUTTER 41 STEADYSHOT 80 Stereo tape 92 STILL 41 Sub sound 81 SUPER LASER LINK .......... 32 SUPER NIGHTSHOT .......... 25 S VIDEO OUT jack .. 31, 35, 63 T, U, V Tape counter indicator ........ 23 Tape PB ZOOM 57 Tape photo recording .......... 34 Telephoto 21 Time ...


