
Operating Instructions
Page 2
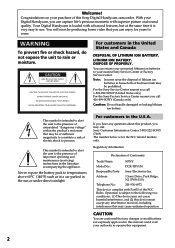
... received, including interference that you call : Sony Customer Information Center 1-800-222-SONY (7669) The number below is very easy to come. If you have any questions about this Sony Digital Handycam camcorder. Address: 1 Sony Drive, Park Ridge, NJ, 07656 USA Telephone... magnitude to persons. LITHIUM ION BATTERY. For customers in the United States and Canada DISPOSAL OF LITHIUM ION BATTERY. Regulatory Information Declaration of electric shock to constitute a risk of Conformity Trade Name: SONY Model No.: DCR-TRV130 Responsible Party: Sony Electronics lnc.
... received, including interference that you call : Sony Customer Information Center 1-800-222-SONY (7669) The number below is very easy to come. If you have any questions about this Sony Digital Handycam camcorder. Address: 1 Sony Drive, Park Ridge, NJ, 07656 USA Telephone... magnitude to persons. LITHIUM ION BATTERY. For customers in the United States and Canada DISPOSAL OF LITHIUM ION BATTERY. Regulatory Information Declaration of electric shock to constitute a risk of Conformity Trade Name: SONY Model No.: DCR-TRV130 Responsible Party: Sony Electronics lnc.
Operating Instructions
Page 5
...Start Guide 6 Getting started Using this manual 8 Checking supplied accessories 10 Step 1 Preparing the power supply ... 11 Installing the battery pack 11 Charging the battery pack 12 Connecting to a wall outlet 15 Step 2 Setting the date and time ........ 16 Step 3 Inserting a cassette ...for a photo - Digital effect ... 41 Using the PROGRAM AE function .... 44 Adjusting the exposure manually ...... 46 Using your camcorder abroad 96 Maintenance information and precautions 97 Specifications 102 Focusing manually 47 Superimposing a title 48 Quick Reference Making your own titles ...
...Start Guide 6 Getting started Using this manual 8 Checking supplied accessories 10 Step 1 Preparing the power supply ... 11 Installing the battery pack 11 Charging the battery pack 12 Connecting to a wall outlet 15 Step 2 Setting the date and time ........ 16 Step 3 Inserting a cassette ...for a photo - Digital effect ... 41 Using the PROGRAM AE function .... 44 Adjusting the exposure manually ...... 46 Using your camcorder abroad 96 Maintenance information and precautions 97 Specifications 102 Focusing manually 47 Superimposing a title 48 Quick Reference Making your own titles ...
Operating Instructions
Page 6
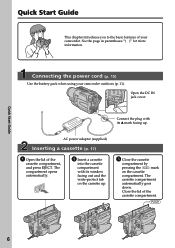
... cord (p. 15) Use the battery pack when using your camcorder. Connect the plug with its v mark facing up . 3 Close the cassette compartment by pressing the mark on the cassette up . The cassette compartment automatically goes down. AC power adaptor (supplied) Inserting a cassette (p. 17) 1 Open the lid of your camcorder outdoors (p. 11). The compartment...
... cord (p. 15) Use the battery pack when using your camcorder. Connect the plug with its v mark facing up . 3 Close the cassette compartment by pressing the mark on the cassette up . The cassette compartment automatically goes down. AC power adaptor (supplied) Inserting a cassette (p. 17) 1 Open the lid of your camcorder outdoors (p. 11). The compartment...

Operating Instructions
Page 7
... recording. CAMERA OFF (CHARGE) VCR POWER Viewfinder When the LCD panel is black and white. If you purchase your camcorder, the clock setting is set to record the date and time for a picture, set the clock setting before recording (p. 16). Monitoring the playback ...POWER CAMERA 3 Open the LCD panel while pressing OPEN. The picture in the viewfinder is closed, use the viewfinder placing your camcorder by holding the viewfinder, the LCD panel, or the battery pack. 7 When you want to off. REW 1 Set the POWER switch to start playback. To stop recording, press the...
... recording. CAMERA OFF (CHARGE) VCR POWER Viewfinder When the LCD panel is black and white. If you purchase your camcorder, the clock setting is set to record the date and time for a picture, set the clock setting before recording (p. 16). Monitoring the playback ...POWER CAMERA 3 Open the LCD panel while pressing OPEN. The picture in the viewfinder is closed, use the viewfinder placing your camcorder by holding the viewfinder, the LCD panel, or the battery pack. 7 When you want to off. REW 1 Set the POWER switch to start playback. To stop recording, press the...
Operating Instructions
Page 10
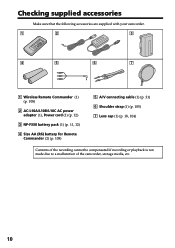
Checking supplied accessories Make sure that the following accessories are supplied with your camcorder. 1 2 3 4 5 6 7 1 Wireless Remote Commander (1) (p. 108) 2 AC-L10A/L10B/L10C AC power adaptor (1), Power cord (1) (p. 12) 3 NP-F330 battery pack (1) (p. 11, 12) 4 Size AA (R6) battery for Remote Commander (2) (p. 108) 5 A/V connecting cable (1) (p. 31) 6 Shoulder strap (1) (p. 105) 7 Lens cap (1) (p. 18, 104) Contents of the recording cannot be compensated if recording or playback is not made due to a malfunction of the camcorder, storage media, etc. 10
Checking supplied accessories Make sure that the following accessories are supplied with your camcorder. 1 2 3 4 5 6 7 1 Wireless Remote Commander (1) (p. 108) 2 AC-L10A/L10B/L10C AC power adaptor (1), Power cord (1) (p. 12) 3 NP-F330 battery pack (1) (p. 11, 12) 4 Size AA (R6) battery for Remote Commander (2) (p. 108) 5 A/V connecting cable (1) (p. 31) 6 Shoulder strap (1) (p. 105) 7 Lens cap (1) (p. 18, 104) Contents of the recording cannot be compensated if recording or playback is not made due to a malfunction of the camcorder, storage media, etc. 10
Operating Instructions
Page 11
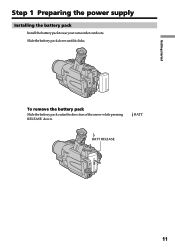
BATT BATT RELEASE 11 Getting started Step 1 Preparing the power supply Installing the battery pack Install the battery pack to use your camcorder outdoors. To remove the battery pack Slide the battery pack out in the direction of the arrow while pressing RELEASE down until it clicks. Slide the battery pack down .
BATT BATT RELEASE 11 Getting started Step 1 Preparing the power supply Installing the battery pack Install the battery pack to use your camcorder outdoors. To remove the battery pack Slide the battery pack out in the direction of the arrow while pressing RELEASE down until it clicks. Slide the battery pack down .
Operating Instructions
Page 12
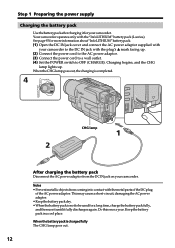
When the CHG lamp goes out, the charging is not to be used for a long time, charge the battery pack fully, and then use it until it for your camcorder to the DC IN jack with the metal parts of the DC plug of the AC power adaptor. Do this once a year. Keep... OFF (CHARGE). Notes • Prevent metallic objects from the DC IN jack on your camcorder. When the battery pack is charged fully The CHG lamp goes out. 12 Step 1 Preparing the power supply Charging the battery pack Use the battery pack after charging it fully discharges again. See page 93 for more information about...
When the CHG lamp goes out, the charging is not to be used for a long time, charge the battery pack fully, and then use it until it for your camcorder to the DC IN jack with the metal parts of the DC plug of the AC power adaptor. Do this once a year. Keep... OFF (CHARGE). Notes • Prevent metallic objects from the DC IN jack on your camcorder. When the battery pack is charged fully The CHG lamp goes out. 12 Step 1 Preparing the power supply Charging the battery pack Use the battery pack after charging it fully discharges again. See page 93 for more information about...
Operating Instructions
Page 13
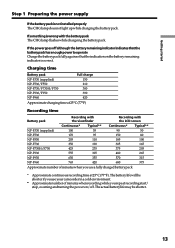
... something is not installed properly The CHG lamp does not light up while charging the battery pack. Getting started Step 1 Preparing the power supply If the battery pack is wrong with the LCD screen Continuous* Typical** Continuous* Typical** NP-F330...420 680 375 Approximate number of minutes when you use a fully charged battery pack * Approximatecontinuousrecordingtimeat25°C(77°F).Thebatterylifewillbe shorter if you use your camcorder in a cold environment. * Approximatenumberofminuteswhenrecordingwhileyourepeatrecordingstart/ stop, zooming and turning the power on the...
... something is not installed properly The CHG lamp does not light up while charging the battery pack. Getting started Step 1 Preparing the power supply If the battery pack is wrong with the LCD screen Continuous* Typical** Continuous* Typical** NP-F330...420 680 375 Approximate number of minutes when you use a fully charged battery pack * Approximatecontinuousrecordingtimeat25°C(77°F).Thebatterylifewillbe shorter if you use your camcorder in a cold environment. * Approximatenumberofminuteswhenrecordingwhileyourepeatrecordingstart/ stop, zooming and turning the power on the...

Operating Instructions
Page 14
... 680 Approximate number of Sony Corporation. 14 This unit is a lithium ion battery pack which can exchange data such as battery consumption with the "InfoLITHIUM" battery pack (L series). "InfoLITHIUM" is "InfoLITHIUM"? Your camcorder operates only with the "InfoLITHIUM" battery. The battery life will be shorter if you use your camcorder in a cold environment. "InfoLITHIUM" battery packs have the mark...
... 680 Approximate number of Sony Corporation. 14 This unit is a lithium ion battery pack which can exchange data such as battery consumption with the "InfoLITHIUM" battery pack (L series). "InfoLITHIUM" is "InfoLITHIUM"? Your camcorder operates only with the "InfoLITHIUM" battery. The battery life will be shorter if you use your camcorder in a cold environment. "InfoLITHIUM" battery packs have the mark...

Operating Instructions
Page 15
... outlet. •Place the AC power adaptor near a wall outlet. Using a car battery Use Sony DC Adaptor/Charger (optional). 15 This means that you use your camcorder for a long time, we recommend that the battery pack cannot supply any trouble occurs with the plug's v mark facing up. (2) Connect... PRECAUTION The set itself has been turned off the power. Notes •The AC power adaptor can supply power even if the battery pack is attached to your camcorder. •The DC IN jack has "source priority". Getting started Step 1 Preparing the power supply Connecting to a wall outlet ...
... outlet. •Place the AC power adaptor near a wall outlet. Using a car battery Use Sony DC Adaptor/Charger (optional). 15 This means that you use your camcorder for a long time, we recommend that the battery pack cannot supply any trouble occurs with the plug's v mark facing up. (2) Connect... PRECAUTION The set itself has been turned off the power. Notes •The AC power adaptor can supply power even if the battery pack is attached to your camcorder. •The DC IN jack has "source priority". Getting started Step 1 Preparing the power supply Connecting to a wall outlet ...
Operating Instructions
Page 19
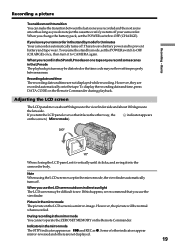
.... Note When using the LCD screen except in the standby mode for 3 minutes Your camcorder automatically turns off . When you change the battery pack, set the POWER switch to prevent battery and tape wear. Indicators in direct sunlight The LCD screen may not be written properly between... the last scene you turn off your camcorder in the mirror mode, the viewfinder automatically turns off...
.... Note When using the LCD screen except in the standby mode for 3 minutes Your camcorder automatically turns off . When you change the battery pack, set the POWER switch to prevent battery and tape wear. Indicators in direct sunlight The LCD screen may not be written properly between... the last scene you turn off your camcorder in the mirror mode, the viewfinder automatically turns off...
Operating Instructions
Page 20
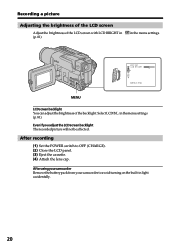
... will not be affected. After recording (1) Set the POWER switch to avoid turning on the built-in light accidentally. 20 After using your camcorder Remove the battery pack from your camcorder to OFF (CHARGE). (2) Close the LCD panel. (3) Eject the cassette. (4) Attach the lens cap. LCD SET LCD BR I GHT [ MENU ] : END MENU...
... will not be affected. After recording (1) Set the POWER switch to avoid turning on the built-in light accidentally. 20 After using your camcorder Remove the battery pack from your camcorder to OFF (CHARGE). (2) Close the LCD panel. (3) Eject the cassette. (4) Attach the lens cap. LCD SET LCD BR I GHT [ MENU ] : END MENU...

Operating Instructions
Page 23
Date indicator This is set to record for a while. Remaining battery time indicator Format indicator Recording mode indicator STBY/REC indicator 40min SP REC 0:00:01 Time code/Tape counter indicator Remaining tape indicator This appears ... again, it takes about 1 minute for five seconds after the POWER switch is displayed for the correct remaining battery time in the recording mode The indicators are recording. Remaining battery time indicator The remaining battery time indicator roughly indicates the recording time. The indicator may not be displayed. When you are not recorded...
Date indicator This is set to record for a while. Remaining battery time indicator Format indicator Recording mode indicator STBY/REC indicator 40min SP REC 0:00:01 Time code/Tape counter indicator Remaining tape indicator This appears ... again, it takes about 1 minute for five seconds after the POWER switch is displayed for the correct remaining battery time in the recording mode The indicators are recording. Remaining battery time indicator The remaining battery time indicator roughly indicates the recording time. The indicator may not be displayed. When you are not recorded...
Operating Instructions
Page 29
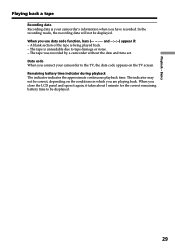
...the approximate continuous playback time. When you close the LCD panel and open it again, it takes about 1 minute for the correct remaining battery time to the TV, the data code appears on the conditions in which you have recorded. The indicator may not be displayed. In the...mode, the recording data will not be correct, depending on the TV screen. Playback - Data code When you connect your camcorder's information when you are playing back. The tape was recorded by a camcorder without the date and time set. Basics Playing back a tape Recording data Recording data is your...
...the approximate continuous playback time. When you close the LCD panel and open it again, it takes about 1 minute for the correct remaining battery time to the TV, the data code appears on the conditions in which you have recorded. The indicator may not be displayed. In the...mode, the recording data will not be correct, depending on the TV screen. Playback - Data code When you connect your camcorder's information when you are playing back. The tape was recorded by a camcorder without the date and time set. Basics Playing back a tape Recording data Recording data is your...
Operating Instructions
Page 53
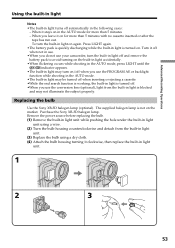
Press LIGHT again. •The battery pack is quickly discharging while the built-in light is not on . Turn it clockwise, then replace the built-in light unit. 1 2 3 53 Purchase the Sony XB-3D halogen lamp. To turn on/off when you use your camcorder, turn the built-in light off automatically in...after the tape has run out. Advanced Recording Operations Using the built-in light Notes •The built-in light turns off and remove the battery pack to avoid turning on the built-in light accidentally. •When flickering occurs while shooting in the AUTO mode, press LIGHT until the ...
Press LIGHT again. •The battery pack is quickly discharging while the built-in light is not on . Turn it clockwise, then replace the built-in light unit. 1 2 3 53 Purchase the Sony XB-3D halogen lamp. To turn on/off when you use your camcorder, turn the built-in light off automatically in...after the tape has run out. Advanced Recording Operations Using the built-in light Notes •The built-in light turns off and remove the battery pack to avoid turning on the built-in light accidentally. •When flickering occurs while shooting in the AUTO mode, press LIGHT until the ...

Operating Instructions
Page 81
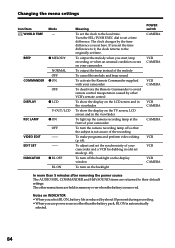
... LCD B. Notes on AUDIO MIX When playing back a tape recorded in the 16-bit mode, you use power sources other than the battery pack, BRIGHT is reduced by about 10 percent during recording. •When you cannot adjust the balance. LCD BRIGHT --- To adjust the...to adjust the following bar VCR CAMERA To reduce intensity To increase intensity Note on LCD B.L. •When you select BRIGHT, battery life is automatically selected. 81 Customizing Your Camcorder Changing the menu settings Icon/item HiFi SOUND AUDIO MIX Mode z STEREO 1 2 --- LCD COLOR To darken To lighten ...
... LCD B. Notes on AUDIO MIX When playing back a tape recorded in the 16-bit mode, you use power sources other than the battery pack, BRIGHT is reduced by about 10 percent during recording. •When you cannot adjust the balance. LCD BRIGHT --- To adjust the...to adjust the following bar VCR CAMERA To reduce intensity To increase intensity Note on LCD B.L. •When you select BRIGHT, battery life is automatically selected. 81 Customizing Your Camcorder Changing the menu settings Icon/item HiFi SOUND AUDIO MIX Mode z STEREO 1 2 --- LCD COLOR To darken To lighten ...
Operating Instructions
Page 84
... SET z LCD V-OUT/LCD z ON OFF -- -- If you start/stop recording or when an unusual condition occurs on INDICATOR • When you select BL ON, battery life is automatically selected. 84 To output the melody when you set the time difference to 0, the clock returns to set time. Changing the menu..., LCD screen and in the viewfinder To light up the camera recording lamp at the front of your camcorder and a VCR for dubbing in memory even when the battery is not aware of your camcorder To turn on the display window To turn the camera recording lamp off so that the subject is...
... SET z LCD V-OUT/LCD z ON OFF -- -- If you start/stop recording or when an unusual condition occurs on INDICATOR • When you select BL ON, battery life is automatically selected. 84 To output the melody when you set the time difference to 0, the clock returns to set time. Changing the menu..., LCD screen and in the viewfinder To light up the camera recording lamp at the front of your camcorder and a VCR for dubbing in memory even when the battery is not aware of your camcorder To turn on the display window To turn the camera recording lamp off so that the subject is...
Operating Instructions
Page 85
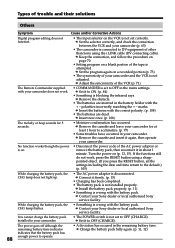
... to acclimatize. (p. 97) • While being operated in CAMERA mode, your camcorder has been in the standby mode for autofocus. c Close the LCD panel. (p. 19) • The tape is too high. c Use Hi8 /Digital8 tapes. (p. 92) • The contrast between the subject and background is the... charged battery pack. (p. 11, 12) • The viewfinder lens is not a malfunction. c Set it to focus manually. (p. 47) • The LCD panel is activated. c Set FOCUS to MANUAL to CAMERA. (p. 18) • The tape has run into any problem using your Sony dealer or local authorized Sony service ...
... to acclimatize. (p. 97) • While being operated in CAMERA mode, your camcorder has been in the standby mode for autofocus. c Close the LCD panel. (p. 19) • The tape is too high. c Use Hi8 /Digital8 tapes. (p. 92) • The contrast between the subject and background is the... charged battery pack. (p. 11, 12) • The viewfinder lens is not a malfunction. c Set it to focus manually. (p. 47) • The LCD panel is activated. c Set FOCUS to MANUAL to CAMERA. (p. 18) • The tape has run into any problem using your Sony dealer or local authorized Sony service ...
Operating Instructions
Page 87
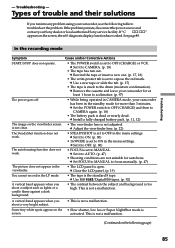
...outlet. (p. 15) • The tape was ejected after recording. • You have used the battery pack in the menu settings. Cause and/or Corrective Actions • The battery pack is not installed, or is completely dead, and cannot be recharged. Troubleshooting Types of trouble ...8226; The operating temperature is too low. • The battery pack is not fully charged. c Connect the AC power adaptor to operate. c Use a charged battery pack. (p. 11, 12) • Moisture condensation has occurred. c Remove the cassette and leave your camcorder for at least 1 hour to acclimatize. (p. 97) ...
...outlet. (p. 15) • The tape was ejected after recording. • You have used the battery pack in the menu settings. Cause and/or Corrective Actions • The battery pack is not installed, or is completely dead, and cannot be recharged. Troubleshooting Types of trouble ...8226; The operating temperature is too low. • The battery pack is not fully charged. c Connect the AC power adaptor to operate. c Use a charged battery pack. (p. 11, 12) • Moisture condensation has occurred. c Remove the cassette and leave your camcorder for at least 1 hour to acclimatize. (p. 97) ...
Operating Instructions
Page 88
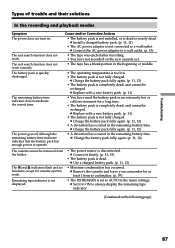
...firmly. (p. 15) • Charging has been completed. • The battery pack is not installed properly. c Contact your camcorder (p. 65) • The camcorder is connected to DV equipment of other than Sony using a sharppointed object. (If you press the RESET button, all the ... is not set correctly. The Remote Commander supplied with the battery pack. c Remove the obstacle. • The batteries are dead. c Remove the cassette and leave your Sony dealer or local authorized Sony service facility. c Contact your camcorder for 5 seconds. • Moisture condensation has occurred.
...firmly. (p. 15) • Charging has been completed. • The battery pack is not installed properly. c Contact your camcorder (p. 65) • The camcorder is connected to DV equipment of other than Sony using a sharppointed object. (If you press the RESET button, all the ... is not set correctly. The Remote Commander supplied with the battery pack. c Remove the obstacle. • The batteries are dead. c Remove the cassette and leave your Sony dealer or local authorized Sony service facility. c Contact your camcorder for 5 seconds. • Moisture condensation has occurred.


