
Handycam® Handbook
Page 3
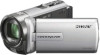
LCD screen Battery pack The camcorder is not dustproofed, dripproofed or waterproofed. Take images of the sun only in low light conditions, such as at the sun. ... operational for effective use with this to the Built-in USB Cable (p. 13), if the Built-in USB Cable is not long enough. Rechargeable battery pack NP-FV30 (1) CD-ROM "Handycam" Application Software (1) "PMB" (software, including "PMB Help") "Handycam" Handbook (PDF) "Operating Guide" (1) "PMB Portable...
LCD screen Battery pack The camcorder is not dustproofed, dripproofed or waterproofed. Take images of the sun only in low light conditions, such as at the sun. ... operational for effective use with this to the Built-in USB Cable (p. 13), if the Built-in USB Cable is not long enough. Rechargeable battery pack NP-FV30 (1) CD-ROM "Handycam" Application Software (1) "PMB" (software, including "PMB Help") "Handycam" Handbook (PDF) "Operating Guide" (1) "PMB Portable...
Handycam® Handbook
Page 4
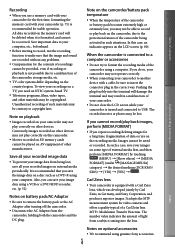
... the desired medium (DCR-SX65/ SX85) [YES] [YES] . The number value indicates the amount of light from the camcorder, holding both the camcorder and the DC plug. Unauthorized recording of such materials may be contrary to remove the battery pack or the AC Adaptor ... recorded. It adopts the MTF measurement system for stable operation. To view your recordings on a disc such as a DVD-R using genuine Sony accessories. If you save the image data on a TV, you may be provided, even if recording or playback is recommended for video ...
... the desired medium (DCR-SX65/ SX85) [YES] [YES] . The number value indicates the amount of light from the camcorder, holding both the camcorder and the DC plug. Unauthorized recording of such materials may be contrary to remove the battery pack or the AC Adaptor ... recorded. It adopts the MTF measurement system for stable operation. To view your recordings on a disc such as a DVD-R using genuine Sony accessories. If you save the image data on a TV, you may be provided, even if recording or playback is recommended for video ...

Handycam® Handbook
Page 5
...The example images used in this manual for understandability. In this manual when there is a difference in this manual, the internal memory (DCRSX65/SX85) of your camcorder and memory card are lit or flashing When using a digital still camera, and therefore may be lost, or other ...malfunctions could occur. Eject the memory card when the access lamp (p. 19) is lit or flashing Remove the battery pack or AC Adaptor from images and screen indicators that actually appear on the bottom of your camcorder and its screen indication are exaggerated or...
...The example images used in this manual for understandability. In this manual when there is a difference in this manual, the internal memory (DCRSX65/SX85) of your camcorder and memory card are lit or flashing When using a digital still camera, and therefore may be lost, or other ...malfunctions could occur. Eject the memory card when the access lamp (p. 19) is lit or flashing Remove the battery pack or AC Adaptor from images and screen indicators that actually appear on the bottom of your camcorder and its screen indication are exaggerated or...
Handycam® Handbook
Page 7
... panning for a while to your movies. Narrate the subject, or talk to the microphone than the recorded person. By always carrying spare batteries, you can continue recording without worrying about battery power shortages. For example, using a tripod, you can make a time-lapse recording or record subjects in and out slowly and smoothly...
... panning for a while to your movies. Narrate the subject, or talk to the microphone than the recorded person. By always carrying spare batteries, you can continue recording without worrying about battery power shortages. For example, using a tripod, you can make a time-lapse recording or record subjects in and out slowly and smoothly...
Handycam® Handbook
Page 9
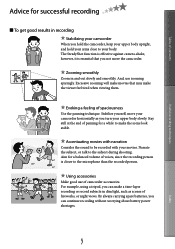
...for information quickly 2 Read this first 3 Notes on use 5 Operation flow 6 Advice for successful recording 7 Getting started Step 1: Charging the battery pack 12 Step 2: Turning the power on, and setting the date and time 15 Changing the language setting 16 Step 3: Preparing the recording ...media 17 Selecting the recording media for movies (DCR-SX65/SX85 17 Selecting the recording media for photos (DCR-SX65/SX85 17 Inserting a memory card 18 Recording/Playback Recording 20 Recording movies 21 Shooting photos 22 Useful ...
...for information quickly 2 Read this first 3 Notes on use 5 Operation flow 6 Advice for successful recording 7 Getting started Step 1: Charging the battery pack 12 Step 2: Turning the power on, and setting the date and time 15 Changing the language setting 16 Step 3: Preparing the recording ...media 17 Selecting the recording media for movies (DCR-SX65/SX85 17 Selecting the recording media for photos (DCR-SX65/SX85 17 Inserting a memory card 18 Recording/Playback Recording 20 Recording movies 21 Shooting photos 22 Useful ...
Handycam® Handbook
Page 11
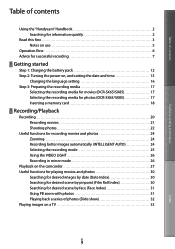
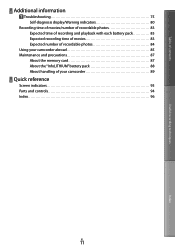
Table of contents Useful recording techniques Additional information Troubleshooting 75 Self-diagnosis display/Warning indicators 80 Recording time of movies/number of recordable photos 83 Expected time of recording and playback with each battery pack 83 Expected recording time of movies 83 Expected number of recordable photos 84 Using your camcorder abroad 85 Maintenance and precautions 87 About the memory card 87 About the "InfoLITHIUM" battery pack 88 About handling of your camcorder 89 Quick reference Screen indicators 93 Parts and controls 94 Index 96 US 11 Index
Table of contents Useful recording techniques Additional information Troubleshooting 75 Self-diagnosis display/Warning indicators 80 Recording time of movies/number of recordable photos 83 Expected time of recording and playback with each battery pack 83 Expected recording time of movies 83 Expected number of recordable photos 84 Using your camcorder abroad 85 Maintenance and precautions 87 About the memory card 87 About the "InfoLITHIUM" battery pack 88 About handling of your camcorder 89 Quick reference Screen indicators 93 Parts and controls 94 Index 96 US 11 Index

Handycam® Handbook
Page 12
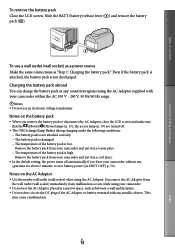
...lamp lights up and charging starts. US 12 Index Getting started Step 1: Charging the battery pack CHG (charge) lamp Table of your camcorder and the wall outlet (wall ...jack. The CHG (charge) lamp turns off your camcorder by closing the LCD screen. 2 Attach the battery pack by sliding it in the direction of the arrow until it clicks. 3 Connect the AC Adaptor...camcorder. 1 Turn off when the battery pack is fully charged. 4 When the battery is charged, disconnect the AC Adaptor from the DC IN jack of contents Useful recording techniques Battery pack DC IN jack DC plug Power...
...lamp lights up and charging starts. US 12 Index Getting started Step 1: Charging the battery pack CHG (charge) lamp Table of your camcorder and the wall outlet (wall ...jack. The CHG (charge) lamp turns off your camcorder by closing the LCD screen. 2 Attach the battery pack by sliding it in the direction of the arrow until it clicks. 3 Connect the AC Adaptor...camcorder. 1 Turn off when the battery pack is fully charged. 4 When the battery is charged, disconnect the AC Adaptor from the DC IN jack of contents Useful recording techniques Battery pack DC IN jack DC plug Power...

Handycam® Handbook
Page 13
... may not function properly. If you connect the camcorder to a notebook computer that is turned on , you fully charge a fully discharged battery pack. Charging time Approximate time (min.) required when you can charge your camcorder by using the USB connection support cable Tips ...See page 83 on recording and playing time. When your camcorder is on with the Built-in such situation. You cannot use Sony portable power unit CP-AH2R/CP-AL (sold separately). Charge with customized or hand-built computers is not guaranteed. Depending on the type of...
... may not function properly. If you connect the camcorder to a notebook computer that is turned on , you fully charge a fully discharged battery pack. Charging time Approximate time (min.) required when you can charge your camcorder by using the USB connection support cable Tips ...See page 83 on recording and playing time. When your camcorder is on with the Built-in such situation. You cannot use Sony portable power unit CP-AH2R/CP-AL (sold separately). Charge with customized or hand-built computers is not guaranteed. Depending on the type of...
Handycam® Handbook
Page 14
...low. Notes on the AC Adaptor Use the nearby wall outlet (wall socket) when using the AC Adaptor. Notes on the battery pack When you remove the battery pack or disconnect the AC Adaptor, close the LCD screen and make sure that the (Movie)/ (Photo) lamps (p. 15), the ...the AC 100 V - 240 V, 50 Hz/60 Hz range. Notes Do not use an electronic voltage transformer. Charging the battery pack abroad You can charge the battery pack in any countries/regions using your camcorder. Do not use a wall outlet (wall socket) as a power source Make the same...
...low. Notes on the AC Adaptor Use the nearby wall outlet (wall socket) when using the AC Adaptor. Notes on the battery pack When you remove the battery pack or disconnect the AC Adaptor, close the LCD screen and make sure that the (Movie)/ (Photo) lamps (p. 15), the ...the AC 100 V - 240 V, 50 Hz/60 Hz range. Notes Do not use an electronic voltage transformer. Charging the battery pack abroad You can charge the battery pack in any countries/regions using your camcorder. Do not use a wall outlet (wall socket) as a power source Make the same...
Handycam® Handbook
Page 21
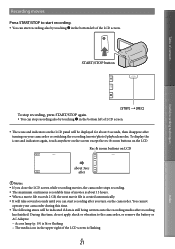
Table of contents Useful recording techniques Recording movies Press START/STOP to the camcorder, or remove the battery or AC Adaptor. Access lamp (p. 19) is lit or flashing The media icon in the bottom left of LCD screen. The icons ...
Table of contents Useful recording techniques Recording movies Press START/STOP to the camcorder, or remove the battery or AC Adaptor. Access lamp (p. 19) is lit or flashing The media icon in the bottom left of LCD screen. The icons ...
Handycam® Handbook
Page 26
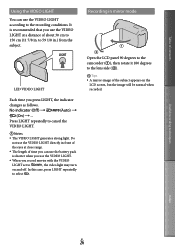
... use the VIDEO LIGHT. When you press LIGHT, the indicator changes as follows. Table of contents Using the VIDEO LIGHT You can use the battery pack is recommended that you use the VIDEO LIGHT at close range. The length of time you can use the VIDEO LIGHT according to...
... use the VIDEO LIGHT. When you press LIGHT, the indicator changes as follows. Table of contents Using the VIDEO LIGHT You can use the battery pack is recommended that you use the VIDEO LIGHT at close range. The length of time you can use the VIDEO LIGHT according to...
Handycam® Handbook
Page 35
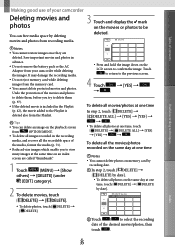
... the Playlist. Tips You can free media space by date]. To delete all images recorded in advance. Do not remove the battery pack or the AC Adaptor from your camcorder Deleting movies and photos 3 Touch and display the mark on the movies or photos to be You...
... the Playlist. Tips You can free media space by date]. To delete all images recorded in advance. Do not remove the battery pack or the AC Adaptor from your camcorder Deleting movies and photos 3 Touch and display the mark on the movies or photos to be You...
Handycam® Handbook
Page 38
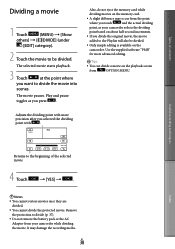
... on the memory card. A slight difference may damage the recording media. Useful recording techniques Index Returns to divide (p. 37). Do not remove the battery pack or the AC Adaptor from OPTION MENU. US 38 Remove the protection to the beginning of contents Dividing a movie 1 Touch (MENU) [Show others...
... on the memory card. A slight difference may damage the recording media. Useful recording techniques Index Returns to divide (p. 37). Do not remove the battery pack or the AC Adaptor from OPTION MENU. US 38 Remove the protection to the beginning of contents Dividing a movie 1 Touch (MENU) [Show others...
Handycam® Handbook
Page 42
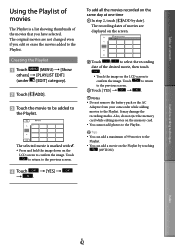
... step 2, touch [ ADD by touching (OPTION). Touch to return to the previous screen. Touch [YES] . Notes Do not remove the battery pack or the AC Adaptor from your camcorder while adding movies to the previous screen. Touch [YES] . Useful recording techniques Index...
... step 2, touch [ ADD by touching (OPTION). Touch to return to the previous screen. Touch [YES] . Notes Do not remove the battery pack or the AC Adaptor from your camcorder while adding movies to the previous screen. Touch [YES] . Useful recording techniques Index...
Handycam® Handbook
Page 60
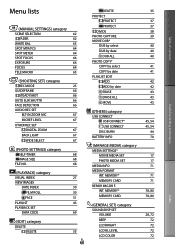
... by select COPY by date PLAYLIST EDIT ADD ADD by date ERASE ERASE ALL MOVE (OTHERS) category USB CONNECT USB CONNECT* USB CONNECT DISC BURN BATTERY INFO (MANAGE MEDIA) category MEDIA SETTINGS* MOVIE MEDIA SET PHOTO MEDIA SET MEDIA INFO MEDIA FORMAT INT. INT. MEMORY* MEMORY CARD (GENERAL SET) category SOUND...
... by select COPY by date PLAYLIST EDIT ADD ADD by date ERASE ERASE ALL MOVE (OTHERS) category USB CONNECT USB CONNECT* USB CONNECT DISC BURN BATTERY INFO (MANAGE MEDIA) category MEDIA SETTINGS* MOVIE MEDIA SET PHOTO MEDIA SET MEDIA INFO MEDIA FORMAT INT. INT. MEMORY* MEMORY CARD (GENERAL SET) category SOUND...
Handycam® Handbook
Page 63
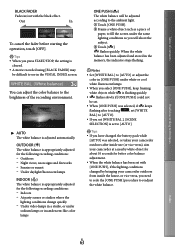
... set with the black effect. Table of contents Useful recording techniques BLACK FADER Fades in/out with [ONE PUSH], if the lighting conditions changed the battery pack while [AUTO] was selected, if keeps flashing after touching , set [WHITE BAL.] to [AUTO]. If you set [WHITE BAL.], [SCENE SELECTION] is flashing...
... set with the black effect. Table of contents Useful recording techniques BLACK FADER Fades in/out with [ONE PUSH], if the lighting conditions changed the battery pack while [AUTO] was selected, if keeps flashing after touching , set [WHITE BAL.] to [AUTO]. If you set [WHITE BAL.], [SCENE SELECTION] is flashing...
Handycam® Handbook
Page 70
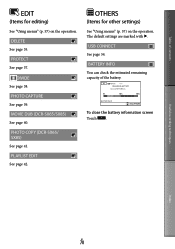
... "Using menus" (p. 57) on the operation. PHOTO CAPTURE See page 39. PHOTO COPY (DCR-SX65/ SX85) See page 41. Useful recording techniques Index US 70 To close the battery information screen Touch . DELETE See page 35. DIVIDE See page 38. BATTERY INFO You can check the estimated remaining capacity of contents EDIT (Items for...
... "Using menus" (p. 57) on the operation. PHOTO CAPTURE See page 39. PHOTO COPY (DCR-SX65/ SX85) See page 41. Useful recording techniques Index US 70 To close the battery information screen Touch . DELETE See page 35. DIVIDE See page 38. BATTERY INFO You can check the estimated remaining capacity of contents EDIT (Items for...
Handycam® Handbook
Page 72
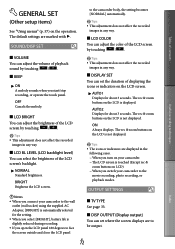
... the screen displays are to the movie recording, photo recording, or playback modes. US 72 AUTO2 Displays for the setting. When you select [BRIGHT], battery life is slightly reduced during recording. If you open the LCD panel 180 degrees to face the screen outside and close the LCD panel...
... the screen displays are to the movie recording, photo recording, or playback modes. US 72 AUTO2 Displays for the setting. When you select [BRIGHT], battery life is slightly reduced during recording. If you open the LCD panel 180 degrees to face the screen outside and close the LCD panel...
Handycam® Handbook
Page 75
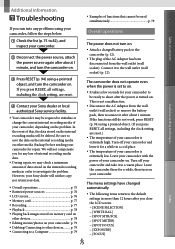
... 78 Editing movies/photos on your camcorder. Leave the camcorder there for any problems using your data. Overall operations p. 75 Batteries/power sources p. 76 LCD screen p. 76 Memory card p. 77 Recording p. 77 Playback p. 78 ...AC Adaptor has been disconnected from the wall outlet (wall socket) or remove the battery pack, then reconnect it to save the data on the internal recording media on . However, your Sony dealer will not compensate you press RESET, all settings, including the clock setting,...
... 78 Editing movies/photos on your camcorder. Leave the camcorder there for any problems using your data. Overall operations p. 75 Batteries/power sources p. 76 LCD screen p. 76 Memory card p. 77 Recording p. 77 Playback p. 78 ...AC Adaptor has been disconnected from the wall outlet (wall socket) or remove the battery pack, then reconnect it to save the data on the internal recording media on . However, your Sony dealer will not compensate you press RESET, all settings, including the clock setting,...
Handycam® Handbook
Page 76
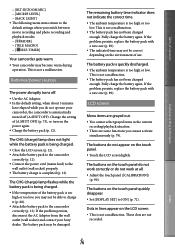
...completed (p. 12). The battery pack may not be correct depending on the environment of [A.SHUT OFF] (p. 73), or turn on the touch panel quickly disappear. Set [DISPLAY SET] to [ON] (p. 72). These dots are some functions you do not operate your Sony dealer. Change the setting ...of use. The buttons on the power again. Charge the battery pack (p. 12). The CHG (charge) lamp does not light while the battery pack is being charged. If the temperature of the...
...completed (p. 12). The battery pack may not be correct depending on the environment of [A.SHUT OFF] (p. 73), or turn on the touch panel quickly disappear. Set [DISPLAY SET] to [ON] (p. 72). These dots are some functions you do not operate your Sony dealer. Change the setting ...of use. The buttons on the power again. Charge the battery pack (p. 12). The CHG (charge) lamp does not light while the battery pack is being charged. If the temperature of the...


