
Handycam® Handbook
Page 3
... points (white, red, blue, or green in low light conditions, such as at the sun. See "About handling of the pixels are used for the memory card you can use . Menu items, LCD panel, and lens A menu item that appear constantly on -screen displays in each local language are operational...
... points (white, red, blue, or green in low light conditions, such as at the sun. See "About handling of the pixels are used for the memory card you can use . Menu items, LCD panel, and lens A menu item that appear constantly on -screen displays in each local language are operational...
Handycam® Handbook
Page 4
... device with a cable, be sure to insert the connector plug in Germany, and Sony Corporation, and produces superior images. Pushing the plug forcibly into the lens. Images cannot...and cannot be recovered. Index Notes on the country/region. All data recorded on the memory card will damage the terminal and may be deleted when it is equipped with a ... [Show others] [MEDIA FORMAT] (under [MANAGE MEDIA] category) the desired medium (DCR-SX65/ SX85) [YES] [YES] . Unauthorized recording of such materials may result in...
... device with a cable, be sure to insert the connector plug in Germany, and Sony Corporation, and produces superior images. Pushing the plug forcibly into the lens. Images cannot...and cannot be recovered. Index Notes on the country/region. All data recorded on the memory card will damage the terminal and may be deleted when it is equipped with a ... [Show others] [MEDIA FORMAT] (under [MANAGE MEDIA] category) the desired medium (DCR-SX65/ SX85) [YES] [YES] . Unauthorized recording of such materials may result in...

Handycam® Handbook
Page 5
... or flashing When using a digital still camera, and therefore may be lost, or other malfunctions could occur. Eject the memory card when the access lamp (p. 19) is a difference in specification between models. And, the illustrations of the following, otherwise, the recording.... Useful recording techniques Index Notes on the bottom of your camcorder. The main differences in specification of your camcorder and memory card are called "recording media." Design and specifications of this manual when there is lit or flashing Remove ...
... or flashing When using a digital still camera, and therefore may be lost, or other malfunctions could occur. Eject the memory card when the access lamp (p. 19) is a difference in specification between models. And, the illustrations of the following, otherwise, the recording.... Useful recording techniques Index Notes on the bottom of your camcorder. The main differences in specification of your camcorder and memory card are called "recording media." Design and specifications of this manual when there is lit or flashing Remove ...
Handycam® Handbook
Page 9
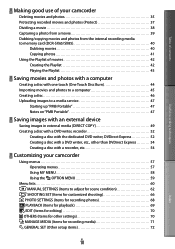
... 15 Changing the language setting 16 Step 3: Preparing the recording media 17 Selecting the recording media for movies (DCR-SX65/SX85 17 Selecting the recording media for photos (DCR-SX65/SX85 17 Inserting a memory card 18 Recording/Playback Recording 20 Recording movies 21 Shooting photos 22 Useful functions for recording movies and photos...
... 15 Changing the language setting 16 Step 3: Preparing the recording media 17 Selecting the recording media for movies (DCR-SX65/SX85 17 Selecting the recording media for photos (DCR-SX65/SX85 17 Inserting a memory card 18 Recording/Playback Recording 20 Recording movies 21 Shooting photos 22 Useful functions for recording movies and photos...
Handycam® Handbook
Page 10
... movies and photos (Protect 37 Dividing a movie 38 Capturing a photo from a movie 39 Dubbing/copying movies and photos from the internal recording media to memory card (DCR-SX65/SX85 40 Dubbing movies 40 Copying photos 41 Using the Playlist of movies 42 Creating the Playlist 42 Playing the Playlist 43 Saving movies...
... movies and photos (Protect 37 Dividing a movie 38 Capturing a photo from a movie 39 Dubbing/copying movies and photos from the internal recording media to memory card (DCR-SX65/SX85 40 Dubbing movies 40 Copying photos 41 Using the Playlist of movies 42 Creating the Playlist 42 Playing the Playlist 43 Saving movies...
Handycam® Handbook
Page 11
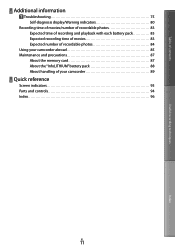
Table of contents Useful recording techniques Additional information Troubleshooting 75 Self-diagnosis display/Warning indicators 80 Recording time of movies/number of recordable photos 83 Expected time of recording and playback with each battery pack 83 Expected recording time of movies 83 Expected number of recordable photos 84 Using your camcorder abroad 85 Maintenance and precautions 87 About the memory card 87 About the "InfoLITHIUM" battery pack 88 About handling of your camcorder 89 Quick reference Screen indicators 93 Parts and controls 94 Index 96 US 11 Index
Table of contents Useful recording techniques Additional information Troubleshooting 75 Self-diagnosis display/Warning indicators 80 Recording time of movies/number of recordable photos 83 Expected time of recording and playback with each battery pack 83 Expected recording time of movies 83 Expected number of recordable photos 84 Using your camcorder abroad 85 Maintenance and precautions 87 About the memory card 87 About the "InfoLITHIUM" battery pack 88 About handling of your camcorder 89 Quick reference Screen indicators 93 Parts and controls 94 Index 96 US 11 Index
Handycam® Handbook
Page 17
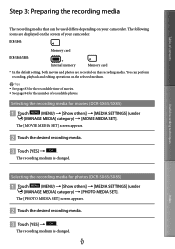
... photos. The [MOVIE MEDIA SET] screen appears. Touch the desired recording media. Touch [YES] . DCR-SX45: Memory card DCR-SX65/SX85: * Internal memory Memory card * In the default setting, both movies and photos are displayed on the screen of your camcorder. The recording medium is changed ..... Tips See page 83 for the recordable time of movies. See page 84 for photos (DCR-SX65/SX85) Touch (MENU) [Show others ] [MEDIA SETTINGS] (under [MANAGE MEDIA] category) [PHOTO MEDIA SET...
... photos. The [MOVIE MEDIA SET] screen appears. Touch the desired recording media. Touch [YES] . DCR-SX45: Memory card DCR-SX65/SX85: * Internal memory Memory card * In the default setting, both movies and photos are displayed on the screen of your camcorder. The recording medium is changed ..... Tips See page 83 for the recordable time of movies. See page 84 for photos (DCR-SX65/SX85) Touch (MENU) [Show others ] [MEDIA SETTINGS] (under [MANAGE MEDIA] category) [PHOTO MEDIA SET...
Handycam® Handbook
Page 18
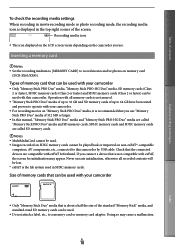
... movies on non-exFAT*-compatible computers, AV components, etc., connected to 32 GB and SD memory cards of 512 MB or larger. In this camcorder. US 18 Index If you use "Memory Stick PRO Duo" media of up to 64 GB have been tested and proven to operate ... on the LCD screen varies depending on memory card (DCR-SX65/SX85). Check that is about a half the size of the screen. Doing so may appear. Inserting a memory card Notes Set the recording medium to [MEMORY CARD] to a memory card or memory card adaptor. Size of memory cards that can be used . ...
... movies on non-exFAT*-compatible computers, AV components, etc., connected to 32 GB and SD memory cards of 512 MB or larger. In this camcorder. US 18 Index If you use "Memory Stick PRO Duo" media of up to 64 GB have been tested and proven to operate ... on the LCD screen varies depending on memory card (DCR-SX65/SX85). Check that is about a half the size of the screen. Doing so may appear. Inserting a memory card Notes Set the recording medium to [MEMORY CARD] to a memory card or memory card adaptor. Size of memory cards that can be used . ...
Handycam® Handbook
Page 19
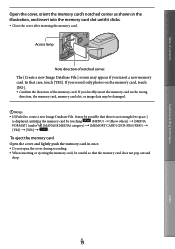
...58320; Close the cover after inserting the memory card. In that there is not enough free space.] is displayed, initialize the memory card by touching (MENU) [Show others] [MEDIA FORMAT] (under [MANAGE MEDIA] category) [MEMORY CARD] (DCR-SX65/SX85) [YES] &#...57732; [YES] . To eject the memory card Open the cover and lightly push the memory card in the wrong direction, the memory card, memory card slot, or image data may be damaged. ...
...58320; Close the cover after inserting the memory card. In that there is not enough free space.] is displayed, initialize the memory card by touching (MENU) [Show others] [MEDIA FORMAT] (under [MANAGE MEDIA] category) [MEMORY CARD] (DCR-SX65/SX85) [YES] &#...57732; [YES] . To eject the memory card Open the cover and lightly push the memory card in the wrong direction, the memory card, memory card slot, or image data may be damaged. ...
Handycam® Handbook
Page 20
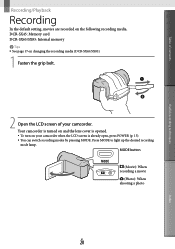
... LCD screen is already open, press POWER (p. 15). You can switch recording modes by pressing MODE. DCR-SX45: Memory card DCR-SX65/SX85: Internal memory Tips See page 17 on changing the recording media (DCR-SX65/SX85). 1 Fasten the grip belt. 2 Open the LCD screen of contents Useful recording techniques Recording/Playback Recording...
... LCD screen is already open, press POWER (p. 15). You can switch recording modes by pressing MODE. DCR-SX45: Memory card DCR-SX65/SX85: Internal memory Tips See page 17 on changing the recording media (DCR-SX65/SX85). 1 Fasten the grip belt. 2 Open the LCD screen of contents Useful recording techniques Recording/Playback Recording...
Handycam® Handbook
Page 22
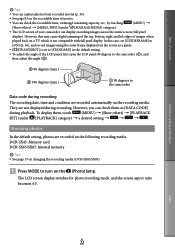
... CODE] during recording. To display them as a guide. [ STEADYSHOT] is not compatible with full pixel display. DCR-SX45: Memory card DCR-SX65/SX85: Internal memory Tips See page 17 on changing the recording media (DCR-SX65/SX85). Press MODE to the camcorder Data code during recording The recording date, time and condition...
... CODE] during recording. To display them as a guide. [ STEADYSHOT] is not compatible with full pixel display. DCR-SX45: Memory card DCR-SX65/SX85: Internal memory Tips See page 17 on changing the recording media (DCR-SX65/SX85). Press MODE to the camcorder Data code during recording The recording date, time and condition...
Handycam® Handbook
Page 27
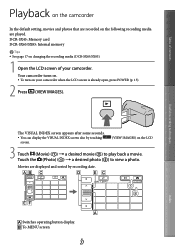
... are played. Useful recording techniques Index Switches operating button display. To MENU screen US 27 DCR-SX45: Memory card DCR-SX65/SX85: Internal memory Tips See page 17 on changing the recording media (DCR-SX65/SX85). 1 Open the LCD screen of contents Playback on the camcorder In the default setting, movies and...
... are played. Useful recording techniques Index Switches operating button display. To MENU screen US 27 DCR-SX45: Memory card DCR-SX65/SX85: Internal memory Tips See page 17 on changing the recording media (DCR-SX65/SX85). 1 Open the LCD screen of contents Playback on the camcorder In the default setting, movies and...

Handycam® Handbook
Page 28
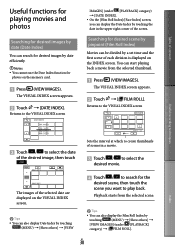
... Useful recording techniques Displays the screen to select the index type ([DATE INDEX]/[ FILM ROLL]/ [ FACE]) (p. 30, 30, 31). / : Displays movies recorded on a memory card.) Playing movies Your camcorder starts playing the selected movie. If you touch the movie or photo with the movie or photo that was most...
... Useful recording techniques Displays the screen to select the index type ([DATE INDEX]/[ FILM ROLL]/ [ FACE]) (p. 30, 30, 31). / : Displays movies recorded on a memory card.) Playing movies Your camcorder starts playing the selected movie. If you touch the movie or photo with the movie or photo that was most...
Handycam® Handbook
Page 29
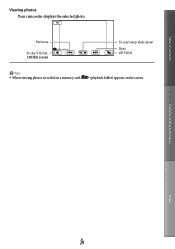
Useful recording techniques Index US 29 Table of contents Viewing photos Your camcorder displays the selected photo. Previous To the VISUAL INDEX screen To start/stop slide show Next OPTION Tips When viewing photos recorded on a memory card, (playback folder) appears on the screen.
Useful recording techniques Index US 29 Table of contents Viewing photos Your camcorder displays the selected photo. Previous To the VISUAL INDEX screen To start/stop slide show Next OPTION Tips When viewing photos recorded on a memory card, (playback folder) appears on the screen.
Handycam® Handbook
Page 30
... touching the date in a movie. Touch / to select the desired movie. Touch / to select the date of each division is displayed on the memory card. Press (VIEW IMAGES). The VISUAL INDEX screen appears. Touch [DATE INDEX]. Returns to the VISUAL INDEX screen Useful recording techniques ...
... touching the date in a movie. Touch / to select the desired movie. Touch / to select the date of each division is displayed on the memory card. Press (VIEW IMAGES). The VISUAL INDEX screen appears. Touch [DATE INDEX]. Returns to the VISUAL INDEX screen Useful recording techniques ...
Handycam® Handbook
Page 35
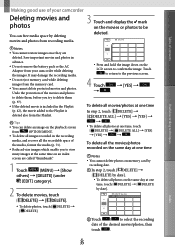
... to return to select the recording date of the desired movies/photos, then touch . It may damage the recording media. Do not eject memory card while deleting images from recording media. Notes You cannot restore images once they are called "thumbnails." 1 Touch (MENU) &#... at one time, touch [ DELETE] [ DELETE ALL] [YES] [YES] . movies and photos from the memory card. You cannot delete protected movies and photos. Index US 35 To delete all the movies/photos recorded on the same day at one...
... to return to select the recording date of the desired movies/photos, then touch . It may damage the recording media. Do not eject memory card while deleting images from recording media. Notes You cannot restore images once they are called "thumbnails." 1 Touch (MENU) &#... at one time, touch [ DELETE] [ DELETE ALL] [YES] [YES] . movies and photos from the memory card. You cannot delete protected movies and photos. Index US 35 To delete all the movies/photos recorded on the same day at one...
Handycam® Handbook
Page 37
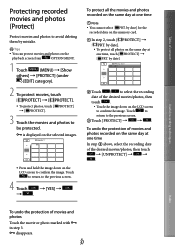
... on the selected images. Press and hold the image down on the LCD screen to confirm the image. To protect all photos on the memory card. In step 2, touch [ PROTECT] [ PRT. by date] for the recorded data on the same day at one time Note You...
... on the selected images. Press and hold the image down on the LCD screen to confirm the image. To protect all photos on the memory card. In step 2, touch [ PROTECT] [ PRT. by date] for the recorded data on the same day at one time Note You...
Handycam® Handbook
Page 38
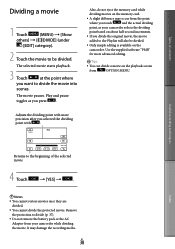
Also, do not eject the memory card while dividing movies on the memory card. A slight difference may damage the recording media. Useful recording techniques Index Returns to the beginning of contents Dividing a movie 1 Touch (MENU) [Show ...
Also, do not eject the memory card while dividing movies on the memory card. A slight difference may damage the recording media. Useful recording techniques Index Returns to the beginning of contents Dividing a movie 1 Touch (MENU) [Show ...
Handycam® Handbook
Page 40
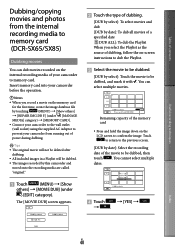
...to the wall outlet (wall socket) using the supplied AC Adaptor to be dubbed, and mark it with . You can dub movies recorded on the memory card for the first time, create the image database file by touching (MENU) [Show others ] [MOVIE DUB] (under [MANAGE ...58371; Select the movie to be dubbed. [DUB by select]: Touch the movie to prevent your camcorder from the internal recording media to memory card (DCR-SX65/SX85) Dubbing movies You can select multiple movies. Table of contents Useful recording techniques Dubbing/copying movies and photos from running out ...
...to the wall outlet (wall socket) using the supplied AC Adaptor to be dubbed, and mark it with . You can dub movies recorded on the memory card for the first time, create the image database file by touching (MENU) [Show others ] [MOVIE DUB] (under [MANAGE ...58371; Select the movie to be dubbed. [DUB by select]: Touch the movie to prevent your camcorder from the internal recording media to memory card (DCR-SX65/SX85) Dubbing movies You can select multiple movies. Table of contents Useful recording techniques Dubbing/copying movies and photos from running out ...
Handycam® Handbook
Page 41
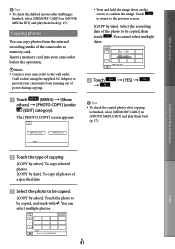
.... Touch [YES] . Tips To check the copied photos after dubbing is finished, select [MEMORY CARD] on [PHOTO MEDIA SET] and play them back (p. 17). Touch the type of copying. [COPY by select]: To copy selected photos ... confirm the image. Table of contents Useful recording techniques Tips To check the dubbed movies after copying is finished, select [MEMORY CARD] on [MOVIE MEDIA SET] and play them back (p. 17). You can copy photos from running out of power during copying. ...
.... Touch [YES] . Tips To check the copied photos after dubbing is finished, select [MEMORY CARD] on [PHOTO MEDIA SET] and play them back (p. 17). Touch the type of copying. [COPY by select]: To copy selected photos ... confirm the image. Table of contents Useful recording techniques Tips To check the dubbed movies after copying is finished, select [MEMORY CARD] on [MOVIE MEDIA SET] and play them back (p. 17). You can copy photos from running out of power during copying. ...


