
Operating Guide
Page 1
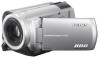
2-887-134-11(1) Operating Guide DCR-SR40/SR60/SR80 US Additional information on this product and answers to use the camcorder. © 2006 Sony Corporation Printed in Japan Also refer to "Handycam Handbook" (PDF) By referring to "Handycam Handbook" (PDF) contained in the supplied CD-ROM, you can be found at our Customer Support Website. Printed on how to frequently asked questions can find more detailed information on 100% recycled paper using VOC (Volatile Organic Compound)-free vegetable oil based ink.
2-887-134-11(1) Operating Guide DCR-SR40/SR60/SR80 US Additional information on this product and answers to use the camcorder. © 2006 Sony Corporation Printed in Japan Also refer to "Handycam Handbook" (PDF) By referring to "Handycam Handbook" (PDF) contained in the supplied CD-ROM, you can be found at our Customer Support Website. Printed on how to frequently asked questions can find more detailed information on 100% recycled paper using VOC (Volatile Organic Compound)-free vegetable oil based ink.
Operating Guide
Page 4
.... The number below . Notes DCR-SR40, DCR-SR60 and DCR-SR80 are cautioned that any interference received, including interference that may call: Sony Customer Information Center 1-800222-SONY (7669). You can help preserve our environment by returning your used with the specified type only. Model No. CAUTION Replace the battery with the Handycam Station Model DCRAC162 and...
.... The number below . Notes DCR-SR40, DCR-SR60 and DCR-SR80 are cautioned that any interference received, including interference that may call: Sony Customer Information Center 1-800222-SONY (7669). You can help preserve our environment by returning your used with the specified type only. Model No. CAUTION Replace the battery with the Handycam Station Model DCRAC162 and...
Operating Guide
Page 6
... the above, when you dispose of recordings cannot be copyrighted. It may damage the hard disk drive of the camcorder. To view your recordings on a DVD using your camcorder. It is... on the model DCR-SR80. • The on use • The camcorder is not dust proofed, drip proofed or waterproofed. On the drop sensor • To protect the internal hard disk from Windows XP....to a computer • Do not format the hard disk of your camcorder. Note on the camcorder in highlands • Do not turn on connecting the camcorder to "Handycam Handbook" (PDF). 6 Note on using the ...
... the above, when you dispose of recordings cannot be copyrighted. It may damage the hard disk drive of the camcorder. To view your recordings on a DVD using your camcorder. It is... on the model DCR-SR80. • The on use • The camcorder is not dust proofed, drip proofed or waterproofed. On the drop sensor • To protect the internal hard disk from Windows XP....to a computer • Do not format the hard disk of your camcorder. Note on the camcorder in highlands • Do not turn on connecting the camcorder to "Handycam Handbook" (PDF). 6 Note on using the ...
Operating Guide
Page 8
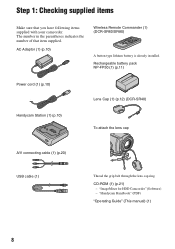
... battery is already installed. Rechargeable battery pack NP-FP50 (1) (p.11) Power cord (1) (p.10) Handycam Station (1) (p.10) Lens Cap (1) (p.12) (DCR-SR40) To attach the lens cap A/V connecting cable (1) (p.20) USB cable (1) Thread the grip belt through the lens cap ring. "Handycam Handbook" (PDF) "Operating Guide" (This manual) (1) 8 "ImageMixer for HDD Camcorder" (Software) - Step 1: Checking...
... battery is already installed. Rechargeable battery pack NP-FP50 (1) (p.11) Power cord (1) (p.10) Handycam Station (1) (p.10) Lens Cap (1) (p.12) (DCR-SR40) To attach the lens cap A/V connecting cable (1) (p.20) USB cable (1) Thread the grip belt through the lens cap ring. "Handycam Handbook" (PDF) "Operating Guide" (This manual) (1) 8 "ImageMixer for HDD Camcorder" (Software) - Step 1: Checking...
Operating Guide
Page 10
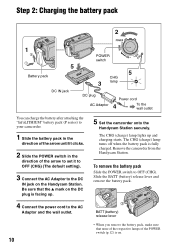
... securely. Slide the BATT (battery) release lever and remove the battery pack. 4 Connect the power cord to the DC IN jack on the Handycam Station. Step 2: Charging the battery pack 2 1 5 Battery pack DC IN jack POWER switch 5 CHG 3 lamp DC plug AC Adaptor Power cord 4 To the wall outlet ... you remove the battery pack, make sure that the v mark on the DC plug is facing up and charging starts. Remove the camcorder from the Handycam Station. To remove the battery pack Slide the POWER switch to OFF (CHG). Be sure that none of the respective lamps of the POWER switch...
... securely. Slide the BATT (battery) release lever and remove the battery pack. 4 Connect the power cord to the DC IN jack on the Handycam Station. Step 2: Charging the battery pack 2 1 5 Battery pack DC IN jack POWER switch 5 CHG 3 lamp DC plug AC Adaptor Power cord 4 To the wall outlet ... you remove the battery pack, make sure that the v mark on the DC plug is facing up and charging starts. Remove the camcorder from the Handycam Station. To remove the battery pack Slide the POWER switch to OFF (CHG). Be sure that none of the respective lamps of the POWER switch...
Operating Guide
Page 12
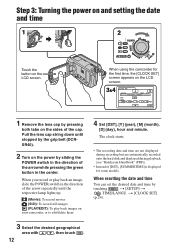
...] t TIME/LANGU. The clock starts. • The recording date and time are not displayed during recording but are automatically recorded onto the hard disk and displayed during playback (see "Handycam Handbook" (PDF)). • Instead of the arrow while pressing the green button in the direction of the cap. Pull the lens cap string...
...] t TIME/LANGU. The clock starts. • The recording date and time are not displayed during recording but are automatically recorded onto the hard disk and displayed during playback (see "Handycam Handbook" (PDF)). • Instead of the arrow while pressing the green button in the direction of the cap. Pull the lens cap string...
Operating Guide
Page 16
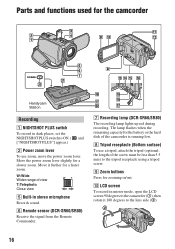
.... 9 Zoom buttons Press for the camcorder Handycam Station Recording 1 NIGHTSHOT PLUS switch To record in dark places, set the NIGHTSHOT PLUS switch to the lens side (2). 16 The lamp flashes when the remaining capacity for the battery or the hard disk of the camcorder is running low. 8 Tripod...optional: the length of view T:Telephoto Close view 5 Built-in stereo microphone Records sound. 6 Remote sensor (DCR-SR60/SR80) Receive the signal from the Remote Commander. 7 Recording lamp (DCR-SR60/SR80) The recording lamp lights up red during recording. LCD screen To record in mirror mode, open...
.... 9 Zoom buttons Press for the camcorder Handycam Station Recording 1 NIGHTSHOT PLUS switch To record in dark places, set the NIGHTSHOT PLUS switch to the lens side (2). 16 The lamp flashes when the remaining capacity for the battery or the hard disk of the camcorder is running low. 8 Tripod...optional: the length of view T:Telephoto Close view 5 Built-in stereo microphone Records sound. 6 Remote sensor (DCR-SR60/SR80) Receive the signal from the Remote Commander. 7 Recording lamp (DCR-SR60/SR80) The recording lamp lights up red during recording. LCD screen To record in mirror mode, open...

Operating Guide
Page 17
...Open when using Active Interface Shoe. 4 Active Interface Shoe (DCR-SR60/SR80) The Active Interface Shoe supplies power to magnify. 2 Magnify the image with W (Wide angle)/T (Telephoto). ws (USB) jack Connect with simple operation (Easy Handycam operation). In this way, you operate the POWER switch on ...Connect with the A/V connecting cable. During Easy Handycam operation, you want to 5 times the original size (Playback zoom). 1 Play back the image you may not use the camcorder with the USB cable. 17 Recording/Playback ql REMOTE jack (DCR-SR60/SR80) Connect other devices qj qk ql...
...Open when using Active Interface Shoe. 4 Active Interface Shoe (DCR-SR60/SR80) The Active Interface Shoe supplies power to magnify. 2 Magnify the image with W (Wide angle)/T (Telephoto). ws (USB) jack Connect with simple operation (Easy Handycam operation). In this way, you operate the POWER switch on ...Connect with the A/V connecting cable. During Easy Handycam operation, you want to 5 times the original size (Playback zoom). 1 Play back the image you may not use the camcorder with the USB cable. 17 Recording/Playback ql REMOTE jack (DCR-SR60/SR80) Connect other devices qj qk ql...
Operating Guide
Page 20
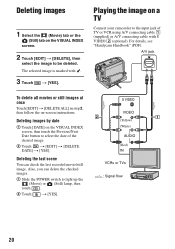
..., you can check the last recorded movie/still image. S VIDEO VIDEO (Yellow) (White) AUDIO (Red) IN VCRs or TVs : Signal flow 20 For details, see "Handycam Handbook" (PDF). Deleting the last scene You can delete the checked images. 1 Slide the POWER switch to be deleted. Deleting images 1 Select the (Movie) tab...
..., you can check the last recorded movie/still image. S VIDEO VIDEO (Yellow) (White) AUDIO (Red) IN VCRs or TVs : Signal flow 20 For details, see "Handycam Handbook" (PDF). Deleting the last scene You can delete the checked images. 1 Slide the POWER switch to be deleted. Deleting images 1 Select the (Movie) tab...
Operating Guide
Page 21
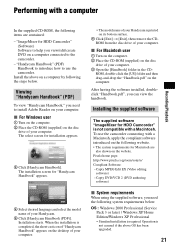
...having the software installed, doubleclick "Handbook.pdf", you view/edit/create DVD on the disc drive of your computer. 3 Open the [Handbook] folder in the CD- Pixela home page: http://www.pixela.co.jp/oem/sony/e/ Compliant Software: - OS : Windows 2000 Professional (Service Pack 3 or later) /...you can view the handbook. ROM, double-click the [US] folder and then drag-and-drop the "Handbook.pdf" on the disc drive of your Handycam is required. Capty DVD/VCD 2 (DVD authoring software) x System requirements When using the supplied software, you need the following system ...
...having the software installed, doubleclick "Handbook.pdf", you view/edit/create DVD on the disc drive of your computer. 3 Open the [Handbook] folder in the CD- Pixela home page: http://www.pixela.co.jp/oem/sony/e/ Compliant Software: - OS : Windows 2000 Professional (Service Pack 3 or later) /...you can view the handbook. ROM, double-click the [US] folder and then drag-and-drop the "Handbook.pdf" on the disc drive of your Handycam is required. Capty DVD/VCD 2 (DVD authoring software) x System requirements When using the supplied software, you need the following system ...
Operating Guide
Page 24
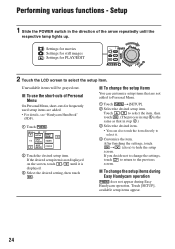
...]. 2 Select the desired setup item. x To change the settings, touch to return to change the setup items during Easy Handycam operation does not appear during Easy Handycam operation. If you decide not to the previous screen. Touch [SETUP], available setup items appear. 24 After finishing the settings...grayed out. If the desired setup item is the same as that are added. • For details, see "Handycam Handbook" (PDF). 1 Touch . 60min STBY SETUP EXPOSURE SPOT FOCUS FADER SPOT METER FOCUS 2 Touch the desired setup item. Performing various functions -...
...]. 2 Select the desired setup item. x To change the settings, touch to return to change the setup items during Easy Handycam operation does not appear during Easy Handycam operation. If you decide not to the previous screen. Touch [SETUP], available setup items appear. 24 After finishing the settings...grayed out. If the desired setup item is the same as that are added. • For details, see "Handycam Handbook" (PDF). 1 Touch . 60min STBY SETUP EXPOSURE SPOT FOCUS FADER SPOT METER FOCUS 2 Touch the desired setup item. Performing various functions -...
Operating Guide
Page 25
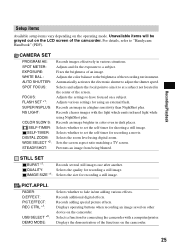
... SLOW S: SELF-TIMER: SELF-TIMER: DIGITAL ZOOM: WIDE SELECT *2: STEADYSHOT: Records images effectively in a higher sensitivity than NightShot plus . Adjusts and fix the exposure to "Handycam Handbook" (PDF). Adjusts various settings for recording a still image. Records an image in various situations. Displays the demonstration of the camcorder. For details, refer to...
... SLOW S: SELF-TIMER: SELF-TIMER: DIGITAL ZOOM: WIDE SELECT *2: STEADYSHOT: Records images effectively in a higher sensitivity than NightShot plus . Adjusts and fix the exposure to "Handycam Handbook" (PDF). Adjusts various settings for recording a still image. Records an image in various situations. Displays the demonstration of the camcorder. For details, refer to...
Operating Guide
Page 27
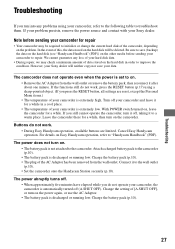
Note before sending your camcorder for a while. Be sure to save your Sony dealer will be required to initialize or change the current hard disk of your hard disk data. • During repair, we may be deleted. With POWER switch turned on . • The battery pack is discharged or running... while you press the RESET button, all settings are limited. Cancel Easy Handycam operation. Connect it to a warm place. In the event of your camcorder and leave it after about one minute. For details on the hard disk in a cool place. • The temperature of this, the data ...
Note before sending your camcorder for a while. Be sure to save your Sony dealer will be required to initialize or change the current hard disk of your hard disk data. • During repair, we may be deleted. With POWER switch turned on . • The battery pack is discharged or running... while you press the RESET button, all settings are limited. Cancel Easy Handycam operation. Connect it to a warm place. In the event of your camcorder and leave it after about one minute. For details on the hard disk in a cool place. • The temperature of this, the data ...
Operating Guide
Page 29
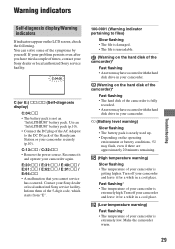
... 100-0001 (Warning indicator pertaining to the DC IN jack of the Handycam Station or your camcorder securely (p.10). Fast flashing* • The temperature of your Sony dealer or local authorized Sony service facility. Warning indicators Troubleshooting Self-diagnosis display/Warning indicators If indicators ...times, contact your Sony dealer or local authorized Sony service facility. You can solve some of the symptoms by yourself. E:20:ss / E:31:ss / E:40:ss / E:61:ss / E:62:ss / E:91:ss / E:94:ss • A malfunction that you have occurred with the hard disk drive in a cool ...
... 100-0001 (Warning indicator pertaining to the DC IN jack of the Handycam Station or your camcorder securely (p.10). Fast flashing* • The temperature of your Sony dealer or local authorized Sony service facility. Warning indicators Troubleshooting Self-diagnosis display/Warning indicators If indicators ...times, contact your Sony dealer or local authorized Sony service facility. You can solve some of the symptoms by yourself. E:20:ss / E:31:ss / E:40:ss / E:61:ss / E:62:ss / E:91:ss / E:94:ss • A malfunction that you have occurred with the hard disk drive in a cool ...
Operating Guide
Page 34
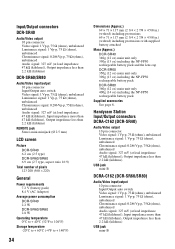
Handycam Station Input/Output connectors DCRA-C162 (DCR-SR40) Audio/Video output 10 pin connector Video signal: 1 Vp-p, 75 Ω (ohms), unbalanced Luminance signal: 1 Vp-p, 75 Ω (ohms), unbalanced Chrominance signal: 0.286 Vp-p, 75... 6.9 cm (2.7 type, aspect ratio 16:9) Total number of pixels 123 200 (560 × 220) General Power requirements 7.2 V (battery pack) 8.4 V (AC Adaptor) Average power consumption DCR-SR40 2.2 W DCR-SR60/SR80 2.8 W Operating temperature 0°C to + 40°C (32°F to 104°F) Storage temperature -20°C to + 60°C (-4°F to + 140°F) ...
Handycam Station Input/Output connectors DCRA-C162 (DCR-SR40) Audio/Video output 10 pin connector Video signal: 1 Vp-p, 75 Ω (ohms), unbalanced Luminance signal: 1 Vp-p, 75 Ω (ohms), unbalanced Chrominance signal: 0.286 Vp-p, 75... 6.9 cm (2.7 type, aspect ratio 16:9) Total number of pixels 123 200 (560 × 220) General Power requirements 7.2 V (battery pack) 8.4 V (AC Adaptor) Average power consumption DCR-SR40 2.2 W DCR-SR60/SR80 2.8 W Operating temperature 0°C to + 40°C (32°F to 104°F) Storage temperature -20°C to + 60°C (-4°F to + 140°F) ...
Operating Guide
Page 35
... other countries. • Macintosh is a trademark or registered trademark of Intel Corporation. On trademarks • "Handycam" and are registered trademarks of Sony Corporation. • "InfoLITHIUM" is a trademark of Sony Corporation. • "Memory Stick Duo" is a trademark of Sony Corporation. • "ImageMixer for other product names mentioned herein may be the trademarks or registered trademarks...
... other countries. • Macintosh is a trademark or registered trademark of Intel Corporation. On trademarks • "Handycam" and are registered trademarks of Sony Corporation. • "InfoLITHIUM" is a trademark of Sony Corporation. • "Memory Stick Duo" is a trademark of Sony Corporation. • "ImageMixer for other product names mentioned herein may be the trademarks or registered trademarks...


