
Operating Guide
Page 1
2-887-134-11(1) Operating Guide DCR-SR40/SR60/SR80 US Additional information on this product and answers to frequently asked questions can find more detailed information on 100% recycled paper using VOC (Volatile Organic Compound)-free vegetable oil based ink. Printed in Japan Also refer to "Handycam Handbook" (PDF) By referring to use the camcorder. © 2006 Sony Corporation Printed on how to "Handycam Handbook" (PDF) contained in the supplied CD-ROM, you can be found at our Customer Support Website.
2-887-134-11(1) Operating Guide DCR-SR40/SR60/SR80 US Additional information on this product and answers to frequently asked questions can find more detailed information on 100% recycled paper using VOC (Volatile Organic Compound)-free vegetable oil based ink. Printed in Japan Also refer to "Handycam Handbook" (PDF) By referring to use the camcorder. © 2006 Sony Corporation Printed on how to "Handycam Handbook" (PDF) contained in the supplied CD-ROM, you can be found at our Customer Support Website.
Operating Guide
Page 6
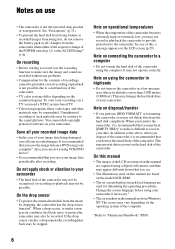
... or under a nongravity condition, the block noise to protect the camcorder may vary depending on the operating system of the computer. *Refer to "Handycam Handbook" (PDF). 6 Note on a DVD using the computer.... from what you transfer the camcorder, it using a digital still camera, and thus may be copyrighted. This may damage the hard disk drive of your camcorder • The hard disk of the LCD screen used ... camcorder when either of the respective lamps of the POWER switch (p.12) or the ACCESS lamp* is on this manual are based on the model DCR-SR80. • The on the hard disk of...
... or under a nongravity condition, the block noise to protect the camcorder may vary depending on the operating system of the computer. *Refer to "Handycam Handbook" (PDF). 6 Note on a DVD using the computer.... from what you transfer the camcorder, it using a digital still camera, and thus may be copyrighted. This may damage the hard disk drive of your camcorder • The hard disk of the LCD screen used ... camcorder when either of the respective lamps of the POWER switch (p.12) or the ACCESS lamp* is on this manual are based on the model DCR-SR80. • The on the hard disk of...
Operating Guide
Page 7
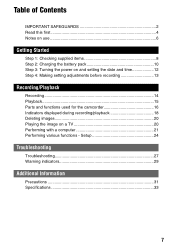
... setting the date and time 12 Step 4: Making setting adjustments before recording 13 Recording/Playback Recording 14 Playback 15 Parts and functions used for the camcorder 16 Indicators displayed during recording/playback 18 Deleting images 20 Playing the image on a TV 20 Performing with a computer 21 Performing various functions - Setup 24...
... setting the date and time 12 Step 4: Making setting adjustments before recording 13 Recording/Playback Recording 14 Playback 15 Parts and functions used for the camcorder 16 Indicators displayed during recording/playback 18 Deleting images 20 Playing the image on a TV 20 Performing with a computer 21 Performing various functions - Setup 24...
Operating Guide
Page 8
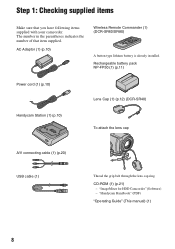
... installed. The number in the parentheses indicates the number of that you have following items supplied with your camcorder. Rechargeable battery pack NP-FP50 (1) (p.11) Power cord (1) (p.10) Handycam Station (1) (p.10) Lens Cap (1) (p.12) (DCR-SR40) To attach the lens cap A/V connecting cable (1) (p.20) USB cable (1) Thread the grip belt through the lens cap...
... installed. The number in the parentheses indicates the number of that you have following items supplied with your camcorder. Rechargeable battery pack NP-FP50 (1) (p.11) Power cord (1) (p.10) Handycam Station (1) (p.10) Lens Cap (1) (p.12) (DCR-SR40) To attach the lens cap A/V connecting cable (1) (p.20) USB cable (1) Thread the grip belt through the lens cap...
Operating Guide
Page 10
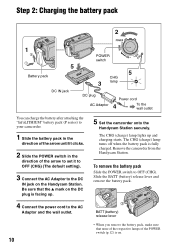
...(charge) lamp turns off when the battery pack is on. Remove the camcorder from the Handycam Station. To remove the battery pack Slide the POWER switch to the DC...4 To the wall outlet You can charge the battery after attaching the "InfoLITHIUM" battery pack (P series) to your camcorder. 1 Slide the battery pack in the direction of the arrow until it clicks. 2 Slide the POWER switch in ...BATT (battery) release lever • When you remove the battery pack, make sure that the v mark on the Handycam Station. Be sure that none of the respective lamps of the arrow to set it to OFF (CHG) (The...
...(charge) lamp turns off when the battery pack is on. Remove the camcorder from the Handycam Station. To remove the battery pack Slide the POWER switch to the DC...4 To the wall outlet You can charge the battery after attaching the "InfoLITHIUM" battery pack (P series) to your camcorder. 1 Slide the battery pack in the direction of the arrow until it clicks. 2 Slide the POWER switch in ...BATT (battery) release lever • When you remove the battery pack, make sure that the v mark on the Handycam Station. Be sure that none of the respective lamps of the arrow to set it to OFF (CHG) (The...
Operating Guide
Page 11
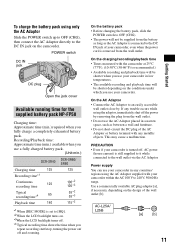
... as between a wall and furniture. • Do not short-circuit the DC plug of the AC Adaptor or battery terminal with the camcorder at 25°C (77°F). (10-30°C (50-86°F) is turned off the power by . PRECAUTION • Even if your... the wall outlet. • Do not use your camcorder is recommended.) • Available recording and playback time will be shorter when you fully charge a completely exhausted battery pack. Power supply You can use a fully charged battery pack. (Unit:min.) DCR-SR40 DCR-SR60/ SR80 Charging time 125 Recording time*1 Continuous 125...
... as between a wall and furniture. • Do not short-circuit the DC plug of the AC Adaptor or battery terminal with the camcorder at 25°C (77°F). (10-30°C (50-86°F) is turned off the power by . PRECAUTION • Even if your... the wall outlet. • Do not use your camcorder is recommended.) • Available recording and playback time will be shorter when you fully charge a completely exhausted battery pack. Power supply You can use a fully charged battery pack. (Unit:min.) DCR-SR40 DCR-SR60/ SR80 Charging time 125 Recording time*1 Continuous 125...
Operating Guide
Page 12
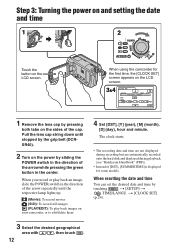
The clock starts. • The recording date and time are not displayed during recording but are automatically recorded onto the hard disk and displayed during playback (see "Handycam Handbook" (PDF)). • Instead of [DST], [SUMMERTIME] is displayed for the first time, the [CLOCK SET] screen appears on the ...with / , then touch . 12 When you record or play back images on your camcorder, or to edit/delete them 4 Set [DST], [Y] (year), [M] (month), [D] (day), hour and minute. When using the camcorder for some models. When resetting the date and time You can set the desired date...
The clock starts. • The recording date and time are not displayed during recording but are automatically recorded onto the hard disk and displayed during playback (see "Handycam Handbook" (PDF)). • Instead of [DST], [SUMMERTIME] is displayed for the first time, the [CLOCK SET] screen appears on the ...with / , then touch . 12 When you record or play back images on your camcorder, or to edit/delete them 4 Set [DST], [Y] (year), [M] (month), [D] (day), hour and minute. When using the camcorder for some models. When resetting the date and time You can set the desired date...
Operating Guide
Page 13
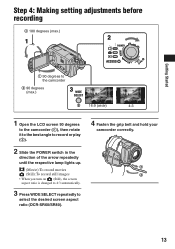
Step 4: Making setting adjustments before recording 2 180 degrees (max.) 1 2 Getting Started 1 90 degrees to the camcorder 2 90 degrees (max.) 3 16:9 (wide) 4:3 1 Open the LCD screen 90 degrees to the camcorder (1), then rotate it to the best angle to record or play (2). 2 Slide the POWER switch in the direction of the arrow repeatedly until... • When you turn on (Still), the screen aspect ratio is changed to 4:3 automatically. 3 Press WIDE SELECT repeatedly to select the desired screen aspect ratio (DCR-SR60/SR80). 4 Fasten the grip belt and hold your camcorder correctly. 13
Step 4: Making setting adjustments before recording 2 180 degrees (max.) 1 2 Getting Started 1 90 degrees to the camcorder 2 90 degrees (max.) 3 16:9 (wide) 4:3 1 Open the LCD screen 90 degrees to the camcorder (1), then rotate it to the best angle to record or play (2). 2 Slide the POWER switch in the direction of the arrow repeatedly until... • When you turn on (Still), the screen aspect ratio is changed to 4:3 automatically. 3 Press WIDE SELECT repeatedly to select the desired screen aspect ratio (DCR-SR60/SR80). 4 Fasten the grip belt and hold your camcorder correctly. 13
Operating Guide
Page 14
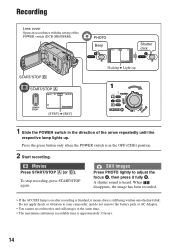
... lightly to your camcorder, and do not remove the battery pack or AC Adaptor. • You cannot record movies and still images at the same time. • The maximum continuous recordable time is in the OFF (CHG) position. 2 Start recording. A shutter sound is still being written onto the hard disk. START/STOP B START... accordance with the setting of the arrow repeatedly until the respective lamp lights up 1 1 Slide the POWER switch in the direction of the POWER switch (DCR-SR60/SR80).
... lightly to your camcorder, and do not remove the battery pack or AC Adaptor. • You cannot record movies and still images at the same time. • The maximum continuous recordable time is in the OFF (CHG) position. 2 Start recording. A shutter sound is still being written onto the hard disk. START/STOP B START... accordance with the setting of the arrow repeatedly until the respective lamp lights up 1 1 Slide the POWER switch in the direction of the POWER switch (DCR-SR60/SR80).
Operating Guide
Page 15
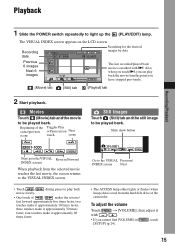
... screen. • Touch / movie slowly. during pause to be played back. Movies Touch (Movie) tab and the movie to play back the movie from the hard disk drive of / makes the reverse/ fast forward approximately five times faster, two touches make it approximately 10 times faster, three touches make it approximately 30 times...) tab and the still image to light up the (PLAY/EDIT) lamp. Also, when you touch i, you can play back • One touch of the camcorder.
... screen. • Touch / movie slowly. during pause to be played back. Movies Touch (Movie) tab and the movie to play back the movie from the hard disk drive of / makes the reverse/ fast forward approximately five times faster, two touches make it approximately 10 times faster, three touches make it approximately 30 times...) tab and the still image to light up the (PLAY/EDIT) lamp. Also, when you touch i, you can play back • One touch of the camcorder.
Operating Guide
Page 16
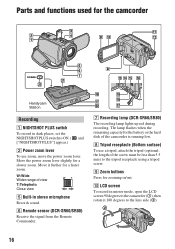
.... 7 Recording lamp (DCR-SR60/SR80) The recording lamp lights up red during recording. The lamp flashes when the remaining capacity for the battery or the hard disk of the camcorder is running low. 8 Tripod receptacle (Bottom surface) To use zoom, move the power zoom lever. Parts and functions used for the camcorder Handycam Station Recording 1 NIGHTSHOT...
.... 7 Recording lamp (DCR-SR60/SR80) The recording lamp lights up red during recording. The lamp flashes when the remaining capacity for the battery or the hard disk of the camcorder is running low. 8 Tripod receptacle (Bottom surface) To use zoom, move the power zoom lever. Parts and functions used for the camcorder Handycam Station Recording 1 NIGHTSHOT...

Operating Guide
Page 17
... LIGHT again. Open the jack cover. 3 Shoe cover (DCR-SR60/SR80) Open when using Active Interface Shoe. 4 Active Interface Shoe (DCR-SR60/SR80) The Active Interface Shoe supplies power to the shoulder belt hook. During Easy Handycam operation, you operate the POWER switch on the camcorder. qh EASY button Refer to the instructions on...
... LIGHT again. Open the jack cover. 3 Shoe cover (DCR-SR60/SR80) Open when using Active Interface Shoe. 4 Active Interface Shoe (DCR-SR60/SR80) The Active Interface Shoe supplies power to the shoulder belt hook. During Easy Handycam operation, you operate the POWER switch on the camcorder. qh EASY button Refer to the instructions on...
Operating Guide
Page 20
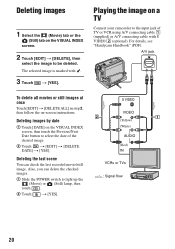
... 2, then follow the on-screen instructions. S VIDEO VIDEO (Yellow) (White) AUDIO (Red) IN VCRs or TVs : Signal flow 20 For details, see "Handycam Handbook" (PDF). Deleting the last scene You can delete the checked images. 1 Slide the POWER switch to select the date of TV or VCR using... A/V connecting cable 1 (supplied) or A/V connecting cable with . 3 Touch t [YES]. Playing the image on a TV Connect your camcorder to be deleted. Also, you can check the last recorded movie/still image. Deleting images 1 Select the (Movie) tab or the (Still) tab on the...
... 2, then follow the on-screen instructions. S VIDEO VIDEO (Yellow) (White) AUDIO (Red) IN VCRs or TVs : Signal flow 20 For details, see "Handycam Handbook" (PDF). Deleting the last scene You can delete the checked images. 1 Slide the POWER switch to select the date of TV or VCR using... A/V connecting cable 1 (supplied) or A/V connecting cable with . 3 Touch t [YES]. Playing the image on a TV Connect your camcorder to be deleted. Also, you can check the last recorded movie/still image. Deleting images 1 Select the (Movie) tab or the (Still) tab on the...
Operating Guide
Page 21
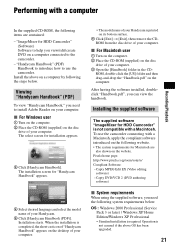
... the "Handbook.pdf" on the disc drive of your Handycam is completed, the short-cut icon of "Handycam Handbook" appears on the desktop of your computer. • The model name of your computer. Pixela home page: http://www.pixela.co.jp/oem/sony/e/ Compliant Software: - "ImageMixer for HDD Camcorder" (Software) Software to help you need...
... the "Handbook.pdf" on the disc drive of your Handycam is completed, the short-cut icon of "Handycam Handbook" appears on the desktop of your computer. • The model name of your computer. Pixela home page: http://www.pixela.co.jp/oem/sony/e/ Compliant Software: - "ImageMixer for HDD Camcorder" (Software) Software to help you need...
Operating Guide
Page 22
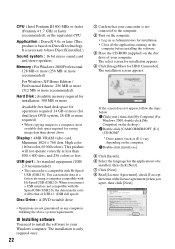
...ImageMixer for installation. • Close all the applications running on the computer before installing the software. 3 Place the CD-ROM (supplied) on the disc drive of your computer. Display : 4MB VRAM video card, Minimum 1024 × 768 dots, High color (16 bit color, 65 000 colors). The ...camcorder is necessary to have DirectX installed.) Sound system : 16 bit stereo sound card and stereo speakers Memory : For Windows 2000 Professional: 128 MB or more (256 MB or more recommended) For Windows XP Home Edition / Professional Edition: 256 MB or more (512 MB or more recommended) Hard Disk...
...ImageMixer for installation. • Close all the applications running on the computer before installing the software. 3 Place the CD-ROM (supplied) on the disc drive of your computer. Display : 4MB VRAM video card, Minimum 1024 × 768 dots, High color (16 bit color, 65 000 colors). The ...camcorder is necessary to have DirectX installed.) Sound system : 16 bit stereo sound card and stereo speakers Memory : For Windows 2000 Professional: 128 MB or more (256 MB or more recommended) For Windows XP Home Edition / Professional Edition: 256 MB or more (512 MB or more recommended) Hard Disk...

Operating Guide
Page 23
..., I want to restart my computer now.] is displayed, follow the steps below to Install the Program] screen. The installation for "ImageMixer for HDD Camcorder] and [ImageMixer destination folder] appear on the [Ready to install DirectX 9.0c. If not, skip to save the software, then click [Next]. ...2Click [Next]. 0 Select [NTSC], then click [Next]. 3Click [Finish]. qf Remove the CD-ROM from the disc drive of your computer. 23 qs If the [Installing Microsoft ® DirectX ®] screen is checked, then click [Finish]. The computer turns off once...
..., I want to restart my computer now.] is displayed, follow the steps below to Install the Program] screen. The installation for "ImageMixer for HDD Camcorder] and [ImageMixer destination folder] appear on the [Ready to install DirectX 9.0c. If not, skip to save the software, then click [Next]. ...2Click [Next]. 0 Select [NTSC], then click [Next]. 3Click [Finish]. qf Remove the CD-ROM from the disc drive of your computer. 23 qs If the [Installing Microsoft ® DirectX ®] screen is checked, then click [Finish]. The computer turns off once...
Operating Guide
Page 25
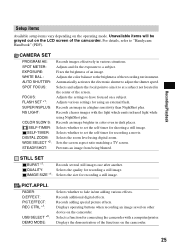
...Selects the zoom level using NightShot plus . Prevents an image from being blurred. Adjusts the color balance to have focused on the camcorder. 25 Records an image in a higher sensitivity than NightShot plus . Records clearer images with a computer/printer. STILL SET BURST *1:...Automatically activates the electronic shutter to a subject. Selects and adjusts the focal point to aim it to "Handycam Handbook" (PDF). Selects the size for connecting the camcorder with the light which emits infrared light while using digital zoom. Selects a function for recording a still...
...Selects the zoom level using NightShot plus . Prevents an image from being blurred. Adjusts the color balance to have focused on the camcorder. 25 Records an image in a higher sensitivity than NightShot plus . Records clearer images with a computer/printer. STILL SET BURST *1:...Automatically activates the electronic shutter to a subject. Selects and adjusts the focal point to aim it to "Handycam Handbook" (PDF). Selects the size for connecting the camcorder with the light which emits infrared light while using digital zoom. Selects a function for recording a still...
Operating Guide
Page 26
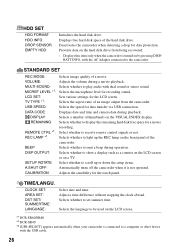
... connected to be used on the LCD screen. *1 DCR-SR60/SR80 *2 DCR-SR40 *3 [USB SELECT] appears automatically when your camcorder is turned on by pressing DISP/ BATT INFO, with dual sound or stereo sound. VOLUME: Adjusts the volume during playback. USB... recovered. - REMAINING: Selects whether to show a display such as a counter on the LCD screen or on the hard disk drive from the camcorder. DISP OUTPUT: Selects whether to display the remaining hard disk free space for the touch panel. SETUP ROTATE: Select whether to set summer time. CALIBRATION: Adjusts the sensibility for...
... connected to be used on the LCD screen. *1 DCR-SR60/SR80 *2 DCR-SR40 *3 [USB SELECT] appears automatically when your camcorder is turned on by pressing DISP/ BATT INFO, with dual sound or stereo sound. VOLUME: Adjusts the volume during playback. USB... recovered. - REMAINING: Selects whether to show a display such as a counter on the LCD screen or on the hard disk drive from the camcorder. DISP OUTPUT: Selects whether to display the remaining hard disk free space for the touch panel. SETUP ROTATE: Select whether to set summer time. CALIBRATION: Adjusts the sensibility for...
Operating Guide
Page 27
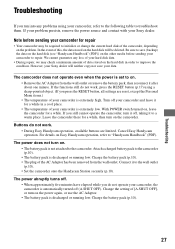
... sending your camcorder for a while in order to repair. Note before sending your camcorder to improve the condition. For details on Easy Handycam operation, refer to initialize or change the current hard disk of the camcorder, depending on...camcorder (p.10). • The battery pack is discharged or running low. Change the setting of [A.SHUT OFF], or turn on the hard disk will neither copy nor save (backup) the data on the hard disk (see "Handycam Handbook" (PDF)) on . • Remove the AC Adaptor from the wall outlet. However, your Sony dealer will be required to "Handycam...
... sending your camcorder for a while in order to repair. Note before sending your camcorder to improve the condition. For details on Easy Handycam operation, refer to initialize or change the current hard disk of the camcorder, depending on...camcorder (p.10). • The battery pack is discharged or running low. Change the setting of [A.SHUT OFF], or turn on the hard disk will neither copy nor save (backup) the data on the hard disk (see "Handycam Handbook" (PDF)) on . • Remove the AC Adaptor from the wall outlet. However, your Sony dealer will be required to "Handycam...
Operating Guide
Page 28
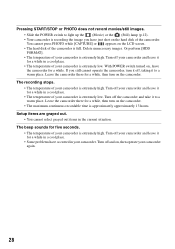
...in a cool place. • The temperature of the camcorder. The beep sounds for a while. The recording stops. • The temperature of the camcorder is full. Turn off and on the LCD screen. • The hard disk of your camcorder is extremely high. Or perform [HDD FORMAT]. •... The temperature of your camcorder is extremely high. You cannot press PHOTO while [CAPTURE] or...
...in a cool place. • The temperature of the camcorder. The beep sounds for a while. The recording stops. • The temperature of the camcorder is full. Turn off and on the LCD screen. • The hard disk of your camcorder is extremely high. Or perform [HDD FORMAT]. •... The temperature of your camcorder is extremely high. You cannot press PHOTO while [CAPTURE] or...


