
Operating Instructions
Page 1
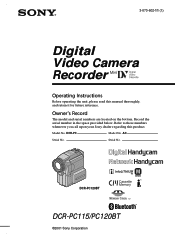
Serial No. Serial No. DCR-PC120BT TM SERIES DCR-PC115/PC120BT ©2001 Sony Corporation Model No. Record the serial number in the space provided below. AC- Owner's Record The model and serial numbers are located on the bottom. 3-070-602-11 (1) Digital Video Camera Recorder Operating Instructions Before operating the unit, please read this product. DCR-PC Model No. Refer to these numbers whenever you call upon your Sony dealer regarding this manual thoroughly, and retain it for future reference.
Serial No. Serial No. DCR-PC120BT TM SERIES DCR-PC115/PC120BT ©2001 Sony Corporation Model No. Record the serial number in the space provided below. AC- Owner's Record The model and serial numbers are located on the bottom. 3-070-602-11 (1) Digital Video Camera Recorder Operating Instructions Before operating the unit, please read this product. DCR-PC Model No. Refer to these numbers whenever you call upon your Sony dealer regarding this manual thoroughly, and retain it for future reference.

Operating Instructions
Page 3
...Declaration of FCC Rules. 3 Note: This equipment has been tested and found to comply with the limits for a Class B digital device, pursuant to radio communications. Consult the dealer or an experienced radio/TV technician for the FCC related matters only. These ...interference in the U.S.A. If you may not cause harmful interference, and (2)this manual could void your authority to Subpart B of Part 15 of Conformity Trade Name: SONY Model No.: DCR-PC120 Responsible Party: Sony Electronics Inc. However, there is connected. - For customers in a residential ...
...Declaration of FCC Rules. 3 Note: This equipment has been tested and found to comply with the limits for a Class B digital device, pursuant to radio communications. Consult the dealer or an experienced radio/TV technician for the FCC related matters only. These ...interference in the U.S.A. If you may not cause harmful interference, and (2)this manual could void your authority to Subpart B of Part 15 of Conformity Trade Name: SONY Model No.: DCR-PC120 Responsible Party: Sony Electronics Inc. However, there is connected. - For customers in a residential ...
Operating Instructions
Page 4
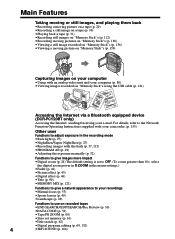
...via a Bluetooth equipped device (DCR-PC120BT only) Accessing the Internet, sending/receiving your computer •Using with the flash (p. 37, 115) •PROGRAM AE (p. 49) •Adjusting the exposure manually (p. 52) Functions to give a natural appearance to your recordings •Manual focus (p. 53) •...;Zero set to OFF. (To zoom greater than 10×, select the digital zoom power in D ZOOM in the recording mode •Back light (p. 27) •NightShot/Super NightShot (p. 27) •Recording images with an analog video unit and your computer (p. 80) •Viewing images...
...via a Bluetooth equipped device (DCR-PC120BT only) Accessing the Internet, sending/receiving your computer •Using with the flash (p. 37, 115) •PROGRAM AE (p. 49) •Adjusting the exposure manually (p. 52) Functions to give a natural appearance to your recordings •Manual focus (p. 53) •...;Zero set to OFF. (To zoom greater than 10×, select the digital zoom power in D ZOOM in the recording mode •Back light (p. 27) •NightShot/Super NightShot (p. 27) •Recording images with an analog video unit and your computer (p. 80) •Viewing images...
Operating Instructions
Page 6
... Self-timer recording 29 Checking the recording - Signal convert function 80 Recording video or TV programs ....... 81 Inserting a scene from a tape as a still image 118 Superimposing a still image in the dark - Picture effect .. 45 Using special effects - Digital effect ... 46 Using the PROGRAM AE function .... 49 Adjusting the exposure manually ...... 52 Focusing manually 53 Interval recording 55 Frame...
... Self-timer recording 29 Checking the recording - Signal convert function 80 Recording video or TV programs ....... 81 Inserting a scene from a tape as a still image 118 Superimposing a still image in the dark - Picture effect .. 45 Using special effects - Digital effect ... 46 Using the PROGRAM AE function .... 49 Adjusting the exposure manually ...... 52 Focusing manually 53 Interval recording 55 Frame...
Operating Instructions
Page 10
... listed in the illustrations. Labeling a cassette (p. 94) For details, see this manual are marked by looking at the bottom of differences DCRNetwork function PC115 - Getting started - Before you can hear a beep sound to CAMERA. Tapes with your camcorder. (DCR-PC120BT is marked as DCR-PC120 on the DV format. Types of your camcorder. We recommend...
... listed in the illustrations. Labeling a cassette (p. 94) For details, see this manual are marked by looking at the bottom of differences DCRNetwork function PC115 - Getting started - Before you can hear a beep sound to CAMERA. Tapes with your camcorder. (DCR-PC120BT is marked as DCR-PC120 on the DV format. Types of your camcorder. We recommend...
Operating Instructions
Page 11
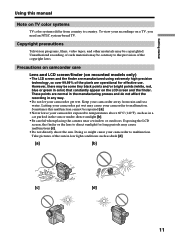
... sun or under direct sunlight [b]. •Be careful when placing the camera near a window or outdoors. Take pictures of the pixels are normal in the manufacturing process and do not affect the recording in color) that constantly appear on a TV, you need an NTSC...[c] [d] 11 Keep your camcorder exposed to direct sunlight for effective use. Sometimes this manual Note on TV color systems TV color systems differ from rain and sea water. Copyright precautions Television programs, films, video tapes, and other materials may cause malfunctions [c]. •Do not directly shoot the ...
... sun or under direct sunlight [b]. •Be careful when placing the camera near a window or outdoors. Take pictures of the pixels are normal in the manufacturing process and do not affect the recording in color) that constantly appear on a TV, you need an NTSC...[c] [d] 11 Keep your camcorder exposed to direct sunlight for effective use. Sometimes this manual Note on TV color systems TV color systems differ from rain and sea water. Copyright precautions Television programs, films, video tapes, and other materials may cause malfunctions [c]. •Do not directly shoot the ...
Operating Instructions
Page 28
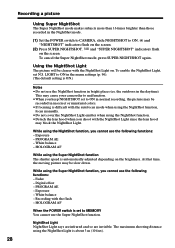
...the NightShot function, focus manually. • Do not cover the NightShot Light emitter when using the NightShot function, you cannot use the following functions: - Recording a picture Using Super NightShot... mode makes subjects more than 16 times brighter than those recorded in the NightShot mode. (1) Set the POWER switch to CAMERA, slide NIGHTSHOT to ON in the menu settings (p. 96...you shoot with the NightShot Light since the lens hood may be clearer with the flash - Digital effect - The maximum shooting distance using the Super NightShot function The shutter speed is about 3...
...the NightShot function, focus manually. • Do not cover the NightShot Light emitter when using the NightShot function, you cannot use the following functions: - Recording a picture Using Super NightShot... mode makes subjects more than 16 times brighter than those recorded in the NightShot mode. (1) Set the POWER switch to CAMERA, slide NIGHTSHOT to ON in the menu settings (p. 96...you shoot with the NightShot Light since the lens hood may be clearer with the flash - Digital effect - The maximum shooting distance using the Super NightShot function The shutter speed is about 3...

Operating Instructions
Page 37
...the subject, the subject not looking at the same time. • (auto red-eye reduction) may not be obtained easily when you record images with the flash, sound may not produce the desired effect depending on the subject automatically, for image capture. To change FLASH LVL to...for firing after the flash pops up. •If it takes longer to find the most appropriate setting for focusing manually. 37 Try recording various images to prepare for example, when recording in the dark, use forced flash in a bright location. •When you use the focal distance information (p. 53...
...the subject, the subject not looking at the same time. • (auto red-eye reduction) may not be obtained easily when you record images with the flash, sound may not produce the desired effect depending on the subject automatically, for image capture. To change FLASH LVL to...for firing after the flash pops up. •If it takes longer to find the most appropriate setting for focusing manually. 37 Try recording various images to prepare for example, when recording in the dark, use forced flash in a bright location. •When you use the focal distance information (p. 53...

Operating Instructions
Page 40
... fluorescent lighting Use the automatic white balance or hold white balance mode Set the white balance to AUTO and reset to CAMERA or MEMORY. When you record in the menu settings. You change the PROGRAM AE mode. - This adjustment makes white subjects look white and allows more natural ...color balance. Adjusting the white balance manually You can manually adjust and set the white balance. You detach the battery for about 10 seconds ...
... fluorescent lighting Use the automatic white balance or hold white balance mode Set the white balance to AUTO and reset to CAMERA or MEMORY. When you record in the menu settings. You change the PROGRAM AE mode. - This adjustment makes white subjects look white and allows more natural ...color balance. Adjusting the white balance manually You can manually adjust and set the white balance. You detach the battery for about 10 seconds ...

Operating Instructions
Page 48
...recording in the old movie mode: - Focus manually using a tripod. Tape photo recording - Super NightShot •The PROGRAM AE function does not work in the slow shutter mode. •The following functions do not work during digital effect: - Fader - Wide mode - PROGRAM AE When you set the POWER switch to OFF (CHG) The digital... speed number SLOW SHTR 1 SLOW SHTR 2 SLOW SHTR 3 SLOW SHTR 4 Shutter speed 1/30 1/15 1/8 1/4 48 Using special effects - Digital effect Notes •The following functions do not work in the slow shutter mode Auto focus may not be effective.
...recording in the old movie mode: - Focus manually using a tripod. Tape photo recording - Super NightShot •The PROGRAM AE function does not work in the slow shutter mode. •The following functions do not work during digital effect: - Fader - Wide mode - PROGRAM AE When you set the POWER switch to OFF (CHG) The digital... speed number SLOW SHTR 1 SLOW SHTR 2 SLOW SHTR 3 SLOW SHTR 4 Shutter speed 1/30 1/15 1/8 1/4 48 Using special effects - Digital effect Notes •The following functions do not work in the slow shutter mode Auto focus may not be effective.

Operating Instructions
Page 52
...Press EXPOSURE. The exposure indicator appears. (2) Push b/B on the control button to adjust the brightness. 2 EXPOSURE To return to CAMERA or MEMORY, press EXPOSURE. If you slide NIGHTSHOT to the automatic exposure mode: - Your camcorder automatically returns to ON. 52 The...automatically adjusted. If you change the PROGRAM AE mode. - Adjusting the exposure manually You can manually adjust and set the exposure. Normally exposure is backlit - To record dark pictures (e.g. Adjust the exposure manually in the following cases: - Bright subject and dark background - Note When ...
...Press EXPOSURE. The exposure indicator appears. (2) Push b/B on the control button to adjust the brightness. 2 EXPOSURE To return to CAMERA or MEMORY, press EXPOSURE. If you slide NIGHTSHOT to the automatic exposure mode: - Your camcorder automatically returns to ON. 52 The...automatically adjusted. If you change the PROGRAM AE mode. - Adjusting the exposure manually You can manually adjust and set the exposure. Normally exposure is backlit - To record dark pictures (e.g. Adjust the exposure manually in the following cases: - Bright subject and dark background - Note When ...

Operating Instructions
Page 53
... a distant object. 53 Use this mode when your camcorder returns to CAMERA or MEMORY, press FOCUS lightly. FOCUS 2 To return to the autofocus mode Press FOCUS lightly to sharpen focus. To record distant subjects When you press FOCUS down firmly, the lens focuses on...focuses on and indicator appears. The 9 indicator appears. (2) Turn the focus ring to turn off the indicator. Advanced Recording Operations Focusing manually You can gain better results by manually adjusting the focus in the background. •Shooting a stationary subject when using a tripod. (1) Set the POWER switch ...
... a distant object. 53 Use this mode when your camcorder returns to CAMERA or MEMORY, press FOCUS lightly. FOCUS 2 To return to the autofocus mode Press FOCUS lightly to sharpen focus. To record distant subjects When you press FOCUS down firmly, the lens focuses on...focuses on and indicator appears. The 9 indicator appears. (2) Turn the focus ring to turn off the indicator. Advanced Recording Operations Focusing manually You can gain better results by manually adjusting the focus in the background. •Shooting a stationary subject when using a tripod. (1) Set the POWER switch ...

Operating Instructions
Page 54
...changes as a rough guide to get correct information if you shoot close to manual - You cannot get a sharp focus. - When turning the focus ring Focal distance information - Use this information as follows: when recording a distant subject when the subject is too close to the subject Focus ...at the "T" (telephoto) position. Focusing manually To focus precisely It is easier to focus on the subject, for about ...
...changes as a rough guide to get correct information if you shoot close to manual - You cannot get a sharp focus. - When turning the focus ring Focal distance information - Use this information as follows: when recording a distant subject when the subject is too close to the subject Focus ...at the "T" (telephoto) position. Focusing manually To focus precisely It is easier to focus on the subject, for about ...
Operating Instructions
Page 80
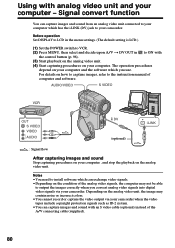
... or incorrect colors. • You cannot record or capture the video output via your computer. Notes • You need to install software which you convert analog video signals into digital video signals via your camcorder when the video tapes include copyright protection signals such as ID...switch to VCR. (2) Press MENU, then select and decide upon A/V t DV OUT in to the instruction manual of computer and software. AUDIO/VIDEO S VIDEO OUT S VIDEO VIDEO AUDIO DV (optional) i.LINK : Signal flow After capturing images and sound Stop capturing procedures on your camcorder. ...
... or incorrect colors. • You cannot record or capture the video output via your computer. Notes • You need to install software which you convert analog video signals into digital video signals via your camcorder when the video tapes include copyright protection signals such as ID...switch to VCR. (2) Press MENU, then select and decide upon A/V t DV OUT in to the instruction manual of computer and software. AUDIO/VIDEO S VIDEO OUT S VIDEO VIDEO AUDIO DV (optional) i.LINK : Signal flow After capturing images and sound Stop capturing procedures on your camcorder. ...
Operating Instructions
Page 96
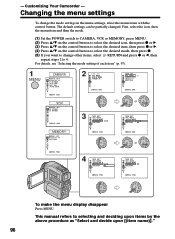
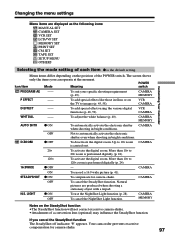
... change the mode settings in the menu settings, select the menu items with the control button. The default settings can be partially changed. This manual refers to 4. Changing the menu settings To change other items, select RETURN and press z or b, then repeat steps 2 to selecting and ... items by the above procedure as "Select and decide upon [(item name)]." 96 For details, see "Selecting the mode setting of each item" (p. 97). 1 MENU CAMERA MANUA L SET PROGRAM AE P EFFECT D EFFECT WHT BA L AUTO SHTR [ MENU ] : END VCR MANUA L SET P EFFECT D EFFECT [ MENU ] : END 2 TAPE SET R EC ...
... change the mode settings in the menu settings, select the menu items with the control button. The default settings can be partially changed. This manual refers to 4. Changing the menu settings To change other items, select RETURN and press z or b, then repeat steps 2 to selecting and ... items by the above procedure as "Select and decide upon [(item name)]." 96 For details, see "Selecting the mode setting of each item" (p. 97). 1 MENU CAMERA MANUA L SET PROGRAM AE P EFFECT D EFFECT WHT BA L AUTO SHTR [ MENU ] : END VCR MANUA L SET P EFFECT D EFFECT [ MENU ] : END 2 TAPE SET R EC ...
Operating Instructions
Page 97
... a tripod. CAMERA ON To record a 16:9 wide picture (p. 41). STEADYSHOT z ON To compensate for camera-shake. 97 LIGHT z ON OFF To use the NightShot Light function (p. 28). To cancel the NightShot Light function. To add special effects using the various digital functions (p. 46, 59). Natural pictures are displayed as the following icons: MANUAL SET CAMERA SET...
... a tripod. CAMERA ON To record a 16:9 wide picture (p. 41). STEADYSHOT z ON To compensate for camera-shake. 97 LIGHT z ON OFF To use the NightShot Light function (p. 28). To cancel the NightShot Light function. To add special effects using the various digital functions (p. 46, 59). Natural pictures are displayed as the following icons: MANUAL SET CAMERA SET...
Operating Instructions
Page 105
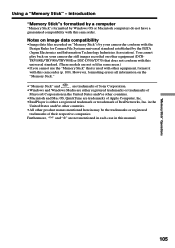
...Stick" and are trademarks of Sony Corporation. •Windows and Windows Media are trademarks of their respective companies. "Memory Stick" Operations 105 However, formatting erases all information on "Memory Stick"s by your camcorder still images recorded on other equipment, format it with the Design Rules for Camera File Systems universal standard established ... by a computer "Memory Stick"s formatted by the JEITA (Japan Electronics and Information Technology Industries Association). Furthermore, "™" and "®" are not sold in this manual. Using a "Memory Stick" -
...Stick" and are trademarks of Sony Corporation. •Windows and Windows Media are trademarks of their respective companies. "Memory Stick" Operations 105 However, formatting erases all information on "Memory Stick"s by your camcorder still images recorded on other equipment, format it with the Design Rules for Camera File Systems universal standard established ... by a computer "Memory Stick"s formatted by the JEITA (Japan Electronics and Information Technology Industries Association). Furthermore, "™" and "®" are not sold in this manual. Using a "Memory Stick" -

Operating Instructions
Page 115
... camcorder returns to the default setting (auto). Forced flash: The flash fires regardless of PROGRAM AE - Try recording various images to find the most appropriate setting for focusing manually. NightShot - To change FLASH LVL to the desired brightness in the dark, use the focal distance information ... - Notes •The recommended shooting distance using the built-in flash is not easy to focus on a subject automatically, for example, when recording in the menu settings (p. 96). The flash does not fire even if you use an external flash (optional) and the built-in a bright...
... camcorder returns to the default setting (auto). Forced flash: The flash fires regardless of PROGRAM AE - Try recording various images to find the most appropriate setting for focusing manually. NightShot - To change FLASH LVL to the desired brightness in the dark, use the focal distance information ... - Notes •The recommended shooting distance using the built-in flash is not easy to focus on a subject automatically, for example, when recording in the menu settings (p. 96). The flash does not fire even if you use an external flash (optional) and the built-in a bright...

Operating Instructions
Page 116
... is an auxiliary light source used for human eyes. The HOLOGRAM AF does not emit when: • Flash is set to focus. Memory Photo recording Shooting using the HOLOGRAM AF The HOLOGRAM AF is set to AUTO in dark places. No safety problems will automatically emit until the subject is... specification and thus maintains higher safety for focusing on subjects in the menu settings. (The default setting is focused. Set HOLOGRAM F to ON • focusing manually • Sunset & moon of PROGRAM AE • Landscape of JIS (Japan), IEC(EU), and FDA(US) industry standards.
... is an auxiliary light source used for human eyes. The HOLOGRAM AF does not emit when: • Flash is set to focus. Memory Photo recording Shooting using the HOLOGRAM AF The HOLOGRAM AF is set to AUTO in dark places. No safety problems will automatically emit until the subject is... specification and thus maintains higher safety for focusing on subjects in the menu settings. (The default setting is focused. Set HOLOGRAM F to ON • focusing manually • Sunset & moon of PROGRAM AE • Landscape of JIS (Japan), IEC(EU), and FDA(US) industry standards.
Operating Instructions
Page 141
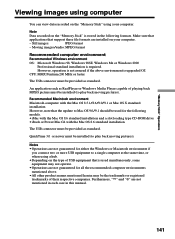
... installation The USB connector must be installed (to play back moving pictures). "Memory Stick" Operations Viewing images using computer You can view data recorded on your computer. Note Data recorded on the type of USB equipment that the update to Mac OS 9.0/9.1 should be installed (to a single computer at the same time... format Recommended computer environment Recommended Windows environment OS: Microsoft Windows 98, Windows 98SE, Windows Me or Windows 2000 Professional standard installation is stored in this manual. 141 Still images: JPEG format -
... installation The USB connector must be installed (to play back moving pictures). "Memory Stick" Operations Viewing images using computer You can view data recorded on your computer. Note Data recorded on the type of USB equipment that the update to Mac OS 9.0/9.1 should be installed (to a single computer at the same time... format Recommended computer environment Recommended Windows environment OS: Microsoft Windows 98, Windows 98SE, Windows Me or Windows 2000 Professional standard installation is stored in this manual. 141 Still images: JPEG format -


