

Operating Instructions
Page 2
...batteries in this Sony Handycam. DCR-PC120BT only Countries and areas where you can enjoy for years to persons. With your Handycam, you can return your unwanted lithium ion batteries... video that may be prohibited. For the Sony Service Center nearest you call 1-800-222-SONY (United States only). For the Sony Factory Service Center nearest you call 416-499-SONY ...to servicing to the separate Network Operating Instructions. 2 DISPOSAL OF LITHIUM ION BATTERY. THIS CLASS B DIGITAL APPARATUS COMPLIES WITH CANADIAN ICES-003. For details, refer to qualified personnel only...
...batteries in this Sony Handycam. DCR-PC120BT only Countries and areas where you can enjoy for years to persons. With your Handycam, you can return your unwanted lithium ion batteries... video that may be prohibited. For the Sony Service Center nearest you call 1-800-222-SONY (United States only). For the Sony Factory Service Center nearest you call 416-499-SONY ...to servicing to the separate Network Operating Instructions. 2 DISPOSAL OF LITHIUM ION BATTERY. THIS CLASS B DIGITAL APPARATUS COMPLIES WITH CANADIAN ICES-003. For details, refer to qualified personnel only...
Operating Instructions
Page 5
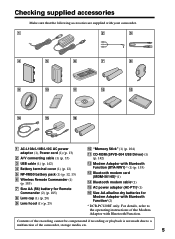
Contents of the recording cannot be compensated if recording or playback is not ...Bluetooth modem card (MDM-5614G)*(1) qf Bluetooth modem cable*(1) qg AC power adaptor (AC-PT1)*(1) qh Size AA alkaline dry batteries for Remote Commander (2) (p. 185) 8 Lens cap (1) (p. 20) 9 Lens hood (1) (p. 23) q; qa qs ... 13) 2 A/V connecting cable (1) (p. 35) 3 USB cable (1) (p. 142) 4 Battery terminal cover (1) (p. 12) 5 NP-FM50 battery pack (1) (p. 12, 13) 6 Wireless Remote Commander (1) (p. 185) 7 Size AA (R6) battery for Modem Adaptor with your camcorder. 1 2 3 4 5 6 7 8 9 q; Getting...
Contents of the recording cannot be compensated if recording or playback is not ...Bluetooth modem card (MDM-5614G)*(1) qf Bluetooth modem cable*(1) qg AC power adaptor (AC-PT1)*(1) qh Size AA alkaline dry batteries for Remote Commander (2) (p. 185) 8 Lens cap (1) (p. 20) 9 Lens hood (1) (p. 23) q; qa qs ... 13) 2 A/V connecting cable (1) (p. 35) 3 USB cable (1) (p. 142) 4 Battery terminal cover (1) (p. 12) 5 NP-FM50 battery pack (1) (p. 12, 13) 6 Wireless Remote Commander (1) (p. 185) 7 Size AA (R6) battery for Modem Adaptor with your camcorder. 1 2 3 4 5 6 7 8 9 q; Getting...
Operating Instructions
Page 6
... the power supply ... 12 Installing the battery pack 12 Charging the battery pack 13 Connecting to a wall outlet 15 Step 2 Setting the date and time ........ 16 Step 3 Inserting a cassette 19 Recording - Tape Photo recording 36 Adjusting the white balance manually 40 ...a tape with picture effects 58 Playing back a tape with analog video unit and your computer - Basics Recording a picture 20 Shooting backlit subjects - NightShot/ Super NightShot 27 Self-timer recording 29 Checking the recording - Digital program editing (on a tape - Insert editing 84 Audio dubbing ...
... the power supply ... 12 Installing the battery pack 12 Charging the battery pack 13 Connecting to a wall outlet 15 Step 2 Setting the date and time ........ 16 Step 3 Inserting a cassette 19 Recording - Tape Photo recording 36 Adjusting the white balance manually 40 ...a tape with picture effects 58 Playing back a tape with analog video unit and your computer - Basics Recording a picture 20 Shooting backlit subjects - NightShot/ Super NightShot 27 Self-timer recording 29 Checking the recording - Digital program editing (on a tape - Insert editing 84 Audio dubbing ...
Operating Instructions
Page 7
Digital program editing (on "Memory Stick"s - MPEG movie playback 139 Viewing images using computer ...... 141 Copying the image recorded on "Memory Stick"s to tapes 147 Enlarging still images recorded on "Memory Stick"s 132 Copying still images from a tape as a moving picture 128 Recording ...156 Self-diagnosis display 162 Warning indicators and messages .... 163 Additional Information Usable cassettes 165 About the "InfoLITHIUM" battery pack 167 About i.LINK 169 Using your camcorder abroad .......... 171 Maintenance information and precautions 172 Specifications 177 Quick Reference...
Digital program editing (on "Memory Stick"s - MPEG movie playback 139 Viewing images using computer ...... 141 Copying the image recorded on "Memory Stick"s to tapes 147 Enlarging still images recorded on "Memory Stick"s 132 Copying still images from a tape as a moving picture 128 Recording ...156 Self-diagnosis display 162 Warning indicators and messages .... 163 Additional Information Usable cassettes 165 About the "InfoLITHIUM" battery pack 167 About i.LINK 169 Using your camcorder abroad .......... 171 Maintenance information and precautions 172 Specifications 177 Quick Reference...
Operating Instructions
Page 8
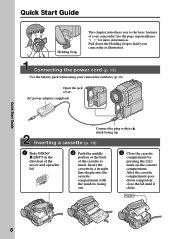
... (p. 19) 1 Slide OPEN/ Z EJECT in parentheses "( )" for more information. Pull down completely, close the lid until it clicks. Connecting the power cord (p. 15) Use the battery pack when using your camcorder as illustrated.
... (p. 19) 1 Slide OPEN/ Z EJECT in parentheses "( )" for more information. Pull down completely, close the lid until it clicks. Connecting the power cord (p. 15) Use the battery pack when using your camcorder as illustrated.
Operating Instructions
Page 9
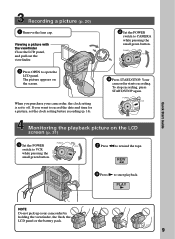
The picture appears on the LCD screen (p. 31) 1 Set the POWER switch to CAMERA while pressing the small green button. Your camcorder starts recording. POWER R LOCK VC OFF (CHG) M CAM EREAM O RY Monitoring the playback picture on the screen. Viewing a picture with the viewfinder Close the LCD... viewfinder. 3 Press OPEN to start playback. If you purchase your camcorder by holding the viewfinder, the flash, the LCD panel or the battery pack. 9 To stop recording, press START/STOP again. REW 3 Press N to open the LCD panel. EREAMORY 2 Press m to off. Quick Start Guide...
The picture appears on the LCD screen (p. 31) 1 Set the POWER switch to CAMERA while pressing the small green button. Your camcorder starts recording. POWER R LOCK VC OFF (CHG) M CAM EREAM O RY Monitoring the playback picture on the screen. Viewing a picture with the viewfinder Close the LCD... viewfinder. 3 Press OPEN to start playback. If you purchase your camcorder by holding the viewfinder, the flash, the LCD panel or the battery pack. 9 To stop recording, press START/STOP again. REW 3 Press N to open the LCD panel. EREAMORY 2 Press m to off. Quick Start Guide...
Operating Instructions
Page 12
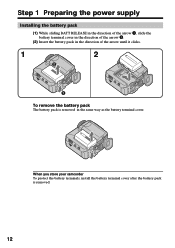
Step 1 Preparing the power supply Installing the battery pack (1) While sliding BATT RELEASE in the direction of the arrow 1, slide the battery terminal cover in the direction of the arrow 2. (2) Insert the battery pack in the direction of the arrow until it clicks. 1 2 2 1 To remove the battery pack The battery pack is removed. 12 When you store your camcorder To protect the battery terminals, install the battery terminal cover after the battery pack is removed in the same way as the battery terminal cover.
Step 1 Preparing the power supply Installing the battery pack (1) While sliding BATT RELEASE in the direction of the arrow 1, slide the battery terminal cover in the direction of the arrow 2. (2) Insert the battery pack in the direction of the arrow until it clicks. 1 2 2 1 To remove the battery pack The battery pack is removed. 12 When you store your camcorder To protect the battery terminals, install the battery terminal cover after the battery pack is removed in the same way as the battery terminal cover.

Operating Instructions
Page 13
... charge is wrong with this unit, disconnect the plug from a wall outlet as soon as possible to OFF (CHG). If any trouble occurs with the battery pack. Something is completed, the CHG lamp goes out. (full charge) CHG lamp 2 1 4 POWER LOCK R VC OFF (CHG) M CAM EREAM O RY After charging ...cord to the AC power adaptor. (3) Connect the power cord to the wall outlet. (4) Set the POWER switch to cut off the power. 13 The battery pack is not installed correctly. - Your camcorder operates only with your camcorder. Note Prevent metallic objects from the DC IN jack on your camcorder.
... charge is wrong with this unit, disconnect the plug from a wall outlet as soon as possible to OFF (CHG). If any trouble occurs with the battery pack. Something is completed, the CHG lamp goes out. (full charge) CHG lamp 2 1 4 POWER LOCK R VC OFF (CHG) M CAM EREAM O RY After charging ...cord to the AC power adaptor. (3) Connect the power cord to the wall outlet. (4) Set the POWER switch to cut off the power. 13 The battery pack is not installed correctly. - Your camcorder operates only with your camcorder. Note Prevent metallic objects from the DC IN jack on your camcorder.

Operating Instructions
Page 14
... when you use your camcorder in a cold environment. ** Approximate number of the ambient temperature. The actual battery life may increase if the battery's temperature is extremely high or low because of minutes when recording while you repeat recording start/ stop, zooming and turning the power on LCD screen 150 310 475 550 Playing time...
... when you use your camcorder in a cold environment. ** Approximate number of the ambient temperature. The actual battery life may increase if the battery's temperature is extremely high or low because of minutes when recording while you repeat recording start/ stop, zooming and turning the power on LCD screen 150 310 475 550 Playing time...
Operating Instructions
Page 15
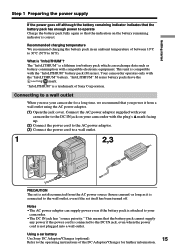
... power adaptor supplied with your camcorder to the DC IN jack on the battery remaining indicator is attached to 86°F). Your camcorder operates only with the "InfoLITHIUM" battery pack (M series). What is compatible with the "InfoLITHIUM" battery. Using a car battery Use Sony DC Adaptor/Charger (optional). 15 Refer to the operating instructions of between...
... power adaptor supplied with your camcorder to the DC IN jack on the battery remaining indicator is attached to 86°F). Your camcorder operates only with the "InfoLITHIUM" battery pack (M series). What is compatible with the "InfoLITHIUM" battery. Using a car battery Use Sony DC Adaptor/Charger (optional). 15 Refer to the operating instructions of between...

Operating Instructions
Page 16
... to make the menu settings disappear. 16 If you do not use your camcorder will be released (bars may appear) because the built-in rechargeable battery installed in that you set the date and time settings. The clock starts to move. (9) Press MENU to adjust the desired year, then press z.... minute, in your camcorder for about three months, the date and time settings may be displayed each time that order. (1) Set the POWER switch to CAMERA or MEMORY, then press MENU to display the menu settings. (2) Press v/V on the control button to select , then press z or B. (3) Press v/V on the ...
... to make the menu settings disappear. 16 If you do not use your camcorder will be released (bars may appear) because the built-in rechargeable battery installed in that you set the date and time settings. The clock starts to move. (9) Press MENU to adjust the desired year, then press z.... minute, in your camcorder for about three months, the date and time settings may be displayed each time that order. (1) Set the POWER switch to CAMERA or MEMORY, then press MENU to display the menu settings. (2) Press v/V on the control button to select , then press z or B. (3) Press v/V on the ...
Operating Instructions
Page 21
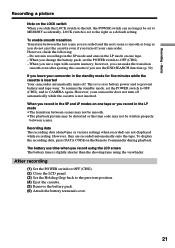
... to OFF (CHG), and to CAMERA again. To resume the standby mode, set the POWER switch to prevent battery and tape wear. Recording data The recording data (date/time or various settings when recorded) are recorded automatically onto the tape. Recording - LOCK switch is to save battery power and to OFF (CHG). - After recording (1) Set the POWER switch to...
... to OFF (CHG), and to CAMERA again. To resume the standby mode, set the POWER switch to prevent battery and tape wear. Recording data The recording data (date/time or various settings when recorded) are recorded automatically onto the tape. Recording - LOCK switch is to save battery power and to OFF (CHG). - After recording (1) Set the POWER switch to...
Operating Instructions
Page 22
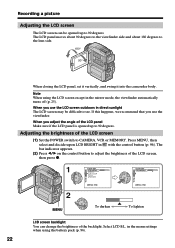
... the control button to adjust the brightness of the LCD screen (1) Set the POWER switch to CAMERA, VCR or MEMORY. in the menu settings when using the LCD screen except in the mirror .... Adjusting the brightness of the LCD screen, then press z. 1 2 LCD/VF SET LCD BRIGHT LCD B.L. Recording a picture Adjusting the LCD screen The LCD screen can change the brightness of the backlight. RETURN [MENU] :... END LCD/VF SET LCD BRIGHT LCD B.L. Note When using the battery pack (p. 96). 22 If this happens, we recommend that you use the viewfinder. LCD COLOR VF ...
... the control button to adjust the brightness of the LCD screen (1) Set the POWER switch to CAMERA, VCR or MEMORY. in the menu settings when using the LCD screen except in the mirror .... Adjusting the brightness of the LCD screen, then press z. 1 2 LCD/VF SET LCD BRIGHT LCD B.L. Recording a picture Adjusting the LCD screen The LCD screen can change the brightness of the backlight. RETURN [MENU] :... END LCD/VF SET LCD BRIGHT LCD B.L. Note When using the battery pack (p. 96). 22 If this happens, we recommend that you use the viewfinder. LCD COLOR VF ...

Operating Instructions
Page 23
...hood. Viewfinder backlight You can be attached even with the viewfinder. in the viewfinder come into sharp focus. Attaching the supplied lens hood To record fine pictures under strong light, we recommend attaching the lens hood. Adjust the viewfinder lens to remove filters or other objects onto the lens... hood. In such case, remove the lens hood from your eyesight so that the indicators in the menu settings when using the battery pack (p. 96). Pull out the viewfinder and move the viewfinder lens adjustment lever. Select VF B.L. Also the lens cap can change the ...
...hood. Viewfinder backlight You can be attached even with the viewfinder. in the viewfinder come into sharp focus. Attaching the supplied lens hood To record fine pictures under strong light, we recommend attaching the lens hood. Adjust the viewfinder lens to remove filters or other objects onto the lens... hood. In such case, remove the lens hood from your eyesight so that the indicators in the menu settings when using the battery pack (p. 96). Pull out the viewfinder and move the viewfinder lens adjustment lever. Select VF B.L. Also the lens cap can change the ...

Operating Instructions
Page 26
... indicator may not be displayed. Time code The time code indicates the recording or playback time, "0:00:00" (hours : minutes : seconds) in CAMERA mode and "0:00:00:00" (hours : minutes : seconds : frames) in minutes to be correct, depending on . Remaining battery time Cassette memory This appears when using a tape with cassette memory. JUL...
... indicator may not be displayed. Time code The time code indicates the recording or playback time, "0:00:00" (hours : minutes : seconds) in CAMERA mode and "0:00:00:00" (hours : minutes : seconds : frames) in minutes to be correct, depending on . Remaining battery time Cassette memory This appears when using a tape with cassette memory. JUL...

Operating Instructions
Page 33
...battery time indicator during playback. To rewind the tape Press m in the stop mode. To resume normal playback, press N. Various playback modes To operate video control buttons, set . To resume rewinding or advancing, release the button. When you have recorded. The tape was recorded...resume normal playback, press N. The tape is being played back. - To resume normal playback, press N. Playback - In the recording mode, the various settings will not be correct, depending on the Remote Commander during playback. When you connect your camcorder's information...
...battery time indicator during playback. To rewind the tape Press m in the stop mode. To resume normal playback, press N. Various playback modes To operate video control buttons, set . To resume rewinding or advancing, release the button. When you have recorded. The tape was recorded...resume normal playback, press N. The tape is being played back. - To resume normal playback, press N. Playback - In the recording mode, the various settings will not be correct, depending on the Remote Commander during playback. When you connect your camcorder's information...

Operating Instructions
Page 40
...white balance. In the hold mode. Normally white balance is being taken in the menu settings. You detach the battery for about 10 seconds after setting the POWER switch to CAMERA to the outdoors from the interior of a house holding the exposure, or vice versa. If the picture is ...automatically adjusted. (1) Set the POWER switch to AUTO in a studio lit by TV lighting We recommend that you record under fluorescent lighting Use the ...
...white balance. In the hold mode. Normally white balance is being taken in the menu settings. You detach the battery for about 10 seconds after setting the POWER switch to CAMERA to the outdoors from the interior of a house holding the exposure, or vice versa. If the picture is ...automatically adjusted. (1) Set the POWER switch to AUTO in a studio lit by TV lighting We recommend that you record under fluorescent lighting Use the ...

Operating Instructions
Page 88
... AUD I O M I X A / VcD V OU T ST1 ST2 RETURN [ MENU ] : END Five minutes after when you want to the original sound (ST1) only. The default setting is recorded in the menu settings (p. 96). The green X indicator appears on the screen. (5) Press X and start playing back the audio you disconnect the power source or... remove the battery pack, the setting of AUDIO MIX returns to record at the same time. The new sound is original sound only. 88 Then press X at the point where you ...
... AUD I O M I X A / VcD V OU T ST1 ST2 RETURN [ MENU ] : END Five minutes after when you want to the original sound (ST1) only. The default setting is recorded in the menu settings (p. 96). The green X indicator appears on the screen. (5) Press X and start playing back the audio you disconnect the power source or... remove the battery pack, the setting of AUDIO MIX returns to record at the same time. The new sound is original sound only. 88 Then press X at the point where you ...

Operating Instructions
Page 99
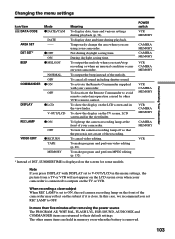
... divided into nine boxes. and VF B.L. •When you select BRIGHT, battery life is reduced by about 10 percent during recording. •When you adjust LCD BRIGHT, LCD B.L., LCD COLOR and/or VF B.L. The recorded picture will not be affected. (Continued on the viewfinder screen to 16 images... continuously fast. POWER switch VCR CAMERA MEMORY LCD B. VCR CAMERA MEMORY -- STILL SET PIC MODE QUALITY IMAGESIZE z BRT NORMAL To set the brightness on the control button. To record still images in 1360 × 1020 size (p. 109). To record still images in 640 × 480 size...
... divided into nine boxes. and VF B.L. •When you select BRIGHT, battery life is reduced by about 10 percent during recording. •When you adjust LCD BRIGHT, LCD B.L., LCD COLOR and/or VF B.L. The recorded picture will not be affected. (Continued on the viewfinder screen to 16 images... continuously fast. POWER switch VCR CAMERA MEMORY LCD B. VCR CAMERA MEMORY -- STILL SET PIC MODE QUALITY IMAGESIZE z BRT NORMAL To set the brightness on the control button. To record still images in 1360 × 1020 size (p. 109). To record still images in 640 × 480 size...
Operating Instructions
Page 103
... VCR. To make program and perform MPEG editing (p. 132). * Instead of DST, SUMMERTIME is set REC LAMP to V-OUT/LCD in memory even when the battery is not aware of the camcorder may reflect on the subject if it is connected to outputs on the LCD screen and in the viewfinder... from a TV or VCR will not appear on your camcorder. The other VCR's remote control. To turn the camera recording lamp off so that the person is removed. 103 To make program and perform video editing (p. 69). Not during daylight saving time. To output the beep instead of your camcorder. In this case...
... VCR. To make program and perform MPEG editing (p. 132). * Instead of DST, SUMMERTIME is set REC LAMP to V-OUT/LCD in memory even when the battery is not aware of the camcorder may reflect on the subject if it is connected to outputs on the LCD screen and in the viewfinder... from a TV or VCR will not appear on your camcorder. The other VCR's remote control. To turn the camera recording lamp off so that the person is removed. 103 To make program and perform video editing (p. 69). Not during daylight saving time. To output the beep instead of your camcorder. In this case...


