
Operating Instructions
Page 4
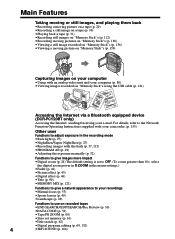
... the digital zoom power in D ZOOM in the recording mode •Back light (p. 27) •NightShot/Super NightShot (p. 27) •Recording images with an analog video unit and your e-mail. For details, refer to the Network Function Operating Instructions supplied with your camcorder. (p.... Stick"s using the USB cable (p. 141) Accessing the Internet via a Bluetooth equipped device (DCR-PC120BT only) Accessing the Internet, sending/receiving your computer (p. 80) •Viewing images recorded on recorded tapes •END SEARCH/EDITSEARCH/Rec Review (p. 30) •DATA CODE (p. 32) &#...
... the digital zoom power in D ZOOM in the recording mode •Back light (p. 27) •NightShot/Super NightShot (p. 27) •Recording images with an analog video unit and your e-mail. For details, refer to the Network Function Operating Instructions supplied with your camcorder. (p.... Stick"s using the USB cable (p. 141) Accessing the Internet via a Bluetooth equipped device (DCR-PC120BT only) Accessing the Internet, sending/receiving your computer (p. 80) •Viewing images recorded on recorded tapes •END SEARCH/EDITSEARCH/Rec Review (p. 30) •DATA CODE (p. 32) &#...
Operating Instructions
Page 5
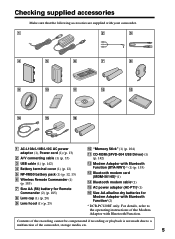
Contents of the recording cannot be compensated if recording or playback is not made due to the operating instructions of the camcorder, storage media, etc. 5 "Memory Stick" (1) (p. 104) qa CD-ROM (SPVD-004 USB Driver) (1) (p. 142) qs Modem Adaptor with Bluetooth Function (... (p. 20) 9 Lens hood (1) (p. 23) q; Getting started Checking supplied accessories Make sure that the following accessories are supplied with Bluetooth Function*(2) * DCR-PC120BT only. For details, refer to a malfunction of the Modem Adaptor with Bluetooth Function. qa qs qd qf qg qh 1 AC-L10A/L10B/L10C AC...
Contents of the recording cannot be compensated if recording or playback is not made due to the operating instructions of the camcorder, storage media, etc. 5 "Memory Stick" (1) (p. 104) qa CD-ROM (SPVD-004 USB Driver) (1) (p. 142) qs Modem Adaptor with Bluetooth Function (... (p. 20) 9 Lens hood (1) (p. 23) q; Getting started Checking supplied accessories Make sure that the following accessories are supplied with Bluetooth Function*(2) * DCR-PC120BT only. For details, refer to a malfunction of the Modem Adaptor with Bluetooth Function. qa qs qd qf qg qh 1 AC-L10A/L10B/L10C AC...
Operating Instructions
Page 6
... a tape with analog video unit and your own titles 93 Labeling a cassette 94 Recording a still image on tapes - Photo search/Photo scan 65 Editing Dubbing a tape 67 Dubbing only desired scenes - Cut recording 57 Customizing Your Camcorder Changing the menu settings ... Adjusting the exposure manually ...... 52 Focusing manually 53 Interval recording 55 Frame by frame recording - Digital program editing (on tapes 69 Using with digital effects 59 Enlarging images recorded on a tape - Signal convert function 80 Recording video or TV programs ....... 81 Inserting a scene from a...
... a tape with analog video unit and your own titles 93 Labeling a cassette 94 Recording a still image on tapes - Photo search/Photo scan 65 Editing Dubbing a tape 67 Dubbing only desired scenes - Cut recording 57 Customizing Your Camcorder Changing the menu settings ... Adjusting the exposure manually ...... 52 Focusing manually 53 Interval recording 55 Frame by frame recording - Digital program editing (on tapes 69 Using with digital effects 59 Enlarging images recorded on a tape - Signal convert function 80 Recording video or TV programs ....... 81 Inserting a scene from a...
Operating Instructions
Page 7
... messages .... 163 Additional Information Usable cassettes 165 About the "InfoLITHIUM" battery pack 167 About i.LINK 169 Using your camcorder abroad .......... 171 Maintenance information and precautions 172 Specifications 177 Quick Reference Identifying the parts and controls .... 179 Index 187...using computer ...... 141 Copying the image recorded on "Memory Stick"s to tapes 147 Enlarging still images recorded on "Memory Stick"s 132 Copying still images from a tape as a moving picture 128 Recording edited pictures as a moving picture - Digital program editing (on "Memory Stick"s -...
... messages .... 163 Additional Information Usable cassettes 165 About the "InfoLITHIUM" battery pack 167 About i.LINK 169 Using your camcorder abroad .......... 171 Maintenance information and precautions 172 Specifications 177 Quick Reference Identifying the parts and controls .... 179 Index 187...using computer ...... 141 Copying the image recorded on "Memory Stick"s to tapes 147 Enlarging still images recorded on "Memory Stick"s 132 Copying still images from a tape as a moving picture 128 Recording edited pictures as a moving picture - Digital program editing (on "Memory Stick"s -...
Operating Instructions
Page 8
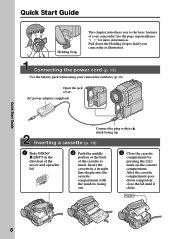
.... Quick Start Guide 8 See the page in the direction of the arrow and open the lid. 2 Push the middle portion of the back of your camcorder. Pull down completely, close the lid until it clicks. Insert the cassette in a straight line deeply into the cassette compartment with its v mark facing up.... After the cassette compartment goes down the Holding Grip to insert. Connecting the power cord (p. 15) Use the battery pack when using your camcorder as illustrated. Quick Start Guide Holding Grip This chapter introduces you to the basic features of the cassette to hold your...
.... Quick Start Guide 8 See the page in the direction of the arrow and open the lid. 2 Push the middle portion of the back of your camcorder. Pull down completely, close the lid until it clicks. Insert the cassette in a straight line deeply into the cassette compartment with its v mark facing up.... After the cassette compartment goes down the Holding Grip to insert. Connecting the power cord (p. 15) Use the battery pack when using your camcorder as illustrated. Quick Start Guide Holding Grip This chapter introduces you to the basic features of the cassette to hold your...
Operating Instructions
Page 9
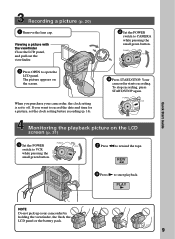
... and time for a picture, set to CAMERA while pressing the small green button. POWER R LOCK VC OFF (CHG) M CAM EREAM O RY 4 Press START/STOP. EREAMORY 2 Press m to start playback. REW 3 Press N to rewind the tape. Your camcorder starts recording. To stop recording, press START/STOP again. Quick Start Guide Recording a picture (p. 20) 1 Remove the lens...
... and time for a picture, set to CAMERA while pressing the small green button. POWER R LOCK VC OFF (CHG) M CAM EREAM O RY 4 Press START/STOP. EREAMORY 2 Press m to start playback. REW 3 Press N to rewind the tape. Your camcorder starts recording. To stop recording, press START/STOP again. Quick Start Guide Recording a picture (p. 20) 1 Remove the lens...
Operating Instructions
Page 10
...CAMERA. We recommend that the operation is marked as DCR-PC120 on the DV format. The functions which require different operations depending on Cassette Memory Your camcorder...camcorder are clearly indicated in the text, for the two models listed in the illustrations. Tapes with your camcorder.... Otherwise, the model name is based on the bottom of the features that are operated only with the cassette memory are for example, "DCR...buttons and settings on your camcorder. (DCR-PC120BT is being carried out...this manual and operating your camcorder, check the model number ...
...CAMERA. We recommend that the operation is marked as DCR-PC120 on the DV format. The functions which require different operations depending on Cassette Memory Your camcorder...camcorder are clearly indicated in the text, for the two models listed in the illustrations. Tapes with your camcorder.... Otherwise, the model name is based on the bottom of the features that are operated only with the cassette memory are for example, "DCR...buttons and settings on your camcorder. (DCR-PC120BT is being carried out...this manual and operating your camcorder, check the model number ...
Operating Instructions
Page 11
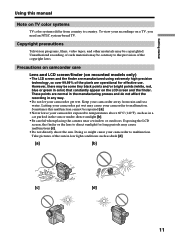
... programs, films, video tapes, and other materials may be copyrighted. Precautions on camcorder care Lens and LCD screen/finder (on TV color systems TV color systems differ from rain and sea water. Doing so might cause your camcorder to malfunction. Unauthorized recording of the sun ...in the sun or under direct sunlight [b]. •Be careful when placing the camera near a window or outdoors. Getting started Using this malfunction cannot ...
... programs, films, video tapes, and other materials may be copyrighted. Precautions on camcorder care Lens and LCD screen/finder (on TV color systems TV color systems differ from rain and sea water. Doing so might cause your camcorder to malfunction. Unauthorized recording of the sun ...in the sun or under direct sunlight [b]. •Be careful when placing the camera near a window or outdoors. Getting started Using this malfunction cannot ...
Operating Instructions
Page 12
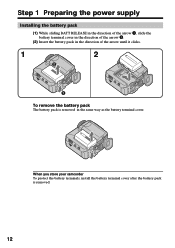
When you store your camcorder To protect the battery terminals, install the battery terminal cover after the battery pack is removed in the direction of the arrow 2. (2) Insert the battery pack in the same way as the battery terminal cover. Step 1 Preparing the power supply Installing the battery pack (1) While sliding BATT RELEASE in the direction of the arrow 1, slide the battery terminal cover in the direction of the arrow until it clicks. 1 2 2 1 To remove the battery pack The battery pack is removed. 12
When you store your camcorder To protect the battery terminals, install the battery terminal cover after the battery pack is removed in the direction of the arrow 2. (2) Insert the battery pack in the same way as the battery terminal cover. Step 1 Preparing the power supply Installing the battery pack (1) While sliding BATT RELEASE in the direction of the arrow 1, slide the battery terminal cover in the direction of the arrow until it clicks. 1 2 2 1 To remove the battery pack The battery pack is removed. 12

Operating Instructions
Page 13
...LOCK R VC OFF (CHG) M CAM EREAM O RY After charging the battery pack Disconnect the AC power adaptor from the DC IN jack on your camcorder. Something is wrong with this unit, disconnect the plug from coming into contact with the metal parts of the DC plug of "InfoLITHIUM" battery pack.... (1) Open the jack cover and connect the AC power adaptor supplied with your camcorder. Your camcorder operates only with the plug's v mark facing up when the charge begins. See page 167 for your camcorder to the DC IN jack with the "InfoLITHIUM" battery pack (M series). Note Prevent ...
...LOCK R VC OFF (CHG) M CAM EREAM O RY After charging the battery pack Disconnect the AC power adaptor from the DC IN jack on your camcorder. Something is wrong with this unit, disconnect the plug from coming into contact with the metal parts of the DC plug of "InfoLITHIUM" battery pack.... (1) Open the jack cover and connect the AC power adaptor supplied with your camcorder. Your camcorder operates only with the plug's v mark facing up when the charge begins. See page 167 for your camcorder to the DC IN jack with the "InfoLITHIUM" battery pack (M series). Note Prevent ...

Operating Instructions
Page 14
... temperature. The battery life will be shorter if you use your camcorder in a cold environment. 14 Approximate minutes at 25°C (77°F) to charge an empty battery pack Recording time Battery pack NP-FM50 (supplied) NP-FM70 NP-FM90 NP-FM91 Recording with the viewfinder Continuous* Typical** 130 75 270 155 410...
... temperature. The battery life will be shorter if you use your camcorder in a cold environment. 14 Approximate minutes at 25°C (77°F) to charge an empty battery pack Recording time Battery pack NP-FM50 (supplied) NP-FM70 NP-FM90 NP-FM91 Recording with the viewfinder Continuous* Typical** 130 75 270 155 410...
Operating Instructions
Page 15
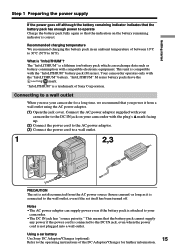
...battery packs have the mark. Connect the AC power adaptor supplied with your camcorder to the wall outlet, even if the set is compatible with the "InfoLITHIUM" battery. Using a car battery Use Sony DC Adaptor/Charger (optional). 15 Refer to the operating instructions of between 10... that the battery pack has enough power to operate Charge the battery pack fully again so that you use your camcorder for further information. Your camcorder operates only with the "InfoLITHIUM" battery pack (M series). This unit is not disconnected from a wall outlet using...
...battery packs have the mark. Connect the AC power adaptor supplied with your camcorder to the wall outlet, even if the set is compatible with the "InfoLITHIUM" battery. Using a car battery Use Sony DC Adaptor/Charger (optional). 15 Refer to the operating instructions of between 10... that the battery pack has enough power to operate Charge the battery pack fully again so that you use your camcorder for further information. Your camcorder operates only with the "InfoLITHIUM" battery pack (M series). This unit is not disconnected from a wall outlet using...

Operating Instructions
Page 16
... not the time is daylight saving time, then press z. Step 2 Setting the date and time Set the date and time settings when you use your camcorder for about three months, the date and time settings may appear) because the built-in rechargeable battery installed in that you set the date and... time settings. If you do not use your camcorder will be released (bars may be displayed each time that order. (1) Set the POWER switch to CAMERA or MEMORY, then press MENU to display the menu settings. (2) Press v/V on the control button to select...
... not the time is daylight saving time, then press z. Step 2 Setting the date and time Set the date and time settings when you use your camcorder for about three months, the date and time settings may appear) because the built-in rechargeable battery installed in that you set the date and... time settings. If you do not use your camcorder will be released (bars may be displayed each time that order. (1) Set the POWER switch to CAMERA or MEMORY, then press MENU to display the menu settings. (2) Press v/V on the control button to select...

Operating Instructions
Page 17
When using your camcorder operates on a 12-hour cycle. •12:00 AM stands for midnight. •12:00 PM stands for some models. Getting started 17 Step 2 Setting ... [ MENU ] : END Note Instead of DST, SUMMERTIME is displayed on the data code of your camcorder abroad Set the clock to the local time (p. 18). If you do not set the date and time "--:--:--" and are recorded on the screen for noon. Note on the time indicator The internal clock of the...
When using your camcorder operates on a 12-hour cycle. •12:00 AM stands for midnight. •12:00 PM stands for some models. Getting started 17 Step 2 Setting ... [ MENU ] : END Note Instead of DST, SUMMERTIME is displayed on the data code of your camcorder abroad Set the clock to the local time (p. 18). If you do not set the date and time "--:--:--" and are recorded on the screen for noon. Note on the time indicator The internal clock of the...
Operating Instructions
Page 20
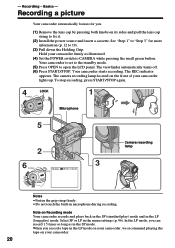
... LP (long play ) mode and in microphone during recording. Your camcorder starts recording. The camera recording lamp located on Recording mode Your camcorder records and plays back in the SP (standard play ) mode. Hold your camcorder firmly as in the SP mode. - Note on the front of your camcorder. 20 When you record a tape in the menu settings (p. 96). The REC...
... LP (long play ) mode and in microphone during recording. Your camcorder starts recording. The camera recording lamp located on Recording mode Your camcorder records and plays back in the SP (standard play ) mode. Hold your camcorder firmly as in the SP mode. - Note on the front of your camcorder. 20 When you record a tape in the menu settings (p. 96). The REC...
Operating Instructions
Page 21
... battery power and to CAMERA again. This is smooth as long as a default setting. When you record in the SP and LP modes on the LOCK switch When you use the END SEARCH function (p. 30). To display the recording data, press DATA CODE on one tape. - When you leave your camcorder does not turn...
... battery power and to CAMERA again. This is smooth as long as a default setting. When you record in the SP and LP modes on the LOCK switch When you use the END SEARCH function (p. 30). To display the recording data, press DATA CODE on one tape. - When you leave your camcorder does not turn...
Operating Instructions
Page 22
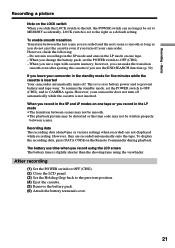
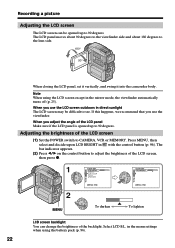
... 180° 90° When closing the LCD panel, set it vertically, and swing it into the camcorder body. RETURN [MENU] : END LCD/VF SET LCD BRIGHT LCD B.L. LCD COLOR VF B.L. in the...to adjust the brightness of the LCD screen (1) Set the POWER switch to 90 degrees. Select LCD B.L. Recording a picture Adjusting the LCD screen The LCD screen can change the brightness of the backlight. When you ...When you adjust the angle of the LCD panel Make sure if the LCD panel is opened up to CAMERA, VCR or MEMORY. Press MENU, then select and decide upon LCD BRIGHT in the mirror mode, the...
... 180° 90° When closing the LCD panel, set it vertically, and swing it into the camcorder body. RETURN [MENU] : END LCD/VF SET LCD BRIGHT LCD B.L. LCD COLOR VF B.L. in the...to adjust the brightness of the LCD screen (1) Set the POWER switch to 90 degrees. Select LCD B.L. Recording a picture Adjusting the LCD screen The LCD screen can change the brightness of the backlight. When you ...When you adjust the angle of the LCD panel Make sure if the LCD panel is opened up to CAMERA, VCR or MEMORY. Press MENU, then select and decide upon LCD BRIGHT in the mirror mode, the...

Operating Instructions
Page 23
.... 23 Pull out the viewfinder and move the viewfinder lens adjustment lever. Photocell window Notes •When you will no longer be able to your camcorder. •You cannot attach filters or other objects onto the lens hood. If you do so forcibly, you use the filter (optional) •... Adjust the viewfinder lens to remove filters or other objects from your eyesight so that the indicators in the viewfinder come into sharp focus. Recording - Also the lens cap can change the brightness of the lens hood may appear in the menu settings when using the battery pack (p. 96...
.... 23 Pull out the viewfinder and move the viewfinder lens adjustment lever. Photocell window Notes •When you will no longer be able to your camcorder. •You cannot attach filters or other objects onto the lens hood. If you do so forcibly, you use the filter (optional) •... Adjust the viewfinder lens to remove filters or other objects from your eyesight so that the indicators in the viewfinder come into sharp focus. Recording - Also the lens cap can change the brightness of the lens hood may appear in the menu settings when using the battery pack (p. 96...
Operating Instructions
Page 28
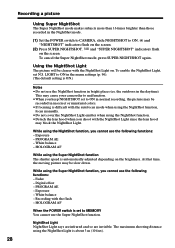
.... • Detach the lens hood when you cannot use the following functions: - Digital effect - HOLOGRAM AF When the POWER switch is set to ON in the menu settings... NightShot mode makes subjects more than 16 times brighter than those recorded in the NightShot mode. (1) Set the POWER switch to CAMERA, slide NIGHTSHOT to MEMORY You cannot use the Super NightShot function.... This may be clearer with the flash - At that time, the moving picture may cause your camcorder to malfunction. • When you cannot use the following functions: - PROGRAM AE - the outdoors...
.... • Detach the lens hood when you cannot use the following functions: - Digital effect - HOLOGRAM AF When the POWER switch is set to ON in the menu settings... NightShot mode makes subjects more than 16 times brighter than those recorded in the NightShot mode. (1) Set the POWER switch to CAMERA, slide NIGHTSHOT to MEMORY You cannot use the Super NightShot function.... This may be clearer with the flash - At that time, the moving picture may cause your camcorder to malfunction. • When you cannot use the following functions: - PROGRAM AE - the outdoors...
Operating Instructions
Page 29
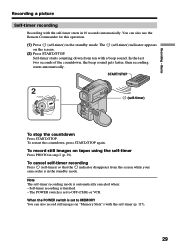
...camcorder is in 10 seconds automatically. Recording - The (self-timer) indicator appears on tapes using the self-timer Press PHOTO in the standby mode. In the last two seconds of the countdown, the beep sound gets faster, then recording starts automatically. You can also record... O R Y LOCK (self-timer) To stop the countdown Press START/STOP. Basics Recording a picture Self-timer recording Recording with a beep sound. Self-timer recording is automatically canceled when: - Note The self-timer recording mode is finished. - When the POWER switch is set to OFF (CHG) or VCR...
...camcorder is in 10 seconds automatically. Recording - The (self-timer) indicator appears on tapes using the self-timer Press PHOTO in the standby mode. In the last two seconds of the countdown, the beep sound gets faster, then recording starts automatically. You can also record... O R Y LOCK (self-timer) To stop the countdown Press START/STOP. Basics Recording a picture Self-timer recording Recording with a beep sound. Self-timer recording is automatically canceled when: - Note The self-timer recording mode is finished. - When the POWER switch is set to OFF (CHG) or VCR...


