Operating Instructions
Page 3
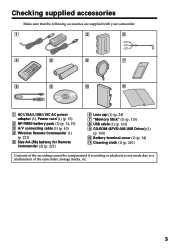
qa 1 AC-L10A/L10B/L10C AC power adaptor (1), Power cord (1) (p. 15) 2 NP-FM50 battery pack (1) (p. 14, 15) 3 A/V connecting cable (1) (p. 43) 4 Wireless Remote Commander (1) (p. 221) 5 Size AA (R6) battery for Remote Commander (2) (p. 221) 6 Lens ... cover (1) (p. 14) qa Cleaning cloth (1) (p. 210) Contents of the recording cannot be compensated if recording or playback is not made due to a malfunction of the camcorder, storage media, etc. 3 Getting started Checking supplied accessories Make sure that the following accessories are supplied with your...
qa 1 AC-L10A/L10B/L10C AC power adaptor (1), Power cord (1) (p. 15) 2 NP-FM50 battery pack (1) (p. 14, 15) 3 A/V connecting cable (1) (p. 43) 4 Wireless Remote Commander (1) (p. 221) 5 Size AA (R6) battery for Remote Commander (2) (p. 221) 6 Lens ... cover (1) (p. 14) qa Cleaning cloth (1) (p. 210) Contents of the recording cannot be compensated if recording or playback is not made due to a malfunction of the camcorder, storage media, etc. 3 Getting started Checking supplied accessories Make sure that the following accessories are supplied with your...
Operating Instructions
Page 8
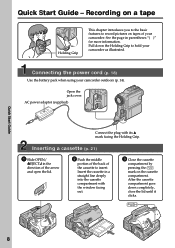
... of the back of your camcorder outdoors (p. 14). Connecting the power cord (p. 18) Use the battery pack when using your camcorder. After the cassette compartment goes down the Holding Grip to hold your camcorder as illustrated. Pull down completely..., close the lid until it clicks. Insert the cassette in a straight line deeply into the cassette compartment with its v mark facing the Holding Grip. Inserting a cassette (p. 21) 1 Slide OPEN/ ZEJECT in parentheses "( )" for more information. Quick Start Guide 8 AC power adaptor...
... of the back of your camcorder outdoors (p. 14). Connecting the power cord (p. 18) Use the battery pack when using your camcorder. After the cassette compartment goes down the Holding Grip to hold your camcorder as illustrated. Pull down completely..., close the lid until it clicks. Insert the cassette in a straight line deeply into the cassette compartment with its v mark facing the Holding Grip. Inserting a cassette (p. 21) 1 Slide OPEN/ ZEJECT in parentheses "( )" for more information. Quick Start Guide 8 AC power adaptor...
Operating Instructions
Page 10
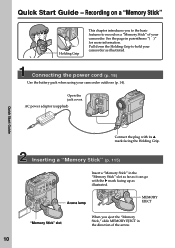
.... Connecting the power cord (p. 18) Use the battery pack when using your camcorder. Access lamp MEMORY EJECT "Memory Stick" slot When you to the basic features to hold your camcorder as illustrated. AC power adaptor (supplied) Quick Start Guide Connect the plug with the B mark facing up ...as illustrated. See the page in the direction of your camcorder outdoors (p. 14). Open the jack cover. Pull down ...
.... Connecting the power cord (p. 18) Use the battery pack when using your camcorder. Access lamp MEMORY EJECT "Memory Stick" slot When you to the basic features to hold your camcorder as illustrated. AC power adaptor (supplied) Quick Start Guide Connect the plug with the B mark facing up ...as illustrated. See the page in the direction of your camcorder outdoors (p. 14). Open the jack cover. Pull down ...
Operating Instructions
Page 15
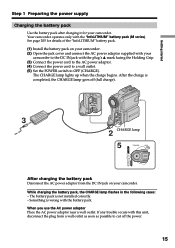
...lights up when the charge begins. When you use the AC power adaptor Place the AC power adaptor near a wall outlet. Your camcorder operates only with the plug's v mark facing the Holding Grip. (3) Connect the power cord to the AC power adaptor. (4) Connect the power cord to a wall outlet. (5) Set ...- The battery pack is wrong with this unit, disconnect the plug from the DC IN jack on your camcorder. (2) Open the jack cover and connect the AC power adaptor supplied with your camcorder to the DC IN jack with the "InfoLITHIUM" battery pack (M series). After the charge is completed, the...
...lights up when the charge begins. When you use the AC power adaptor Place the AC power adaptor near a wall outlet. Your camcorder operates only with the plug's v mark facing the Holding Grip. (3) Connect the power cord to the AC power adaptor. (4) Connect the power cord to a wall outlet. (5) Set ...- The battery pack is wrong with this unit, disconnect the plug from the DC IN jack on your camcorder. (2) Open the jack cover and connect the AC power adaptor supplied with your camcorder to the DC IN jack with the "InfoLITHIUM" battery pack (M series). After the charge is completed, the...
Operating Instructions
Page 18
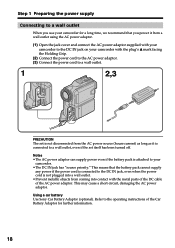
This means that you use your camcorder for further information. 18 Refer to the operating instructions of the AC power adaptor. Using a car battery Use Sony Car Battery Adaptor (optional). Notes •The AC power adaptor can supply power even if the battery pack is not disconnected from coming into a wall outlet. ... power source (house current) as long as it from a wall outlet using the AC power adaptor. (1) Open the jack cover and connect the AC power adaptor supplied with your camcorder to the DC IN jack on your camcorder with the metal parts of the DC cable of the Car Battery...
This means that you use your camcorder for further information. 18 Refer to the operating instructions of the AC power adaptor. Using a car battery Use Sony Car Battery Adaptor (optional). Notes •The AC power adaptor can supply power even if the battery pack is not disconnected from coming into a wall outlet. ... power source (house current) as long as it from a wall outlet using the AC power adaptor. (1) Open the jack cover and connect the AC power adaptor supplied with your camcorder to the DC IN jack on your camcorder with the metal parts of the DC cable of the Car Battery...
Operating Instructions
Page 43
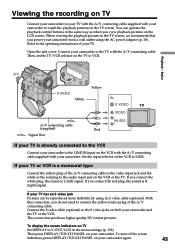
...camcorder to your TV with the A/V connecting cable supplied with the A/V connecting cable. Connect your camcorder to the TV with your camcorder...(supplied) : Signal flow AUDIO Red If your camcorder again. 43 If you do not need to ...already connected to the VCR Connect your camcorder to connect the yellow (video) plug ... A/V connecting cable supplied with your camcorder. When viewing the playback picture on...camcorder. To display the screen indicators on the TV screen, we recommend that you power your camcorder...the TV/VCR selector on both your camcorder from a wall outlet using an ...
...camcorder to your TV with the A/V connecting cable supplied with the A/V connecting cable. Connect your camcorder to the TV with your camcorder...(supplied) : Signal flow AUDIO Red If your camcorder again. 43 If you do not need to ...already connected to the VCR Connect your camcorder to connect the yellow (video) plug ... A/V connecting cable supplied with your camcorder. When viewing the playback picture on...camcorder. To display the screen indicators on the TV screen, we recommend that you power your camcorder...the TV/VCR selector on both your camcorder from a wall outlet using an ...
Operating Instructions
Page 164
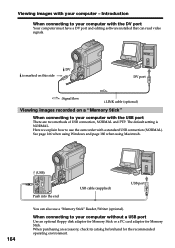
.... When connecting to your computer with the DV port Your computer must have a DV port and editing software installed that can also use the camcorder with the USB port There are two methods of USB connection, NORMAL and PTP. Viewing images with your computer without a USB port Use an... optional floppy disk adaptor for Memory Stick or a PC card adaptor for the recommended operating environment. DV is NORMAL. See page 166 when using Windows and page 180 when using Macintosh. 164 ...
.... When connecting to your computer with the DV port Your computer must have a DV port and editing software installed that can also use the camcorder with the USB port There are two methods of USB connection, NORMAL and PTP. Viewing images with your computer without a USB port Use an... optional floppy disk adaptor for Memory Stick or a PC card adaptor for the recommended operating environment. DV is NORMAL. See page 166 when using Windows and page 180 when using Macintosh. 164 ...
Operating Instructions
Page 169
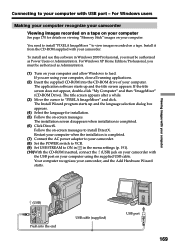
...details on viewing "Memory Stick" images on your computer. The installation screen disappears when installation is completed. (7) Connect the AC power adaptor to your camcorder. (8) Set the POWER switch to VCR. (9) Set USB STREAM to ON in in Windows 2000 Professional, you must be authorized... title screen appears. Your computer recognizes your computer and allow Windows to install DirectX. For Windows users Making your computer recognize your camcorder Viewing images recorded on a tape on your computer See page 170 for installation. (5) Follow the on-screen messages. The title screen...
...details on viewing "Memory Stick" images on your computer. The installation screen disappears when installation is completed. (7) Connect the AC power adaptor to your camcorder. (8) Set the POWER switch to VCR. (9) Set USB STREAM to ON in in Windows 2000 Professional, you must be authorized... title screen appears. Your computer recognizes your computer and allow Windows to install DirectX. For Windows users Making your computer recognize your camcorder Viewing images recorded on a tape on your computer See page 170 for installation. (5) Follow the on-screen messages. The title screen...
Operating Instructions
Page 170
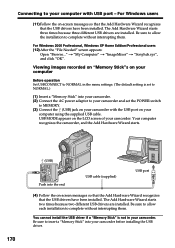
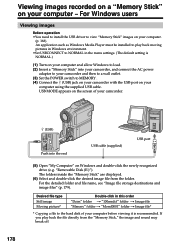
... the USB driver if a "Memory Stick" is set to NORMAL.) (1) Insert a "Memory Stick" into your camcorder. (2) Connect the AC power adaptor to your camcorder and set the POWER switch to MEMORY. (3) Connect the (USB) jack on your camcorder with USB port - USB MODE appears on -screen messages so that the Add Hardware Wizard recognizes...
... the USB driver if a "Memory Stick" is set to NORMAL.) (1) Insert a "Memory Stick" into your camcorder. (2) Connect the AC power adaptor to your camcorder and set the POWER switch to MEMORY. (3) Connect the (USB) jack on your camcorder with USB port - USB MODE appears on -screen messages so that the Add Hardware Wizard recognizes...
Operating Instructions
Page 171
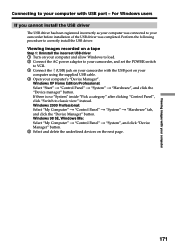
... 1: Uninstall the incorrect USB driver 1 Turn on your computer and allow Windows to load. 2 Connect the AC power adaptor to your camcorder, and set the POWER switch to VCR. 3 Connect the (USB) jack on your camcorder with USB port - If there is no "System" inside "Pick a category" after clicking "Control Panel", click "Switch... Manager". For Windows users If you cannot install the USB driver The USB driver has been registered incorrectly as your computer was connected to your camcorder before installation of the USB driver was completed.
... 1: Uninstall the incorrect USB driver 1 Turn on your computer and allow Windows to load. 2 Connect the AC power adaptor to your camcorder, and set the POWER switch to VCR. 3 Connect the (USB) jack on your camcorder with USB port - If there is no "System" inside "Pick a category" after clicking "Control Panel", click "Switch... Manager". For Windows users If you cannot install the USB driver The USB driver has been registered incorrectly as your computer was connected to your camcorder before installation of the USB driver was completed.
Operating Instructions
Page 173
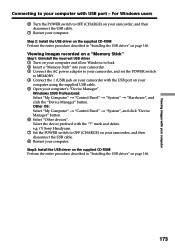
... incorrect USB driver 1 Turn on your computer and allow Windows to load. 2 Insert a "Memory Stick" into your camcorder. 3 Connect the AC power adaptor to your camcorder, and set the POWER switch to your computer with USB port - Select the device prefixed with the "?" Step2: Install... "My Computer" t "Control Panel" t "System", and click "Device Manager" button. 6 Select "Other devices". e.g. (?) Sony Handycam 7 Set the POWER switch to OFF (CHARGE) on your camcorder, and then disconnect the USB cable. 8 Restart your computer. For Windows users 6 Turn the POWER switch to OFF (CHARGE) ...
... incorrect USB driver 1 Turn on your computer and allow Windows to load. 2 Insert a "Memory Stick" into your camcorder. 3 Connect the AC power adaptor to your camcorder, and set the POWER switch to your computer with USB port - Select the device prefixed with the "?" Step2: Install... "My Computer" t "Control Panel" t "System", and click "Device Manager" button. 6 Select "Other devices". e.g. (?) Sony Handycam 7 Set the POWER switch to OFF (CHARGE) on your camcorder, and then disconnect the USB cable. 8 Restart your computer. For Windows users 6 Turn the POWER switch to OFF (CHARGE) ...
Operating Instructions
Page 174
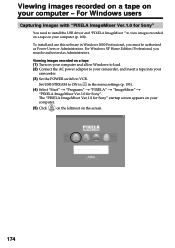
...and "PIXELA ImageMixer " to view images recorded on a tape on the screen. 174 For Windows users Capturing images with "PIXELA ImageMixer Ver.1.0 for Sony" startup screen appears on your computer. (5) Click on the leftmost on your computer (p. 168). Viewing images recorded on a tape (1) Turn on ... computer - Viewing images recorded on a tape on your computer and allow Windows to load. (2) Connect the AC power adaptor to your camcorder, and insert a tape into your camcorder. (3) Set the POWER switch to VCR. Set USB STREAM to ON in in Windows 2000 Professional, you must be ...
...and "PIXELA ImageMixer " to view images recorded on a tape on the screen. 174 For Windows users Capturing images with "PIXELA ImageMixer Ver.1.0 for Sony" startup screen appears on your computer. (5) Click on the leftmost on your computer (p. 168). Viewing images recorded on a tape (1) Turn on ... computer - Viewing images recorded on a tape on your computer and allow Windows to load. (2) Connect the AC power adaptor to your camcorder, and insert a tape into your camcorder. (3) Set the POWER switch to VCR. Set USB STREAM to ON in in Windows 2000 Professional, you must be ...
Operating Instructions
Page 178
..." folder t "100msdcf" folder t Image file "Mssony" folder t "Moml0001" folder t Image file* * Copying a file to the hard disk of your camcorder. 178 (USB) Push into your camcorder, and connect the AC power adaptor to your camcorder and then to a wall outlet. (3) Set the POWER switch to view "Memory Stick" images on your computer - For Windows...
..." folder t "100msdcf" folder t Image file "Mssony" folder t "Moml0001" folder t Image file* * Copying a file to the hard disk of your camcorder. 178 (USB) Push into your camcorder, and connect the AC power adaptor to your camcorder and then to a wall outlet. (3) Set the POWER switch to view "Memory Stick" images on your computer - For Windows...
Operating Instructions
Page 182
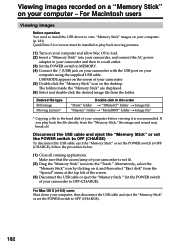
.... Alternatively, select the "Memory Stick" icon by clicking on it is not lit. (2) Drag the "Memory Stick" icon into your camcorder, and connect the AC power adaptor to your computer. (p. 181) QuickTime 3.0 or newer must be installed to play back the file directly from the folder. Disconnect the ...Memory Stick" images on your computer before viewing it , and then select "Eject disk" from the "Special" menu at the top left of your camcorder to OFF (CHARGE). If you play back moving pictures. (1) Turn on the screen of the screen. (3) Disconnect the USB cable or eject the "...
.... Alternatively, select the "Memory Stick" icon by clicking on it is not lit. (2) Drag the "Memory Stick" icon into your camcorder, and connect the AC power adaptor to your computer. (p. 181) QuickTime 3.0 or newer must be installed to play back the file directly from the folder. Disconnect the ...Memory Stick" images on your computer before viewing it , and then select "Eject disk" from the "Special" menu at the top left of your camcorder to OFF (CHARGE). If you play back moving pictures. (1) Turn on the screen of the screen. (3) Disconnect the USB cable or eject the "...
Operating Instructions
Page 196
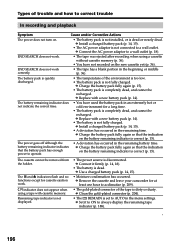
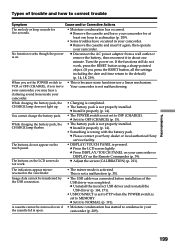
... displayed. • The power source is correct (p. 15). c Install a charged battery pack (p. 14, 15). • The AC power adaptor is completely dead, and cannot be removed from the holder. END SEARCH does not work . The battery remaining indicator does not indicate the correct ...playback Symptom Cause and/or Corrective Actions The power does not turn on the battery remaining indicator is disconnected. c Remove the cassette and leave your camcorder for cassette ejection work . • The tape was ejected after recording when using a tape with a new battery pack (p. 14). c ...
... displayed. • The power source is correct (p. 15). c Install a charged battery pack (p. 14, 15). • The AC power adaptor is completely dead, and cannot be removed from the holder. END SEARCH does not work . The battery remaining indicator does not indicate the correct ...playback Symptom Cause and/or Corrective Actions The power does not turn on the battery remaining indicator is disconnected. c Remove the cassette and leave your camcorder for cassette ejection work . • The tape was ejected after recording when using a tape with a new battery pack (p. 14). c ...
Operating Instructions
Page 199
c Disconnect the AC power adaptor from inside your • This is because some functions use...14). c Press DISPLAY/TOUCH PANEL on your camcorder, you may hear a clattering sound from a wall outlet or remove the battery, then reconnect it again, then operate your Sony dealer or local authorized Sony service facility. The buttons on the Remote Commander... the settings including the date and time return to acclimatize (p. 209). • Some troubles have occurred in your camcorder. While charging the battery pack, the CHARGE lamp does not light up. • Charging is completed. •...
c Disconnect the AC power adaptor from inside your • This is because some functions use...14). c Press DISPLAY/TOUCH PANEL on your camcorder, you may hear a clattering sound from a wall outlet or remove the battery, then reconnect it again, then operate your Sony dealer or local authorized Sony service facility. The buttons on the Remote Commander... the settings including the date and time return to acclimatize (p. 209). • Some troubles have occurred in your camcorder. While charging the battery pack, the CHARGE lamp does not light up. • Charging is completed. •...
Operating Instructions
Page 200
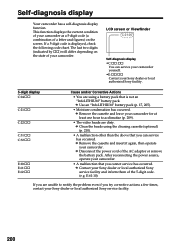
...Remove the cassette and leave your Sony dealer or local authorized Sony service facility and inform them of the 5-digit code. (e.g. c Disconnect the power cord of your Sony dealer or local authorized Sony service facility. 200 c Contact your camcorder for at least one hour to ... of the AC adaptor or remove the battery pack. Self-diagnosis display Your camcorder has a self-diagnosis display function. After reconnecting the power source, operate your camcorder. • A malfunction that you can service your camcorder yourself. •E:ss:ss Contact your camcorder. c Clean the...
...Remove the cassette and leave your Sony dealer or local authorized Sony service facility and inform them of the 5-digit code. (e.g. c Disconnect the power cord of your Sony dealer or local authorized Sony service facility. 200 c Contact your camcorder for at least one hour to ... of the AC adaptor or remove the battery pack. Self-diagnosis display Your camcorder has a self-diagnosis display function. After reconnecting the power source, operate your camcorder. • A malfunction that you can service your camcorder yourself. •E:ss:ss Contact your camcorder. c Clean the...

Operating Instructions
Page 205
... proper function. 1. Remove the battery from the DC IN jack on your camcorder in minutes. The "InfoLITHIUM" battery pack calculates the power consumption according to 10 minutes. With an AC adaptor/charger (optional), the remaining battery time and charging time are displayed. When ... inserted. Effective use it is correct. Please buy a new battery pack. •The battery life varies depending on your camcorder and an optional AC adaptor/charger. About the "InfoLITHIUM" battery pack What is frequently used. Battery capacity drops little by little as time passes. If...
... proper function. 1. Remove the battery from the DC IN jack on your camcorder in minutes. The "InfoLITHIUM" battery pack calculates the power consumption according to 10 minutes. With an AC adaptor/charger (optional), the remaining battery time and charging time are displayed. When ... inserted. Effective use it is correct. Please buy a new battery pack. •The battery life varies depending on your camcorder and an optional AC adaptor/charger. About the "InfoLITHIUM" battery pack What is frequently used. Battery capacity drops little by little as time passes. If...
Operating Instructions
Page 208
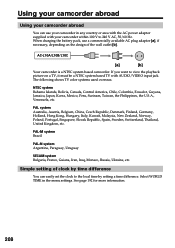
.... 208 When charging the battery pack, use your camcorder in the menu settings. Using your camcorder abroad Using your camcorder abroad You can easily set the clock to the local time by time difference You can use a commercially available AC plug adaptor [a], if necessary, depending on a TV, it ...must be a NTSC system based TV with your camcorder within 100 V to 240 V AC, 50/60 Hz. PAL system Australia, Austria, Belgium, China...
.... 208 When charging the battery pack, use your camcorder in the menu settings. Using your camcorder abroad Using your camcorder abroad You can easily set the clock to the local time by time difference You can use a commercially available AC plug adaptor [a], if necessary, depending on a TV, it ...must be a NTSC system based TV with your camcorder within 100 V to 240 V AC, 50/60 Hz. PAL system Australia, Austria, Belgium, China...
Operating Instructions
Page 211
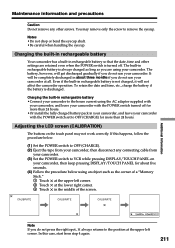
...than 24 hours. •Or install the fully charged battery pack in rechargeable battery •Connect your camcorder to the house current using the AC adaptor supplied with your camcorder, and leave your camcorder with the POWER switch set to OFF (CHARGE) for about three months if you do not use ...your camcorder at all. Even if the built-in rechargeable battery is not charged, it will get discharged ...
...than 24 hours. •Or install the fully charged battery pack in rechargeable battery •Connect your camcorder to the house current using the AC adaptor supplied with your camcorder, and leave your camcorder with the POWER switch set to OFF (CHARGE) for about three months if you do not use ...your camcorder at all. Even if the built-in rechargeable battery is not charged, it will get discharged ...


