Operating Instructions
Page 3
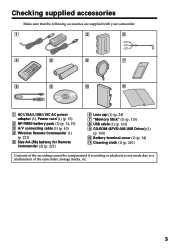
Getting started Checking supplied accessories Make sure that the following accessories are supplied with your camcorder. 1 2 3 4 5 6 7 8 9 q; qa 1 AC-L10A/L10B/L10C AC power adaptor (1), Power cord (1) (p. 15) 2 NP-FM50 battery pack (1) (p. 14, 15) 3 ...(p. 221) 5 Size AA (R6) battery for Remote Commander (2) (p. 221) 6 Lens cap (1) (p. 24) 7 "Memory Stick" (1) (p. 113) 8 USB cable (1) (p. 163) 9 CD-ROM (SPVD-008 USB Driver) (1) (p. 168) q; Battery terminal cover (1) (p. 14) qa Cleaning cloth (1) (p. 210) Contents of the recording cannot be compensated if recording or playback ...
Getting started Checking supplied accessories Make sure that the following accessories are supplied with your camcorder. 1 2 3 4 5 6 7 8 9 q; qa 1 AC-L10A/L10B/L10C AC power adaptor (1), Power cord (1) (p. 15) 2 NP-FM50 battery pack (1) (p. 14, 15) 3 ...(p. 221) 5 Size AA (R6) battery for Remote Commander (2) (p. 221) 6 Lens cap (1) (p. 24) 7 "Memory Stick" (1) (p. 113) 8 USB cable (1) (p. 163) 9 CD-ROM (SPVD-008 USB Driver) (1) (p. 168) q; Battery terminal cover (1) (p. 14) qa Cleaning cloth (1) (p. 210) Contents of the recording cannot be compensated if recording or playback ...
Operating Instructions
Page 4
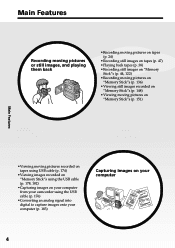
... "Memory Stick"s (p. 151) Main Features •Viewing moving pictures recorded on tapes using USB cable (p. 174) •Viewing images recorded on "Memory Stick"s using the USB cable (p. 178, 182) •Capturing images on your computer from your camcorder using the USB cable (p. 176) •Converting an analog signal into digital to capture images onto...
... "Memory Stick"s (p. 151) Main Features •Viewing moving pictures recorded on tapes using USB cable (p. 174) •Viewing images recorded on "Memory Stick"s using the USB cable (p. 178, 182) •Capturing images on your computer from your camcorder using the USB cable (p. 176) •Converting an analog signal into digital to capture images onto...
Operating Instructions
Page 7
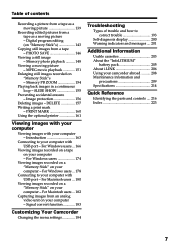
...images recorded on your computer - Image protection 156 Deleting images - For Windows users ... 178 Connecting to your computer with USB port - Getting started Table of trouble and how to correct trouble 193 Self-diagnosis display 200 Warning indicators and messages ....... 201 Additional Information Usable cassettes 203 About the "InfoLITHIUM" battery pack 205 About i.LINK 206 Using your camcorder abroad .......... 208 Maintenance information and precautions 209 Specifications 214 Quick Reference Identifying the parts and controls .... 216 Index 223 7...
...images recorded on your computer - Image protection 156 Deleting images - For Windows users ... 178 Connecting to your computer with USB port - Getting started Table of trouble and how to correct trouble 193 Self-diagnosis display 200 Warning indicators and messages ....... 201 Additional Information Usable cassettes 203 About the "InfoLITHIUM" battery pack 205 About i.LINK 206 Using your camcorder abroad .......... 208 Maintenance information and precautions 209 Specifications 214 Quick Reference Identifying the parts and controls .... 216 Index 223 7...
Operating Instructions
Page 19
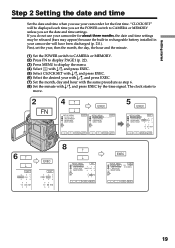
... RET. 19 "CLOCK SET" will have been discharged (p. 211). r R EXEC RET. 5 EXEC SETUP MENU EXIT CLOCK SET USB STREAM LANGUAGE 2002 JAN 1 DEMO MODE 12 00 AM r R EXEC RET. 6R r EXIT 2002 JAN 1 12 00 AM ...EXEC EXIT 2002 JAN 1 12 00 AM 8 R r SETUP MENU EXIT CLOCK SET USB STREAM LANGUAGE 2002 JUL 4 DEMO MODE 5 30 PM r R EXEC RET. If you set the year, then the month...started Step 2 Setting the date and time Set the date and time when you use your camcorder for about three months, the date and time settings may be released (bars may appear) because...
... RET. 19 "CLOCK SET" will have been discharged (p. 211). r R EXEC RET. 5 EXEC SETUP MENU EXIT CLOCK SET USB STREAM LANGUAGE 2002 JAN 1 DEMO MODE 12 00 AM r R EXEC RET. 6R r EXIT 2002 JAN 1 12 00 AM ...EXEC EXIT 2002 JAN 1 12 00 AM 8 R r SETUP MENU EXIT CLOCK SET USB STREAM LANGUAGE 2002 JUL 4 DEMO MODE 5 30 PM r R EXEC RET. If you set the year, then the month...started Step 2 Setting the date and time Set the date and time when you use your camcorder for about three months, the date and time settings may be released (bars may appear) because...

Operating Instructions
Page 75
... functions: - Stop playing back. - Insert a "Memory Stick." Images in PB ZOOM Images in the PB ZOOM mode are not output through the DV Interface and (USB) jack. Advanced Playback Operations Enlarging images recorded on the PB ZOOM screen disappears. Set the POWER switch to the center of the screen. 75
... functions: - Stop playing back. - Insert a "Memory Stick." Images in PB ZOOM Images in the PB ZOOM mode are not output through the DV Interface and (USB) jack. Advanced Playback Operations Enlarging images recorded on the PB ZOOM screen disappears. Set the POWER switch to the center of the screen. 75

Operating Instructions
Page 113
... - Mov00001.mpg: This file name appears on the "Memory Stick" is flashing. - Under direct sunlight - You can exchange image data with your camcorder. You can record and play back, record or delete images. Dsc00001.jpg: This file name appears on a "Memory Stick" supplied with the metal ... may be damaged in its label on the screen of speakers and televisions. •Prevent metallic objects or your computer etc., using the USB cable for replacement when the access lamp is set to "Memory Stick"s. •Do not disassemble or modify "Memory Stick"s. •Do...
... - Mov00001.mpg: This file name appears on the "Memory Stick" is flashing. - Under direct sunlight - You can exchange image data with your camcorder. You can record and play back, record or delete images. Dsc00001.jpg: This file name appears on a "Memory Stick" supplied with the metal ... may be damaged in its label on the screen of speakers and televisions. •Prevent metallic objects or your computer etc., using the USB cable for replacement when the access lamp is set to "Memory Stick"s. •Do not disassemble or modify "Memory Stick"s. •Do...
Operating Instructions
Page 163
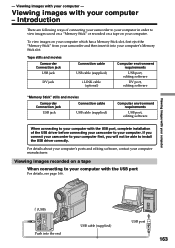
... your computer. Tape stills and movies Camcorder Connection jack USB jack DV jack Connection cable USB cable (supplied) i.LINK cable (optional) Computer environment requirements USB port, editing software DV port, editing software "Memory Stick" stills and movies Camcorder Connection jack USB jack Connection cable USB cable (supplied) Computer environment requirements USB port, editing software When connecting to your...
... your computer. Tape stills and movies Camcorder Connection jack USB jack DV jack Connection cable USB cable (supplied) i.LINK cable (optional) Computer environment requirements USB port, editing software DV port, editing software "Memory Stick" stills and movies Camcorder Connection jack USB jack Connection cable USB cable (supplied) Computer environment requirements USB port, editing software When connecting to your...
Operating Instructions
Page 164
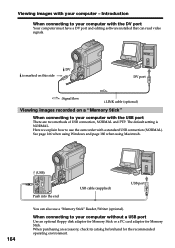
... adaptor for the recommended operating environment. See page 166 when using Windows and page 180 when using Macintosh. 164 (USB) Push into the end USB cable (supplied) USB port You can also use the camcorder with your computer with the DV port Your computer must have a DV port and editing software installed that can...
... adaptor for the recommended operating environment. See page 166 when using Windows and page 180 when using Macintosh. 164 (USB) Push into the end USB cable (supplied) USB port You can also use the camcorder with your computer with the DV port Your computer must have a DV port and editing software installed that can...

Operating Instructions
Page 165
... be assured if a "Memory Stick" formatted on your computer is used on your camcorder, or if the "Memory Stick" in your camcorder was connected. •Do not compress the data on your camcorder, the image format will differ so a file error indicator may appear and you may be played back on your application...." Compressed files cannot be unable to open a still image file. •When you load an image modified using retouching software from your computer when the USB cable was formatted from your computer to your computer - Viewing images with your computer Viewing images with your...
... be assured if a "Memory Stick" formatted on your computer is used on your camcorder, or if the "Memory Stick" in your camcorder was connected. •Do not compress the data on your camcorder, the image format will differ so a file error indicator may appear and you may be played back on your application...." Compressed files cannot be unable to open a still image file. •When you load an image modified using retouching software from your computer when the USB cable was formatted from your computer to your computer - Viewing images with your computer Viewing images with your...
Operating Instructions
Page 166
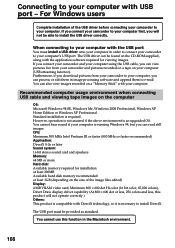
... Memory: 64 MB or more Hard disk: Available memory required for viewing images. When connecting to your computer with USB port - Furthermore, if you download pictures from your camcorder and pictures recorded on a tape on the CD-ROM supplied, along with your computer. However, operation is not ...software required for installation: at least 200MB Available hard disk memory recommended: at least 1GB (depending on the size of the USB driver before connecting your camcorder to your computer. You cannot hear sound if your computer is running Windows 98, but you can also view images recorded ...
... Memory: 64 MB or more Hard disk: Available memory required for viewing images. When connecting to your computer with USB port - Furthermore, if you download pictures from your camcorder and pictures recorded on a tape on the CD-ROM supplied, along with your computer. However, operation is not ...software required for installation: at least 200MB Available hard disk memory recommended: at least 1GB (depending on the size of the USB driver before connecting your camcorder to your computer. You cannot hear sound if your computer is running Windows 98, but you can also view images recorded ...
Operating Instructions
Page 167
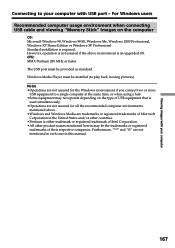
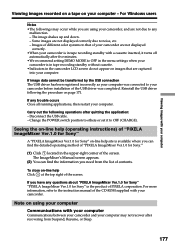
...and "®" are trademarks or registered trademarks of Microsoft Corporation in this manual. 167 For Windows users Recommended computer usage environment when connecting USB cable and viewing "Memory Stick" images on the type of their respective companies. Viewing images with your computer Connecting to a single ..., or when using a hub. •Some equipment may be provided as standard. CPU: MMX Pentium 200 MHz or faster The USB port must be installed (to play back moving pictures). Notes •Operations are not assured for all the recommended computer environments mentioned...
...and "®" are trademarks or registered trademarks of Microsoft Corporation in this manual. 167 For Windows users Recommended computer usage environment when connecting USB cable and viewing "Memory Stick" images on the type of their respective companies. Viewing images with your computer Connecting to a single ..., or when using a hub. •Some equipment may be provided as standard. CPU: MMX Pentium 200 MHz or faster The USB port must be installed (to play back moving pictures). Notes •Operations are not assured for all the recommended computer environments mentioned...
Operating Instructions
Page 168
... computer. Note If you can copy "Memory Stick" images from your camcorder onto your camcorder". This is completed, the USB driver will not be properly registered. See page 191 for simply copying images from your camcorder onto your computer without connecting the USB cable to your computer following the steps on page 171. Connecting to...
... computer. Note If you can copy "Memory Stick" images from your camcorder onto your camcorder". This is completed, the USB driver will not be properly registered. See page 191 for simply copying images from your camcorder onto your computer without connecting the USB cable to your computer following the steps on page 171. Connecting to...
Operating Instructions
Page 169
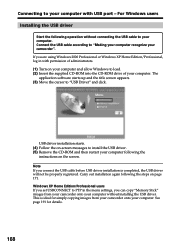
...images on your computer. The title screen appears after a while. (3) Move the cursor to view images recorded on your camcorder with your computer (USB) Push into the CD-ROM drive of your computer when the installation is completed. (6) Click DirectX. Connecting to your ...recognizes your computer, close all running applications. (2) Insert the supplied CD-ROM into the end USB cable (supplied) USB port 169 Follow the on your computer using your camcorder, and the Add Hardware Wizard starts. The installation screen disappears when installation is completed. (7) Connect...
...images on your computer. The title screen appears after a while. (3) Move the cursor to view images recorded on your camcorder with your computer (USB) Push into the CD-ROM drive of your computer when the installation is completed. (6) Click DirectX. Connecting to your ...recognizes your computer, close all running applications. (2) Insert the supplied CD-ROM into the end USB cable (supplied) USB port 169 Follow the on your computer using your camcorder, and the Add Hardware Wizard starts. The installation screen disappears when installation is completed. (7) Connect...
Operating Instructions
Page 170
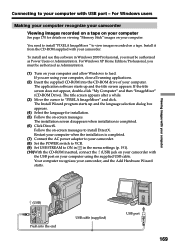
...Add Hardware Wizard recognizes that the USB drivers have been installed. Your computer recognizes the camcorder, and the Add Hardware Wizard starts. 170 (USB) Push into the end USB cable (supplied) USB port (4) Follow the on the LCD screen of your camcorder. The Add Hardware Wizard starts three... times because three different USB drivers are installed. Be sure to insert a "Memory Stick" into your camcorder. (2) Connect the AC power adaptor to your camcorder and set the POWER switch to MEMORY. (3) Connect the (USB) jack on your camcorder with USB port - Be sure to ...
...Add Hardware Wizard recognizes that the USB drivers have been installed. Your computer recognizes the camcorder, and the Add Hardware Wizard starts. 170 (USB) Push into the end USB cable (supplied) USB port (4) Follow the on the LCD screen of your camcorder. The Add Hardware Wizard starts three... times because three different USB drivers are installed. Be sure to insert a "Memory Stick" into your camcorder. (2) Connect the AC power adaptor to your camcorder and set the POWER switch to MEMORY. (3) Connect the (USB) jack on your camcorder with USB port - Be sure to ...
Operating Instructions
Page 171
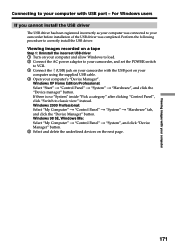
If there is no "System" inside "Pick a category" after clicking "Control Panel", click "Switch to your camcorder before installation of the USB driver was completed. Windows 2000 Professional: Select "My Computer" t "Control Panel" t "System" t "Hardware" tab, and click the "Device Manager" button... on a tape Step 1: Uninstall the incorrect USB driver 1 Turn on your computer and allow Windows to load. 2 Connect the AC power adaptor to your camcorder, and set the POWER switch to VCR. 3 Connect the (USB) jack on your camcorder with USB port - Viewing images with your computer Connecting ...
If there is no "System" inside "Pick a category" after clicking "Control Panel", click "Switch to your camcorder before installation of the USB driver was completed. Windows 2000 Professional: Select "My Computer" t "Control Panel" t "System" t "Hardware" tab, and click the "Device Manager" button... on a tape Step 1: Uninstall the incorrect USB driver 1 Turn on your computer and allow Windows to load. 2 Connect the AC power adaptor to your camcorder, and set the POWER switch to VCR. 3 Connect the (USB) jack on your camcorder with USB port - Viewing images with your computer Connecting ...
Operating Instructions
Page 172
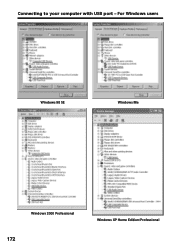
For Windows users Windows 98 SE Windows Me Windows 2000 Professional 172 Windows XP Home Edition/Professional Connecting to your computer with USB port -
For Windows users Windows 98 SE Windows Me Windows 2000 Professional 172 Windows XP Home Edition/Professional Connecting to your computer with USB port -
Operating Instructions
Page 173
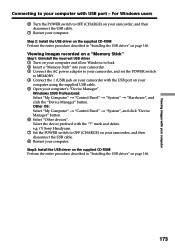
.... 5 Open your computer's "Device Manager". mark and delete. e.g. (?) Sony Handycam 7 Set the POWER switch to OFF (CHARGE) on page 168. Viewing images recorded on a "Memory Stick" Step1: Uninstall the incorrect USB driver 1 Turn on your computer and allow Windows to load. 2 Insert a "Memory Stick" into your camcorder. 3 Connect the AC power adaptor to your...
.... 5 Open your computer's "Device Manager". mark and delete. e.g. (?) Sony Handycam 7 Set the POWER switch to OFF (CHARGE) on page 168. Viewing images recorded on a "Memory Stick" Step1: Uninstall the incorrect USB driver 1 Turn on your computer and allow Windows to load. 2 Insert a "Memory Stick" into your camcorder. 3 Connect the AC power adaptor to your...
Operating Instructions
Page 174
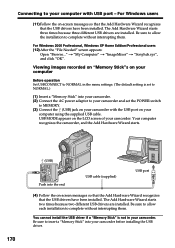
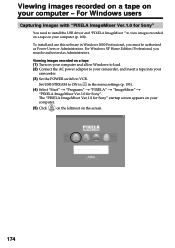
...Set USB STREAM to ON in in Windows 2000 Professional, you must be authorized as Power Users or Administrators. The "PIXELA ImageMixer Ver.1.0 for Sony". Viewing images recorded on a tape (1) Turn on your computer and allow Windows to load. (2) Connect the AC power adaptor to your camcorder,... and insert a tape into your camcorder. (3) Set the POWER switch to view images recorded ...
...Set USB STREAM to ON in in Windows 2000 Professional, you must be authorized as Power Users or Administrators. The "PIXELA ImageMixer Ver.1.0 for Sony". Viewing images recorded on a tape (1) Turn on your computer and allow Windows to load. (2) Connect the AC power adaptor to your camcorder,... and insert a tape into your camcorder. (3) Set the POWER switch to view images recorded ...
Operating Instructions
Page 175
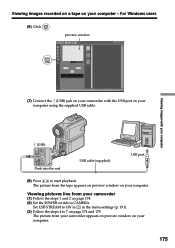
... the steps 4 to 7 on your computer using the supplied USB cable. (USB) Push into the end USB cable (supplied) USB port (8) Press to CAMERA. For Windows users (6) Click . Viewing images recorded on a tape on your computer. The picture from your camcorder appears on preview window on your camcorder (1) Follow the steps 1 and 2 on page 174. (2) Set...
... the steps 4 to 7 on your computer using the supplied USB cable. (USB) Push into the end USB cable (supplied) USB port (8) Press to CAMERA. For Windows users (6) Click . Viewing images recorded on a tape on your computer. The picture from your camcorder appears on preview window on your camcorder (1) Follow the steps 1 and 2 on page 174. (2) Set...
Operating Instructions
Page 177
... Ver.1.0 for Sony." (1) Click located in the camcorder LCD screen do not appear on images that of your camcorder are captured into your computer. Viewing images with a cassette inserted, it to any malfunction. - Disconnect the USB cable. - Images of different color systems to that are not displayed correctly. •When your camcorder is in tape...
... Ver.1.0 for Sony." (1) Click located in the camcorder LCD screen do not appear on images that of your camcorder are captured into your computer. Viewing images with a cassette inserted, it to any malfunction. - Disconnect the USB cable. - Images of different color systems to that are not displayed correctly. •When your camcorder is in tape...


