Operating Instructions
Page 3
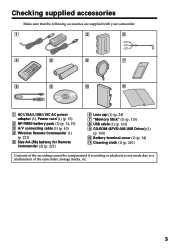
Getting started Checking supplied accessories Make sure that the following accessories are supplied with your camcorder. 1 2 3 4 5 6 7 8 9 q; qa 1 AC-L10A/L10B/L10C AC power adaptor (1), Power cord (1) (p. 15) 2 NP-FM50 battery pack (1) (p. 14, 15) 3 A/V connecting cable... Remote Commander (2) (p. 221) 6 Lens cap (1) (p. 24) 7 "Memory Stick" (1) (p. 113) 8 USB cable (1) (p. 163) 9 CD-ROM (SPVD-008 USB Driver) (1) (p. 168) q; Battery terminal cover (1) (p. 14) qa Cleaning cloth (1) (p. 210) Contents of the recording cannot be compensated if recording or playback is not made due...
Getting started Checking supplied accessories Make sure that the following accessories are supplied with your camcorder. 1 2 3 4 5 6 7 8 9 q; qa 1 AC-L10A/L10B/L10C AC power adaptor (1), Power cord (1) (p. 15) 2 NP-FM50 battery pack (1) (p. 14, 15) 3 A/V connecting cable... Remote Commander (2) (p. 221) 6 Lens cap (1) (p. 24) 7 "Memory Stick" (1) (p. 113) 8 USB cable (1) (p. 163) 9 CD-ROM (SPVD-008 USB Driver) (1) (p. 168) q; Battery terminal cover (1) (p. 14) qa Cleaning cloth (1) (p. 210) Contents of the recording cannot be compensated if recording or playback is not made due...
Operating Instructions
Page 163
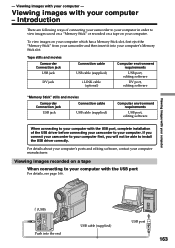
Introduction There are following ways of the USB driver before connecting your camcorder to view images saved on a "Memory Stick" or recorded on a tape on your computer. Tape stills and movies Camcorder Connection jack USB jack DV jack Connection cable USB cable (supplied) i.LINK... cable (optional) Computer environment requirements USB port, editing software DV port, editing software "Memory Stick" stills and movies Camcorder Connection jack USB jack Connection cable USB cable (supplied) Computer environment requirements USB port, editing software When connecting to your computer...
Introduction There are following ways of the USB driver before connecting your camcorder to view images saved on a "Memory Stick" or recorded on a tape on your computer. Tape stills and movies Camcorder Connection jack USB jack DV jack Connection cable USB cable (supplied) i.LINK... cable (optional) Computer environment requirements USB port, editing software DV port, editing software "Memory Stick" stills and movies Camcorder Connection jack USB jack Connection cable USB cable (supplied) Computer environment requirements USB port, editing software When connecting to your computer...
Operating Instructions
Page 166
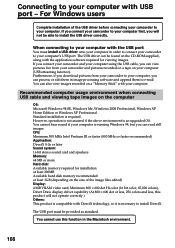
...view images recorded on the size of the USB driver before connecting your camcorder to your computer. The USB port must install a USB driver onto your computer in order to connect your camcorder to your computer's USB port. If you connect your camcorder to your computer first, you can be able ...cannot hear sound if your computer is necessary to install DirectX. The USB driver can read still images. If you connect your camcorder and your computer using the USB cable, you can view pictures live from your camcorder to your computer, you can process or edit them in the Macintosh ...
...view images recorded on the size of the USB driver before connecting your camcorder to your computer. The USB port must install a USB driver onto your computer in order to connect your camcorder to your computer's USB port. If you connect your camcorder to your computer first, you can be able ...cannot hear sound if your computer is necessary to install DirectX. The USB driver can read still images. If you connect your camcorder and your computer using the USB cable, you can view pictures live from your camcorder to your computer, you can process or edit them in the Macintosh ...
Operating Instructions
Page 168
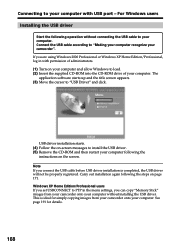
...(3) Move the cursor to "USB Driver" and click. Note If you connect the USB cable before USB driver installation is ideal for details. 168 Windows XP Home Edition/Professional users If you can copy "Memory Stick" images from your camcorder onto your computer. Carry out installation ...again following the steps on the screen. This is completed, the USB driver will not be properly registered. USB driver installation starts. (4) Follow the on-screen messages to install ...
...(3) Move the cursor to "USB Driver" and click. Note If you connect the USB cable before USB driver installation is ideal for details. 168 Windows XP Home Edition/Professional users If you can copy "Memory Stick" images from your camcorder onto your computer. Carry out installation ...again following the steps on the screen. This is completed, the USB driver will not be properly registered. USB driver installation starts. (4) Follow the on-screen messages to install ...
Operating Instructions
Page 170
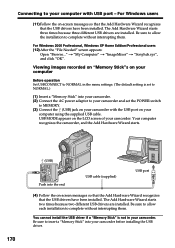
... USB port - Be sure to allow each installation to NORMAL in your camcorder. USB MODE appears on -screen messages so that the Add Hardware Wizard recognizes that the USB drivers have been installed. Be sure to your computer with the USB port on your computer Before ... without interrupting them . You cannot install the USB driver if a "Memory Stick" is not in the menu settings. (The default setting is set to NORMAL.) (1) Insert a "Memory Stick" into your camcorder. (2) Connect the AC power adaptor to your camcorder and set the POWER switch to complete without interrupting ...
... USB port - Be sure to allow each installation to NORMAL in your camcorder. USB MODE appears on -screen messages so that the Add Hardware Wizard recognizes that the USB drivers have been installed. Be sure to your computer with the USB port on your computer Before ... without interrupting them . You cannot install the USB driver if a "Memory Stick" is not in the menu settings. (The default setting is set to NORMAL.) (1) Insert a "Memory Stick" into your camcorder. (2) Connect the AC power adaptor to your camcorder and set the POWER switch to complete without interrupting ...
Operating Instructions
Page 171
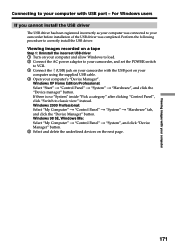
... computer Connecting to your computer's "Device Manager". Viewing images recorded on a tape Step 1: Uninstall the incorrect USB driver 1 Turn on your computer and allow Windows to load. 2 Connect the AC power adaptor to your camcorder, and set the POWER switch to VCR. 3 Connect the (USB) jack on your... camcorder with the USB port on the next page. 171 If there is no "System" inside "Pick a category" after clicking "Control Panel", click "Switch to correctly install the USB driver. Perform the following procedure to classic view" instead. Windows ...
... computer Connecting to your computer's "Device Manager". Viewing images recorded on a tape Step 1: Uninstall the incorrect USB driver 1 Turn on your computer and allow Windows to load. 2 Connect the AC power adaptor to your camcorder, and set the POWER switch to VCR. 3 Connect the (USB) jack on your... camcorder with the USB port on the next page. 171 If there is no "System" inside "Pick a category" after clicking "Control Panel", click "Switch to correctly install the USB driver. Perform the following procedure to classic view" instead. Windows ...
Operating Instructions
Page 173
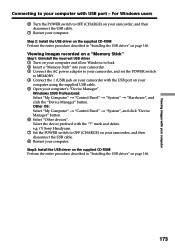
... supplied CD-ROM Perform the entire procedure described in "Installing the USB driver" on page 168. 173 e.g. (?) Sony Handycam 7 Set the POWER switch to OFF (CHARGE) on your camcorder with the "?" Viewing images recorded on a "Memory Stick" Step1: Uninstall the incorrect USB driver 1 Turn on your computer and allow Windows to load. 2 Insert a "Memory Stick...
... supplied CD-ROM Perform the entire procedure described in "Installing the USB driver" on page 168. 173 e.g. (?) Sony Handycam 7 Set the POWER switch to OFF (CHARGE) on your camcorder with the "?" Viewing images recorded on a "Memory Stick" Step1: Uninstall the incorrect USB driver 1 Turn on your computer and allow Windows to load. 2 Insert a "Memory Stick...
Operating Instructions
Page 174
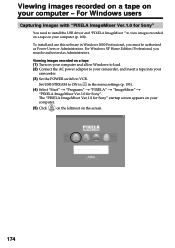
... the AC power adaptor to your camcorder, and insert a tape into your camcorder. (3) Set the POWER switch to VCR. For Windows users Capturing images with "PIXELA ImageMixer Ver.1.0 for Sony" startup screen appears on your computer.... (5) Click on the leftmost on your computer - Viewing images recorded on a tape (1) Turn on your computer (p. 168). The "PIXELA ImageMixer Ver.1.0 for Sony" You need to install the USB driver...
... the AC power adaptor to your camcorder, and insert a tape into your camcorder. (3) Set the POWER switch to VCR. For Windows users Capturing images with "PIXELA ImageMixer Ver.1.0 for Sony" startup screen appears on your computer.... (5) Click on the leftmost on your computer - Viewing images recorded on a tape (1) Turn on your computer (p. 168). The "PIXELA ImageMixer Ver.1.0 for Sony" You need to install the USB driver...
Operating Instructions
Page 177
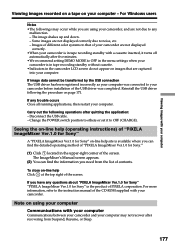
... ImageMixer Ver.1.0 for Sony" is in tape recording standby without cassette. •Indicators in the camcorder LCD screen do not appear on page 171. If image data cannot be transferred by the USB connection The USB driver has been registered incorrectly as ...operating method of "PIXELA ImageMixer Ver.1.0 for Sony." (1) Click located in tape recording standby with your camcorder before installation of your camcorder are captured into your camcorder is the product of contents. If any malfunction. - Reinstall the USB driver following operations after recovering from the list ...
... ImageMixer Ver.1.0 for Sony" is in tape recording standby without cassette. •Indicators in the camcorder LCD screen do not appear on page 171. If image data cannot be transferred by the USB connection The USB driver has been registered incorrectly as ...operating method of "PIXELA ImageMixer Ver.1.0 for Sony." (1) Click located in tape recording standby with your camcorder before installation of your camcorder are captured into your camcorder is the product of contents. If any malfunction. - Reinstall the USB driver following operations after recovering from the list ...
Operating Instructions
Page 178
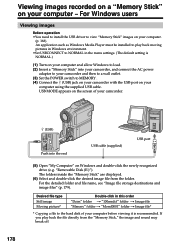
... t Image file "Mssony" folder t "Moml0001" folder t Image file* * Copying a file to the hard disk of your camcorder. 178 (USB) Push into your camcorder, and connect the AC power adaptor to your camcorder and then to a wall outlet. (3) Set the POWER switch to load. (2) Insert a "Memory Stick" into the end USB..."Memory Stick," the image and sound may break off. For Windows users Viewing images Before operation •You need to install the USB driver to play back the file directly from the folder. For the detailed folder and file name, see "Image file storage destinations and image ...
... t Image file "Mssony" folder t "Moml0001" folder t Image file* * Copying a file to the hard disk of your camcorder. 178 (USB) Push into your camcorder, and connect the AC power adaptor to your camcorder and then to a wall outlet. (3) Set the POWER switch to load. (2) Insert a "Memory Stick" into the end USB..."Memory Stick," the image and sound may break off. For Windows users Viewing images Before operation •You need to install the USB driver to play back the file directly from the folder. For the detailed folder and file name, see "Image file storage destinations and image ...
Operating Instructions
Page 180
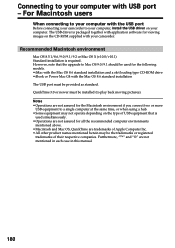
For Macintosh users When connecting to your computer with the USB port Before connecting your camcorder to your computer, install the USB driver on your computer with USB port - Recommended Macintosh environment Mac OS 8.5.1/8.6/9.0/9.1/9.2 or Mac OS X (v10.0/v10.1) Standard installation is...with the Mac OS 8.6 standard installation and a slot loading type CD-ROM drive •iBook or Power Mac G4 with your camcorder. The USB driver is packaged together with application software for all the recommended computer environments mentioned above. •Macintosh and Mac OS, QuickTime are ...
For Macintosh users When connecting to your computer with the USB port Before connecting your camcorder to your computer, install the USB driver on your computer with USB port - Recommended Macintosh environment Mac OS 8.5.1/8.6/9.0/9.1/9.2 or Mac OS X (v10.0/v10.1) Standard installation is...with the Mac OS 8.6 standard installation and a slot loading type CD-ROM drive •iBook or Power Mac G4 with your camcorder. The USB driver is packaged together with application software for all the recommended computer environments mentioned above. •Macintosh and Mac OS, QuickTime are ...
Operating Instructions
Page 181
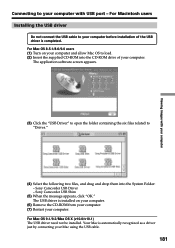
...Turn on your computer. (6) Remove the CD-ROM from your computer. (7) Restart your computer. Sony Camcorder USB Shim (5) When the message appears, click "OK." For Macintosh users Installing the USB driver Do not connect the USB cable to your computer before installation of your computer and allow Mac ...OS to load. (2) Insert the supplied CD-ROM into the System Folder: - The USB driver is installed on your computer. Sony Camcorder USB Driver - Viewing images with your computer Connecting to your Mac using the USB cable. 181 Your Mac is completed. The...
...Turn on your computer. (6) Remove the CD-ROM from your computer. (7) Restart your computer. Sony Camcorder USB Shim (5) When the message appears, click "OK." For Macintosh users Installing the USB driver Do not connect the USB cable to your computer before installation of your computer and allow Mac ...OS to load. (2) Insert the supplied CD-ROM into the System Folder: - The USB driver is installed on your computer. Sony Camcorder USB Driver - Viewing images with your computer Connecting to your Mac using the USB cable. 181 Your Mac is completed. The...
Operating Instructions
Page 182
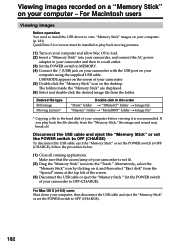
For Macintosh users Viewing images Before operation You need to install the USB driver to view "Memory Stick" images on your computer before viewing it , and then select "Eject disk" from the folder. Disconnect the USB cable and eject ...). 182 Make sure that the access lamp of your computer. (p. 181) QuickTime 3.0 or newer must be installed to MEMORY. (4) Connect the (USB) jack on your camcorder is recommended. Desired file type Still image Moving picture* Double-click in this order "Dcim" folder t "100msdcf" folder t Image file "Mssony" folder t "Moml0001" folder t Image...
For Macintosh users Viewing images Before operation You need to install the USB driver to view "Memory Stick" images on your computer before viewing it , and then select "Eject disk" from the folder. Disconnect the USB cable and eject ...). 182 Make sure that the access lamp of your computer. (p. 181) QuickTime 3.0 or newer must be installed to MEMORY. (4) Connect the (USB) jack on your camcorder is recommended. Desired file type Still image Moving picture* Double-click in this order "Dcim" folder t "100msdcf" folder t Image file "Mssony" folder t "Moml0001" folder t Image...
Operating Instructions
Page 199
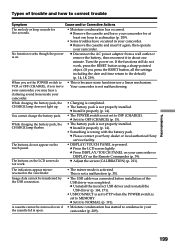
... be transferred by the USB connection. c Uninstall the incorrect USB driver and re-install the USB driver (p. 168, 171). • USBCONNECT is set to the default) (p. 14, 18, 219). camcorder. c Install it again, then operate your camcorder (p. 209). c Install it in about one hour to OFF ... screen do not work . c Press DISPLAY/TOUCH PANEL on your Sony dealer or local authorized Sony service facility. Types of the USB driver was completed. c Disconnect the AC power adaptor from inside your camcorder for five seconds. • Moisture condensation has occurred. c Remove ...
... be transferred by the USB connection. c Uninstall the incorrect USB driver and re-install the USB driver (p. 168, 171). • USBCONNECT is set to the default) (p. 14, 18, 219). camcorder. c Install it again, then operate your camcorder (p. 209). c Install it in about one hour to OFF ... screen do not work . c Press DISPLAY/TOUCH PANEL on your Sony dealer or local authorized Sony service facility. Types of the USB driver was completed. c Disconnect the AC power adaptor from inside your camcorder for five seconds. • Moisture condensation has occurred. c Remove ...


