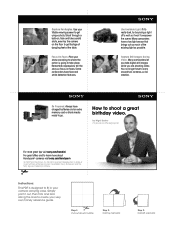
How to shoot a great birthday video.
Page 1
...no longer have a low light sensor that brings out as possible. Reproduction in whole or in your camera carrying case. Sony, Handycam and the Sony logo are shooting video. Capture Fun Angles. Be Prepared. by Nigel Barker Professional Photographer For more great tips visit..., hide and take digital still images while you are trademarks of the existing light as much of Sony. Many camcorders let you take candid shots, even lay the camera on faces. How to learn more about Handycam® cameras visit sony.com/handycam © 2009 Sony Electronics Inc. All rights reserved.
...no longer have a low light sensor that brings out as possible. Reproduction in whole or in your camera carrying case. Sony, Handycam and the Sony logo are shooting video. Capture Fun Angles. Be Prepared. by Nigel Barker Professional Photographer For more great tips visit..., hide and take digital still images while you are trademarks of the existing light as much of Sony. Many camcorders let you take candid shots, even lay the camera on faces. How to learn more about Handycam® cameras visit sony.com/handycam © 2009 Sony Electronics Inc. All rights reserved.
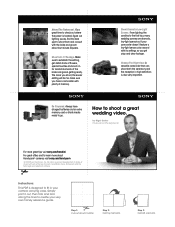
How to shoot a great wedding video.
Page 1
... easier editing will be. From lighting the candles to fit in for candid moments of Sony. Always have a camcorder with the bride and groom about Handycam® cameras visit sony.com/handycam © 2009 Sony Electronics Inc. All rights reserved. A versatile camcorder that can shoot both the ceremony and the reception in part without written permission is...
... easier editing will be. From lighting the candles to fit in for candid moments of Sony. Always have a camcorder with the bride and groom about Handycam® cameras visit sony.com/handycam © 2009 Sony Electronics Inc. All rights reserved. A versatile camcorder that can shoot both the ceremony and the reception in part without written permission is...

How to take great vacation video.
Page 1
...You Are Recording. Consider Dramatic LowLight Shots. Cup your camcorder to compensate for your voice will drown out environment sounds. How to learn more about Handycam® cameras visit sony.com/handycam © 2009 Sony Electronics Inc. Reproduction in whole or in part without... camera carrying case. Be Prepared. Some camcorders feature technologies that ensure crisp images even in GPS receiver that keeps your very own handy reference guide. Some camcorders feature a built-in low light. Sony, Handycam and the Sony logo are trademarks of a conversation detracts ...
...You Are Recording. Consider Dramatic LowLight Shots. Cup your camcorder to compensate for your voice will drown out environment sounds. How to learn more about Handycam® cameras visit sony.com/handycam © 2009 Sony Electronics Inc. Reproduction in whole or in part without... camera carrying case. Be Prepared. Some camcorders feature technologies that ensure crisp images even in GPS receiver that keeps your very own handy reference guide. Some camcorders feature a built-in low light. Sony, Handycam and the Sony logo are trademarks of a conversation detracts ...
Computer Applications Guide
Page 8
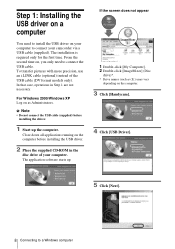
... depending on as Administrators. For Windows 2000/Windows XP Log on the computer. 3 Click [Handycam]. 4 Click [USB Driver]. 5 Click [Next]. 8 Connecting to a Windows computer To transfer pictures with more precision, use an i.LINK cable (optional) instead of your camcorder via a USB cable (supplied). b Note • Do not connect the USB cable (supplied...
... depending on as Administrators. For Windows 2000/Windows XP Log on the computer. 3 Click [Handycam]. 4 Click [USB Driver]. 5 Click [Next]. 8 Connecting to a Windows computer To transfer pictures with more precision, use an i.LINK cable (optional) instead of your camcorder via a USB cable (supplied). b Note • Do not connect the USB cable (supplied...
Computer Applications Guide
Page 10
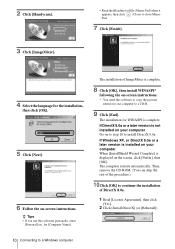
... instructions. Then, remove the CD-ROM. (You can skip the rest of the procedure.) 10Click [OK] to continue the installation of ImageMixer is complete. 2 Click [Handycam]. 3 Click [ImageMixer]. • Read the [Readme.txt] file (Memo Pad) when it appears, then click (Close) to close Memo Pad. 7 Click [Finish]. 4 Select the language...
... instructions. Then, remove the CD-ROM. (You can skip the rest of the procedure.) 10Click [OK] to continue the installation of ImageMixer is complete. 2 Click [Handycam]. 3 Click [ImageMixer]. • Read the [Readme.txt] file (Memo Pad) when it appears, then click (Close) to close Memo Pad. 7 Click [Finish]. 4 Select the language...
Computer Applications Guide
Page 11
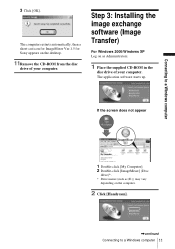
Step 3: Installing the image exchange software (Image Transfer) For Windows 2000/Windows XP Log on the computer. 2 Click [Handycam]. ,continued Connecting to a Windows computer 3 Click [OK]. The application software starts up. If the screen does not appear 1 Double-click [My Computer]. 2 Double-click [ImageMixer] (...-ROM in the disc drive of your computer. Connecting to a Windows computer 11 The computer restarts automatically, then a short-cut icon for ImageMixer Ver.1.5 for Sony appears on the desktop. 11Remove the CD-ROM from the disc drive of your computer.
Step 3: Installing the image exchange software (Image Transfer) For Windows 2000/Windows XP Log on the computer. 2 Click [Handycam]. ,continued Connecting to a Windows computer 3 Click [OK]. The application software starts up. If the screen does not appear 1 Double-click [My Computer]. 2 Double-click [ImageMixer] (...-ROM in the disc drive of your computer. Connecting to a Windows computer 11 The computer restarts automatically, then a short-cut icon for ImageMixer Ver.1.5 for Sony appears on the desktop. 11Remove the CD-ROM from the disc drive of your computer.
Computer Applications Guide
Page 14
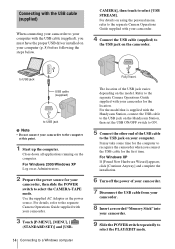
... the supplied AC Adaptor as Administrators. 2 Prepare the power source for the location. For details, refer to the separate Camera Operations Guide supplied with your camcorder. 3 Touch [P-MENU], [MENU], [ (STANDARD SET)] and [USB- 14 Connecting to the computer at this point. 1 Start up the computer. For the model that ...the USB jack on the Handycam Station, then set the USB ON/OFF switch to ON. 5 Connect the other end of the USB cable to the USB jack on the computer. to USB jack USB cable (supplied) to USB jack b Note • Do not connect your camcorder to a Windows computer Fully...
... the supplied AC Adaptor as Administrators. 2 Prepare the power source for the location. For details, refer to the separate Camera Operations Guide supplied with your camcorder. 3 Touch [P-MENU], [MENU], [ (STANDARD SET)] and [USB- 14 Connecting to the computer at this point. 1 Start up the computer. For the model that ...the USB jack on the Handycam Station, then set the USB ON/OFF switch to ON. 5 Connect the other end of the USB cable to the USB jack on the computer. to USB jack USB cable (supplied) to USB jack b Note • Do not connect your camcorder to a Windows computer Fully...
Computer Applications Guide
Page 31
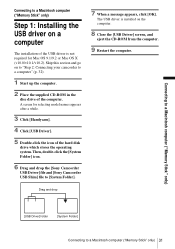
...Sony Camcorder USB Driver] file and [Sony Camcorder USB Shim] file to a Macintosh computer ("Memory Stick" only) 31 Drag and drop [USB Driver] folder [System Folder] Connecting to [System Folder]. 7 When a message appears, click [OK]. The USB driver is not required for selecting model names appears after a while. 3 Click [Handycam... for Mac OS 9.1/9.2 or Mac OS X (v10.0/v10.1/v10.2). Skip this section and go on to "Step 2: Connecting your camcorder to a Macintosh computer ("Memory Stick" only) Step 1: Installing the USB driver on a computer The installation of the USB driver ...
...Sony Camcorder USB Driver] file and [Sony Camcorder USB Shim] file to a Macintosh computer ("Memory Stick" only) 31 Drag and drop [USB Driver] folder [System Folder] Connecting to [System Folder]. 7 When a message appears, click [OK]. The USB driver is not required for selecting model names appears after a while. 3 Click [Handycam... for Mac OS 9.1/9.2 or Mac OS X (v10.0/v10.1/v10.2). Skip this section and go on to "Step 2: Connecting your camcorder to a Macintosh computer ("Memory Stick" only) Step 1: Installing the USB driver on a computer The installation of the USB driver ...
Computer Applications Guide
Page 32
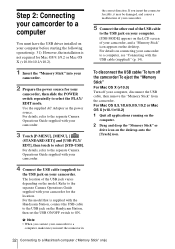
...is supplied with your camcorder to a computer, make sure you connect your camcorder. 3 Touch [P-MENU], [MENU], [ (STANDARD SET)] and [USB-PLY/ EDT], then touch to the USB jack on the desktop. For details, refer to the separate Camera Operations Guide supplied with the Handycam Station, connect the USB... cable to select [STD-USB]. The location of your camcorder, and a "Memory Stick" icon appears on the Handycam Station, then set the USB ON/OFF switch to ON.
...is supplied with your camcorder to a computer, make sure you connect your camcorder. 3 Touch [P-MENU], [MENU], [ (STANDARD SET)] and [USB-PLY/ EDT], then touch to the USB jack on the desktop. For details, refer to the separate Camera Operations Guide supplied with the Handycam Station, connect the USB... cable to select [STD-USB]. The location of your camcorder, and a "Memory Stick" icon appears on the Handycam Station, then set the USB ON/OFF switch to ON.

Computer Applications Guide
Page 40
... that is seeing on the computer. You cannot view the pictures the camcorder is supplied with the Handycam Station, set the USB ON/OFF switch to a "Memory Stick" in your camcorder first, then copy the pictures recorded on the Macintosh computer. You cannot...recorded on a "Memory Stick" on the camcorder, then connect it again. cFinish camcorder operation before connecting the camcorder to select [USB STREAM]. cFor the model that is supplied with the Handycam Station, connect the Handycam Station to your camcorder. Additional information Troubleshooting Symptom Cause and/or...
... that is seeing on the computer. You cannot view the pictures the camcorder is supplied with the Handycam Station, set the USB ON/OFF switch to a "Memory Stick" in your camcorder first, then copy the pictures recorded on the Macintosh computer. You cannot...recorded on a "Memory Stick" on the camcorder, then connect it again. cFinish camcorder operation before connecting the camcorder to select [USB STREAM]. cFor the model that is supplied with the Handycam Station, connect the Handycam Station to your camcorder. Additional information Troubleshooting Symptom Cause and/or...
Computer Applications Guide
Page 41
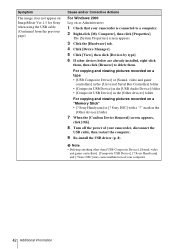
... then click [Remove] to your camcorder before the installation of your computer. Additional information ,continued Additional information 41 Sony DSC] with a "?" Symptom The image does not appear on Windows 98. 1 Check that your camcorder is connected to install the USB ...driver correctly. For Windows 98*/Windows 98SE/Windows Me * When copying or playing the pictures on a tape using a computer, the operation is not guaranteed on ImageMixer Ver.1.5 for Sony when using the USB cable. Sony Handycam] and [? Sony Handycam] or [? Sony...
... then click [Remove] to your camcorder before the installation of your computer. Additional information ,continued Additional information 41 Sony DSC] with a "?" Symptom The image does not appear on Windows 98. 1 Check that your camcorder is connected to install the USB ...driver correctly. For Windows 98*/Windows 98SE/Windows Me * When copying or playing the pictures on a tape using a computer, the operation is not guaranteed on ImageMixer Ver.1.5 for Sony when using the USB cable. Sony Handycam] and [? Sony Handycam] or [? Sony...
Computer Applications Guide
Page 42
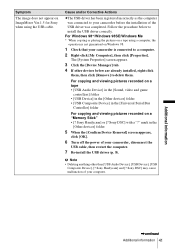
... anything other devices below are already installed, right-click them . Sony Handycam] or [? Sony DSC] may cause malfunction of your computer. 42 Additional information Sony Handycam] and [? mark in the [Other devices] folder For copying and viewing pictures recorded on as Administrators. 1 Check that your camcorder is connected to delete them , then click [Remove] to a computer...
... anything other devices below are already installed, right-click them . Sony Handycam] or [? Sony DSC] may cause malfunction of your computer. 42 Additional information Sony Handycam] and [? mark in the [Other devices] folder For copying and viewing pictures recorded on as Administrators. 1 Check that your camcorder is connected to delete them , then click [Remove] to a computer...
Computer Applications Guide
Page 43
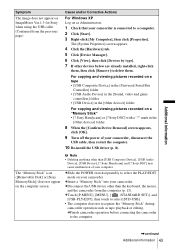
Sony Handycam] or [? Sony Handycam] and [? For copying and viewing pictures recorded on a tape • [USB Composite Device] in the [Universal Serial Bus Controller] folder • [USB Audio Device] ...click [My Computer], then click [Properties]. cInsert a "Memory Stick" into your camcorder. Sony DSC] with a "?" cFinish camcorder operation before connecting the camcorder to select the PLAY/EDIT mode on your camcorder. Additional information Symptom The image does not appear on ImageMixer Ver.1.5 for Sony when using the USB cable. (Continued from the computer (p. 15). The [...
Sony Handycam] or [? Sony Handycam] and [? For copying and viewing pictures recorded on a tape • [USB Composite Device] in the [Universal Serial Bus Controller] folder • [USB Audio Device] ...click [My Computer], then click [Properties]. cInsert a "Memory Stick" into your camcorder. Sony DSC] with a "?" cFinish camcorder operation before connecting the camcorder to select the PLAY/EDIT mode on your camcorder. Additional information Symptom The image does not appear on ImageMixer Ver.1.5 for Sony when using the USB cable. (Continued from the computer (p. 15). The [...
Computer Applications Guide
Page 46
... function..... 37 DirectX 8.0a 10 Drag and drop 21 DV Interface 16, 34 DVD 34 H Handycam Station ........ 14, 32 I i.LINK cable 13, 16, 34 Image Transfer 11, 26 ImageMixer Ver.1.5 for Sony 9, 19 Install 8, 9, 11 M Macintosh 3, 31 MEMORY MIX 29 "Memory Stick" ..... 26, 29, 33 MICROMV 2 O On-line help 22 46 Additional information
... function..... 37 DirectX 8.0a 10 Drag and drop 21 DV Interface 16, 34 DVD 34 H Handycam Station ........ 14, 32 I i.LINK cable 13, 16, 34 Image Transfer 11, 26 ImageMixer Ver.1.5 for Sony 9, 19 Install 8, 9, 11 M Macintosh 3, 31 MEMORY MIX 29 "Memory Stick" ..... 26, 29, 33 MICROMV 2 O On-line help 22 46 Additional information


